A Fighting Chance for the South in the Early Days of the Korean War
Introduction
The great challenge of playing historical military games is trying to surpass the achievements (or at least avoid the disasters) of the historical commanders. We try to beat Napoleon’s time to Moscow; defend the tactical donut at Alesia more successfully than Caesar (although he did it well); and actually attempt to score a knockout against the British with our Continentals in 1776. All of this makes for fascinating play, but many of these simulations are, well… lopsided. One side acts as the aggressor until they either succeed or run out of steam. If the initial defender survives, he may be able to transition to the offensive. But by this time the initial attacker is usually a spent force. What follows is more of a mop-up operation that a true operational shift in initiative.
The Korean War was unique in that both sides collapsed and the regained the initiative within a time span of 6 months. Both sides are required to plan for sustained offensive and defensive operations. Since the UN forces didn’t know the Chinese would intervene, very little planning went into the advance into North Korea. The game situation is quite different. We know the Chinese are coming; we just don’t know when. Therefore planning for both offensive and defensive operations is critical.
The Korean War: July 1950-May 1951, designed by Joe Balkoski and published by Victory Games, is a gamer’s dream. It is an operational level simulation which covers the war from the North Korean invasion of South Korea on June 25, 1950 to the stalemate which developed along the border of today’s North and South Korean states in the spring of 1951. Each of the combatants is afforded an opportunity for calculated offensive and defensive operations.
The North Korean People’s Army (NKPA) invasion force must attempt to force a decisive victory before the reinforcing UN troops arrive in strength. The NKPA commander initially has the offensive momentum expected in a surprise attack situation initiated by a force with overwhelming firepower advantage. If they fail to secure a military victory very quickly, the initiative rapidly shifts to the South Korean/UN player. The attack is quickly turned into a rout and the communist troops flee towards what they believe is the safe zone north of the 38th parallel.
The UN player, commanding US (United States), UN (United Nations) and ROK (Republic of Korea – South) forces begins the game fighting for survival. If the fight is successful, the UN forces must trap and destroy as many NKPA units as possible in preparation for a counteroffensive into North Korea. Careful deployment, skillful delaying tactics, and a good sense of when to counterattack and when to sit tight are required of the UN commander.
UN troops (ROK/US/UN) now become the invaders, crossing the 38th parallel into North Korea. The military situation is reversed. The North Korean player must adopt a defensive posture and try to weather the advancing storm of UN troops. Driven by the victory conditions of the game, the UN forces are maneuvered closer and closer to the Chinese border.
The Chinese Communist Forces (CCF) offensives of November and December 1950 send the UN forces reeling back toward South Korea. Fresh CCF units slam into UN units at the moment when they are most distant from their South Korean bases of supply. All but the most determined defenders will crack under the pressure of the CCF attack, which will push the UN forces south once again.
Your job as either the CCF/NKPA player or the UN player is to change history and succeed where your real-life counterparts failed. Possible, but not easy.
This article discusses an operational strategy which may be employed by the UN player in the Campaign game to successfully defend against the initial North Korean invasion of the south.
Game Overview
The starting positions for each side are fixed (see Figure 1). The North Korean player’s starting lineup consists of ten divisions each with an offensive combat strength of 12 (four of them with full armor support) massed along the 38th Parallel. This gives him an approximate 3:1 combat strength point advantage against the 22 South Korean regiments (with combat strengths of 1 or 2 each) scattered throughout South Korea. No US or UN units are initially deployed. The game begins with the 2nd Action Phase (AP) of Turn 1 (June, 1950).
Before the start of turn 2 (July), the US player must determine the extent of his commitment to South Korea, and there are four charts which govern this (see Figure 2); the Intervention Level, the Mobilization Level, the Rules of Engagement Level, and the Global Tension Level. These are summarized as follows:
- Initial Intervention Level: Ranging from 1 to 6, this level represents the timing and amount of US/UN ground troops which can be deployed during the coming year. Each Intervention Level has a corresponding reinforcement schedule. The higher the level, the greater the commitment.
- Mobilization Level: Ranging from 1 to 4, this level represents the US commitment to mobilize National Guard units (which do not deploy to Korea for 6 months), levy the draft, etc. and provides for faster repair and reconstitution of destroyed/damaged US units.
- Rules of Engagement Level: Ranging from 1 to 7, this level represents the restraints under which the Far Eastern Air Force (FEAF) must operate. The higher the level, the more latitude the US player has in interdicting supply routes and conducting combat air operations in North Korea. A Rules of Engagement level of 5 or greater also allows for the use of Atomic Weapons.
- Global Tension Level: Ranging from 0 to 7, this level represents the risk of igniting World War III with the Chinese and/or the Soviets. In case you were wondering why any sane US player would opt for less than the maximum on the three previous levels, this is your answer. As the other 3 levels rise, the greater the likelihood of an increase in Global Tension as well. Reaching Level 7 on the Global Tension Track triggers World War III, resulting in an immediate victory for the North Korean player.

None of these initial Levels are permanent. The US player may escalate as the game proceeds (note that levels may not decrease, should the player later decide on a change of strategy). However, each escalation increases the chance of a rise in Global Tension. Increases in Global Tension are not automatic; you must still roll the die once each turn to determine this, so the UN can escalate through the roof and hope for good Global Tension die rolls… but the laws of probability weigh heavily against such hopes.
Although this is an operational level game (perhaps grand operational), the Intervention, Mobilization, and (to a lesser extent) Rules of Engagement decisions are strategic in scope. The historical figures that had to decide these issues, such as Truman and MacArthur, were forced to consider consequences that extended far beyond the battlefield. An accelerated Intervention schedule meant leaving Europe vulnerable at a time when the US military was already woefully inadequate and unprepared to carry out its global responsibilities. The game’s Global Tension Track represents not only the extent to which the Soviet Union and China might be angered or threatened by large US combat formations in Korea, but also the strategic repercussions of weakening western European defenses.
Recommendations for Initial Setup
Your initial decisions are critical. For example, starting at Intervention Level 1 (lowest) and gradually escalating up to Level 6 (highest) will not get you the same quantity of reinforcements in the same time frame that starting at Level 6 would have gotten you. The game design thus requires you to make long term decisions right from the first turn, adding to the realism and political/military accuracy of the game.
The following starting levels are recommended:
- Initial Intervention Level: 4
- Mobilization Level: 2
- Rules of Engagement Level: 1
Intervention Level 4 guarantees sufficient reinforcements to insure (well, almost insure) the salvation of South Korea as well as providing the necessary power to initiate a counter-offensive into North Korea. Later in the game, if Global Tension and victory point conditions are right, the player can escalate to Level 5 and 6 to give a little extra depth to the UN forces near the end game, as well as providing garrison units for captured cities.
Mobilization Level 2 allows for maximum reconstitution capabilities which are all that are absolutely essential in the early stages of the game. The decision to escalate to Levels 3 and 4 must be made by turn 3; the additional reinforcements for this escalation do not arrive for six months (i.e. game turns). Since there are only 12 months in the game, it doesn’t make sense to wait much past turn 3 to escalate and call for these National Guard reinforcements.
Rules of Engagement Level 1 allows US air units to conduct operations only in South Korea. On the first two or three turns, the main US concern will be to provide close air support and to restrict road movement in South Korea. North Korean units to not have to trace supply until turn 3, so supply interdiction is pointless on turns 1 and 2. Therefore, needlessly increasing the chance of a spike in Global Tension by escalating to a higher Rules of Engagement level at this stage of the game is not warranted.
Overview of the Game Turn
Each game turn in the Korean War represents one month of real time. The turn is divided into two Action Phases during which the units move and fight. At the start of an Action Phase, one player will be granted the “initiative” (the option of performing the first operation) based on a superior supply situation. Starting with the initiative player, each player rolls one die to receive from 0 (none) to 4 operations. Again, the better the supply situation, the more likely the player will be able to perform operations. On turns 1 and 2 (June and July), the UN player has very limited opportunities to perform operations, while the North Korean player generally receives 2 to 3 operations per roll. The initiative player (always the NKPA on turns 1 and 2) conducts the first operation. Each operation allows one unit to spend 3 Action Points (only 2 Action Points on the very first turn of the game). Units move, fight, entrench, etc. using these Action Points. A combat unit may combine moving and fighting until his Action Points are used up. For example, a NKPA division may spend one Action Point to move (4 Movement Points), then make an intensive attack with the remaining 2 Action Points.
The players then alternate turns conducting operations until both players pass or until no units remain eligible for operations on either side.
No units are required to trace a supply line to a supply depot during turns 1 and 2. Beginning turn 3 all units must trace supply lines and the side that is bettered supplied will have the greatest opportunity to conduct operations.
Victory Conditions
Victory is achieved in one of two ways: Military Victory or Victory Point Level. Military victory is awarded for conquest of certain geographical objectives. Victory Points are awarded to the UN player for control of real estate (Victory Point Cities) and are subtracted for rises in the Global Tension Level. Strategies for achieving victory will not be discussed in detail here as this article is concerned mainly with strategies for repulsing the initial NKPA invasion of South Korea.
UN Strategy – Forward Defense
In the early stages of the game, the UN player can take some comfort in the fact that the tactical situation will improve shortly (if the brave ROK forces are not swept into the sea first, that is). With each passing turn NKPA supply lines grow longer and thinner, and fresh UN troops arrive to bolster sagging defenses. Unfortunately, time is the ONLY thing that favors the UN. The number and strength of the North Korean units combined with his advantage of more operations per segment (the UN player is luck to get the occasional chance to maneuver) make the defense of South Korea very difficult in the face of an experienced North Korean player.
That the Pusan perimeter held in 1950 was as much the result of tactical blunders on the part of NKPA commanders as it was the result of a solid UN defense (e.g. the NKPA’s decision to dispatch some of their best divisions to the Masan area that could have been put to better use in a concentrated push elsewhere along the Naktong River). The NKPA player need not repeat these mistakes and, indeed, with aggressive maneuvering (and a little luck) can reach the Naktong before the Pusan perimeter defenses are in place.
The UN player cannot count on being allowed sufficient operations at critical times to counter all of the possible points of NKPA penetration once they have crossed the Han River south of Seoul. Thus, the need for a “Forward Defense”.
Game Turn 1 – 2nd Action Phase
Due to the 2-action point limit on all operations during turn 1, it is impossible for the NKPA to cross the Han River until the 2nd turn unless the ROK forces flee in terror upon initial contact (not MY South Koreans!). Most likely, unless the North Korean player is using shaved dice, turn 1 will end with the UN player still in control of Seoul. If he gets the opportunity, the UN player should consolidate his three ROK regiments around Seoul into one division in or near the city. Hold the Han River line! As your ROK division begins to be pounded by NKPA assaults, retreat it towards Inchon. Then, at the first opportunity, move it back towards Seoul and the Han River. This is necessary to keep the enemy away from Inchon and also to keep Inchon clear of friendly units so there will be no stacking limit complications when reinforcing US units attempt to land there.
Correct usage of defensive units is most important. The temptation exists to leave the ROK regiments scattered about the roadways as delaying forces while the US units construct the defensive perimeter around Pusan. I believe this to be a fatal mistake. Destroyed ROK regiments are gone for good. History. Any destroyed US or UN units will be back on the board usually by the end of the following turn. Reconstituted US/UN units are brought back on the board at Pusan, without limit (other than stacking restrictions in Pusan and the six adjacent hexes). So any US units lost for example in the 2nd Action Phase of Turn 2 (July-1950) will be back at Pusan after the UN Reconstitution segment of the 2nd Action Phase of turn 3 (August-1950)… which is exactly where they will be most needed at that time! Don’t be afraid to throw those US units right into the fray! The NKPA player gets no victory points for destroying enemy units, so let the US units be the delaying force while the ROK regiments consolidate into divisions.
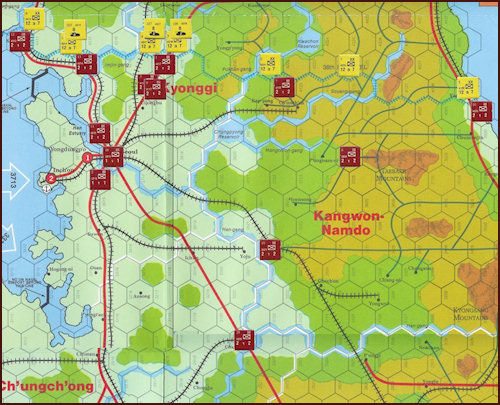
Operations are very limited in the beginning of the game, so move the US units forward first, and then move the ROK regiments back. Try to group your ROK regiments around key defensive areas, such as the stretch of road between Kumch’on and Taegu, and eventually consolidate them into divisions (I define “key defensive area” as any hex that is not in clear terrain, is located on or adjacent to a major road, and is preferably situated behind a river – see Figure 3).
At the start of the game there are 22 ROK regiments on the board. Approximately 7 of them are just dead meat. They’ll be very lucky to even survive to see the beginning of turn 2. That leaves the ROK/UN player with about 15 ROK regiments that can consolidate into 5 divisions (three regiments per division). Realistically, you can expect to lose another 6 of these regiments to the NKPA juggernaut (I refer to these as the “Turn 2 sacrificial regiments” to distinguish them from the “Turn 1 dead meat regiments”). Your goal should be to consolidate the remaining 9 of them into 3 divisions. Anyone who has played this game will tell you that these ROK divisions, while not as powerful as full US divisions, are absolutely essential to launching a successful invasion of North Korea later in the game. They give depth to the UN attack line, provide flanking cover for the offensive, and free US divisions for offensive combat operations. In order to get one reinforcing ROK division during the game, the UN player must roll once per Action Phase (twice per turn, beginning turn 4) and has, at best, a 50% chance of getting a reinforcement division. Therefore, it would take you 3 Action Phases (1 1/2 turns) with perfect rolls to bring 3 ROK divisions onto the board through normal reinforcement methods. Considering this, you can see why giving priority to the survival of these ROK units early in the game provides the UN player a great increase in defensive and offensive capability in the middle turns of the game. So, begin withdrawing ROK regiments toward the Kumch’on-Taegu area immediately.
Game Turn 2 – 1st Action Phase
When the US 24th Division arrives on the 1st Action Phase of turn 2, it should be rushed immediately up to hex 3716 (south of the Han River) to assist with the defense of the Seoul/Inchon area. Don’t hold it in reserve! Even the most successful NKPA drive down the east coast will not be a threat to Pusan until the 2nd Action Phase of turn 2 at the earliest, and an NKPA blitz along the west coast will take longer than that, so send the 24th Division immediately up to where the action is. The Seoul/Inchon area must be held as long as possible!
As a general rule of thumb, if the NKPA are unable to clear the road network around Seoul of UN units (and zones of control) by the end of the 2nd Action Phase of turn 2, the North Korean invasion will not succeed!
Eventually some of the invaders will push past the Seoul/Inchon defenses and you must be ready to meet them with a strong second line of resistance. Special attention should be given to forming a strong defensive line in hexes 1724, 1823, and 1924 behind the Naktong River northwest of Taegu. Easily the best defensive position along the main highways, this will be the greatest stumbling block for the advancing NKPA. The defensive advantages of the rough terrain combined with the protection of the river will render the enemy armor practically worthless (-5 die roll modifier on the Armor table). The NKPA will be faced with the choice of moving around the roadblock, paying prohibitive movement costs, or reducing the defenders by combat. Either way it’ll be a slow process. Scatter your 6 “Turn 2 sacrificial regiments” along the stretch of road between Ch’ungju (hex 3020) and Kumch’on (hex 2021), and along the roadway between Yongdong (2119) and Kumch’on while you consolidate 3 regiments into a division in hex 1823 behind the river, and consolidate another division in Taegu itself.
Game Turn 2 – 2nd Action Phase
Another critical point in a successful defense is the maintenance of control of the port of Inchon. On the 2nd Action Phase of turn 2 bring the US 25th Division into Pusan during the Reinforcement Phase and, at the first opportunity, land the US 7th Cavalry Division at Inchon. (NOTE: Assuming here that the UN player has selected the recommended Initial Intervention Level of 4. Level 3 would provide sufficient strength to hold the perimeter, but not enough, but not enough punch for the hunting down and destroying of NKPA divisions which must follow the successful defense of the Pusan perimeter. Anything less than Initial Intervention Level 3 is just suicidal and won’t even be discussed here). Inchon is important to the UN player for three reasons:
- It will tie up at least one NKPA division as a blocking force to contain the 1st Cav division. The NKPA cannot afford to have their reinforcements slowed down by a harassing American unit in their rear, and control of Seoul is imperative for them because loss of control causes a negative modifier (-2) on their reinforcement arrival die roll. This amphibious landing will probably cause the NKPA player to attempt the destruction of the 1st Cav Division which will require two or three NKPA divisions and will cause a delay of their drive south by at least one Action Phase, if not longer.
- If Inchon is lost it cannot be used as a staging point for the opening of a “second front” by the UN player, which is of paramount importance in overall UN strategy. Remember that in addition to liberating South Korea, UN forces must trap and destroy the bulk of the North Korean combat formations. If the exhausted NKPA units are allowed to simply retreat back into the North unmolested, the UN will have to fight them again under less advantageous circumstances. An NKPA-occupied Inchon will have to be recaptured by amphibious assault if a second front is to be opened to block retreating NKPA units. This may not necessarily be the “walk-over” that the US staged in September 1950. The smart NKPA player will defend Inchon with a full division in addition to the 3-point garrison (freely placed by the NKPA after capturing a UN port), providing a minimum defense strength of 7 for the port (winning NKPA strategies will be discussed in separate articles). This will provide him maximum protection for the flank of his retreating units. The UN player would have to assault this port using the 3-1 column of the amphibious row on the Combat Results table, making this assault a long-shot which will take at least two assaults to overcome (again, using shaved dice).
- Use of Inchon as a supply source during the UN counter-offensive is essential as the stretched supply lines from Pusan to the front will cause greater and greater negative modifiers to the UN die roll on the depot table during the depot supply level determination segments. If Inchon is lost, not only do the NKPA receive a free 3-strength-point Garrison unit in the port (which is not subject to supply rules), but the port also has a Minesweeping marker placed on it (indicating that the capture port was mined by the enemy). This marker will have to be removed during the Minesweeping Segment before Inchon is again an operable UN port for supply purposes and there is only a 40% chance of rolling the correct number to remove the marker. An “iffy” supply source greatly complicates UN counteroffensive plans which must be formulated as early as possible to have the maximum chance of succeeding.
To summarize, the loss of the Seoul-Inchon area early in the game to an experienced North Korean player increases his chances of driving 8th Army into the sea and, failing that, assures him of an escape route when he senses the attack is failing. The UN player cannot simply fall back to the Pusan perimeter line and hope for the best. While the proximity of the perimeter defensive to its supply source (Pusan itself) makes for a wonderful UN logistical situation, the UN must plan ahead to win this game. From the instant the defensive situation comes under control, the UN must start maneuvering for the coming offensive. The weaker and fewer the NKPA units in the Pusan/Taegu area and the more favorable the UN situation in the Seoul/Inchon area, the easier the march north will be.
While the defense of Inchon becomes vital during the 2nd Action Phase of turn 2 (remember to land the 1st Cav at Inchon to handle the situation), the UN must now also deal with the NKPA divisions that have bypassed Seoul and are closing in on Kumch’on, as well as any enemy divisions heading down the east coast road.
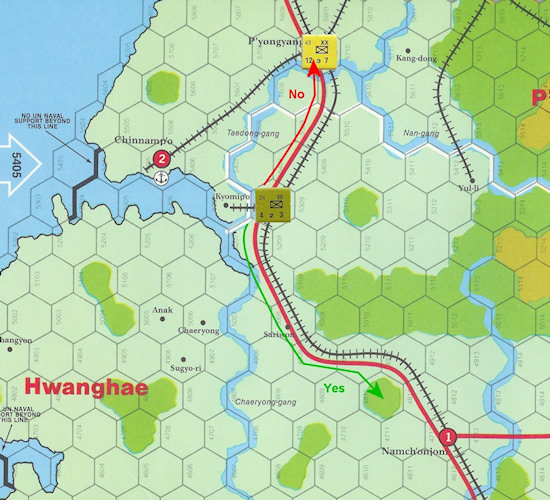
First of all, the US 25th Division (just placed as a reinforcement in Pusan) should be broken down into three regiments and placed in defensive positions on either of the roads leading north or northwest from Kumch’on, depending on which is the enemy’s main axis of advance. When determining where to place defenders you should always try to place those more than 4 movement points away from the enemy (see Figure 4). The enemy will have to spend MORE than 4 movement points (for a cost of 2 Action Points) to get into attack position adjacent to you, which will only leave the unit 1 Action Point for an attack and therefore no favorable offensive combat modifiers. IMPORTANT: Whenever possible, do NOT remain adjacent to an enemy unit which is eligible to perform an operation, unless you are in your final defensive positions. Your “Turn 2 sacrificial regiments” should always back off at least one hex from a potential attacker. After your unit is done moving, it must be flipped over to signify that it has completed its operation for the turn, and the reverse side has a weaker combat strength than the full side. But putting up a formidable defense is not their job. Their job is to delay the enemy, and they will accomplish their job by backing off one hex from their potential attacker, forcing the unit to spend 1 Action Point to move adjacent to them, then a 2nd Action Point to attack them, leaving only the 3rd Action Point to continue advancing. If they had remained adjacent, the NKPA could have blown them away with the first Action Point, saving 2 more for forward movement. The ultimate goal is to position your 6 sacrificial ROK regiments in such a way that their elimination will require 6 NKPA divisions to use 2 of their 3 action points. If the NKPA must use 6 of their original 10 invading divisions just to clear the roadways of delaying units, there may not be sufficient strength remaining to overwhelm the main UN defensive lines.
Use the remaining operations of this Action Phase to consolidate any remaining ROK regiments that have not done so already, and entrench the one that have consolidated into divisions. Don’t panic if 1 or 2 NKPA divisions penetrate past Kumch’on and advance on the Naktong River line. Concentrate on not letting any more of them get past. Since supply lines must be traced on turn 3, these forward NKPA divisions will be most likely be attacking at reduced strength so any attempt to further hinder divisions which are already past the screening forces is wasted energy.
Game Turn 3 – 1st Action Phase
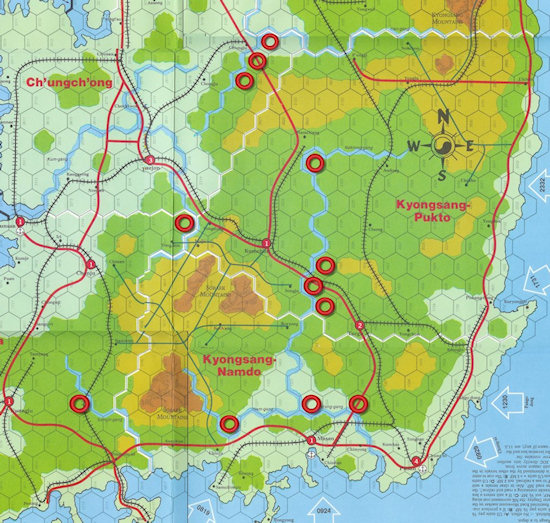
All the preparation and maneuvering of both sides culminates in the slug-fest that begins in Game Turn 3. The success or failure of the NKPA invasion will be determined during this turn. If the UN defensive plans have proceeded according to schedule (see Figure 5), turn 3 will begin with the NKPA main force astride the Naktong river along a line running roughly north-south from hex 2123 to hex 1723. Hopefully there will still be a few UN units in the area surrounding Kumch’on to complicate the NKPA supply predicament. The NKPA secondary thrust will either be along the east coast road, dangerously close to Pusan, or will be advancing from the west of Pusan along the south coast road.
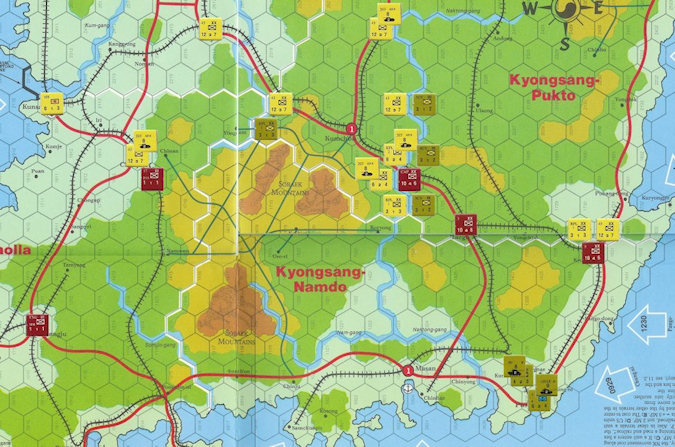
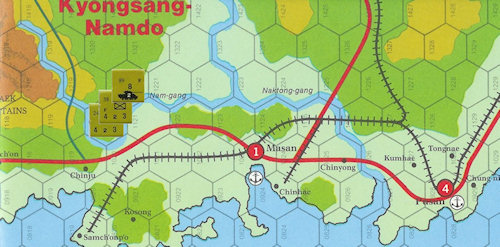
All units must begin drawing supply this turn. In general, since the UN armies are much closer to their source of supply, their supply condition should be much better than the NKPA’s. The tactical situation is beginning to favor the UN. Any subsequent UN reinforcements should be deployed along the arc of the historical “Pusan Perimeter”. Send as many units as required to the Pohang-dong area on the east coast (centered in hex 1730), the farther north the better. Send the balance of the new reinforcements west toward Masan (hex 1023). If time and circumstances permit, deploy the southwest defenses four hexes west of Masan (in and around hex 1019) where the road becomes bottlenecked between the sea and the Nam-gang River. Hex 1120 is a particularly useful defensive position, because it is wrapped up behind the river on 4 sides while still allowing a unit deployed there to exert a zone of control over the main road. One or two regiments placed there will be most difficult to dislodge (see Figure 6).
Give ground grudgingly. Turn 3 is when the running stops and the fighting starts. See the Air Power section for suggestions on the correct usage of air units to inflict maximum hindrance on the NKPA. If not in an enemy zone of control (ZOC), entrench the US 1st Cav Division at Inchon.
Game Turn 3 – 2nd Action Phase
Basically, the battle continues. The UN receive a healthy chunk of reinforcements this turn. The 2 US regiments and the US 7th Division, complete with armor support, arriving at Pusan should be more than enough to counter any NKPA divisions that have penetrated the UN defensive lines and are threatening Pusan. Assess the situation and send these reinforcement where they are most needed.
As far as supply considerations, if your depot in Pusan has 2 supply points to spend, save one of them. Your defensive combat strengths cannot be increased above face value through additional supply expenditure (although your offensive strength can). This saved supply point can be combined with any new supply points received on the 1st Action Phase of turn 4, when the UN mission should shift from a defensive to an offensive one. A unit’s supply status is not only dependent upon which type of supply depot he is tracing supply to (type are Restricted, Limited, Accelerated, or Offensive, depending on how many supply points were expended at each one), but is also dependent on how close the unit is to that supply depot. A popular tactic at this stage of the game is to begin slowly withdrawing my defenders into a tighter circle around Pusan. If your North Korean opponent takes the bait and moves in closer, at the start of turn 4, he may be staring into the face of a UN army within primary range of an Offensive commitment depot (providing double attack strength to all UN units).
As a final warning for turn 3, watch for signs of an NKPA “bug-out”. If it appears that your NKPA adversary has lost his nerve and has decided to flee northward, do all you can (short of totally destroying your army) to block his retreat into North Korea. A successful UN invasion strategy demands that NKPA resistance be negligible. The NKPA must be trapped and destroyed south of the 38th parallel! UN divisions must quickly be moved into key defensive positions north of the Parallel to await the inevitable Chinese attack. If a few full strength NKPA divisions are still running around in the North, UN offensive operations are placed in great jeopardy (more on this in future articles).
Game Turn 4 – 1st Action Phase
“WE ARE FIGHTING A BATTLE AGAINST TIME. THERE WILL BE NO MORE RETREATING, WITHDRAWAL, OR READJUSTMENT OF THE LINES OR ANY OTHER TERMS YOU CHOOSE. THERE IS NO LINE BEHIND US TO WHICH WE CAN RETREAT… THERE WILL BE NO DUNKIRK, THERE WILL BE NO BATAAN. A RETREAT TO PUSAN WOULD BE ONE OF THE GREATEST BUTCHERIES IN HISTORY… ANY MAN WHO GIVES GROUND MAY BE PERSONALLY RESPONSIBLE FOR THE DEATH OF THOUSANDS OF HIS COMRADES… I WANT EVERYBODY TO UNDERSTAND THAT WE ARE GOING TO HOLD THIS LINE. WE ARE GOING TO WIN.”
JULY 1950 – KOREA
If, at the beginning of turn 4, the UN command find itself (despite all my great advice) with one foot in the sea, don’t despair… there are still a few more UN options available.
Starting with the Reinforcement Phase of turn 4, and each Reinforcement Phase thereafter, the UN player has the option of receiving Nationalist Chinese reinforcements. These three 9-strength divisions may be just enough additional strength to turn the tide of the battle against the NKPA. Warning: Using these units may precipitate an early Chinese entry into the war. However, given the choice between certain destruction at the hands of the NKPA and an early Chinese intervention, the latter is preferable.
At the start of turn 4, the Rules of Engagement Level can be raised to Level 5 which will then allow the use of Atomic weapons. A rather drastic move, but infinitely preferable to surrender or defeat. The use of Atomic weapons will insure a poor supply situation for the North Koreans, which could turn the tide in favor of the UN. The flip-side of this coin is that the Global Tension marker is immediately raised two levels. This will mean that for the remainder of the game the UN player will have to be extremely conscious of the rising Global Tension level, since reaching the limit results in World War III… and an NKPA victory. Use of the Atomic weapons option at this early stage of the game will probably mean that the UN chances for a military victory are slim-to-none. UN forces will have to tiptoe around the map for the remainder of the game for fear of further increasing the Global Tension (using Atomic Weapons also causes a +1 modifier to the Global Tension die roll EACH turn for the rest of the game). Because of the Victory Point losses assessed due to the increased Global Tension, winning on points becomes less likely every turn. Backed up against a wall like this, your average UN player will launch an ill-timed attack into North Korea, be savaged by the Chinese and will probably spend the balance of the game fighting the North Koreans AND the Chinese in South Korea. The UN will have to try to achieve a military stalemate and hope to win on points. If the chances of doing this are better than the chances of surviving the NKPA assault then, by all means, use Atomic weapons.
UN Strategy – Air Power
UN air power is very limited in the early stages of the game. It can, however, be used most effectively to stall the North Korean advance.
Prior to turn 3, Close Air Support points should be used exclusively in support of units fighting in the Seoul/Inchon area. As long as there are units engaged in combat along the Han River, give them support. Let the others fend for themselves for now.
Starting with game turn 3, the NKPA (and the UN as well) must begin tracing supply lines in order to keep their combat units functioning at full strength. At this point in the game the UN player has eight air units at his disposal. Six of these can perform either Close Air Support or Interdiction roles; the remaining two are only permitted to perform Interdiction. Each Close Air Support point nets the UN player a maximum of +1 or -1 on the combat die roll (while attacking or defending, respectively). By this time your units should be placed in solid defensive positions so the air points will provide a relatively minor contribution to the battle. Units placed on Interdiction in a given province hurt the enemy’s supply situation and may inhibit his movement. All eight of these air units should be placed on Interdiction missions in order to inflict the greatest possible negative modifier to the North Korean supply roll.
Additionally, since 4 air units (of any strength) placed in one province restrict NKPA movement along roads in that province (by raising the movement point cost from 1/2 MP to 1 full MP per road hex), two provinces can be successfully restricted. If your defense has gone reasonably well, restricting road movement in Ch’ungch’ong and Kyongsang-Pukto provinces should provide the maximum delay to the advancing NKPA forces because these two provinces contain approximately 40% of all the road hexes in South Korea. If your defense has not gone well then most of the NKPA units will already have passed these provinces so it will be more effective to interdict Cholla and Kyongsang-Namdo provinces. Determine where NKPA units will be spending the most time on roads in the coming turn and interdict those provinces. The key word is delay, delay, delay! The -1 defensive benefit of using these aircraft in a Close Air Support role will not be enough to prevent the NKPA from rolling right over you. Interdict. Delay. The UN’s greatest ally in the early part of the game is TIME.
UN Strategy – Summary
Since the most desirable objective for the UN player is a Military Victory (winning on points just doesn’t give you the same thrill), it is imperative that the initial North Korean invasion be shut down as quickly as possible and a counter-offensive be launched immediately thereafter. Don’t simply form a defensive line, hold out, and think you’re doing well… If the NKPA are not driven out of South Korea and completely crushed by the end of turn 6, the UN player’s chances of winning on Victory Points will be almost non-existent, forcing the UN commander to make rash offensive moves (to gain a Military Victory or to gain more points) which would not have been necessary otherwise.
Even though the odds are heavily in favor of the NKPA at the start of the game, with each passing turn their advantage decreases. Using the Forward Defense and Air Power strategies outlined in this article will give the UN player an excellent chance of turning the NKPA invasion into a disastrous NKPA military defeat.
