One of the early games in my collection was the Avalon Hill game of the American Revolution, 1776. The game was released in 1976 for the Bicentennial and was the main game on the subject matter at that time. I have played the game many times over the years and still find both the scenarios and campaign game a fun experience. While quite playable, one thing it lacked was leaders and named units. British Regulars, Tory Militia, Continental Army, Rebel militia and French all had their counter mix, which was quite normal for Avalon Hill designs of that era.
In 2000 Bruce Monin published “The Boardgamer’s Unoffical Guide to 1776″. This was a collection of variant rules and additional scenarios by Jim Lawler, Rod Coffey, Gilbert Collins and others that included new leader counters and rules that further enhanced the game. For my part, I doubt I would play the game as originally published now that I have used most of these enhancements.
Fast Forward to 2014 and Compass Games publishes this new spin on American Revolutionary War games. Designer William Marsh was inspired by 1776 and decided that he would expand on that game by doing the research and providing a new design with leaders and historical unit counters. In fact, using the same basic system, this game includes scenarios, special rules and counters for The War of Jenkin’s Ear, King George’s War, a couple of scenarios for the French and Indian War as well as several scenarios for the American Revolutionary War. These earlier scenarios brought in the Spanish and extended the map to include New Orleans and some of the Gulf Coast as well. In fact, there are two maps now and when using any of the scenarios that require both maps the playing surface is close to 68″x 22”. Many of the scenarios use only a single map, but in both cases a lot of the map is Wilderness or otherwise unused area used for charts and tables.
This is many games in one. The research that went into it is astounding! While the American Revolutionary War is the main event, the French and Indian war is an equally enjoyable and historical game. The rules allow for quick play and the historical detail of units arriving, departing and being upgraded gives the history buff a real lesson in how it all developed.
The Basics
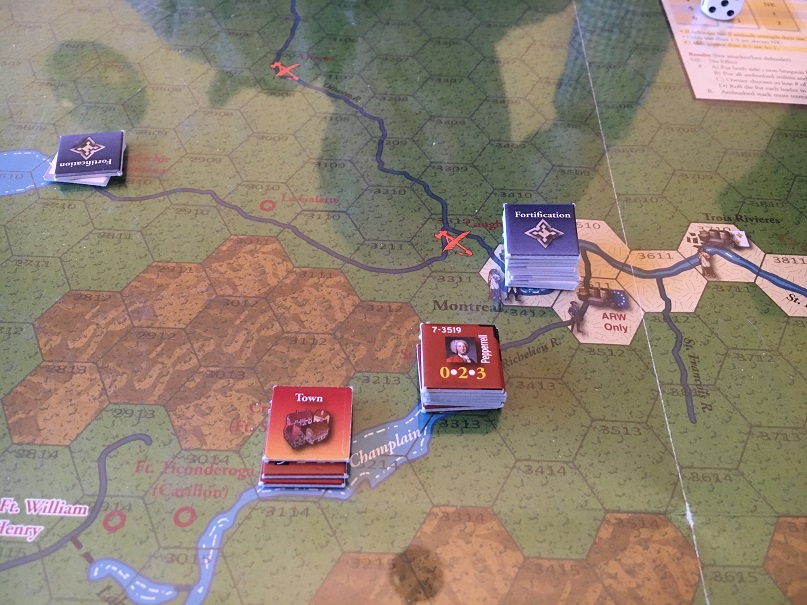
Some of the game board is shown here. Most of the map is Wilderness, which is slow for movement but gives the opportunity for ambush, which can be brutal! It is 5MP to move through the Wilderness, but only 2MP if moving along the rivers, which are also used for tracing supply in the Winter. In this age in North America the rivers were the main highways for all movement. The men represent recruitment spaces, where reinforcements will appear. Indian villages where indians will appear if recruited, ports (anchors) and areas that provide supply. There are cultivated spaces with towns and cities, while the Wilderness areas have outposts that can be fortified and are able to supply a single unit during the Winter turns.
 Counters are mostly leaders and units. The 3 numbers on the leader counters are their combat bonus (mostly 0 or +1), seniority and initiative. The initiative number is the most important, the higher the better. Before a stack of units can do ANYTHING, they must pass an initiative roll. If there is no leader present, then a default leader of initiative ‘2’ is assumed, so only a 1/3 chance of being activated. The middle number is seniority, the leader with the lowest number in the stack is in command.
Units have a combat factor, ambush factor and movement number. Combat factors with a circle may not attack, boxed numbers attack at 1/2 strength. The + on the ambush factor allows the unit to conduct an ambush, otherwise the factor is used only on defense. The + after the movement allowance means that unit has an initiative of ‘8’, so will always be able to move each turn.
The numbers in the top left of all counters are their turn of arrival and starting location. An ‘AV’ means available to recruit. Some units have just a hex number, so they start the game there, others simply a turn number, which means they arrive by sea. The top right number indicates the turn they are removed. In the units shown above, the PA Rifle unit arrives on turn 3 in hex 1515. It is removed on turn 11 for a substitute unit, which is the 1PA unit next to it which is organized in hex 1515.
Each turn follows the same sequence. Each side rolls to see if their navy is available (French, then British, then Spanish), Reinforcements, indian recruitment and replacements, followed by movement and combat for the British first, then the Americans/French. There are six turns for each year. A Campaign season is really 4 turns. Spring, 2 Summer turns and a Fall turn. There are 2 Winter turns where very little happens on the North map due to Winter restritions. All initiative ratings are reduced by 2, movement costs are doubled, rivers are not usable for movement, you get the picture.
Indian recruitment is quite interesting. Both sides must roll each turn to see if any of the tribes that are available to them join the war. Availability for Iroquois tribes are based on British occupation of certain locations that affect the Iroquois Loyalty index, while the other tribe often require the presence of an indian agent in certain locations to recruit them.

Militia employment is also quite different. Each colony has both Tory and American militia. Some of them, like the MA militia shown here, are quite powerful. These units ‘may’ be deployed to the map at the start of any turn and move as do other units. Often the better choice is to leave them in their ‘available’ box for deployment in reaction to enemy movement in their home colony. Any time a hostile force enters a hex in their colony and the militia are available, they may immediately deploy into that hex and force a battle. Deployment of tory militia in the thirteen colonies usually requires the presence of a British unit as hexes in these colonies are always friendly to the American and hostile to the British if there is no British unit present.
Any time a moving force engages in combat, it must use 5MP to do so and must pass another initiative check to continue movement after the battle. Militia will often be eliminated in a battle against a large force, but they are very effective at slowing down a large force and may even cause them to stop movement where the battle takes place. This can be a real headache for a force with no leader or a leader with a low initiative rating.
All militia, regardless of their location, are removed to the available box at the end of the Spring turn (for planting) and the Fall turn (for harvesting) and are immediately available on the next turn. No matter how many times you eliminate/disperse them they just keep turning up!
The Game Play
The simplicity of the system means you, the gamer, are actually spending most of your mental energy on planning and executing the campaigns for each season. Jim Lawler and I played the “King George’s War” in just over 2 hours so I will recap that game here for an idea of how it plays.
King George’s War Replay –
The victory conditions are pretty straight forward. Control of Annapolis (Port Royal) in Nova Scotia and the Fortress of Lewisburg by either side is the first step. If the British control both of these and Quebec City as well at any time they win. If the French control both of them and Boston at any time they win. At the end of turn 27 the side that controls both of them wins. If each control one, then control of Crown Point decides the victory. I played the British, Jim played the French.
1744 – Turns 1-5
 There are very few units on the board at the start of this scenario. The main action takes place in Nova Scotia, as the only other British unit on the board is the leader Shirley in Boston. On turn 2 Ghormley’s Rangers arrive as a reinforcement at Port Royal. With 2 units available I was fortunate enough to gain initiative ahead of the French and move the British 40th regiment into Grand Pre. The French may enter replacement units here on the Spring turn if they control it, so best to make them fight for it. In the course of these 5 turns the French were able to activate the Micmac indians and their Marine unit on the island and move forward, but these units are not strong enough to attack either location. The Britsh 40th regiment and the French Marine unit occupy cultivaed hexes during the Winter so they will be in supply.
Most of the turn is spent rolling to see if we can activate Indian allies. The Britsh have the Mohawks available and the French have 4 Algonquin tribes available. 5 dice were rolled each turn for these tribes and no 1’s were rolled, so none activated.
1745 – Turns 6-11
At the start of turn 7, Spring of 1745, the British gain the use of several Provincial Regiments. These units will all disperse at the end of the 2nd Winter turn, but they are recruited again at full strength during the Spring of each following year. These troops will dictate the main event of each year.
With no British regular troops available, there is little point in conducting operations toward Montreal. Since these units all disperse at the end of the Winter turn their gains would be ephemeral. Their main use this year is to wrest Lewisburg from the French. To do so they first need the British fleet to arrive (on a d6 of 1-2), then they must pass an initiative check (on a d6 of 1-3). As fate would have it, the British fleet did indeed arrive in the Spring and Gov Shirley did pass his initiative roll to make the move.
Siege of Lewisbourg
The Provincial army disembarks directly on to the fortress of Louisbourg to attack the garrison. To make the attack uses 5MP of their 20MP allotment. The army attack factors are boxed, so they all attack at 1/2 strength or 12 factors. To this they may add the 6 factors of the British Marines aboard the fleet for 18 factors vs the French 4 factors. This is sufficient for 4:1 odds, the highest odds available. Therre is a -2drm to the attack as the French have a fortification and also a unit with artillery in the fort. The Provincial army has no artillery in the Cultivated Terrain hex.
The die roll for the attack is a ‘1’, modified to a 1AR/1 result. Each side must lose 1 step and the British force must reteat back to the fleet! The Naval Marines may not absorb a step loss, but the loss of any unit means the British marines are no longer available this turn.
Gov Shirley must now roll for continuation following the battle to see if he may continue moving. This would be true even if his force had not been forced to retreat and was still outside the fortress. As this is a die roll to continue movement rather than to initiate movement, his rating is +1 so he needs a 1-4 for success…and rolls a ‘4’. The army again lands on the fortress and uses another 5MPs to attack again. The flipped provincial unit provides no support (the attac factor on the reverse side is circled) and the naval marines are no longer available, so Gov Shirley has 20/2 or 10 factors to attack the French 3 factor defense, again with the -2 drm. This time he rolls a ‘5’, modified to a ‘3’ for a 1/2 result. The Provincials lose another step, but the 2 step loss to the French eliminates the defending force and the Provincial army occupies the Fortress of Louisbourg.
The fall of Lewisbourg triggers several special reinforcements for both sides. These units are marked with an ‘Sp’ for their turn of arrival and the details are found in the scenario special rules. The bottom line is that both sides will receive additional troops in the Spring of 1746.
And then…nothing else happens! On the next three turns the British fleet fails to remain (did not roll a 1-2, they must roll each turn) and the Provincial army is stuck at Louisbourg all year as it cannot make a sea move without the British fleet. At the end of the second winter turn (first turn of 1746) the Provincial troops are removed as usual, but they are replaced by a couple of (Sp) provincial garrison units. Nothing else happens because both sides again fail to activate indians. Incredibly, with 5 die rolls each turn looking for a ‘1’ to activate indians, only the Huron tribe is activated on turn 10. These indians make their way to join the French Marine unit at Ft. Frontenac as control of this space is important for Iroquois Loyalty.
1746 – Turns 12-17

The Spring turn of 1747 starts with a big surprise, as the British fleet fails to appear but the French fleet does! 6 turns after the fall of Lewisburg, the relief force arrives from France on the first turn the French fleet is available. The British also receive some regular forces as reinforcements, but the presence of the French fleet prevents them from landing in Nova Scotia, or anywhere along the Gulf of Maine. The way is clear for the French to retake Lewisbourg!
However, Jim decides to try something different and chooses to land his relief force at Grand Pre, which is the only place he is allowed to return Marine R units as replacements. This may be necessary, as Typhus is rampant among the troops on the French fleet. At the very end of each turn each unit in the affected force will take a step loss and there is a 50% chance that the leader will be killed. Then a 5-6 is required on a d6 to remove the Typhus marker. The force lands with 2x 4-step units, so if they can survive the Typhus they can use the Marine Provincial units to rebuild.
In the actual event, the French eliminated the defending British 40th regiment without loss, but are prevented from leaving that space until the Typhus is removed and were ultimately eliminated by the Typhus as all three die rolls that followed failed to remove it. This is a crushing blow to the French cause. It makes the capture of either Lewisbourg or Annapolis very difficult so the British are almost sure to win at this point. Historically the force landed at what is now Halifax (a harbor in the Wilderness at this time) and was so weakened by the Typhus that when the expedition’s leader died of it the survivors returned to France aboard the fleet.
Meanwhile, the newly resurrected Provincial Army under the command of Gov. Shirley decides to march on Fronteac to see if they can influence the indians. Control of that fort would cause some of the Iroqouis tribes to desert the French and others become available to the British. A Regular Independant company arrives as a reinforcement with the Spring turn, and will be able to retain possession into the next year. Gov. Shirley passes his activation roll, then stops in Albany to pick up the Independant Company. When picking up units the force must pass a continuation roll to continue and Shirley is again successful. He is able to get as far as Ft. Oswego on this activation.
In response, the French have a fine leader in Ramezay who arrives in the Spring at Quebec City. With his excellent initiative rating of ‘5’, he makes his initiative roll is able to pick up the Marine units along the river path and reach the hex just short of Ft. Fronteac.
The other British leader, Pepperell, makes a HUGE mistake and leads a couple of regu lar units toward Crown Point. These two units have ZERO ambush factors. If brought to battle in a Wilderness hex by a unit with even a +1 Ambush factor it would be a certain loss of at least 2 steps and likely more. He fortunately stopped at Ft. William Henry (actually the fort is not built yet, but the space does have a Wilderness town where he can take refuge) and will remain there until a provincial unit with ambush factors arrive.
 Gov Shirley failed his activation roll on turn 14, the first Summer turn, putting a crimp in his schedule. The French also failed to move any units. On turn 15, the second Summer turn, Shirley finally advanced upon Ft. Fronteac. The French leader attempted to intercept this move, needing a 1-4 for success (all forces without cavalry have their leader initiative rating lowered by 1), and is successful. As the hex is a Wilderness hex, the French opt to conduct an Ambush. Only units with a + before their ambush factor may use it to attack, and the French have 8 such factors. The British force may not conduct an Ambush, but do have Ambush factors for defense. In this case the Ambush is at 8:10, or 1:2. Only the ambushed side can take losses, and on a d6 roll of ‘5’, the British indeed take a step loss.
When a force loses a step to an ambush it must retreat and every leader in that force must make a leader loss die roll, being killed on a ‘1’ and captured on a ‘2’. Alas, Gov. Shirley is KIA in the ambush and the force now uses an implied leader with initiative ‘2’ and combat ‘0’ rating. It retreats back to 2610 where it must pass a continuation initiative roll to continue movement. Stacks lead by an inherent 0-2 leader do not get the +1 initiative rating for continueation, and it fails.
If a leader does not move during a turn, it may conduct a free redeployment to any friendly force on the map. I could have sent Pepperell to lead the force, but it was now late in the season and the French were around Ft. Fronteac in force. Instead, Pepperell conducts Leader Redeployment to return to Boston where he will take command of next year’s new Provincial army.
The British force fails to activate again, and at the end of the 2nd Winter turn the Provincial Army again disperses, leaving the independant company alone in the Wilderness. In the spring of the next year the French are able to quickly eliminate them with the Huron Tribe that conducts an ambush. The main force then moves to Montreal at the end of the year.
During the Fall turn the French fleet arrived in the Gulf of Maine and the British fleet did not appear. While the French fleet will be withdrawn on the following Winter turn, the fact that it controlled the Gulf during the Fall turn means that the British forces in Nova Scotia will not be able to trace Overseas supply during the Winter Attrition phase. This will eliminate steps from all but 1 unit in each of the towns there during both turns of Winter Attrition. One saving grace is that the British Ranger unit is not subject to Winter Attrition.
1747 – Turns 18-23
 The French receive a few Marine units as reinforcements in the Spring, and are able to replace all of their lost Marine units by redeploying them as replacements in the three allowed supply spaces in Canada. Once again, the Provincial Army is reborn at full strength in Boston with Pepperell ready to lead this “Death Star” toward Montreal. On turn 21, after 20 failed attempts to activate their Mohawk indians the British finally roll a ‘1’ and the Mohawk tribe joins the cause. They pass an activatation roll and proceed to block any advance by the French and enemy indians on Albany from the Oswego area by blocking the river.
The French consider a campaign into Nova Scotia, but that would require the French Fleet to return and allow the Sea movement of troops there from Quebec City. It does not arrive and soon the forces in Quebec City are called to block the advance of the Provincial Army toward Montreal.
Pepperell successfully passed two intiative rolls and advanced upon Crown Point before the French could get reinforcements there. In a desperate attempt to save the fort, the French Provincial Marine unit there attempts to ambush the British as they enter the location. This can be done in the Wilderness area outside the fortification, but that will allow the British to attack the French in linear combat immediately after if they survive the Ambush. The Ambush is at the minimum odds, but if successful will force the British to retreat and take another Leader Loss check. In the event, it fails and the French Marine is eliminated without loss in the following combat phase.
Pepperell successfully passed inititiave rolls in the Spring and first Summer turn to reach Crown Point and capture it. He failed his initiative roll on the second summer turn, but again passed it for the Fall turn and continues to Montreal. He is unable to capture Montreal and retreats, which means he will have only the two Winter turns to complete the siege. With the reduction of his initiative value by 2 during the Winter turns, he fails to get the initiative die rolls he needs and the force disperses with Pepperell using a Leader Redeployment to return to Boston.
1748 – Turns 24-27 (through the Summer 2 turn)
The British now control all 3 victory locations and there are no significant French reinforcements this year. We decided to call it a game on turn 25 when we could see no real effective strategy for the French to recover the situation. If we play this again, I would suggest following the designers suggestion of playing without the Typhus special rule to give the French a force capable of threatening the British.
I have to belive that the French and Indian War scenario would be very interesting and look forward to a chance to try it. The American Revolution scenarios should be a lot of fun.
As a final note, some of the pictures used here were from my camera of our game, while others were created using the VASSAL module for this game. You can find the VASSAL module here.
Related Articles:
The Battle of Setauket – A Boardgaming Life Session Replay
Amateurs to Arms!: Board Game Review
Winning American Strategies for 1812: The Invasion of Canada
King Philip’s War: Opening Moves (Strategy)
Washington’s War: First Look (Review)
