by Russ Lockwood, Designer: Dirk Vergauwen, Publisher: MDVC Games
This Dutch wargame on the 1944 Arnhem campaign has a big 20×55-inch board, plastic troops, and a couple interesting mechanics. Four of us gathered to play this game: me (British/Polish airborne near Arnhem), Marc (British 30 Corp), Dan (US 82nd and 101st Airborne and supporting ground troops behind 30 Corp), and Rory (Germans).
Now, I’ve complained about rules, but this translation needed an English-speaking editor. You can kind of get through it, but one of the most important mechanics — what we called ‘intrusion attacks’ — is but a single, hard-to-find line. If it wasn’t for Dan going through and essentially rewriting the rules into an easier-to-understand version, we might still be playing this thing wrong.
I’ve complained about rules, but this translation needed an English-speaking editor
The psychedelic area map tries to duplicate aerial photos with different colored fields that generally, but not always, indicate different combat numbers.
Map of Equality
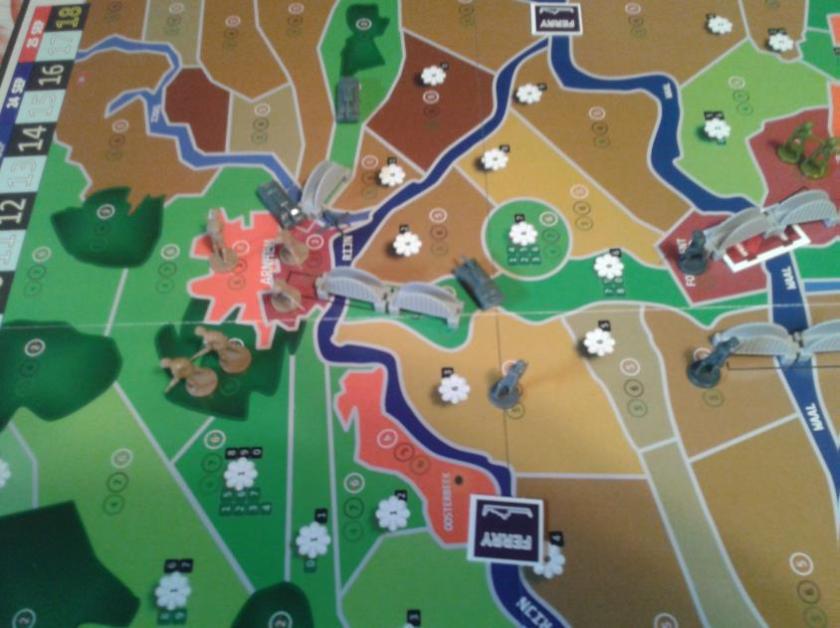
Dan (left) and Marc ponder the setup. Arnhem is at the bottom of photo. Allied start line is up top. Those white spots on the map are drop zone locations. The black counters are German ferries. Some bridges have counters underneath – explosives.
To Hit numbers are printed directly on the map: one for infantry, one for tanks, and one for artillery. These change depending on the terrain. For example, targets in the green open terrain are easier to hit when tanks are firing, but targets in Arnhem and other urban areas are harder to hit when tanks are firing.
It’s pretty simple to figure out. All infantry toss two d10 attack dice, all tanks toss four d10s, and all artillery toss six d10s to get equal to or lower than the number (0 is considered an automatic miss). When artillery is in the same area as tanks, it gets half dice.
All infantry and artillery take two hits to destroy. German tanks take four hits to destroy, US/UK tanks only three. In our game, this one hit difference mattered a few times.
Armageddon Artillery
Yes, combat is often bucket ‘o dice-a-rama. Each area can hold nine units (maximum four artillery). So, when the UK fires artillery barrages (two area range versus three for the Germans), that four artillery x six d10s = 24 d10s! The Germans learned that units by their lonesome went poof quickly! Even two and three troops in a space went poof. By turn 3, between artillery and regular attacks, no Germans were south of the Maas River.
Intrusion Combat
When troops move into an area, they trigger what we called intrusion combat by the defenders. Essentially, the defenders fire, inflict casualties on the attackers, and if any attackers remain, they fire back. If half the hits needed to eliminate a unit are scored, the attacker retreats before firing.
Note that intrusion attacks occur at the exact time enemy units move into an area. If attacking one area from multiple areas, each grouping of units attack separately. The good news is that you can see the results of a combat before committing other troops that have yet to move. The bad news is that unless you group units beforehand, attacks go in piecemeal.
Better yet, British airborne get an extra d10 per unit on the first turn. All units get an extra 2d10 per unit when defending a bridge against an attack from across a river, stream, or canal. Attacking across a well-defended bridge needs considerable troops or artillery bombardments, as we shall see.

Rory (left) prepares to roll dice as Russ (right) sets up the defense in Arnhem
If anyone is left in a contested area, a second combat occurs, where fire is simultaneous.
Rory (left) prepares to roll dice as Russ (right) sets up the defense in Arnhem.
Airdrop Beginning
The game starts with a British and two US airdrops. These are random d10 rolls (printed on the map) for each unit. If bad weather moves in (as it did for us on turn 2), the scattering is more pronounced.


As it turned out, the first day good weather drop allowed my Brits to land close enough that three units occupied Arnhem. The US counterparts also were close to their bridge objectives.
The Germans placed explosive charges on many of the bridges. Roll a d10 and if the number is equal to or less, the charge goes off and drops the bridge. Higher is a failure and the explosive number goes down by one.
As for 30 Corp, they start on a broad front and head northward toward Arnhem. UK and US reinforcements behind them are brought in on a d10 roll. Note that Marc’s first roll was a 0, so none came in. His second roll was a 1, so only one unit came in. He subsequently rolled a 4 and an 8, so by turn 4, all UK and many US reinforcements were on the table — “Northbound and down, loaded up for trucking, we doin’ what they say just can’t be done. We’ve got a long way to go, and a short time to get there, we’re northbounder, look at that Bandit run.”
German Counterattack
The first thing the Germans did was launch an intrusion attack across the bridge at the trio of UK paratroopers in Arnhem. Remember all those bonuses? Three units x two dice equals 6d10. But, each unit gets a bonus 1d10 on the first turn for another 3d10, and, defending a bridge gets another 2d10 for another 6d10. All told, that 15d10. The German units (one tank and one artillery) that made it across were quickly whacked in the follow up combat. Only one UK unit was eliminated.
If the idea was to duplicate the hasty attack that left lots of burning German vehicles on the bridge, it worked.
Overall Tempo

The UK artillery blasted clean of Germans one area after another and overwhelmed any local resistance. One bridge at Einhoven was blown, but there was another and other bridges were captured. By turn 3, no Germans were south of the Maas River.
In Arnhem, Germans survive the 15d10s, but are eventually repulsed. German efforts to blow one of the two Nijmegen bridges were successful, but Allied attacks soon crushed resistance and captured enough bridges to eventually open up the road to Arnhem.
The second UK drop stuffed more troops and supplies into Arnhem, making it a tough nut to crack that the Germans only attacked via artillery barrage. To be fair, Rory’s dice for artillery attacks were abysmal. Marc’s dice for artillery were never bad and sometimes quite good. Then again, when Marc’s rolling 24 dice to kill off a couple units, you don’t need spectacular dice.
By turn 7 (3.5 days elapsed), Arnhem was relieved and the Allies were over the Rhine. Not enough Germans remained to threaten a counterattack. In our game, Monty was vindicated.
Snipe and Tripe
I understand the reasoning behind German tanks being superior to the Shermans, but I cannot figure out why German artillery gets a three area range and the US/UK only two areas.

Turn 3: No Germans south of the Maas River.
Speaking of areas, the irregular map areas means that artillery can use those loooong and skinny areas to fire a long way north and south, but only a short way east and west.
We used Axis and Allies plastic game pieces. The ones supplied with the game were somewhat crude in comparison. For example, the Tiger tank was a blank square-ish slab for a hull.
Turn 7: End of game. Brits hold Arnhem. US holds Nijmegen.
Overall
We’ve played lots of Arnhem games over the years and this had some clever mechanisms. We liked the simplicity of terrain To Hit numbers, even if units tended to act identical. The intrusion attacks are an interesting effort to insert a version of an overrun attack into an area game. Blowing up bridges, or diffusing explosives, adds a nice tension to the pace.
On the other hand, and admittedly after only one game, 24 dice for four artillery units gets a bit overwhelming. When an artillery unit is by itself, not so much, but four — and 30 Corps has four stacks of four at start — and it gets to be a dice-rolling fest of death. The option to build Bailey bridges (remove units from board and roll 1d10 for ‘construction points’) can take a long or short time, especially for the big double bridges over major rivers — when you need 20 points on 1d10 per turn, you’ll need a minimum of three turns and a maximum of well, 20 turns, in a game that 18 turns.
Of note, we played the nine-unit per area rule wrong. It’s not ending the turn with maximum of nine units per area, but allowing no more than nine units to move through an area – should string out the Allies a bit more and help the Germans.
Well worth a second playing, if only to try some strategies to avoid getting Germans bombarded into oblivion.
About the Author
 Russ Lockwood has been bouncing around the wargaming world for the last 25 years in one capacity or another. Most know him as creator and CEO of MagWeb.com (on-line archive of 162 military history and related magazines from Coalition Web, Inc. from 1996-2009). He appeared on camera on The History Channel (Modern Marvels), ABC, NBC, Fox, and various cable TV shows. MagWeb was also covered by the NY Times, USA Today, and other newspapers, a variety of trade and consumer magazines, and a multitude of on-line sites. He’s given lectures at various HMGS conventions, Origins War College, and various professional meetings and seminars. Although MagWeb closed in 2009, those white MagWeb rulers still appear on wargaming tabletops across the country.
On the prior professional front, Lockwood was Editorial Director of AT&T’s web division, Senior Editor at Personal Computing Magazine, Assistant Editor at Creative Computing Magazine, Telecommunications Editor for A+ Magazine (Apple), tech writer at AT&T, Staff Writer (Financial) NY Times Information Service, and freelancer for PC Sources, Windows Sources, PC, MacUser, Byte, Restaurant Business, Hotel Business, Computer Buyer’s Guide and Handbook, and other magazines. He also hosted a radio show, ComputerWise, for five years, and was an on-line editor for ZiffNet on Compuserve and Ziffnet on Prodigy.
He is currently a freelance editor and writer covering financial and defense news, with a concentration on the retail industry. If you are really interested, go to Linked In, where he maintains a profile.
On the miniatures front, you may have seen his byline in various hobby publications in the 1990s and 2000s. Lockwood is also the author of: Snappy Nappy: Simple, Subtle & Ultrafast Miniature Rules for the Napoleonic Era, and, Hyperspace Hack: Ultrafast Spaceship Fleet Battles with Miniatures (both published in 2009 and available from http://www.onmilitarymatters.com and http://www.caliverbooks.com). Lockwood is also the editor of the Secrets of Wargame Design series, releasing the fifth volume in 2015.
Related Articles:
Moscow ‘41 – A Boardgaming Life Review
Blitz! Clever Design on a WW II Global Scale
ARDENNES ’44 A Boardgaming Life Review and After Action Report
The Maps of Collapse – Wargaming the End of the Reich
Blocks in the West- A Boardgaming Life Review by Harvey Mossman
