Strategies for the 1943 Scenario in Mark Herman’s “Empire of the Sun”
by Tom Thornsen

Overview
Many of you who read Mark D’s review of Empire of the Sun may have looked into it further and decided “No, a game with a long learning curve that takes 10 to 12 hours or more to play is not for me.” Other than playing the game with someone very familiar with it, there isn’t much that can be done about the learning curve, but there is something that can be done about the playing time. The 1943 scenario is an excellent game for learning the system from either side of the table. This scenario has been used in the preliminary rounds of the WBC tournament for the last couple of years and has proven to be very balanced with some very exciting games.
The scenario starts with the Japanese Empire at their peak and the allies just starting to field forces sufficient enough to contest further advances and conduct some limited offensives of their own. The Guadalcanal campaign is over in the South Pacific and the allies are ready to take the offensive in New Guinea. The Japanese have conquered Burma and are planning offensives into Northern India. Both sides must be on the offensive in some part of the map to be successful, while defending in other areas. Victory will depend on how successful these campaigns are as the allied strength builds and the Japanese forces, with their very limited replacement and reinforcement rate, fade away.
If you played the game once or twice and are familiar with the mechanics, then this scenario can be played to completion in about 3 hours. There are a lot of moving parts in this game, so set up time is not insignificant. You will have to sort the counters and consult the rules for set up to properly place them all. Just as important is the construction of each player’s card deck. Many event cards are already out of the game and many of the good Japanese offensive events are in the discard pile. When you include the set up time for the game you should expect to dedicate 3.5 to 4 hours. I have my units and counters sorted for the 1943 scenario, since that is what I usually play, which facilitates set up a great deal.
Perhaps the one item that slows the game down the most is the one we all ask the first time we set up the game and look at our first hand of cards. “What do I do now?” This is when you look up the victory conditions and attempt to figure out what you can do with your cards and units available to achieve them. The victory conditions for this scenario offer several paths to victory for both sides. This article will help get you started down the road to playing by answering that question.
Japanese Options
The Japanese control the Australian Mandates (+3) and the Burma Road is closed (+1), while the US Political Will is 6 (-1) for a total of 3VPs. The Japanese need at least 6VP to win, so they have to get to work early. By the end of this scenario the allied forces are going to be picking up VPs that the Japanese cannot contest, so the greater the VP count on the last turn the more risks the allies will have to take.
China-Burma-India (CBI)
There is a treasure trove of VPs in Northern India for the Japanese. Each of the five hexes of Northern India (1905, 2005, 2104, 2105, 2205) is worth 1VP with the 2VP bonus for control of all five. In addition, control of all 5 hexes at the end of the game will result in India being in Unrest on the India Status Chart for an additional VP, resulting in a total of 8VPs.
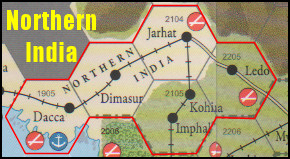
But wait, there’s more! If the Japanese can achieve this result by the end of the second turn (turn 6), there are event cards that could move the India Status marker to Unstable for yet another 2VPs on turn 7. If the Japanese can play one of these events and hold the Northern India hexes against all allied attacks on turn 7, then that is 2 more VPs for a total of 10VPs. There are several Japanese event cards that either move the India Status marker or negate SEAC HQ offensives and these should be considered for play to the Future Offensives Queue if it looks like you will have a chance to use them.
There is one more threat here that the allies cannot ignore, and that is the conquest of China. While the cards and dice have to cooperate for this to happen, there is much to be gained by keeping this threat in play. The fall of China and the -2 US Political Will associated with it is 7VPs, plus the allies will be reduced to a six card hand on the last turn. Once this damage is done there is no way for the allies to undo it. The China marker starts in the Major Breakthrough box of the Chinese Government Front Status track. The Japanese start the game with a successful China offensive event as their Future Offensive card. If they can draw another China offensive event in their first two hands of cards, that will move the marker adjacent to the Government Collapsed box. The only way to move the marker to the last box is the play of an OC3 card for Operation points and make a China Offensive die roll.
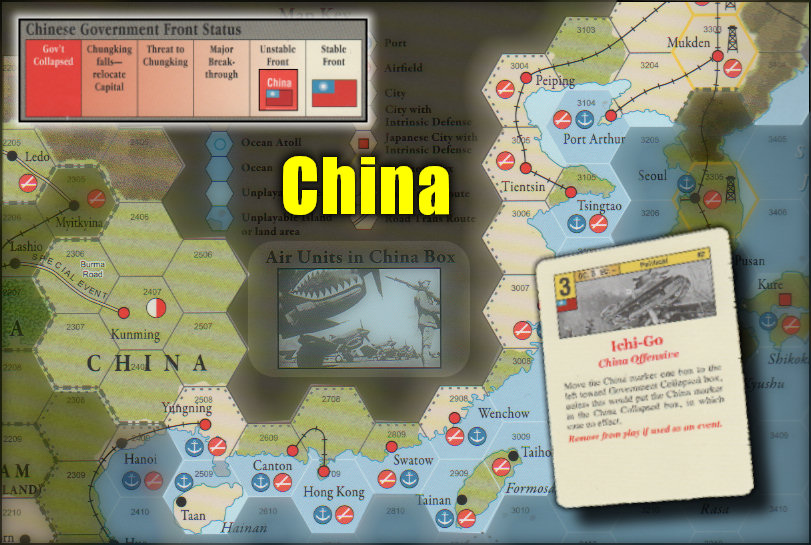
This die roll may only be attempted on the second turn of the scenario (turn 6). The chance of success is very poor if the Hump is still active. If Dacca is controlled to shut down the Hump for an allied support die roll modifier of 0, even if you took 2 divisions out of China for reinforcements and the Allies still have an air unit in the China box the chance of success is still 50%. Well worth the effort.
The forces available at start in this area are insufficient to make much progress. Early in the game the Japanese must redeploy significant army ground and air units to this area, especially the 20 factor elite army air units. Playing a card for Operation points limits the player to a single declared battle hex. Only by playing Operational Events can the attacker declare more than one battle hex. Many of the big Operational events in the Japanese deck limit the number of ground units that can be activated to none or one. The big air units will be required to pummel and pin down allied units, as well as attrit the allied air and naval power and provide air cover for attacking ground units.
North Pacific
Attu/Kiska (hex 4600) starts occupied by Japan for 2 turns, so if the Japanese still control the space after the first turn (turn 5) there will be a loss of 1 US Political Will (Rule 16.42).
Since event cards that move the US Political Will marker are only playable for Operation points in any scenario, this is often the only time the US Political Will marker moves in the scenario. Is it significant because moving the marker from 6 to 5 is a difference of 2VPs (from -1VP to +1VP). By using 1 army activation and an Amphibious Shipping Point (ASP) the reduced Japanese 27th army at Hokkaido (3704) can be used to reinforce the space, which makes any allied attempt to capture it almost prohibitive.
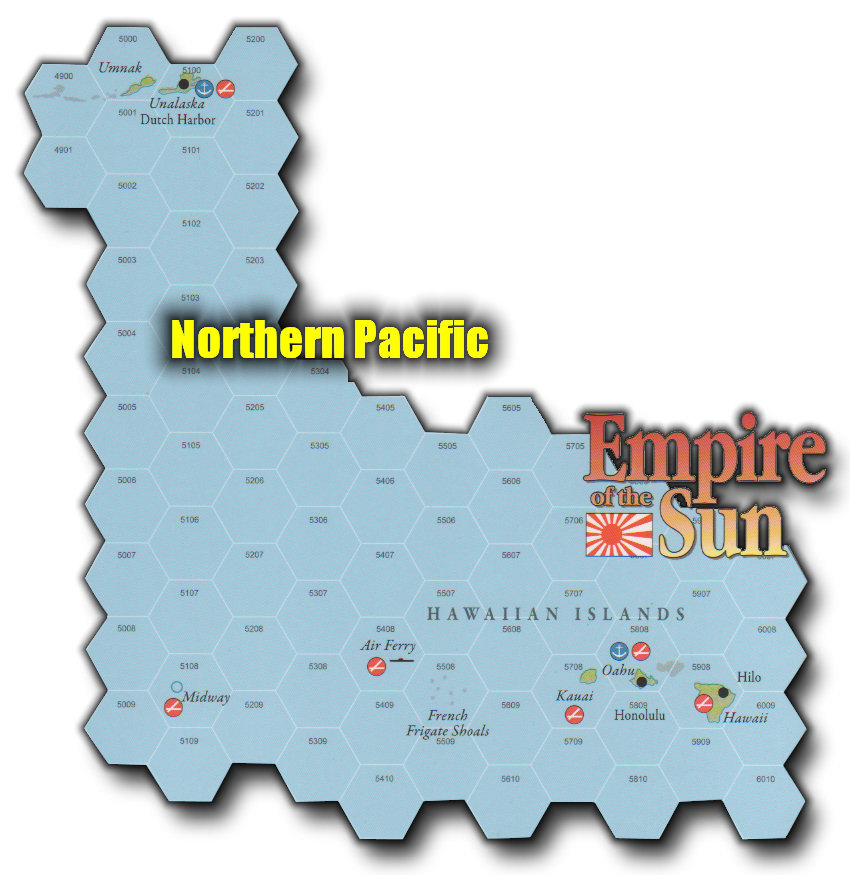
If occupied at the end of any turn, the islands of Kauai (5708) and Hawaii(5908) each give 1VP, while Oahu (5808) awards 3VP. This requires having a full strength unit survive the turn there, as all are outside of the supply range of any Japanese HQ. None of these are likely unless the US army forces abandon Oahu. This becomes a creditable threat if the Japanese move all of the troops in range of Combined Fleet HQ into range of other HQs, then use a card to remove the Combined Fleet HQ to the turn track and enter it as reinforcement on turn 6 at Kwajalein (4715) in the Marshall Islands. This will surely draw the attention of the allied player to that area and they will promptly reinforce those areas. With the major commitment of units and card play that this requires, it is rarely attempted unless the US navy has met with a disaster during the turn.
However, Combined Fleet HQ at Kwajalein also creates a forward threat to the Solomons (the island chain that includes Guadalcanal (4423)) and South Pacific, which might stretch the allied defense and leave other options.
South Pacific and Dutch East Indies
For the most part, the Japanese will be on the defensive in these areas. There are 5VP available if there is no LOC between Townsville (3727) and Oahu (5808), but it will be difficult to achieve this condition at the end of the game in the face of the overwhelming naval power the allies should have on the last turn. The most important objective here is to maintain control of Rabaul, and with it the Australian Mandates. Should the allies gain control of the Australian Mandates the Japanese will lose their 3VP plus a -3VP for allied control for a total loss of 6VP.

It is important to garrison ports and Resource spaces, as this will require the allied player to declare a battle hex by attacking them. The allied player will be hard pressed to make progress if he draws a hand with only two or three offensive events that allow multiple battle hexes to be declared. For some ideas on what to defend, read the section on allied priorities.
The Allied Options
The scenario starts with the VP count as an Allied Tactical victory, just 1 VP short of an Allied Decisive victory. If you can only foil all the Japanese initiatives, then victory is yours. Doing so is far more difficult that it would appear at first. The Japanese have the benefit of interior lines and can shift their forces between areas much quicker than the allies. This forces some long term planning on the allies, especially when it comes time for reinforcements and replacements.
China-Burma-India (CBI)
While the forces at start here slightly favor the allies, you are sitting on a virtual gold mine of Japanese VPs and they are likely to send significant army forces to reinforce this front. The allied ability to reinforce this front is…almost nonexistent. There is a path of 28 sea hexes from Darwin (3023) to Madras (1406), but the moment the Japanese place an air unit in Medan (1813) or Tjilatjap (2019) the SR path is blocked and an allied carrier would have to attack that base to allow ground units to SR between those ports.
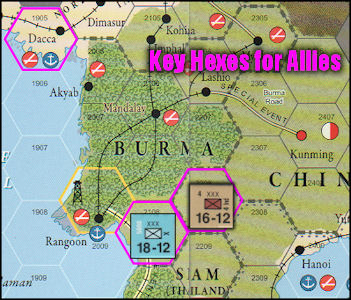
Your seven commonwealth ground steps and four Chinese ground steps are going to be hard pressed to hold on, but do your best. Dacca (1905) is the key position, as control of that one space at the end of the game will keep India stable and limit the Japanese to no more than 4VP for the CBI theater.
Since the allies play first in the scenario, one line of play is to open with an offensive in this area to attrit the Japanese ground forces, gain ground and get the remaining Chinese units into play. The objective of such an offensive is the occupation of hexes 2108 and 2208, which will put all Japanese units north of that line Out of Supply. If successful it could delay the Japanese advance considerably, but if unsuccessful it could accelerate the Japanese offensive.
Another line of play, which can be used in addition to the early offensive, is to remove S. PAC HQ from play with a card play, then have it return to play at Madras. This will permit the entry of US ground and naval forces to this area as long as the HQ is in supply. The arrival of XXIV corps in this area as a turn 6 reinforcement is a boon to the defense. Since S. PAC HQ cannot activate any commonwealth units, it has limited uses for offensive actions in this area.
North Pacific
As noted in the Japanese section, the US Political Will drops by 1 if you do not have a ground unit in Attu/Kiska at the end of the turn. The 8 factor Marine Brigade and the BB Mississippi could attempt to land there with an OC3, but Combined Fleet HQ is in range for reaction and the CVL Junyo in Kure (3407) would react to the battle to turn it away, since the allies have no air factors. Even if you have removed Inter-Service Rivalry (ISR) and can commit the Long Range Bomber (LRB) unit from Dutch Harbor (5100) to the attack, the Japanese have enough naval strength at Kure to make victory in the air naval battle difficult. Even if you win the air/naval battle, Japanese air and naval forces would deny you any positive die roll modifiers in the ground battle, reducing the chance of a successful landing to 70%.

You could redeploy those units to Dutch Harbor for an attempted landing at Attu/Kiska with an OC1 or OC2 card, but the Japanese have a reduced army they could use to reinforce Attu/Kiska to make a successful landing almost impossible. It is probably worth making the threat, just to force a Japanese reaction. A more likely path to success is a surprise attack with an OC3 card near the end of the turn, when the Japanese may not have a card to change the intel condition.
Probably the greatest impediment to any operation to liberate Attu/Kiska is that it requires a valuable ASP to attack it, and the allies have only 4 ASPs on the opening turn. Progress of War requires them to take four enemy held bases by the end of the turn, and Attu/Kiska does not count toward Progress of War since it is not a named location.
One important objective for Central Pacific HQ is the conquest of the Marshall Islands, and the -3VP it inflicts on the Japanese. Note that the Japanese do not have an Aircraft Zone of Influence (ZoI) over Eniwetok (4415), nor any unit defending that port. The allies could use their opening offensive to land a ground unit there, which is then 50% of the way toward the conquest of the Marshall Islands. The problem is that this base is way beyond the allies’ ability to provide air cover, so any unit there is likely to be OOS by a Japanese air unit at Ponape. You could deploy a carrier there to exert your own air ZoI, but the allies are very short on carrier SPs at the start. The greater threat is a late turn follow up invasion of Kwajalein, which would convert all of the Marshall Island hexes to Allied control at the end of the turn. A boon if Progress of War needs those bases.
South Pacific
While playing defense in Northern India, the Allies must conduct a vigorous offensive in the Solomons and New Guinea. Not only is this important for the Victory points, but it captures enemy bases for Progress of War that, for the most part, do not require ASPs to capture. Let’s go right to the details.
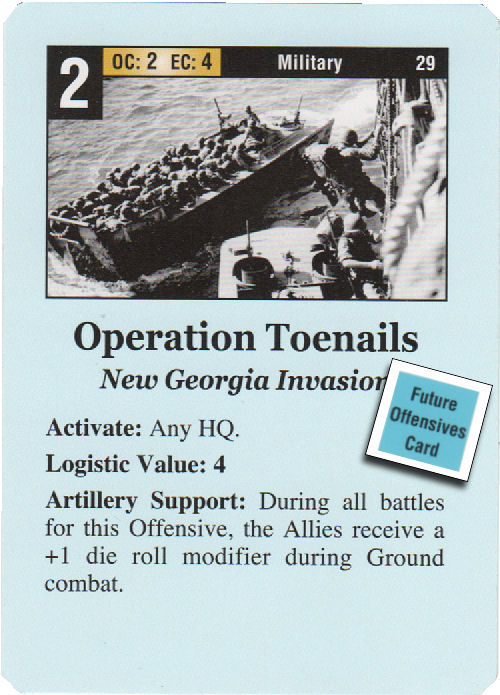
The allied Future Offensive card at the start of the game is Operation Toenails, which provides a +1drm in ground combat. Driving the Japanese from Lae (3822) should be a high priority at the start with that event. The allies start with control of two New Guinea ports and need 2 more for -1VP. Those two are going to be Lae and Wewak (3720). The sooner they are under allied control, the sooner the allies can start pressing forward for more. The Japanese have two full strength armies on New Guinea, with another at Rabaul (4021). However, they are unlikely to be reinforced with the higher priority going to Northern India, so the sooner you can start to reduce these armies the better. There is no ground unit at Truk, and the Japanese are unlikely to weaken the defense of Rabaul, so press them in New Guinea.
With the fall of Wewak, the allies must press forward into Aitape (3620) and Hollandia (3520) to create two additional threats. Once the allies have Hollandia, the fall of Biak would give the allies control of New Guinea. Control of 4 ports of a Japanese controlled New Guinea is -1VP, but allied control of New Guinea is a loss of 3VP for the Japanese. Hollandia or Aitape also make possible an allied LOC to Palau Island (3416) or Ulithi (3615). Both of these ports are within 11 hexes of Tokyo (3706) and allied control of either of them (in supply at the end of the game) is another -3VP. If the allies can take control of Hollandia by the end of turn 6, they are very likely to have conquered New Guinea and have a port within 11 hexes of Tokyo for a total of -6VP. I will note here that the other two ports that are within 11 hexes of Tokyo are Samar/Leyte (3014) and Saipan/ Tinian (3813). The former is usually well defended and difficult to keep in supply, while Samar/Leyte can be taken if the Marshall Islands have been secured.
In spite of all the above, the focal point of the South Pacific will be Rabaul. There is net swing of 6VP for the transfer of control of the Australian Mandates from the Japanese to the Allies. The allies are going to face many demands for ground units in this scenario, from Northern India to New Guinea to the Solomons, and how they allocate their precious ground units may well determine the victor. One of the important reasons for capturing Hollandia by the end of turn 6 is that the US army corps can then focus on Rabaul. The Japanese are not going to abandon Rabaul, and unless they have reduced their ground forces there to less than an army, a direct landing on Rabaul is unlikely to succeed. The most common approach to investing Rabaul is to land US army corps units adjacent to Rabaul in hex 4022 for an overland march into the port. If things have gone very well (or very poorly) in Northern India, a crafty allied player will land reduced strength corps there for 1 ASP each, then reinforce them to full strength at the start of turn 7 for the final push.
The New Britain hex (4022) is both a blessing and a curse for the allies. A blessing because the hex has no air base so is not eligible for a Special Reaction (Rule 6.27), a curse because it has no air base so any ground unit there subject to a air/naval attack requires a successful inteligence table roll in order to react allied air/naval forces there to defend them. I have seen some Japanese players deploy reduced strength naval marine units into that hex to foil this allied play. By doing so it forces the allied player to declare a battle hex which the Japanese can then react into to either turn back the invasion or send additional ground forces from Rabaul to cause additional allied ground step losses.
Much that is written about the War in the Pacific mainly discusses the air and naval aspect. In this game it is ground units that both sides will decry they lack. In the final analysis, you have to capture and hold terrain, and you need ground units to make that happen. And the ground combat CRT is bloody.
Dutch East Indies
For both sides, this is a peripheral theater of operations. The Japanese control it and have no VPs to gain there. The allies can reduce the VP total by 1 for each Resource hex they control at the end of the game, plus control of 2 of them will reduce the Japanese card draw by one. In a close game the allies should consider stationing a carrier group with a marine unit at Darwin (3023) to at least threaten a landing somewhere. The Japanese will rarely have enough units to cover ALL the resource spaces and will have to count on a successful intel roll to intercept.
The main point to remember here is that any resource space you capture has to be in supply at the end of the game for the -1VP to take effect. The Japanese air unit at Makassar (2620), on the island of Celebes, is the major obstacle to this. Unless the Japanese have relocated an HQ to provide an alternate path, this unit’s supply from South HQ must pass through Balikpapan (2517). Allied occupation or control of Balikpapan will put this unit OOS, which will negate its air ZoI and open supply lines for the allies. If the Japanese deplete the defenses of this area too much, the allied player could cause a lot of trouble by redeploying a carrier task force and a ground unit or two to this area. The command range of Southwest HQ can be a limiting factor, but usually it is a dearth of ground units to spare from the higher priorities that restrict operations here.
Other Things that Both Sides Must Consider
Both sides start the scenario under Inter-Service Rivalry (ISR), which prevents army and navy units from participating in the same operation. This is rarely a major problem for either side, but is certainly a limiting factor. The Allied player likes to use the 6 hex range of the LRB to pin enemy reaction forces at long range when conducting major naval operations, and this won’t be possible under ISR. The Japanese like to pair up reduced armies with naval units as a reaction force against allied naval landings, which won’t be possible under ISR. Drawing an ISR ender event is a bonus that must not be passed up. For the Japanese, and occasionally the allies, this offers the chance to discard a non-playable event (anything that directly affects the US Political Will) and return a good card from the discard pile. The allies have the very valuable “Heroic Repair” event in their discard pile, while the Japanese have several excellent operational events they will want to use in the first couple of turns.
While a special scenario rule allows you to discard an OC3 card to remove ISR, it is rarely done. The main reason for this is that each side is going to have 7 action rounds per turn, or 21 total for the scenario. The Japanese may well have fewer since they can expect to lose at least 1 card and ASP to Allied Strategic Warfare. Both sides have a lot to accomplish in this scenario, and every one of those 7 actions per turn has to be productive. The more productive player will usually win. Other than the dreaded 0/9 die roll that goes against you in a major air/naval battle, there is little worse than discarding an OC3 to remove ISR only to have your opponent play an ISR event to put you back under ISR then drawing a replacement card!

And a final word regarding the War in Europe (WiE) Level. This level has no effect on the VP total. The Japanese would need to move it 3 spaces to increase the possible delay of allied reinforcements, but there are so few of them in this scenario that it would be wasteful. The real battle here is the allied attempt to drive the WiE level above 0 which will allow his turn 7 reinforcements to enter the game. As the Japanese player you should consider playing any Major Victory in Europe for the event, keeping in mind that the allies need only a single event card to procure those four naval units. For the allies, any Victory in Europe event is probably better used for the event than the OC2 unless the WiE level is already above 0.
But the “Card Gods” have a sense of humor, and even the allied player lucky enough to drive the WiE level above 0 can run afoul of a turn 6 Submarine Launched Air Attack on the Panama Canal event, which puts those turn 7 units out of the game and allows Japan to draw a replacement card.

I liked your article but am puzzled by your statement “Since event cards that move the US Political Will marker are only playable for Operation points in any scenario, this is often the only time the US Political Will marker moves in the scenario.” Where did you find this in the rules?
Hi Gilbert!
Welcome to the world of Mark Herman’s “Empire of the Sun”. As with any Herman/Berg game there is usually a LOT to it and there are a lot of ‘detail’ rules that are often overlooked or found in places you would not expect to find them. We both know from experience that authoring rules for any game is often tricky.
For all yearly scenarios (3 turn games) in the v2.0 rules there is a rule that permits removal of ISR with the play of any OC3 card for OPs, which is the entire action for that card play. That rule also states that the four events that directly move the US PW number may only be played for OPs, not the event. For the 1943 scenario this is found in rule 17.37.
Keep on playing…keep on learning!
Tom
The rule is covered in the scenario section as it is an exception to the campaign rules. Great article Tom, I use it for all new players of the game. Very well done.
Mark
Hello there, You’ve doje an excellent job. I will definitely digg it and
personally suggedt to my friends. I am sure they’ll be benefited from this site.