Battles of The Black Cavalry
Hill 262 – Chambois: August 1944
Author: Paul Comben
Designer: Adam Niechwiej
Publisher: Strategemata
Some readers may recall an article I wrote for this site around fifteen months ago featuring another game by the same company, Festung Breslau. That design covered the 1945 siege of the German city, in which Polish forces under Red Army command played a far from insignificant role. My review was very largely positive, given the character of a relatively simple system in relation to the nature of a bitter street fight that lasted throughout the last months of the war in Europe.
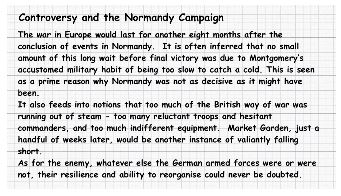
 Now, the same designer, Adam Niechwiej, has approached a very different subject, one that presents Polish forces fighting alongside the Western Allies in the struggle to close the Falaise Pocket. This is, arguably, one of the most controversial episodes from the 1944 campaign – many believe that no German forces should never have been allowed to leach out the pocket and thus live to fight another day. Blame is often assigned to various figures and formations for a lack of verve – but one thing that we can be certain of is that the Poles themselves did all they possibly could.
Tactical games, of which this is very much one, often invite the presumption that they are going to be long on rules and time-consuming on procedures. However, before I actually received this game I quietly suspected that this might not be the case here, given that Festung Breslau had got an awful lot done with a very modest set of rules. If anything, the rules to Black Cavalry, which are of a series type covering more than one design (two others presently, one of which covers Polish campaign events of 1939), are even shorter. The system itself can take just a little getting used to, given some of its idiosyncrasies and a few passages where the English is not absolutely ideal, but for all that, someone who has this system grasped could teach it to another experienced wargamer in a handful of minutes.
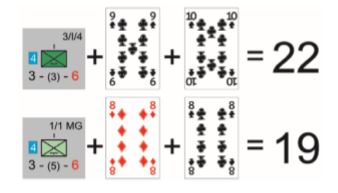
One other thing I do want to address before proceeding into actual game details and mechanisms is any hesitation there may be about the fact that this system requires a deck of ordinary playing cards to operate several of its key mechanisms. This might raise an eyebrow here and there, but I consider this design to be one of the best uses of a common or garden card deck I have seen. Both the draw deck and the hand a player holds have their own range of functions – the draw deck determines the “pattern” of initiative possessed by the player designated as having the initiative by scenario rule. In addition, either the deck or sometimes a card from the player’s hand will determine a scope of initiative actions and opponent responses. The deck also features as a randomizer for the various forms of combat; and it determines, by dint of a clever and incredibly easy to work process, how accurate incoming artillery and airstrikes will be (more on these later). As for the player hand, this acts as a potential resource for creating high value attacks (i.e. by having high value cards), as well as being a potential stock of in-game events, some of which will be more obviously beneficial than others, though all are dependent on having the right card (not that many apply – mainly the court cards) at the right time.

The essence of the game sees both the initiative and “passive” player (well, let’s say attacker and defender), doing what comes naturally in the course of any particular game turn. The initiative player will get to make as many “plays” as his choice of units allows, set against the value of an accompanying card – blind drawn or selected from the player’s hand. Clearly, this implies holding onto high value cards in order to facilitate a complex coordinated move by units belonging to different formations (costly in points, and card values are the currency), but while court cards are only worth one in value terms, these are the very event cards you are going to need at some point, so the player must attempt to manage their hand with some thought as to their needs and priorities.
Note, certain other cards can become event cards by scenario rule.
As for the defender, they will get to perform actions as and when an appropriate opportunity arises. Just how much action will depend on the contingency, as well as in the case of defensive fire, how a card draw result limits such fire opportunities. You may get to blaze away as targets present themselves, or discover that you get only the one fire against one particular target and that’s it.
Both sides can call in airpower and artillery if the scenario rules permit, but like overall ammunition levels, available amounts can vary and a eye has to be kept on how much of the good stuff you are getting through.
A final thing to emphasize here is that the turn structure is a little different from what players may be used to – there is only one truly active/initiative player in a turn, and whoever is deemed to be passive this time around will be limited to the reaction options. This has subtle implications for how you may wish to handle an active formation when the initiative is yours. Unless you have good reason to believe that an enemy response is going to lack bite, you do not want to leave units stranded in the open at the end of your play – it may, after all, be a while before returning initiative gives you any chance to dig them out of trouble.
Now, let’s take a look at the units and the maps.
 For both sides many of the infantry units are companies, but while Allied armour units also represent the smallest organized grouping in command terms (some five tanks), German armour units are individual vehicles attempting to fight their way out of the pocket alongside whatever infantry is to hand.
German units, or at least many of them, have a colour/column designation (Rot/Red; Braun/Brown; Gelb/Yellow; Grün/Green; Blau/Blue) that is a major mover in how victory is determined in the larger scenarios – you have to get units from particular columns off the map
The ratings/information shown on units is pretty much what one would expect from a tactical WW2 game – firepower, range, movement allowance, morale etc.
Tanks, of course, also have an armour rating, as do the field gun/AT units (an expression both of the presence of a gun shield as well as the difficulty in hitting a small and likely to be decently concealed target).
One other type of unit worth mentioning is the formation HQ. Their importance comes largely in the ability to offer some or all of their support value to a combat providing it is in range of the action – one might imagine this representing anything from committing extra weapon assets to the fight to an intervention by a more senior officer.
One double-sided map sheet portrays the area where the key engagements were fought – essentially a game representation of the historical terrain, all pretty typical of that part of rural France. One criticism to make here is that what map is used for which scenario is not terribly obvious. I did work it out after a few minutes, but I have suggested to the designer that a clarification on BGG would be handy.
Map scale is about 200 yards per hex, while the per-turn timescale is somewhat flexible within the overall series/system. Of course, if you count the turn spaces sandwiched between night turns for any given scenario, you can get an idea of what allocation of time applies.
Stacking is the pretty common 2 or 3 units of most types, and is dependent on terrain type.
With the exception of armoured units, there is nothing really approaching the notion of a defence factor in the game. Against standard forms of fire combat, units “defend” with the value of the terrain they are located in plus their own morale rating – in essence, how much protection does the unit have coupled with how well can it endure psychologically the destruction, noise, and chaos of incoming fire.
The various forms of combat have their own processes, and to present such matter, we need to set a few things up on the table…
The Game in Operation
The images here show aspects of the “at start” from one of the larger scenarios – The Defense of “Maczuga” 19th -21st August 1944. Numbers for the Germans will augment considerably as more units pile on in the hope of piling off to somewhere rather safer. This reality is an open invitation to briefly highlight the victory assessments. In very basic terms, the Germans nearly always need to take something or get off the map at one or more locations; the Allied forces, by contrast, are usually trying to stop that kind of thing happening. And while I want to address the mechanisms attached to the use of artillery later on, it will do no harm here, and probably surprise no one, that the Germans have no big calibre and “behind the scenes” artillery support – it’s either all blown up in the fields or strafed to blazes somewhere in a Normandy lane.

Several things deserving of attention can be gleaned from the set-up sheet. First, the German hand here (15 cards) is about as big as it gets in the game – no surprise there, as all the onus of movement and attack is on them. Also, barring somewhat exceptional turns of the deck, the Germans are likely to hit low ammunition problems ahead of the Allied forces (they have only to get four qualifying results compared to the Allies’ six). But the main issue is lurking around the German reinforcement schedule, for this is very likely to be one seriously wild and utterly chaotic battle.

SS units already on the “safe” side of the pocket will appear on the map’s eastern regions, with the specific purpose of linking with those elements still driving west. Those elements include what the German player will have secretly designated as his/her scoring columns. The Blue, Yellow, and Green columns appear in indeterminate amounts and times from the map’s west edge. Not all will count as points for exiting the map – just two of those three colours. The Poles and some other units are slap bang in the way of the direct escape routes, and the German player will have to devote some time considering which will be the scoring columns, and then during play, how to work each of the formations to best advantage.

If we look at this portion of the scenario’s turn record track, we see that units of any potential scoring column are in rotation with the others in terms of what is likely to appear, and when. Beyond the player’s control are precisely when any colour will be that turn’s reinforcement, and what most of that reinforcement will consist of – it will consist of three units of the relevant colour, one openly chosen and the other two drawn blindly. This can cause problems for the Germans if the arrival of forces becomes unbalanced in favour of one of the scoring colours. This is because although the German player definitely needs to get some effective force onto the map, the number of units of a chosen scoring colour that need to escape to the east increases by one each time that particular column has strength added – basically, for each reinforcing group of three units of a scoring colour that enters the map, one more unit of that colour needs to exit to the east. If that column becomes particularly bogged down, the challenge of winning through is bound to become all the harder.
One compensation for the Germans is the possibility of bluffing their opponent as to what colours will score; another is that while a very small formation might seem easier to score with, if the number of units actually on the map falls below the number of exiting units needed, things are going to get very difficult. As with most things, ideally the German player will keep to a happy medium and not need to exit droves of delayed stuff before the clock runs out.
Personally, I am rather impressed that a valid tactical system could be fitted into so few mechanisms.
For the Poles, the job of holding the door at least partly shut would be that much easier were it not for the SS forces creeping back in from the east. This creates its own challenges, as if the Allies seek to extend their perimeter to interdict scoring units creeping by to the south, as well as deterring at least some of these inveigling SS units from ever appearing at all, they run the risk of weakening their own fire zones and leaving units cut off and vulnerable. And from the German point of view, if the Allied player overreacts to the movements of a non-scoring colour, that offers advantages worth exploiting.
Allied reach is somewhat extended by dint of their available artillery, but in this scenario at least, the Tempests and Typhoons are all off elsewhere. Nevertheless, one kind of unit the Allied player will want to move to some better location (where they can see stuff) is their signal units. Artillery fire is appreciably more accurate when called in by signal units, and in what is, for the Allies, the odd situation of winning the campaign while being in somewhat of a desperate condition in this one vital spot, means making best use of whatever is to hand. So, try not to lose signal units!
Not all combat in the game involves fire coming in from a few hundred yards away to several miles distant. Close Combat here has its own take on accustomed forms – such combat takes place in the given/targeted hex, and the only printed unit rating to count is morale. Other than that, the decision is a matter of whether an effective combination of units is available to either side for the combat (essentially, do you possess both infantry and armour), and whether the assaulting side has been capable of bringing in units from multiple directions. This is all then compared to opposing card values (player’s hand can be used) to produce a final result.
Making a Mess of The Enemy’s Things
The system presents a few nuances to how it goes about the process of firing something at someone/something else, and so to help the reader here is a list of some of the key aspects:
Artillery/Airstrike Accuracy: If signal units are not bringing the fire in, accuracy is dependent on drawing one or two cards (dependent on phase) and comparing their suit to the designated suit of the hex in question (each hex has a card suit designator). If there is a (complete) match, fire hits the designated hex; otherwise it hits the drawn hex (opponent’s choice if multiple options).
Defensive Fire: How much such fire (actions) a unit can employ in a turn is determined by a card draw modified by its current ammo level – so if your previous blazing away has compromised the supply, you may well get less defensive opportunity than ideal.
Losses: Combat can result in a step loss (flip the unit if it has a remaining step), morale drop and disruption (possibly temporary); and outright elimination.
Important Distinctions: Players need to be a little careful in applying the correct modifiers to any given combat process. In particular, note that some modifiers apply to the ratings printed on units, while others are specifically applied to the cards that have been drawn.
Showing Some Initiative
Integral to game set-up is preparing the precise character of any scenario’s initiative process. To perform this, the player designated as having the initiative draws three cards from the deck – thus giving them the chance of drawing three different suits, though in many cases it will be less than that. Chits are then allocated to the turn record track’s first turn to indicate the number of different suits that the initiative player drew, as well as those other suits that are now deemed to belong to the second player pro temp.
Once play commences, a fresh card is drawn to determine who actually has initiative for that turn – possibly/probably the initiative player, but it is not a certainty. In any case, whatever suit was revealed, the chit for that suit is then flipped to its other side (to show it has changed allegiance for the next turn’s draw), and all the chits then moved to the turn two space on the track ready for the next initiative card draw.
Conclusions
This is a game operating to a very neat tactical system. That system occupies a mere five pages of rules, with the rest of the booklet given over to the introduction and the examples of play. Personally, I am rather impressed that a valid tactical system could be fitted into so few mechanisms.
One thing to stress is that I was pushing everything around as a solo player. The game is perfectly capable of accommodating such play, given that there are no hidden units or hidden movement, but inevitably, when you have the opportunity of influencing the game’s to and fro via you own hand of cards, knowing more than you should is going to be somewhat detrimental to the experience.
I did feel there was an occasional issue with the clarity of the system rules, and I would also stress that the larger scenarios will require a thorough reading of their specific rules in order to understand how those extra columns enter the map and how the scoring system works. That is why I was at pains to offer my own explanations in this article. I have also made a few recommendations direct to the designer, and would stress that he is a very approachable and helpful chap, who will support a player seeking to understand one his designs to the absolute limit.
Back with this design, the smaller scenarios have their own victory conditions (more “take this” or “hold that”), but clearly the designer has built this game primarily to work around representations of the larger battle. In that regard, there is every indication that he has done a rather good job.
Adam Niechwiej has dedicated his design career, as far as I can tell, to portraying key moments in the story of the Polish nation and the passage of Polish arms. However, irrespective of how interesting you find that particular chapter of European history, if you do appreciate a different and well-conceived system to portray historical events, this game and its partners are worth considering.
(Battles of The Black Cavalry: Hill 262 – Chambois, is available via Second Chance Games in the UK and Noble Knight Games in the USA.)
About the Author
 Paul has been involved in the hobby since the early 1970s. Of largely Belgian ancestry on his father’s side, and English (Yorkshire) on his mother’s, after finishing his education he worked in tourism and student services, and also spent some time in the former West Germany. He met his wife Boo in 1990, and they married a couple of years later.
Paul hails from a long line of former servicemen – one grandfather was a sergeant in the BEF of 1914, whilst two of his great grandfathers were killed serving with the Royal Navy. His own father, who was born in Britain, served with the army in Malaya in the early 1950s.
Related Articles:
ARDENNES ’44 A Boardgaming Life Review and After Action Report
Moscow ‘41 – A Boardgaming Life Review
My Forty Years on the Eastern Front: A Boardgaming Life Game Survey

How lethal was combat? One long Polish review demonstrated the units would die like flies from offensive fire, and would almost always be Disorganized if they didn’t take a loss. Since a second Disorganized result is a step loss …