Paul Comben takes a look at the inaugural design of a new company, Trafalgars Editions. and their simulation of the Battle of Waterloo which combines elements of miniatures with traditional historical board war game mechanics.
by Paul Comben
Designer: Jose Antonio Luengo
Publisher: Trafalgar Editions
Before I began this article, I tried to recall all the many Waterloo games I have played over the years. To be more precise, I endeavored to create a mental picture of the maps each of those games had come with. It was a giddying mix, for it comprised playing surfaces of vastly different size and style, of varying content in terms of significant effects; of things omitted and things highlighted; depictions constrained by the budgets and the printing processes of a bygone time; of flamboyant dash, period feel, rigid function; of some serious pieces of graphic art contrasting with others of austere practicality; and among all of those, some whose recollection invokes memories of times and friends gone by, because conviviality and the more genial pleasures always tend to thrive among the materials and agreeable commerce of game-playing…unless you happen to be playing against some boorish competitive misery guts.
How many Waterloo games have I played in the last forty years? At least a dozen is my best guess – it may well be more, it certainly is not any less. It is always the same battlefield, but no two games have ever shown it in the same way; and while it is always the same armies, again, as we will all be aware, no game on this or any other subject has made the fight feel precisely like it was at any time and with any game we previously encountered.

And when I think about it, it largely comes down to the map – the austere or simplified renderings, the complex depictions or the brash modern interpretations. In some, like Vento Nuovo’s Waterloo 200, an utterly nondescript patch of Belgian mud becomes the very epitome of detail and definition – colours, numbers and symbols defining how much of this or that nation’s soldiery may stand there, and in standing, with what advantage can they make their fight. In others, it is enough that that barely perceptible ridge confers a doubling of combat factors, or hides the Duke’s infantry from the power of the Emperor’s cannon. And then there are those mighty offerings, like the map to the original version of Wellington’s Victory (being the version I know – well, loved and lost) or the one accompanying the La Bataille treatment, where so much emphasis is placed on the discomforting of formations by the sunken lanes and hedges that readily belong to this scale of depiction, and yet have also occasionally found their way into other less minutely detailed accounts.
Indeed, it was a small battlefield, and one packed with men, cannon, wagons and horses. Historians have stressed this time and again. The field of Waterloo was a fraction of the size of Austerlitz or Wagram, and was entirely dwarfed by the perimeter at Leipzig in 1813. Some games have maps, which, in both look and function, create this Waterloo reality; many others seem to let it slip by. It is more than simply having the right features in the right place; it is creating a range of performance aspects for the armies that make them feel constrained or inhibited by what they have to move on. And in Waterloo: Napoleon’s Last Battle, a map do that has no grid, no hex pattern, no areas, no boundaries – nothing in fact, except the terrain of the field, and a few peripheral administration tracks – does precisely that. This Waterloo map for this Waterloo game makes it very clear why it was here, and in no other place, that Wellington chose to make his stand against Napoleon. And as the Emperor and his key subordinates are repeatedly criticized for failing to coordinate the arms of their contingents to best effect, on this map I got a glimpse into one of the contributing reasons why it proved to be so – there just was no room to accommodate real attacking finesse on so narrow a set of fronts.

After the repulse of D’Erlon’s I Corps, itself partly blamed on the want of sufficient supporting cavalry, Napoleon considered a novel alternative – a concentrated punch straight down the Brussels Road by no more than a few hundred cuirassiers advancing on a very limited frontage. This was not the customary way heavy cavalry got used – essentially like the equivalent of a sabot round aimed at piercing Wellington’s line at its most vulnerable point, but as the subsequent massed cavalry charges would demonstrate by dint of hardly being charges at all, and being far more “massed” than was ideal, it was not only time that was short for Napoleon, but space as well. Whilst Wellington’s forward bastions held, everything the French did fell between these chokepoints, and as a result, precious little of what was thrown at the Duke’s army was capable of being employed to best effect.
There are other Waterloo games that will give you a sense of this, but this one, in what I have experienced in the playing of it, goes that bit further in making it desperately hard to get the right sort of attack forward – or, for Wellington, the right unit(s) on the line at the right time. And this, in turn, is all to do with the nature of the field and the presentation of the units upon it.
So what is the story of this game?
To begin with, Waterloo: Napoleon’s Last Battle, is very much a pure miniatures game in a boardgame format. That puts it in very rare company, although ironically, one of the recent examples of this genre was another Waterloo game – Waterloo: Enemy Mistakes. I reviewed that game and came to the conclusion that an exciting project had been sadly undermined by an incomplete set of rules, which had then been badly translated out of the original Italian. Therefore, when I say that this new game is the product of a Spanish company, with the “in-box” English rules translated direct from the Spanish, alarm bells might sound in some ears. Then again, there are now a serious number of European companies producing wargames, and the English language rules for many of these are as sound as one might hope for. Regarding this game, the rules that came with my copy of the game were not too difficult a read – in my opinion. However, there were definitely areas where some more clarification was necessary or would have simply helped with understanding the system, some instances of outright errors requiring correction, and numerous occasions where not quite the most apposite term or phrase, the mot juste, has been employed. But overall, I did not think the rules were simply an unintelligible tangle, and one odd little positive about them is that, in places, they did give me a clearer idea as to how to approach the many puzzles and enigmas of Waterloo: Enemy Mistakes.
Waterloo: Napoleon’s Last Battle, is very much a pure miniatures game in a boardgame format
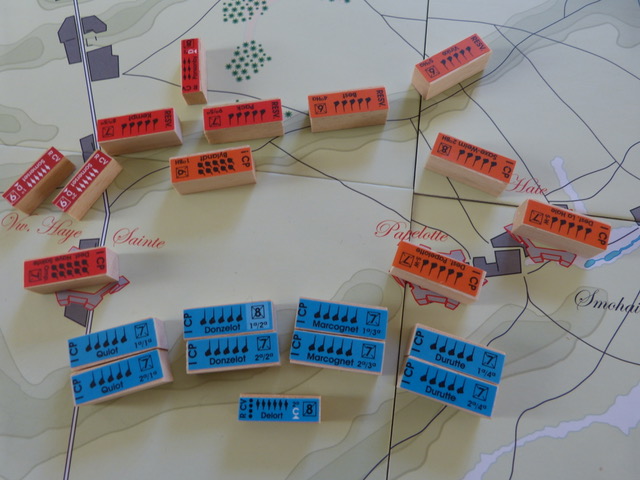
So, we have a miniatures game – formations move by the laying out of measuring strips (marked and described as Movement Units – but the game retains the Spanish acronyms throughout, so UM instead of MU); artillery fields of fire are determined by template; and on each wooden block one affixes (in most instances) two labels on opposite sides (depicting a top-down view of the unit’s presentation – line, column, limbered or unlimbered. The graphics on the labels are unfussy – top-down views of infantry, cavalry or artillery in the relevant state, and the wooden blocks come in various sizes for each specific unit type. At first I was a little uncertain as to the look of the labels on their plain wood blocks, but actually, with everything deployed, the units look rather good on the mounted playing surface.
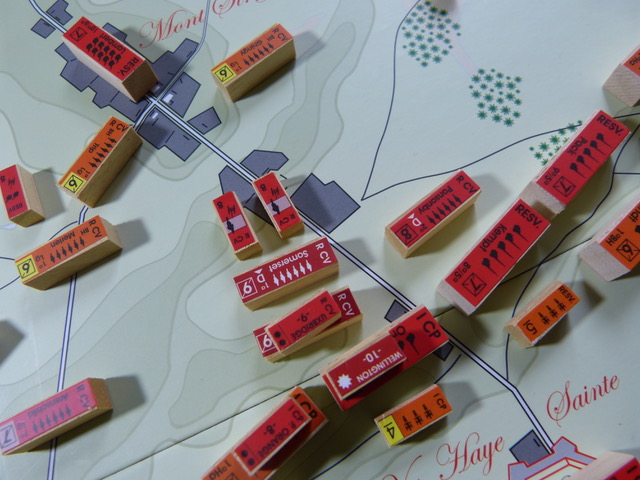
The mapboard design is equally unfussy, and has a look somewhat reminiscent of the Bowen Simmons’ designs – Bonaparte at Marengo and Napoleon’s Triumph. The difference is, of course, that this Waterloo map has no areas or anything of the like, and also comes in at a relatively modest size. Deployment is assisted by unit depictions on two period map reproductions; and one thing that is going to make Waterloo veterans feel just a little perturbed is the presence of Girard’s division as part of the French II Corps set-up. Historically, this unit never left the Ligny battlefield, having been “borrowed” to augment Vandamme’s forces during the fight on June 16th. During the action around Saint Amand, the division was badly depleted, and was then left at Ligny to help clear the field of wounded.
As to why Girard has turned up in this Waterloo game, the designer’s explanation was that it was done for balance; but, in truth, no one is going to compel you to employ it, and as there is nothing on the actual playing surface to denote its presence, you can completely forget it ever existed if that is your wish. And before I leave the look and the presence of things, I should also point out that a very small number of the French labels have incorrect information on them – two of the four cavalry units of Milhaud’s corps lack their cuirassier symbol, and there is also a small hiccup with the Subervie cavalry division just in terms of its precise designation. Finally, one of the control markers (for Hougoumont) has differing VP awards front and back, but as it is one of the major prizes on the map, it should not be difficult to tell which should apply.
The scale of the game is brigade, with artillery units depicting, at a guess, two or three batteries per unit block. Turns come in at an hour, though I am not convinced that is meant to be a hard and fast definition given that there are twelve full turns in the game, and Waterloo historically did not get underway until nearly noon. The game also comes with its various templates, two sets of player aid cards, as well as two sets of rules – one set in Spanish and one in English. There is also a sheet of information markers (mainly to denote things such as morale changes and casualties) and a small deck of cards, some of which denote the key aspects of the units’ fighting capabilities, while others offer a variety of random events and what-if’s that players can employ if they so wish.
Before looking at the system in detail, there is one other thing I should add about the blocks and the labels. This game system operates with three different sizes of rectangular block, and all but the largest (those for the infantry brigades) are really a bit on the small side, and in the case of the artillery and leaders, it is a definite trial fitting very small labels onto very small blocks. And these are not the sorts of labels you can continually lift and reset – I needed a glue stick after one or two wonky applications. And note, with these smaller blocks I did use a craft knife to trim a very slight bit of overhang here and there – labels being occasionally slightly larger than the blocks, but that is hardly anything like a major issue.
Now let us get to the essence of the system. The sequence of play contains no real surprises – phases of rally, artillery fire, unit movement, musket fire, bayonet assault and cavalry charge. Apart from formation status and current morale ceiling (plus any current morale or loss markers) a unit’s capability is largely defined by a series of values and modifiers tied to that unit’s present formation, casualty level and the kind of combat it may be engaged in. Playing the game effectively means understanding this information – the firepower thrown out by different formations belonging to different nations and contingents; the strength of charging cavalry in line; and the vulnerability of certain unit types to particular enemies – e.g. charging cavalry formed in line can be totally devastating…unless it is facing infantry in square, in which case it not only loses its combat bonuses (except for lancers) but also faces musketry coming in at a much augmented strength.

Units with superior morale can endure that much longer through surviving combat-related morale checks, but morale in itself is no protection against actual physical hurt – i.e. a step loss is a step loss as the musket balls and canister begins to rip home. Close range combat is nasty, and the lesson here pertains to how you organize your attacks. It is not good playing pitter-patter with major sections of the enemy line; if you are going in, go in with force, go in directly, and ideally with the capacity to launch a following blow.
What happens if you do not? In essence, the chances are that significant quantities of your attacking elements will be wrecked before they have closed with the enemy line. Ideally, you want a defending line stripped of functioning artillery before you close; and if you must close with artillery still capable of canister fire, you will need to finish the deal in one move, and have another force ready to take advantage. What you never want to do is dally around with a couple of units doing nothing whilst sitting in canister range – the chances are both will be wrecked by the spread of destruction before they ever get into the fight.
Infantry – What Not To Do With It?
And getting into the fight presents the greatest challenge for players to master, and can be illustrated by recreating the initial attack of D’Erlon’s I Corps within this design’s game world. As has been recorded in so many accounts over the years, much of D’Erlon’s infantry advanced in massive unwieldy columns – actually more a case of each division advancing in a series of three rank battalion lines, with the component battalions following one behind the other. In game terms, this is recreated by having both brigades of each division in line presentation (the block advancing via its longer front facing), and the two brigade blocks of the division arranged with the second brigade following immediately behind (touching) the first.
Sending four of those formations forward (eight blocks total) could look pretty stunning – and in the real battle, that was partly the intention. But then the actual history and the game neatly coincide in the simple fact that four infantry divisions so deployed are not going to fit too well into the assault area – the breakwaters/chokepoints, call them what you will, of La Haie Sainte on their left, and Papelotte/La Haie on their right hemming them in. Therefore, historical analysis suggests that both the outer divisions split their brigades, leaving Donzelot and Marcognet to advance in full and foolish effect. But room would still be tight given each brigade is deployed upon its longest facing, and one upshot of that is the complete lack of space for any cavalry to come forward in “assault” (line) formation. It also means that adverse combat effects can be “caught” by units not immediately in harm’s way – retreating units will collide with whatever is directly behind them, and eliminated units will prompt a series of morale checks in units that have been close enough to see everything going on.
adverse combat effects can be “caught” by units not immediately in harm’s way – retreating units will collide with whatever is directly behind them, and eliminated units will prompt a series of morale checks in units that have been close enough to see everything going on.
We can look at this in more detail, simply by extrapolating the relevant information from the various combat tables:
First, let us assume that Marcognet’s division, two blocks in line, one directly behind the other, avoids harm from Wellington’s artillery and crests the ridge directly facing Pack’s brigade, against which it intends to carry out a bayonet assault (the game term employed here). Pack, thus far undamaged in any game sense, gets to fire defensively into the lead French brigade. Looking at the British Infantry combat information, we see that Pack’s brigade, firing in line against a French line target, has a 5 fire strength (IMPORTANT: this figure – or any other such figure for any other unit – does not directly contribute to the die total, but may supply a modifier) with a +1 modifier for firing against a French line, and another +1 for being a British unit delivering the attack. To this modifier total of +2 (a 5 fire strength is a 0 modifier) will be added the result of 1d6.
In this case, Pack’s men really cannot miss – at the very least they will inflict a morale check. If the French unit fails, and more adversity then comes its way, the unit may retreat in rout…only it cannot because the second brigade is in the way. This will result in the first brigade being eliminated and the following brigade being disorganized and having to take a morale check.
And even if the target brigade remains at full strength, functional and on the field, its return fire will only be via a firepower of 2 (yielding a -1 initial modifier to the die), with a +1 for line firing on line. In this case, two of the six possible die totals (starting from a mighty 0), yield nothing against the defender, and the best possible result is a morale check with a -2 (adverse to the defender) modifier. If the issue then goes to the bayonet, it certainly is not impossible that Pack could be pushed back (having a mere +1 die modifier as opposed to the French 0), but the following French brigade is still about as useful as a chocolate fireguard, and if the Allied player has placed his units with foresight, it will be time to send the Union Brigade and/or Household brigades forward.

If in a full-on line charge, Ponsonby’s Greys will be +6 on the dice roll against a French +1, leaving the result in very little doubt at all. And note, the lead French brigade cannot form square in reaction to an oncoming charge because some fool put another brigade too close for it all to fit. And even if Ponsonby has to go in as an ad hoc column, his unit will still be +2 ahead before the die gets rolled.
And that, in a nutshell, is why the initial French attack was a dismal failure – no room for cavalry, no chance for following infantry brigades to do anything other than occupy space, and everything ready to topple the moment the first block fell down.
To do it differently in the game world entails making some use of the game version of an infantry column to optimize space (blocks advancing and facing on their shorter side), and thus giving Milhaud’s cuirassiers and some horse artillery a chance to work effectively by giving them room to deploy. Unfortunately, this process is somewhat hampered by a rule I think needs changing, and have discussed to some effect with the designer. As things stand, a full cavalry charge requires the unit in question to be deployed in line and have a line of sight to the target. To be blunt, there are going to be plenty of situations on this battlefield where cavalry will not be able to see a particular charge target, but some other friendly unit can see that same unit. I have suggested permitting a charge to go ahead in these circumstances, as it should be clear that coordinated cavalry attacks are going to be difficult enough to pull off without issues of what can see what getting in the way.
Artillery – The “Hard Pounding” and A Few Misfires
 The next phase of the battle, broadly speaking, was the rebuilding of the Grand Battery to soften Wellington’s line for that decisive blow by the heavy cavalry. By now, the original component batteries – or at least those that were still viable after the British cavalry got among them, were partnered by the batteries of the Imperial Guard, and with these Napoleon intended to blow a hole right in the middle of his opponent’s position.
When it comes to doing anything like this in the game, some of the rules do help with the process…but other rules, I think, rather get in the way. Part of the issue is that the designer, an incredibly nice chap by the name of Jose Luengo, wanted to keep the game accessible to as wide an audience as possible. The trouble is, that kind of approach can lead you to fall between two caissons, and I think that has happened in this instance. To come straight to the point, I think Wellington’s artillery can do too much, while the French artillery might get to do too little.
All artillery, if units are within ½ UM (that is half the length of one measuring strip) of the next in line, can concentrate fire against a given target. Obviously, there is a commonsense limit to how many units you would want to combine, as you would be indulging in wasteful overkill on the Fire Table. But I am dubious, because of doctrine and the simple lack of ammunition to many of Wellington’s batteries, as to giving his artillery this sort of capability in any measure. At the very least, I would prefer the Anglo-Allied combinations to be restricted to two units at most.
One other issue players may note is that artillery does not decrease in effectiveness as range increases. Yes, canister has a relatively short reach, but for solid shot, you have just as much chance of hitting your target at 1000 yards-plus as at 600. Furthermore, for most artillery, the chance of hitting is between 50% and 66%. However, providing you remember (and I did not to begin with!) that a unit’s fire strength is not part of the resolution save in terms of possibly providing a modifier, the actual products of fire seem reasonable enough.
One other thing I do want to include here are the workings of that old bugbear, line of sight. I have already mentioned this in the context of cavalry charges, but most players will always associate line of sight, understandably, with firing at distance. The actual rules for determining what you can see in this design are hardly difficult – perhaps they could do with a little elaboration here and there, but not that much. The thing is, like so many Waterloo games, there is a dubious immunity conferred on most things deployed on the north side of what we can call Wellington’s ridge. However, to be fair, in Waterloo: Napoleon’s Last Battle, there is at least a rule that tethers this immunity to a given distance (no more than 1 UM) from a crest contour. The thing is, and here I would cite many Waterloo games and not just this one, the French artillery spent a great amount of the afternoon and evening hurting targets they were not, by such game logic, able to see.[I] If it were all about seeing, why do no games ever account for the hundreds of yards of dense smoke between the bombarding guns and their targets? The thing is, Napoleon’s gunners knew how to hit what they could not properly see, including how to compensate for terrain. And it would be nice to see provision for this in designs. Perhaps in this game, bringing in a LOS hindrance modifier for ridges rather than an out and out prohibition on fire might be worthy of consideration.
The Cavalry
In many designs covering battles of this era, cavalry rules can get rather daunting. It is always done in the name of authenticity, but frankly, in at least some instances, they can be a struggle. Putting aside issues of line of sight to targets, in this Spanish design the mechanisms for sending cavalry hurtling towards its intended victims is simple, effective, and is so because much of the unfolding story is found in a set of tabulated modifiers.
Like infantry, cavalry can operate in either column or line. Columns will move faster, and will fit into much more confined spaces. But this comes at the cost of forsaking the charge modifiers that can make the mounted arm an absolute killer. To get an idea of this, we can take a look at the same unit going forward in the two different formations against the same rather indifferently functioning target:
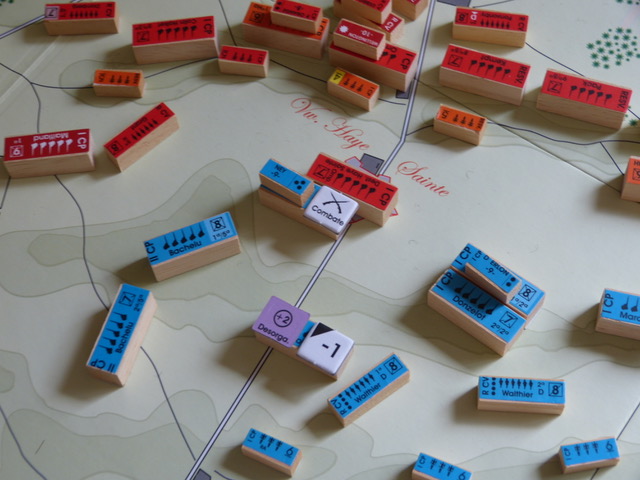
As bright spot among the pervading French calamity of Waterloo Round One, a fairly small force of cuirassiers caused havoc among elements of Alten’s division – who, ironically, given our past discussion, failed to see who was rumbling up until it was too late to do much about it. In game terms, they failed to form square as a reaction to an incoming charge.
To make the charge, the appropriate declaration is made prior to movement, and then with glittering breastplates, flashing sabres and bugles sounding, the French unit (in line) strikes the hapless troops of Kielmannsegge’s brigade. There is nothing especially “picky” about this process, you simply lay out sufficient UM’s (in a straight line – no twisty charges allowed) to reach the target (cavalry can move four of these, but after a while you may well not need them all the time as your eye starts to work with the game).
Relating history to the game world, the Hanoverian brigade on the receiving end attempts to form square (rolls a die with an adverse modifier against its own morale, fails, and then is stunned – “shaken” might have been the better term, but the game uses “stunned”). Being in this condition means the infantry cannot get any defensive fire in, so unless, by some quirk another unit can offer some fire, the cuirassiers will go in unimpeded.
Which means what?
In this form of combat, the attack rolls a die and adds applicable modifiers. The defender will only have its roll plus the unit’s inherent value for this kind of combat. In other words, the French unit will get +4 for being a charging cuirassier unit, another +1 or +2 depending on whether the target is dithering around in column or line, and another +1 for the dither (stun) itself – and then there will be the die roll. Note: the charge might lose one point of modifiers if it is downhill of the target, but that will depend on circumstances. Meanwhile, Kielmannsegge will have a grand total of +1 by way of modifiers (that is what Hanoverian units of the pertinent quality get). The difference between the two totals is assigned to the owner of the lower sum, and with the modifier disparity on view here, there is every chance the Hanoverians will be dislocated, disorganized, suffer a step loss…and then rout. Who knows when exactly they will ever be seen again?

But it is a different matter if charging cavalry suddenly find that their foe has managed to form square – and it is important to bear in mind that cavalry cannot initiate a charge against infantry already in square. If square occurs by reaction, and the chances improve the better the morale of the target, the cavalry (our cuirassiers) have two choices – pull up short, or ride around (in game terms, over) the target (essentially a cluster of squares), assuming that there is somewhere to roam on the over side. And cavalry does not want to get too close to squares, as their firepower is seriously augmented and the cavalry can become rapidly ruined.
The only units that can maintain the charge are lancers, because of their reach. Other cavalry units can still attack (i.e. without an actual charge) shorn of their modifiers; and this, in historical terms, goes a long way to explain how impotent much of the French cavalry was in the late afternoon, doing little of anything particularly useful, and getting in the way of the artillery that could have won the whole thing.
And please note: there is no counter charge mechanism in the game.
In my play thus far, I feel the game does confer a decent sense of needing to use forces in some semblance of combined arms, and to keep this simple, it largely rests upon using one arm to coerce the opponent to adopt a posture where another arm can really hurt it. But as I have already said, the battlefield is small, and it is difficult to find space on the direct routes because of…
The Outposts
Hougoumont, La Haie Sainte, Papelotte and La Haie were Wellington’s forward bastions, and in this game, for the French player, they are an absolute pain until taken. To a certain extent, however, we can dismiss the fight for Hougoumont, which became a drawn out “private” fight running contrary to what the French were supposedly trying to do.
Directly or indirectly, so much of the fight along the rest of Wellington’s line has some kind of relationship to the defence of La Haie Sainte. Thinking of the game and the system, taking the farmhouse on the Brussels Road will free up the French position in ways that taking the positions to the extreme left and right cannot do. And it is not as if the French cannot muster a strong force against the stronghold, but in intending to do so, given the proximity to Wellington’s main line, in addition to thinking about those issues of space and where to place any reserve, you are going to have to provide for the security of your forces to either side of the main assault. If you do try to take the farmhouse early, Wellington is still likely to have artillery posted in the vicinity, and if those advancing French forces are not carefully placed, and if the assault is not carefully timed, the contingents of L’Armée du Nord could pick up notable damage.
Each of these bastions operates primarily by conferring a defensive modifier upon its occupier – and the occupier is automatically given all round facing, taking the fire values of a square. The amount of terrain protection varies from location to location – Hougoumont supplies a -3 to incoming fire, La Haie Sainte a -2, and the eastern outposts -1. In practical terms this means that the first two positions are likely to reduce most fire results on the defender to morale checks or nothing. The Guards holding Hougoumont are an elite unit, and morale checks are not that likely to produce much of a crisis in the very short term – especially as any garrison is also protected by an immunity from retreats and not having to launch their own attacks in engaged situations.
Possession of any of these locations will contribute towards victory for either side, but first and foremost players should be thinking about these outposts in terms of the tactical outlook on the battlefield. Something that I experienced playing the game solitaire was a tendency, perhaps one might call it a necessity, for at least a few of the Anglo-Allied units to move south of the ridge line. The main prompts for this were a simple reaction to French efforts to take one or other of these outposts; or using the outposts, while still in Anglo-Allied hands, as cover for the preparation of some form of limited counterblow. This especially seemed the case with the two easternmost outposts, where the presence of several Allied cavalry brigades and, initially, the sheltered position of the Saxe-Weimar infantry brigade, can offer opportunities to attack an advanced flank of D’Erlon’s forces if the French have not made a suitable provision.
The Prussians
Issues surrounding the Prussian representation in the game are actually rather extensive, touching upon certain aspects of the design’s architecture, the subject of national distinctions, the way in which the game works with formation, and where just a little dash of extra colour shows itself.
As I have said in other articles, one major design aspect of many a Waterloo game is what to do about the fact that the French player not only knows that the Prussians are coming, but also where and when they will begin to arrive. It might vary just a little from game to game, but the reality is inescapable – unlike the Emperor, who was caught somewhere between blind faith and misplaced assumptions, anyone sitting on the French side of the board is going to aware of the time pressure the Prussian arrival puts him under, and will seek to make whatever preparation the rules allow him.
Precisely what is permitted will again be subject to variance between titles, from complete laissez-faire to formations frozen in place to prohibitions on entering certain eastern portions of the map. With Waterloo: Napoleon’s Last Battle the solution is to keep certain French corps frozen until particular game turns. This enforced inactivity is broadly in line with the historical first use of the same units, and it needs to be pointed out that not all the frozen units are those most likely to be used to ward the French right flank – such as the artillery of the Imperial Guard.
What certainly deserves more exploration than I was able to conduct before writing this piece is a more forward French defence, possibly employing an advanced screen of light skirmisher cavalry (Domon and Subervie) – units that have a skirmisher ability can move freely through woods, and cavalry has disengage advantages versus infantry. Just east of where the French actually formed to stave off the Prussian threat the map depicts the expanse of the Bois de Paris, and making some kind of stand in its defence-friendly confines is certainly worth consideration.
As for the Prussians, their portrayal in the game adds a few extra bits and pieces to the game’s portrayal of national characteristics. Up till now, the units I have referenced have been defined in character by a range of morale levels (and some of the Anglo-Allied contingents are definitely in better spirits than others); furthermore, combat qualities as found on the various data cards add finesse to precisely what any given type from any given contingent is capable of. However, in the case of the Prussians, the distinctions are broadened to include a significant drop in staying power after a step loss – most other units are -1 on morale after such a loss, whereas Prussian units use a -2 chit. But, as some compensation for the fact that much of this Prussian army is hastily formed Landwehr, the nearby presence of the revered Blücher will add a bonus that makes the presence of the “Old Father” rather useful close to the point of the main broil.
One last thing to add here is the compromise the game makes over issues of formation – and this is hardly something unique to this design. In the game, column is demonstrated by placing the unit on the appropriate side (I allow changes in facing, providing the unit’s “pivot” point remains the same). It will then move by its short front facing. Of course, this means that the game’s combat columns are too long (and narrow), whilst its march column (the same presentation mode) is too short. But games have let this go for years, and among the sole exceptions I can think of are the Napoleonic and Civil War Brigade Series, where you can get seriously long march columns on the map. Nevertheless, where it matters, in terms of freeing up maneuver room, fighting with a different and appropriate range of modifiers, and giving a benefit to units moving on roads, the column presentation works perfectly well.
Up Guards and Recule!
Both the French and the British have guards, both infantry and cavalry, though only the French have guard quality artillery. Guards are denoted by having their morale printed in white. One thing that these two national types have in common is that they do not suffer a morale penalty for taking a step loss.

The British and French infantry guard units are pretty much identical except the best French morale is 10 whereas the British measure as a 9. The French infantry guard units also are moderately superior in combat (melee) modifiers. However, the rival mounted contingents are just about the same in capability.
Where the two sides differ is in the French Garde Imperiale’s ability to inspire or dismay depending on who is seeing the bearskins bobbing close by. French Guard infantry boosts the morale level of French units within 1 UM by one point. It also forces morale checks and lowers inherent morale of enemy units it is facing – except on British units, who are not going to put up with any nonsense like that.
The bad news for the French, as it invariably is in games across the years, pertains to the fact that the bearskins have a tendency to force adversely modeled morale checks on their own units if ever they go back after first going forward. The way this works in the game could possibly cause units in the immediate locality (within 2UM) to lose a bit of heart, but it is not framed to cause a wholesale collapse (the modifier is too modest and there is no chain reaction). I would have preferred to see these penalties upped a bit; and when we get into the consideration of victory determination, the lack of an overall sense of army morale related to losses and events will be highlighted – after all, it always seems pretty much integral to Waterloo that Nappy could be meeting his…again. Yes, one moment you are the adored Emperor of a great European nation, and then one apparently inexplicable “recule” later, the “most generous” of your enemies has got you stuck on an island in the middle of the Atlantic, playing the doting uncle to an adolescent English girl and accidentally breaking the island’s one and only ice-maker.*
*(The girl in question was one Betsy Balcombe, who was to write of her friendship with Napoleon when she was a young girl. The ice-maker had come courtesy of a Professor Leslie, described by Andrew Roberts in Napoleon the Great as a pioneer of refrigeration. Betsy’s account is available as an e-book).
“My Victory is Certain”

No. Well, when is it ever?
Via the in-box rules victory is decided by several means, two of which are gaining more points by controlling key points on the map as the game ends, or destroying everything in the opponent’s army. The first of these is fair enough; the second does not do merit to the quality of the design and needs dispensing with.*
The designer did want to keep some things simple, but this is an error of judgment. Destroying a given amount of the enemy, or sliding an army morale marker down another notch when certain things happen was surely the way to go. I do not know if the designer and his team were “rushing for the line” when they formed this victory determinant, but it does not belong in this design nor any other since Avalon Hill got the Duchess of Richmond’s ball rolling back in 1962.
You can also win by “capturing” Wellington or the Corsican Ogre – no actual deaths here. The loss of Bonaparte, of course, is an entirely valid decider; Wellington I am not so sure about. At the very least, it might be fun to add a die roll if the Duke gets himself caught on the wrong side of the hedge – 1- 3 his army fights on, 4 – 6 it packs up. You could even refine this a bit more: the British and KGL units always hang around, the others (the ones coloured orange and green in this design – Dutch, Hanoverians, Brunwickers et al) have to roll.
*(See the remarks at the end of this article, where I refer to the recent formulation of some seriously improved victory conditions that will appear online).
“If I Had Not Been There”
Thankfully, leaders in this Waterloo design do rather more than those in the aforementioned antique – you know, those “Prime Directive” leaders, allowed to sort of be there in an unnoticeable way not touching or actually doing anything. The most useful function for the leaders is to improve the morale of the unit they are attached to, and more modestly to improve the morale of units very close by. The one value on these leader blocks is their morale, and in the case of a leader moving with a rather unremarkable force, it does make a difference. Ney for example, has a value of 9, which is a worthwhile improvement on the average value of the French infantry brigades, 7. Napoleon and Wellington are both rated 10, although you need to be careful with these two fellows for the reasons given in the last section.
Again, there are some refinements players may want to think about. Wellington will aid the defence most places you care to position him, because many of his units are a bit short of rugged on the morale side of things. Ironically, Napoleon historically stacked with his braves, will do no good there at all because men of absolute proven quality surround him. The trouble is, putting him elsewhere, and essentially turning him into a real man of action, does not sit well (and that was just one of his many problems that day) with what he actually did. Well, we can waive this aside and let him go forward at will, or get a little clever about it, making a few house rules about when he can get to do precisely what – like not letting the otherwise “released” Guard infantry move unless he is within a couple of UM’s of the units in question.
This might sound like I am sticking my oar into another person’s design, but what I am really wanting to stress is that this game has such a strong basic framework it will carry most extras that the experienced grognard might want add. In that context, it might not be strict history to permit Napoleon to wander all over the place and be first over the wall at La Haie Sainte, but it is also not correct to deem him so utterly lethargic he cannot do anything other than mope. At times during this brief campaign, Napoleon went into bouts of serious activity – leading 10,000 cavalry towards Quatre Bras in the early afternoon of June 17th – must have been one heck of a sight – and on the 18th, he was very close to Saint-Maurice, the Guard Artillery commander, when the poor chap was bifurcated by a cannon ball.
Other mechanisms for the commanders do appear in a set of optional rules, but these only work in multiplayer games, and are to do with a basic framework of issuing commands and reassigning units as the battle progresses. I did not use them so I cannot comment further. Hopefully, another reviewer will try them out with friends and report back.
Chances in Our Favour
Provided with the game but entirely optional is a deck of event cards, from which you can make a small random draw at game start. These provide a range of alternative history options or options based on character (like Wellington’s coolness under the stress of battle), but none are that fantastically adrift in historical purpose or overly pronounced in their effect.
Unfortunately, something that nearly got the game off on the wrong foot is the English wording on the cards, which is very bad. For some reason, it is way below the standard of the English in the rules, and often verges on the unintelligible.
However, the problem appears to have been addressed by including reworded text for each card on a separate sheet. It is still a pity that the cards now do not work unless you are, in a real sense, not looking at them, but the company does seem very keen to get errors dealt with, and they deserve credit for that.
The Wreckage of The Field
Here I will make a totally subjective comment – I do not like markers on my units. Many games totally depend on them, but personally, I would rather cut down a little on the detail just to keep my playing surface look as aesthetic as possible.

For me, there are a couple of issues with the markers in this game, but I must stress that plenty of readers may well think I have got this wrong.
1) The marriage between the blocks and the markers is not that great, and the blocks are probably better put next to units than on top of them. Furthermore, one feeling that grew in me as I played the game was that, ideally, the battlefield could do with being just a bit bigger, as with the dimensions both it and the units/markers work to, nudges and bumps are bound to happen – and trying to accommodate the markers just makes everything that bit more of a challenge.
2) The game works with a series of progressively deteriorating (or improving) morale states. They are perfectly logical in certain regards, but given that the mildest bad state, “Stunned,” really throws a seriously big spanner into the works of a unit’s function, I am not convinced another state is needed prior to descending into rout. For me, the one impaired state prior to rout is enough.
Of course, in an ideal world of unlimited budgets you could address such things easily, but a starter company needs a bit of leeway, and I must stress again that the markers and what they depict do work, but not in a way that really stresses finesse. Down the line, I would prefer to see the job of what markers the game really does need transferred to wood – disks, cubes etc. Two of Martin Wallace’s designs, on Waterloo and Gettysburg, both kept to the wooden way, and while their look did not appeal to everyone, I liked it, and especially liked the use of white wooden markers to denote fired (and thus revealed) artillery. Well, at the least, these are ideas for down the line. And, in all fairness, a mix of components works very nicely in the Bowen Simmons’ design, The Guns of Gettysburg, but the aesthetic is somewhat different there, and the designer’s previous two pieces of original brilliance managed to work without any cardboard ever showing itself – except for the box.
Conclusion

All told, whatever criticisms I have offered here and there, this is a worthy and interesting first design effort from this company. It is one of the positives of the hobby today that we have quite a number of European companies producing quality titles, and this game is one I genuinely enjoyed and will play again. What others will make of it will possibly depend on how such gamers feel about fighting a battle without hexagons, areas, and with a genuine sense of difference. For some, it will be an experience outside of their accustomed comfort zone, but there is nothing wrong with that if difference means more than simply change for change’s sake.
I hope I have highlighted both the stronger aspects of the game as well as a few points that need addressing. The designer, Jose Luengo, is very motivated to make this game work for people, and the service I had in regard to preparing this game was first rate. I was missing one block for my labels when preparing the game for play – the replacement was in the post by return.
One way to describe the game, at least for me, is as a product that required tinkering under the bonnet/hood, and a bit of a fine tune here and there. Actually, “required” might well be substituted in some areas with “invited,” for I do suspect that the experienced Napoleonics player will want to augment or adjust things here and there – and why not, as our world, including the miniatures part of it, thrives on house rules and player variants.
Finally, one thing to be stressed is that I am just one player who has worked with this game for just a couple of weeks before embarking on the ensuing article. And because this game does offer much that looks different and feels different to the norm, I would recommend any reader to seek out other opinions and views on the game before deciding if it is for them.
Important:
Since writing this article I have been directly involved in revising the English language rules for an online version. This has involved working on better English phrasing throughout, as well as making clarifications to particular rules, creating an improved range of victory conditions, and formulating some interesting advanced options.
Amongst other things beyond tidying the English, the use of Girard’s division is now optional, and comes with a penalty if it is deployed. Other “colour” items include restrictions on Wellington’s artillery and some interesting mechanisms for the entry of the Prussians.
These rules should be online soon.
About the Author

Paul has been involved in the hobby since the early 1970s. Of largely Belgian ancestry on his father’s side, and English (Yorkshire) on his mother’s, after finishing his education he worked in tourism and student services, and also spent some time in the former West Germany. He met his wife Boo in 1990, and they married a couple of years later.
Paul hails from a long line of former servicemen – one grandfather was a sergeant in the BEF of 1914, whilst two of his great grandfathers were killed serving with the Royal Navy. His own father, who was born in Britain, served with the army in Malaya in the early 1950s.
Related Articles:
Waterloo 200: A Board gaming Life Review
Small But Perfectly Formed – A Boardgamimg Life review of W1815
Umpiring the Empire-TheBoardGamingLife Player Aid for Le Vol De L’Aigle
Legion of Honor – A first look by TheBoardgamingLife
Several Ways with The Hundred Days
Waterloo – An Utter Waste of Time
Le Vol de L’Aigle – A Board Gaming Life After Action Report
Le Vol de L’Aigle (The Flight of the Eagle) Volume 3: A Board Game Review
Borodino 1812: Board Game Review
A Real-World Approach to Understanding the Attack Sequence

Hi Paul, no news about the Waterloo 1815 english updated rules You was talking about? Best, Paolo
Hello Paolo
I did indeed put an amended document together, which:
1) Clarified certain rules and improved the English.
2) Added some new rules and substantially changed the victory conditions.
I think the designer has been very busy putting the final touches to the company’s second game (on Trafalgar). Anyway, as I will be writing to him today on some other matters, I’ll ask about getting those rules posted.
Paul
Thanks Paul! Best, Paolo
A couple of comments on both an hour nteresting game and an outstanding and helpful review. They touch on two issues: artillery usage and “Static Line Fire.” The first addresses a substantive but easily corrected glitch in the game design, the second a more cosmetic design fix.
Artillery usage is directly connected to ground scale, which in this game is just a little over 400 yards to the inch. Examination of the artillery range fan reveals that artillery in the game can engage at ranges in excess of a mile and a half (2,400 yards plus), well beyond actual napoleonic artillery ranges, which were just under half a mile (880 yards) for light and medium guns, and just over that for Napoleon’s 12 pounders. This shortfall is exacerbated by line of sight rules that permit unobserved artillery fire against units behind intervening ridges. Unobserved fire by field artillery would not become possible until the introduction of artillery recoil mechanisms at the close of the nineteenth century.
The easy fix is to discard the large artillery range fan, and use the cannister range fan for regular artillery fire. At 2″ (about 800 yards), this is a good approximation of actual ranges. Cannister range should be about 1 UM (Unit Movement), or400 yards.
Hills should also obstruct all artillery fire, which is both historical and useful in game terms. It forces players to match historical deployment of batteries along ridge lines in order to effectively support advancing infantry formations. While anecdotes abound of artillery rounds passing over ridges to decapitate soldiers standing in ranks on the reverse slope, a careful examination of unit histories from the battle confirms that the actual impact of such random events on unit effectiveness was not significant.
Regarding static line fire, historians will point out, correctly, that the limitations of period flintlock muskets precluded the kind of ranged fire fights that the rules imply are occurring with static line fire. However, gameplay reveals that the system does an excellent job replicating the extended skirmishing that preceded infantry assaults. In fact, what the rules refer to as static line fire is probably the simplest and most elegant vehicle to emerge in game design, at this scale, for napoleonic skirmish combat.