
Borodino 1812 Review

Borodino was the climactic battle of Napoleon’s ill-fated invasion of Russia in 1812. Napoleon needed a decisive defeat of the Russian army in order to end the campaign quickly before the vastness of Russia absorbed his men and the harsh winter weather caused his army to wither.
His main force of 135,000 Frenchmen, already reduced by detachments, straggling, desertion and disease, was thrown against 150,000 Russian troops in a set piece frontal assault that remains the bloodiest day of fighting in the 19th century.
Although several fine operational and tactical simulations of this battle have been published in the past, they tend to be both intricate and time-consuming. None, to my mind, have the ease of play and elegance of design that allows players to conclude this large battle in just a few hours.
Components
The game comes in Columbia Games’ standard slipcover box in which all the components fit quite easily. The board is a beautifully rendered mounted map (preorders came with a mounted map but other copies come with the typical Columbia games cardboard) in which the battlefield is divided into areas each with a different stacking limit depending upon the predominant terrain. Rivers course through the field of battle and can be crossed via bridges. The terrain includes forests, swamps, towns, rivers, dams, bridges and the all-important redoubts. The map is aesthetically pleasing, yet extremely functional leaving no ambiguity about terrain types, movement restrictions and combat effects.

The rules are 10 pages long with 2 additional pages devoted to scenarios, game turn sequence and terrain effects charts. Columbia Games typically uses sidebars in the rules to explain certain design concepts or provide historical commentary. These sidebars often make interesting reading. The rules are very clear and concise, well-organized and relatively free of errata. They can be read and digested in less than 20 minutes. Once again the designers and developers did an excellent job.

For those not familiar with Columbia games products, units are represented by blocks that stand upright. There are 47 French blue blocks and 56 Russian green blocks. Labels with relevant unit information are applied to one face of the block and deployed oriented toward the owner while your opponent only sees its blank back. This allows for a certain amount of fog-of-war since players are never sure what units they will be facing nor the enemy’s exact strength. The labels have easily distinguishable symbols (crossed muskets for infantry, crossed canons for artillery, cross swords for cavalry) so that unit types are readily recognizable. Unit characteristics include the division and parent corps designation, the combat strength and an alphanumeric firepower rating. The labels must be applied to the blocks before play; however, this is not particularly difficult or time-consuming.
Order-of-battle cards are provided for each side and corps set up areas are depicted clearly on the map, making set up a breeze. Finally, 4 six sided dice are provided to resolve combat.

There are three scenarios provided. The first one centers on September 5, 1812, with French attempts to capture the Shevardino redoubt. It lasts seven turns and serves as a good introduction to the overall system since it is the quickest playing scenario. The second scenario is the battle of Borodino proper which occurred on September 7, 1812. This lasts for 15 turns and is quite a slugfest. The final scenario combines the two. Unit positions at the end of the 8 PM game turn of the Shevardino scenario become the starting positions for the September 7 scenario. The French get to deploy any units that have not yet arrived on September 5 while the Russians may relocate any 2 command headquarters and their attached units to any friendly area within Corps command range. Players then receive double their normal supply points to rebuild headquarters and forces as desired. Play commences on the 6 AM turn of September 7. This campaign scenario can result in some interesting dynamics as the starting positions for the Borodino scenario may end up quite different from the historical starting positions.
Sequence of play
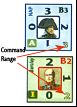
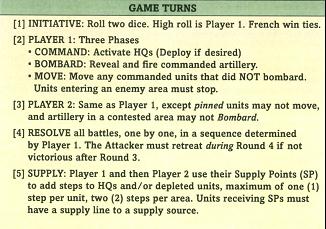
The game turn starts with the initiative phase where both players roll two 6 sided dice to determine who takes actions first. The French player always has the initiative on the first turn of every scenario and also wins tied initiative die rolls. After this, players move to the Action Phases. Each Action Phase consists of three Segments. The Command segment allows headquarters to activate units within their command range. Each Corps has a headquarters with the leader’s portrait depicted on the label. The headquarters have a certain number of steps and a command range. Every time they activate, they are reduced 1 step thereby limiting the number of activations unless they are augmented during the Supply Phase. The command range is the maximum distance in areas that friendly divisions of that Corps can be activated for movement, bombardment and combat. Napoleon and the three Russian Army headquarters can activate a number of units equal to their strength within their command range while Corps commanders activate any number of units within range as long as they are attached to their Corps.
The Command segment will be instantly recognizable to fans of Columbia games Eastfront, Westfront, Medfront and Eurofront series. It even has the same option to deploy one area when the headquarters activates.
The command structure and character of the armies gives Napoleon a significant advantage. The French have seven corps (and a detachment of Voltigeurs) and one Army HQ with high command ranges. This makes the French Army much more efficient since it usually requires fewer headquarter activations to move a large portion of the Army. The Russians, with13 Corps, have headquarters with significantly lower command ranges resulting in a less flexible Army.
Moreover, French divisions generally have higher combat strengths compared to their Russian counterparts resulting in a Russian army that is slightly more brittle. These advantages are offset a bit by the necessity of the French to be on the offensive against a Russian army that occupies favorable defensive terrain and can maneuver on interior lines.
After Command comes the Bombard segment. Any artillery under command of an active headquarters can bombard into adjacent areas. However their firepower is modified by different terrain types. For example, if an artillery unit occupies a clear area and is bombarding into a wooded area, it receives a -1 to its firepower. If it is bombarding from Woods to Woods, the firepower is reduced by 2. Artillery gains a positive modifier if bombarding downslope and a negative modifier if bombarding upslope. Swamp areas may not be the origin or target of bombardment. Interestingly, the designers felt that the redoubts did not give any defensive advantage to artillery bombardment and herein may lay one small flaw in the game (more on this later).

Following the Bombard segment is the Move segment. The player now moves friendly units that are within the command range of an active headquarters. Infantry and artillery units move one area while cavalry and horse artillery move 2. If the movement is solely along a road, units may move an additional space. Stacking in clear areas is generally 4 units for each army, with more restrictive terrain reducing the number of units that may be present. There are also limits to how many units can move across a given border to attack, reinforce, retreat or regroup. These Battle Limits apply only if friendly units are entering or retreating from enemy occupied areas.
Once all units within command range have moved, units outside of an activated headquarter’s command range can move but must make a Straggler Roll with a 50% chance of losing one step.
After all movement is complete, active headquarters are reduced one step and can complete a normal move.
Interestingly, players resolve their action phases before any battles occur. Therefore, the enemy can use his actions to reinforce areas that were entered by the first player’s move. However, enemy units occupying a friendly area pin an equal number of friendly units preventing their movement. I suspect this represents local infantry feints and cavalry demonstrations forcing units to deploy for battle rather than move. The tactic of pinning can become crucial when trying to inhibit enemy reinforcement of a battle. Players can use this to isolate crucial spaces in an effort to make a decisive attack against an enemy held area. It is one of the nuances of the system that makes it so much fun to play and such a challenge to master.
Battles
After both players have completed their actions, battles are fought between opposing units in the same area with the first player deciding the sequence. Each battle lasts 4 rounds and, if the defender has not cleared of the area by the third round, the attacker is obligated to retreat in round four. If player 1 has moved in units from more than one area, he can designate one group of units as the main attack and the second group as a Flanking Attack. The Flanking Attack units do not get to fire in the first round of combat (representing the time it takes to march around the enemy’s flank) but on subsequent rounds they fire with +1 to their firepower. Units of the defender that reinforce the battle in their action phase are placed in Reserve. They do not affect the battle until the second round of combat since they were not present at the beginning and will require time to stream onto the battlefield and deploy.

Player 2 may actually Flank and reinforce a battle. If reinforcements come from more than one area, one set of reinforcements will be designated as the Reserve and will not affect the battle until round two. The Flanking units will arrive in round three (since they are technically entering the area as reserve units and then require another round to execute the flanking maneuver) but will have the +1 firepower. If friendly units do not survive the first round of combat, Reserve and Flanking units enter in the subsequent rounds as usual but the roles of attacker and defender are reversed (which means they must clear the enemy area before the battle ends or they are obligated to retreat on the fourth round of combat). This can significantly affect the course of an area combat!
At the beginning of a combat round, each unit must decide whether it is going to fire or retreat. If they retreat they must obey the Retreat Limits for that area. If these limits would be exceeded than the unit may not retreat and must stay and fight.
The sequencing of unit fire depends upon the alphabetic part of their firepower rating. Units rated with an “A” firepower value fire before “B” value units. After all “B” firepower units fight then “C” units fire. If attacking and defending units both have the same letter firepower the defender fires first. Generally artillery units are “A” rated, cavalry units are “B” rated and infantry units are “C” rated. So, for example, a defending artillery unit (“A” rated) would fire before all other attacking artillery units. An attacking infantry unit would fire last since all “A” rated and “B” rated and defending “C” rated units would fire before it. The current combat round concludes when all units have had a chance to fire or retreat.
This combat system does not allow players to have this kind of flexibility.
Now I only make this a minor complaint because at the divisional level scale represented in the game, commanders were not necessarily directing what would be battalion or regimental sized tactical deployments. The designers’ attempt to include Napoleonic battlefield small unit tactics within the combat system should be applauded; however their solution is not ideal.
Units fire by rolling a number of dice equal to their combat strength with hits applied to the enemy for each roll equal to or less than the numeric part of the firepower rating. Hits are applied to the strongest unit in the area, except when enemy squares (more on this in a moment) are sheltering other units. Sheltered units must be targeted separately and the attacker’s firepower is slightly modified when targeting them.
At the start of each Battle round, units may Form Square or Break Square. There are no markers for this and the publishers ask that you simply use a coin to mark the units. A Square can shelter any non-infantry unit of equal or lesser strength. This unit then inherits all the benefits and disadvantages of being in Square. When units fight against the Square, cavalry, artillery and HQ’s must target the units in square or the other units being sheltered. Hits are allocated normally within each target group but surplus hits are not applied to the other group. Infantry in Square have their numeric firepower rating reduced by one and Militia in Square, who are already at a numeric rating of 1, simply roll one less combat die. Squares or sheltered units that want to retreat must make a Straggler Roll with a 50% chance for a loss. Cavalry or headquarters that target squares automatically have “B1” firepower and Cossacks roll one less die. When artillery targets a Square, its numeric firepower rating is increased by one representing the benefit of firing on a massed target.
Infantry units not in square have the option to declare a Bayonet Charge on their battle turn which increases their firepower by one, however die rolls of 6 cause self-inflicted hits. Russian units defending in redoubt areas have double defense requiring the French to inflict 2 hits to cause one step loss.
All of the above rules try to impart some feel of Napoleonic tactical combat in a game that is largely grand tactical in scope. Although imperfect, it does encourage use of combined arms and conveys some feel for lower-level Napoleonic tactics. It works smoothly in a system that is generally unfettered by minutiae. Therefore, as a Napoleonic Grognard, I happily accept this design for effect rather than bemoan its minor deficiencies.
If the attacker does not clear the area by round four of combat he must retreat rather than fire. Defending units get Pursuit Fire. Units fire normally except that pursuing cavalry add 1 to their firepower rating and Cossacks add 2. If a unit is forced to retreat into an over stack area it loses one step and must retreat to another legal area that is not over stacked or else face elimination.
The victor of the battle may Regroup his remaining units by moving them into any adjacent areas that are friendly or vacant. A Regroup move may not start a new battle or reinforce an existing one. Battle limits apply to units moving via Regroup.
The final phase of a turn, after all battles are resolved, is the Supply phase. Each player gets supply points from on-map supply centers they control. Unless the supply centers are enemy occupied, the French get 3 and the Russians get 4. These points can be used to add steps to a unit that is on or adjacent to a road that can trace back to a friendly supply source uninterrupted by enemy occupied areas. Decisions in the supply phase can be crucial to determining the outcome of the battle. One of the aspects I like is that players are faced with the dilemma of deciding between augmenting combat units and/or augmenting headquarters. If your headquarters are not resupplied, they will quickly lose the ability to activate after a few game turns, subjecting their un-commanded units to Straggler Rolls when they wish to move. Therefore, players must decide what the most decisive areas of the battlefield are and allocate their supply points accordingly. Moreover, both armies must protect their supply lines, as failure to do so will rapidly result in a depleted, inactive army!
Winning the Game
Victory points are accrued for holding redoubts and destroying enemy units. At the end of the last game turn of the scenario, the higher victory point total wins with the Russians winning ties. The redoubts are worth 2 victory points to the French and 1 to the Russians. Eliminated French units are worth 2 victory points to the Russians, while the French only receive 1 victory point for each eliminated Russian unit. However, headquarters, particularly the French and Napoleon himself, are worth quite a lot more, as are eliminated units of the French Imperial Guard and the Russian Guard.
General Thoughts on Tactics
In general, players must decide on a specific plan with all activations focused on achieving their objectives. Battles should not be fought if they do not further the objective, as combat tends to be bloody and rarely are there enough supply points to replace losses.
The Russians in particular, must use terrain to their advantage. The battlefield is crossed by significant water barriers so it is extremely important to hold bridges to hinder any French advance. Defensively, woods and swamps can ameliorate losses to enemy bombardments and attacks. In particular, the Russian army, unit for unit, has lower combat strengths and is more brittle. Therefore, players must become intimately familiar with how terrain affects stacking, bombardment and battles to minimize losses.
Artillery bombardment from adjacent areas should be used to soften up enemy held areas before you launch an attack. Remember that the attacker must clear the area by round three of combat or he is forced to retreat. If you can begin the process of eliminating the enemy with bombardment, it will make it easier for you to succeed in the subsequent combat. Additionally, weakening enemy units before allowing them to fire will reduce your potential losses.
When fighting a battle, players should utilize combined arms with a mixture of “A” (artillery), “B” (cavalry), “C” (infantry) units. Use the combat firing sequence to your advantage. Artillery units firing first allows you to weaken enemy units before they fire thereby reducing potential friendly losses. Likewise, cavalry can inflict losses on enemy infantry before those units get to fire. Although attacking or defending with all cavalry may seem appealing, infantry units can simply form square, making opposing cavalry ineffective. However, infantry may be loath to form square and present a massed target if enemy artillery is present. Cavalry is particularly useful during pursuit fire when an attacker must retreat because he has not cleared the area. Therefore, proper utilization of combined arms is of utmost importance.
General Thoughts on Strategy
The French have the burden of attack and start the first turn with the initiative. There are three possible routes of advance. Each has its own advantages and challenges, which is what makes this game so fascinating.
The northern approach requires Napoleon to send Eugene’s IV Corps across the bridges at Borodino and areas north. This will likely require support from Marshall Ney III Corps and perhaps Murat’s cavalry Corps. The advantages to this approach are that it avoids trying to tackle the Russian redoubts while attacking through relatively clear terrain. Unfortunately, this attack can stall when trying to cross the Kolocha River. It also tends to stretch the French Army, while the Russians are able to use their central position to quickly shift reinforcements northward. Therefore, this must be combined with an aggressive attack around the Great Redoubt or a very strong push by Poniatowski’s V Polish Corps to fix Russian forces further south. The French player must be careful not to stretch his lines to the point that a Russian counterattack launched from the vicinity of Borodino breaks his lines. The key to this approach is adequate support from Ney and Murat and a diversionary effort further south.

The central approach is the one chosen by Napoleon. He feared that anything short of a direct attack might allow the Russians to retreat and fight another day. Simply put, this central attack is a slugfest as the French are attacking directly into the teeth of the main Russian forces that are firmly ensconced in the redoubts. There has been much talk online of a strategy whereby the French simply use adjacent powerful artillery to bombard the Great Redoubt until it becomes untenable for Russian forces to survive there. Once captured, the French sit on the defensive forcing the Russians to counterattack. This strategy may be the inadvertent result of the designers’ decision to not give the redoubts any defensive advantage against bombardment. While this may be a viable strategy, we have found it does not assure a French victory. Russian counterattacks in other areas, although difficult, can cause enough French losses to balance the two victory points for capture of the redoubt. The Russians can also utilize several adjacent areas to bombard and counterattack the French once the redoubt has fallen essentially reversing the French tactic. As eliminated French units are worth twice as much as Russian units, the victory point advantage will go to the Russians.

No matter how you slice it, the attack on the Russian center will be a bloody slugfest and the French player must make proper use of Davout’s powerful I Corps aided by well-positioned Imperial Guard artillery bombardments. Once again, feints must be made to the North and/or South to try to draw off Russian units from the center. The problem is that although the French have somewhat higher quality units, the Russians have very defensible terrain and are more numerous. They can also replace their losses more quickly because of their higher resupply rate. This strategy is a real nail biter and needs expert handling of your troops with a dash of good luck to succeed. Nevertheless, it is quite fun to try.
The southern approach is my least favorite, although this was the one that was championed by Marshall Davout. He urged Napoleon to flank the Russians rather than try to beat them in a set piece frontal assault. The southern approach is problematical however. The terrain is very difficult with numerous areas containing swamps, woods and water obstacles. The terrain only gets denser as the French advance. Also, the French have their weakest units deployed in the south, so any attempt at a southern push would require several turns of marching centrally located units to the southern line of advance. Once again, this strategy tends to stretch the French line and allows the Russians to quickly reinforce any threatened sectors utilizing their central position. I have found that this strategy requires patience on the part of the French to allow it to develop. It can be successful as long as French forces pressure the Russians in other areas along the line.
A combination of a North and South approach is possible whereby Eugene, Ney and Murat assault along the northern axis and Poniatowski gets support from Junot and the Imperial Guard to tackle the southern approach. Davout will be left alone in the center, but usually has sufficient strength and quality to hold against anything but a determined Russian attack.

The Russian player must not sit back idly waiting for the French to attack. Remember that eliminated French units give you twice as many victory points as eliminated Russian units. Although your army is of slightly lesser quality, it is more numerous and is fighting in terrain of its own choosing. The defense of the redoubts is extremely important as it is likely to tie up a tremendous amount of French combat strength. Therefore, these should be defended until they become untenable. If the French player attempts a northern approach, the Russians can marshal units of the 2nd and 4th Corps to counterattack at the base of their northern pincer. This may cut them off from supply, allowing the French units to be ground down and eliminated.
If the French attack comes in the south, use 3rd Corps to screen and delay. Retreat to Utitski Kurgan to make your initial stand and then draw the French back into the swampy terrain further east. Make the best possible use of terrain and draw the French forward. Try to collect a counterattack force in the area of Semyomovskaya Heights that can threaten the left flank of the French advance.
In general, the Russians must make use of terrain and their central position to shift forces between threatened battle sectors. They should never give up the opportunity to eliminate a French unit or cut French units off from their supply. Out of supply units cannot be augmented in the supply phase, so they are more susceptible to being attrited and eliminated.
Summary
I must say that I quite enjoyed playing Borodino 1812. The game is a grand tactical puzzle that requires a well-conceived battle plan prior to commencement of the French onslaught. No matter which approach the French choose, the game will most assuredly be tense!
I like games that make you think. Borodino 1812 forces constant decision-making about how to commit your forces, which headquarters to activate, what areas of the battlefield require resupply, how aggressive the attack or the defense should be and in what manner to properly coordinate the use of the various combat arms to their maximum effect. Although Napoleonic small unit tactics are not simulated in great detail, the nuances of the combat firing sequence along with decisions regarding pinning enemy units, flanking forces, defensive reserves, bayonet charges, forming square and sheltering units provide quite a bit of Napoleonic flavor. Best of all, this is achieved with a mere 10 pages of rules utilizing a tried-and-true battle system that is greatly enhanced by its use of blocks to simulate the fog-of-war. If you are a Napoleonic fan and want to be able to fight a large Napoleonic battle in a single evening, this is the game for you!
Columbia Games has done a fantastic job with Borodino 1812 and I hope they continue to utilize this system for other iconic Napoleonic battles. Hats off to Tom Dagliesh and Carl Willner for producing such an excellent game.
