By Paul Comben
Designer: Adam Niechwiej
Publisher: Strategemata
During the October and November of 1944, the newly raised contingents of National Socialist Volkssturm gathered in halls and in city squares across Germany, collecting a variable mix of old rifles, foreign rifles, armbands and panzerfausts, swearing oaths and then parading with determined zeal for the benefit of the newsreel cameras. The largest assembly was in Berlin on November 12th, where, in a constant rain and under leaden skies, thousands of men in their civilian jackets or overcoats, and not a few with medals from the last world catastrophe proudly on display, marched past the stern-faced and saluting Joseph Goebbels. At the same time, two hundred miles to the southeast, many thousands more gathered in Breslau’s Schlossplatz, and were led past the spectating multitudes, mainly women, and boys, by their Gauleiter, Karl Hanke.
Such manifestations of the nation’s will were meant to create an air of imperturbable resolution and invincibility, and yet the Volkssturm’s performance over the coming months of crisis would often fall short of the desired ideal. Breslau, in many respects, was the exception. In Breslau Hitler had a fortress city that actually did what it was meant to do. Invested by Red Army forces following their advance across the Vistula in January 1945, Breslau then resisted enemy attacks for a longer period than the Soviet forces that had defended Stalingrad, and the city garrison was still fighting even as their Führer was putting an end to his life on April 30th.
In the pages of his diary, Goebbels would highlight the role of a dedicated party machine led by a determined Gauleiter for the city’s prolonged resistance. Certainly, those factors played a part, but they never were the whole story. Other factors can be found in other books; but then, if you want an actual working model of the siege, to get to the nub of the hows and whys, where else should you turn but to a bona fide military simulation of the event in question. So, is Festung Breslau such a game, and just who exactly is Strategemata?
Regarding the latter question, the best answer I can offer in the first instance is that they are another wee indication that the old adage about ours being an aging hobby and a shrinking hobby might need a bit of a rethink. This company is Polish, and the leading figure behind many of their designs, Adam Niechwiej, is decades away from being considered “old” and thus part of the balding and often portly ensemble that we often consider to be our hallmark. And on the quiet, the company he leads is just one of a considerable number of European companies that those in the English-speaking wargame world would do well to pay rather more attention to.
That I want to highlight this one particular Polish company, with due respect to the works of other designers across the same continent, is at least partly because of a memory I have of a letter that appeared in The General many years ago. This letter, belonging to a time when the Iron Curtain was still very much a reality, asked American readers for any help they might be able to offer in regard to getting wargames into Poland. Among the uncomfortable realities for Polish gamers in those days was the sheer difficulty in getting a club together in the first place, and then being able to access games that might be impounded for spurious reasons of ideological slant or unacceptable subject matter.
Today, thankfully, that wheel has turned considerably, and as a consequence, this company, along with other Polish games companies, is free to publish what it pleases. Perhaps understandably, not a small amount of its current line is rooted in battles and campaigns integral to Polish history. But Festung Breslau puts readers on more familiar ground as it addresses events from the final stages of the war on the Eastern Front, and for that reason, and because it also offers its own insight into the approach of its designer, this is the game I have chosen to highlight. Which leaves us with the one question left to answer: does it work?
First, let us sort through what is in the box. This is a game with a fairly modest footprint, and a game whose rules, in straightforward black and white and on nice sensible paper, are surprisingly short. The English translation is solidly competent – the best word or phrase is not always used, but nearly everything is clear and readily comprehensible. The booklet is just twelve pages long, and by the time you have omitted the front and back covers, the page of play examples and the historical briefing, the actual rules set is a mere seven pages.

As for the map, that depicts Breslau and its immediate surrounding areas as they were in early 1945. In addition to city blocks, outlying suburban areas and commercial/industrial locations are represented, as are areas of parkland, canals, rivers (the Oder), rail lines, the city airport (very important), the city’s larger cemeteries and victory point areas. Also represented are the initial Soviet concentration areas (essentially the entry hexes), and one should note that the map terrain can be modified to a limited extent (in fact it should be for the sake of competent play) by the Germans constructing a three hex auxiliary runway. Also on the map sheet are the turn track, and a small number of holding/status boxes where German units enter or leave garrison reserve, are committed to an abstracted struggle for the city’s northern approaches (linked to the possibility of the entry of the Soviet Second Polish Army), or are placed as losses awaiting rebuild.
Whilst the map graphics could not be called state-of-the-art, they are clear and bereft of ambiguities. The same is true of the turn events and combat-related tables, although ideally German and Soviet events would have been printed on separate sheets so that they could have served as a storage area for units scheduled to enter play at various points. It would also have been nice to have a somewhat expanded sequence of play put on a sheet somewhere, with handy prompts as to what precisely each phase consists of. That we do not see these things is, I am guessing, largely a matter of budget, and as most game functions become habit after a little experience, these are not matters to dwell on.
But whilst I am offering a little mild criticism, the unit counters err a little on the small side in my opinion. This is not desperately relevant once play is underway, as combat is mainly resolved by number of units, type of units (defined by icon), and modifiers that are either on the unit itself (as a clear enough single numerical value) or on the combat tables. Where it does become a little difficult is in set-up, where German hex positions are not too easy to read without good eyesight, or in my case, using a magnifying glass. Younger eyes may well have no problems, but my efforts at sorting reflected having to take that slightly longer looking at things. Furthermore, divisional integrity is important in the conducting of Soviet assaults, and after a while, I did find myself having to scan about here and there just to see what had wandered off where. It is not a big issue by any means, but slightly larger units would certainly have helped.
Now for the positives, and there are plenty.
For me, one outstanding aspect of this design is the way its author has modeled two rather different armies fighting over a large expanse of city. This was, of course, something John Hill sought to do in his Stalingrad design from 1980 – units from two forces that have much the same sort of information on them, but behave differently once they start moving and fighting on the game map. In a very deft way, I believe Adam Niechwiej has bedded both forces into the battle environment, creating a distinct character for each of them in a relatively brief set of rules. In play, the experience of commanding either the Soviets or the Germans will feel very different, and for reasons beyond the Soviets having this or that number of units or the Germans simply (one might erroneously assume) being outnumbered.
Something that will soon become painfully clear to the new Soviet player is that they are not exactly living out their own Breslau version of “Red Hordes Across the Oder.”
To understand how this works let us first go back to the map. In terms of movement, the city areas cost more for Red Army units to enter than German forces. Whatever Chuikov’s mob army did or did not do at Stalingrad, not too many of them (though certainly some), had actually lived there. By contrast, a very large number of German soldiers assigned to the Breslau garrison called the city their home – they knew the streets, the shortcuts, the feel of this city environment, and they were inventive in how they got around (tunnels and crossing basement to basement). Thus, at least in terms of being able to shift forces around outside of combat, the Germans could be seen to have a handy advantage – but more on this later.

Terrain works in relation to combat in two ways: it provides a defensive total that the attacker must equal or best to inflict hurt (units do not have defence factors or attack factors), and it also provides a terrain die modifier that can undermine (pardon the pun) that very effort. An assault by ground units of either side is thus a sum of the number of attacking units, any of their inherent modifiers, any modifier offered by the defending unit (usually for being disorganized), and then any modifier offered by the terrain. A die roll total, with these additions/subtractions, is then compared to the terrain value to see if anything happens – but note: a natural die roll of 1 aborts everything irrespective of what modifiers you have (something is deemed to have misfired in the operation, wrecking best-laid plans etc.). Amongst other things, this should also deter any inclination to get too gamey and start creating extravagant surefire “killer” combinations that cannot fail to remove something – for you can never be entirely certain that they will.
To progress things further, we must now bring the armies themselves into the equation, starting with the Soviets.
The Red Army
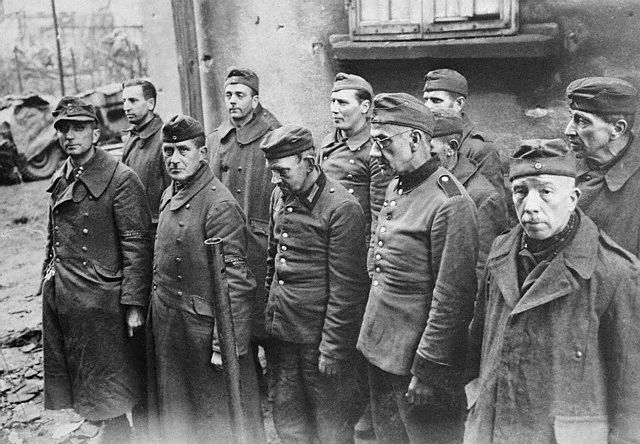
Something that will soon become painfully clear to the new Soviet player is that they are not exactly living out their own Breslau version of “Red Hordes Across the Oder.” To put it bluntly, you have not got a horde; in fact, looking at the initial state of things, it might look like the Germans have got rather more units…and that is because they have got more units. Putting aside a lot of last-gasp National Socialist propaganda involving the far too young or the far too old looking purposefully out from under a helmet that is far too big or rather too small, one cannot separate the ability of the garrison to hold on for so long from the fact that the Red Army had largely gone off elsewhere (Hitler mistakenly thought towards Prague) leaving a somewhat understrength force to take the city all by itself.

Thus, trying to get things done by crass infantry assaults is likely to end in failure – not enough infantry to waste, and not enough time to replace and relocate degraded forces. Your infantry may be able to regenerate if lost, but it takes time off the clock and can leave you in compromised positions. It is essential that the Soviet player understand that much depends on his/her artillery and airpower. The Red Army begins the game with quite a lot of artillery ready to deploy, and this is supplemented by a variable amount of airpower points. The two cannot be used in the same attack, but can be used separately against the same target. The trouble is, although the game gives you what looks like some plentiful assets, it usually takes a large amount of what you have in order to get any real likelihood of success.
What shelling and aerial attack do is disorganize the Germans before your infantry go in. This renders such an affected unit incapable of defensive fire against any Red Army unit moving into an adjacent position. In my expensive experience, defensive fire is one of the real torments the Soviets must either live with or deal with. The relevant terrain modifier does not affect such fire, as, of course, whoever is “moving in” is moving around and hardly in much of a position to carry their rubble around with them. Attempting to make such assaults unless you start in the right place (adjacent) and/or the opposition is still in a state of muddled shock is likely to be costly – and you really do not have that many units to spare. Defensive fire is triggered every time anything moves anywhere “next door” – the same unit can fire any number of times in the same phase providing the criteria are met: and so, if you want to chance your arm by sliding around a defending unit (there are no ZOCs) your unit could be fired at two or three times before it gets to where it is going…if it ever gets there.
One total no-no for the Soviets is shelling or bombing any target you cannot immediately get to or are not presently adjacent to, as these units will recover before there is any belated closing up, and therefore is an utter waste of time. More open to debate, at least in some circumstances, is using your planes and ordnance in penny packet attacks within areas of the map that are all reachable by whatever you have deployed on the ground. Possible advantages of this are that it avoids the Soviet telegraphing his/her intentions via massing a strike force in one particular part of the map; and then, as a bonus, if you get lucky and achieve a lot of German disorganization, you may give the enemy more woe than they can readily deal with.

Speaking of which, one other use of Soviet air points is to get after German supply. This is done by a simple allocation of points and a roll of the die on the right column. Depending on the game situation, this might be worth the effort, but as you need to employ at least five points to get a roll, and as you often have just six to nine points at most, you could consider reserving some kind of concerted supply-degrading effort for turn twelve, when there are some twenty air attack points for you to play with.
Of course, after the artillery and the bombers have done whatever they have done, you do have to go in on the ground. Soviet assault forces come in three different types – nondescript “line” infantry units belonging to this or that division; combat engineers (these are the blokes with the bonuses); and armour. Ideal combinations will involve infantry with armour support (+1 bonus to the roll); engineers with armour (a possible +3 for any one stack) and those average/line infantry with engineers (+1 or +2) – position this sort of thing up against a disorganized target and good things might well happen…unless you roll a 1. In case you are wondering, armour in this model does not suffer obviously detrimental modifiers for attacking or defending on its own in seriously demolished city centres…it just does not get any form of positive help in looking after itself.
Soviet units lost in battle return between one to three turns later (each turn is four days), which might not sound overly punitive in a game of twenty turns, but then the delay in getting them back into the fight can be made worse if they still have to come on at the map edge – possibly meaning two or three more turns of moving up before they can start moving in. This can be addressed by appropriate use of one other type of unit that it is easy to dismiss as a bit of an irrelevance.
Screening units are immobile “extras” that can be placed on the map during Soviet strategic movement – you remove infantry elements for redeployment later, and each such unit, up to the available counter mix, can be replaced at the same location by a screening unit. The obvious use of such units is to ward flanks and rear echelon areas, but the most important use is having these units act as forward staging areas for the arrival of new forces. To be honest, having at least some screening units in appropriate places nearer the front is pretty much essential given that you have barely enough forces and time as it is, so waiting the game equivalent of a fortnight or more for contingents to sort themselves out and progress through the urban jumble to where they need to be is not an option.

And speaking of available time and available forces, one decision that awaits the Soviet player as the game progresses past its halfway point is whether to deploy the Polish 2nd Army. Such a move will give you a lot more forces, but it comes at a cost – you need more VPs to win the game. Furthermore, the competent German player will have provided for this eventuality by ensuring that his/her northern battle box allocation has some viable quantity of units in it. Making the decision to bring in the Poles is all very well, but they will not become a presence on the actual map until they have “defeated” those units the German player has placed in the aforementioned box – a matter of getting a die result, with modifiers, that is sufficient to abstract a victory on this front and get the Poles into the battle proper. Basically, the more German units in this box (and can pay for with supply points) the harder it is to get the Poles their breakthrough.
Given that turn thirteen is when all this can happen, that turn twelve has all the extra Soviet airpower is worth remembering. Hit German supply then, as well as creating some issues elsewhere, and the Germans might not be willing or able to sustain a battle on their northern front to its fullest extent. Frankly, the permutations here can get a little complex, and go beyond this one article to pin down and quantify in any precise way. It is possible, I think, for the Germans to “invite” the Poles onto the map, and in doing so trust that they can still hold enough victory point areas, helped by the extra cushion of VPs needed should the Poles arrive, in order to win the game. Likewise, maybe the Soviet player should not mind German units heading into the relevant box, or should even encourage it by whatever means, as that is going to mean fewer units on what is still likely to be the main front in the south of the city.
The German Forces
On the face of it, things look pretty good for the garrison at game start – you have a lot of city that needs to be taken from you; you have a lot of units to defend that city with; you are in most of the best terrain already, and time is ticking on your opponent.
The forces defending Breslau are a mix of Volkssturm, a few SS battalions, some Hitler Youth, plus a small number of Wehrmacht formations and some incoming paratroopers. Some of these units (no two guesses which) can turn fanatical if unsuccessfully attacked, and adding to the mix are a variable quantity of Goliath mobile mines (basically the Nazi precursor to a cybermat) and on turn nine, if you still hold the relevant Reichsbahn hex, you get an armoured train.
Of course, we all know the problem with armoured trains – if the battle is somewhere beyond the buffers, the train is pretty useless. Unfortunately for the Germans, issues surrounding the combat mobility of your plated chuff-chuff also apply to everything else you command. In truth, the Germans have several problems to deal with as the game progresses, but paramount among them is a fundamental inability to co-ordinate any serious form of attack – too many raw troops; too little experienced military framework. In terms of the design model, this is expressed by the simple expedient of placing the German assault phase before their tactical movement phase. In other words, the Germans cannot pick their likeliest counterattack opportunities by a deliberate move into position – they can only assault what they are already next to, and that might be nothing more than the product of random chance.
The one consolation with this is that German forces seeking to make some kind of assault in any game turn will not have to endure defensive fire first – they might just have gone through that the turn before. This probably means that wherever the Germans can make attacks, they should press ahead, given that there is no real penalty for launching such an attack and failing.
Oddly, the situation for the Germans might improve in the latter stages of the game. With lines more compressed, the chances for the Germans to find something next to something else might increase, and if they do, the Goliath mini menaces could come into their own – providing you have at least a few left. Goliaths weigh in with a +2 modifier, and if the unit(s) they are supporting have anything by way of modifiers in themselves, you can inflict some serious damage.
Also lurking in the background waiting for their moment are those few German units marked with a yellow asterisk. These are your potential fanatics, and just to stop you wondering, these are the SS troops and the Hitler Jugend. If they do become fanatical, their assault modifier increases and their defence against assault also gains a modifier against the enemy total. Although, following the historical deployment option, the small number of SS battalions can seem stuck out on a limb, they are actually on a very important part of the map. Few areas of the city and its environs are more vital to German defence than the city airport (to the west, where the SS Regiment Besslein units deploy) and wherever you start building the emergency airstrip. Without these assets, your supply will drop to a trickle.

Building the emergency/auxiliary strip is essential in my opinion, but construction is also expensive in supply. Over the three turns it takes to establish, you will spend twelve supply points. However, assuming you build the thing over the first three turns of the game (only one of the three necessary airstrip markers can be placed in any turn), you potentially have seventeen turns with the completed strip bringing a +2 modifier to supply determination. In more detailed terms, this determination is a d6 roll, with a +3 for holding the main airport and +2 for the strip – the sum is divided by two and fractions rounded up. Assuming only very average die rolls over seventeen turns, the strip will pay for itself and go into surplus by the late game providing you hold onto it. But the real argument for building it is that it can be located right in the middle of the city, as far out of harm’s way as possible. By contrast, there is no guarantee that a competent Soviet player will not take the other airfield, SS or no SS, in which case if you have not built the auxiliary strip, you are in trouble.

Among the other assets the Germans can call on is a variable but limited amount of chemical weaponry – what that is precisely I shudder to think, and the Goliaths. Chemical stores can stop a Soviet assault in its tracks; the Goliaths are all about boosting German assaults if you can get them into position. The Goliaths are worth staying with for a moment longer, given that they got their own little feature in the Nazi newsreels, which naturally showed them avoiding malfunctions such as toppling over or having their controls cut, before dutifully blowing up precisely where they were meant to. In reality, they were a lot of bother to control, and this probably helps explain why chances to employ them in this game are going to be hard to come by. However, we can also read the following in Richard Hargreaves’ Hitler’s Final Fortress: Breslau 1945
“Hans von Ahlfen had monitored the Soviet engineers on the Weistritz. He had allowed them to throw a bridge across the river. Now he committed his secret weapon. He sent pioneer Leutnant Hans Kohne with three remote-controlled miniature tanks – Goliaths – each packed with a 165lb explosive charge…Kohne manoeuvred his Goliaths on to the bridge. When they reached the main span, the officer detonated them…two stretches of the bridge had been destroyed and one of its pillars had crashed into the Weistritz.”
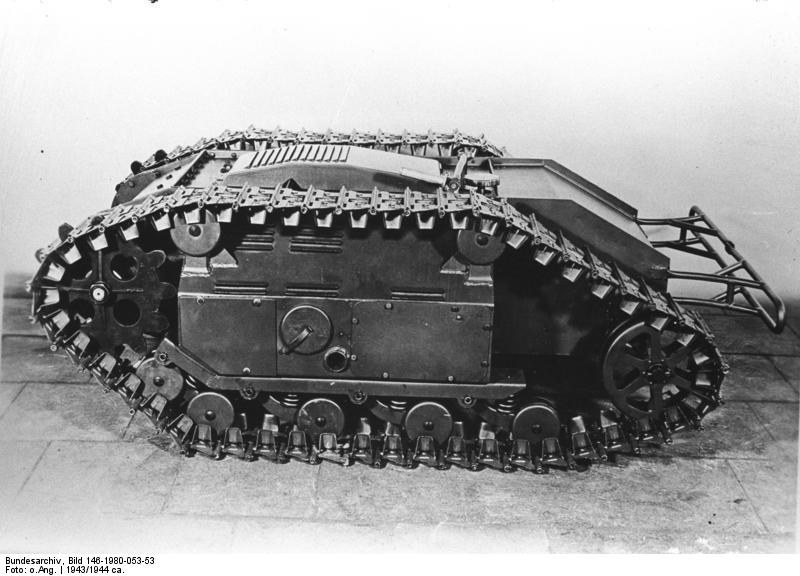
What this tells us in terms of the game is that the Goliaths did work in Breslau, and did work if the enemy came to the spot rather than them leading an attack. That they are present is a nice piece of colour and something for the Soviet player to be a little wary of.
Certainly one thing for the Germans to be wary of is their supply situation. Beyond building airstrips, there is the matter of resourcing the battle out of supply points that the Soviets should seek to keep you spending just to hold your own. Defending the northern suburbs from possible Polish 2nd Army attack will cost points, but in terms of regular and inevitable expenditure, you need to address the economy of getting fatigued (i.e. eliminated) units back into the game. Moving a unit from the fatigued box to the reserves box costs three supply, and as you may well average out at only four or five new points per turn, to add to whatever is already in the pool, your ability to revive units is limited. If the Soviets start knocking out three or more units per turn, lost units are soon going to get plenty of company.
Whether you plump for reviving everything you can each turn, or try to hold some kind of pool in reserve for a rainy day, is going to depend on how you interpret the on-map situation. Part of evaluating that situation correctly pertains to getting returning forces where you need to have them. Even in the early going, this can be a little tricky as deploying German units need to be placed at least eight hexes from the nearest Soviet unit. With a game scale of four hundred metres per hex, this means that new arrivals are going to have to be placed close to two miles from any enemy unit, and it hardly takes much reckoning to understand that if you dither about when to spend points and get stuff on the board, you may well run out of room to put forces anywhere.
Conclusion – Winning The Battle and The Game

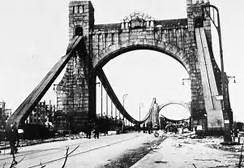
If we turn again to Richard Hargreaves’ account of the battle, his maps make it clear that the battle largely concentrated on Soviet efforts from the south, supplemented at a rather later time by thrusts from the west – though still south of the Oder. Thus, large parts of the city did not have any serious incursion directly pointed at them, and this, in turn, offers part of the explanation as to why the city held for so long. And even allowing for a sheer difference in scale, one still cannot help but compare a Berlin hit by two competing Soviet fronts all at the same time and from multiple directions, with a Breslau garrison that was largely able to fix on the one main threat.
Even as late as the first week in May, much of the central district of Breslau and nearly everything north of the Oder was still in German hands. Aiding this was the simple reality that the priorities of STAVKA had a different shape to them – Berlin was far more important than Breslau, the Polish army that had hovered around Breslau’s northern districts was diverted towards Dresden, and Konev, front commander, would eventually tell the Soviet 6th Army commander merely to contain the city’s garrison and let events develop elsewhere.

How does this sit with the game’s victory conditions? In the historical scenario, the Soviets must own 20 VPs worth of victory locations by game end – essentially, twenty of the hexes marked with a red outline. This number climbs to 25 if the Polish forces enter the map, or if you are playing with the free set-up alternative. South of the Oder, more or less in the path of the historical Soviet effort, there are sufficient locations to win the game either way – although such a victory rather implies that near everything south of the river has been taken. In the actual battle, this did not happen, and comparing campaign maps to the design map, it seems that the Soviets fell just short of winning in game terms. Of course, that hardly implies that the Germans in any broader sense have won anything – just that within the context of the game environment they have “done a job.”

I rather sense that good German play must involve an element of establishing a clear picture as to what they have to let go, what they must contest, and what they must hold onto at all costs. Thus, even if the garrison is reduced to a smashed remnant by the conclusion of turn twenty, providing the count of locations is in your favour, the job done has been well done. For the Soviet player, bringing in the Polish army is certainly not some distorted contrivance running against the grain of historical events. Game circumstances, if translated into an alternative historical flow, might well have seen Konev become more amenable to putting the Poles into the fight for Breslau, which of course, nearly happened anyway.
But for the player, there is again the need to read the map and the overall situation properly. Polish forces cannot directly assist the Russian forces in taking locations likely to be in the path of the main contingents of the Soviet 6th Army – quite apart from where they enter, they are likely to arrive late, and there will not be a lot of time to shift them around. Furthermore, if the German player has packed the northern city defence box with units, further delays may well occur, in which case the player must evaluate whether this game option is really worth the candle.
If the Poles are deployed, their first job must be to pick up the VP points cost their arrival had caused. Four of these points, if there is time enough, should be relatively easy to get, as four locations are on the city’s somewhat vulnerable northern limits. The fifth and any others will be harder to get without good and well thought-out play. Several likely candidates are either a fair march away, or else are located on the wrong side of the waterways that branch off north of the Oder. Simply make the best moves and artillery/assault combinations you can and trust you can get ahead of the clock.
And just if there is any doubt, yes I did enjoy this design – very much. I thought it presented a very accomplished rendering of the situation, and like not a few of the European wargames I own, it gets a lot done with a relatively short rule set. In other words, well worth a look.
About the Author

Paul has been involved in the hobby since the early 1970s. Of largely Belgian ancestry on his father’s side, and English (Yorkshire) on his mother’s, after finishing his education he worked in tourism and student services, and also spent some time in the former West Germany. He met his wife Boo in 1990, and they married a couple of years later.
Paul hails from a long line of former servicemen – one grandfather was a sergeant in the BEF of 1914, whilst two of his great grandfathers were killed serving with the Royal Navy. His own father, who was born in Britain, served with the army in Malaya in the early 1950s.
Related Articles:
Production Blocks: East Front II – A Boardgaming Life Reviev
