by Paul Comben
Designer: Denis Sauvage
Publisher: Golden Games, Shakos
Napoleon’s 1806 campaign in Prussia was one of those occasional examples in military history where two culturally similar nations, armed with much the same sort of weaponry, and this in the hands of more of less similar numbers of men, managed to produce entirely different results. To be blunt, from beginning to end, this campaign really wasn’t close. One tempting comparison (involving much the same combatants, broadly speaking) was the German offensive against France in the spring of 1940. One side (no two guesses which) had the modern method to match the modern weapons, and a daring plan to match the method and the weapons. The other side (narrowed down to a choice of precisely one) thought they were still fighting their last war, and thus had no relevant method, no daring plan, and not that many commanders who would have looked out of place posing for one of Mister Fenton’s photographic portraits in the Crimea.
It was largely the same story in 1806 – just with the roles reversed. Napoleon was the modern military thinker with an army nearing peak performance. By contrast, Prussian leadership was obsessed with the doctrines of Frederick the Great (in 1806, the best part of half-a-century past their best) and the higher tiers of its automaton army were thoroughly overpopulated with aged fossils with no inclination to think or fight other than how it had all been done decades earlier.
This is the setting for Golden Bell Games and Shakos initial offering in the field of operational Napoleonic warfare. And while the actual campaign may have been seriously one-sided, the Prussians did and do have here a number of spanners they can throw in the Napoleonic workings. It is to be hoped that players will savor the challenge of eking out a victory for a Prussian army whose fire-eating Blücher isn’t the oldest thing in it.
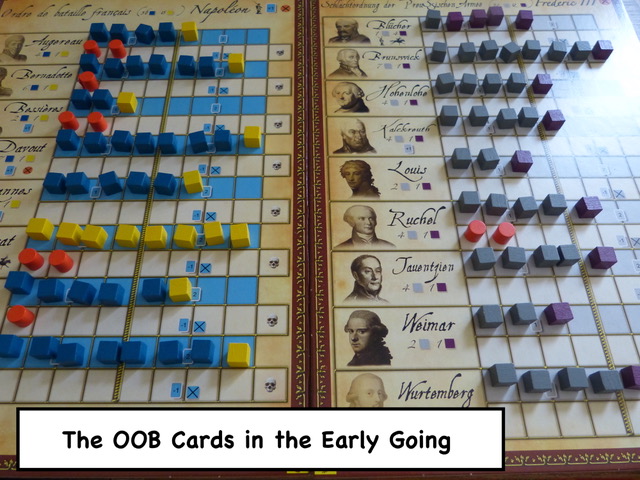
While this design, to my eye, offers the occasional mild suggestion of a concept hailing from a range of other models, ultimately it is very much set within its own identity. The components, as one often sees in European designs (this one hails from France) are first rate, with a pleasing aesthetic running through the entire inventory. The game works at corps level, with the current strength and fatigue levels of individual corps depicted via an assortment of wooden cubes (strength) and cylinders (fatigue) placed on the off-board tracks assigned to each corps. There is a distinction between infantry and cavalry strength (different colored cubes whose relevance kicks in during combat), while one might assume that artillery is factored into the range of combat results as well as some events that can come into play.
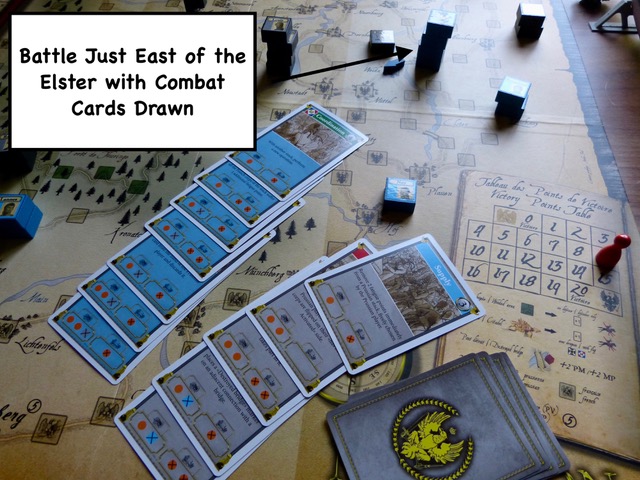
At the absolute heart of the game are the two decks of cards (one deck per player) that both drive a whole range of campaign mechanisms as well as influencing a player’s decision-making. Every card in the game has the potential to be used in one of several ways, and while the process is very straightforward once you are in the swing of things, given the amount of work that has clearly gone into these decks as well as any cursory description leaving readers with only half the information they might prefer to have, I want to take a bit of time here to describe the card layouts in some detail.
Cards can operate in the game one of two ways – they are either played from the player’s hand at some point after they have been drawn into that hand, or else they work as the resolution mechanism to determine turn initiative, movement ability and diverse combat effects as they are drawn from their respective decks. This latter process, certainly for combat, has a slight feeling of the old Up Front means of combat resolution, in that multiple cards will often be drawn to determine results.
Now for what is on the cards:
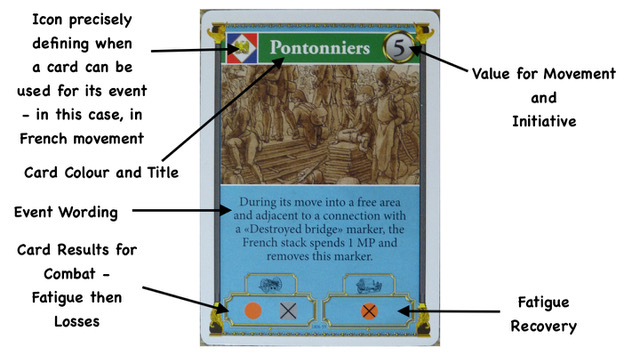
First, every card is color-coded to indicate when its event can be played – events here are typical CDG stuff, pertaining mainly to a range of fairly generic campaign episodes. Cards with a red title bar are immediate mandatory events if they are drawn from the deck in the turn’s opening draw phase. These events (like a rain event or an army being sluggish) are capable of setting a tone for that turn. However, if both sides draw a red card, or if a player draws two in the same action (somewhat unlikely as there are only a few of these and the draw is three cards each), the events all cancel out and the cards go into the discards for reshuffling once the active deck for one or other player is exhausted.
Blue title bars (again, few of these) can be played for their events in the initiative phase – once more, this is potentially something of a tone setter, although the cards are more to do with helping one side (like recovering losses or gaining reinforcements). Finally, the majority of the cards have green title bars, meaning they are to be played for their event at some point in the multi-step process of corps’ operations. Precisely when a card is eligible is defined by one of a range of icons printed on the cards’ top left corner. Broadly speaking, some affect movement positively or adversely for one or other side; others pertain directly to a combat process; and others still apply to the immediate aftermath of a combat and can influence the processes of retreat and possible pursuit.
All of the above is applicable for cards played from the hand; for blind draws from the deck there are three further information areas on each card. A number printed top right is used for both initiative determination (first player for the turn – French player wins ties) as well as the raw movement rate of an individual corps or a stack of corps in the same location – corps are represented on the mounted map board by blocks, with an eligible for activation (portrait) side and a finished side. A little more finesse and fog of war is introduced to the block handling if playing with the advanced options.
At the bottom of all the cards are two small, enclosed areas – the one on the left is for combat results, with enemy losses and fatigue “hits” being depicted by the relevant icon. The box to its right is the main determinant of fatigue recovery for the corps being drawn for in the final phase of the turn. In combat itself, each corps with a strength of five or more (each cube represents c. 2500-3500 men) will draw two such cards in most circumstances; weaker corps or those rife with fatigue will draw only one…or none at all. Thus, an army with five corps in decent strength and good condition will draw ten cards for a battle it is involved in, along with any other card draw bonuses for quality corps commanders or the presence of Bonaparte himself.
At this stage readers may wonder how the inherent superiority of French arms is depicted in the design? The answer is largely built into the cards:
1) The French have better combat results on their cards – card for card, they will hit harder than the Prussians.
2) The movement rate distribution is again rather better for the French than the Prussians.
3) French recovery from fatigue is likely to be quicker.
4) The French get bonuses from Napoleon (he moves the stack he is with that bit quicker; adds an extra card for combat, and can make a slight reduction in fatigue whilst on the march). Corps commanders like Davout, Soult and Murat also bring certain similar advantages, but to their own corps only.


If the cards drive the game, we can ask to what precise purpose? Essentially, this is a design built around the challenge of corps maneuver, wrong footing the enemy, stealing a march here and there, and then bringing your army together in one brutal fist at precisely the right moment to deliver the knockout blow. Trying to go around with a fist all the time is not a good idea at all, and the system has ways of punishing you should you dare to try. For a start, for every corps in excess of one that moves as a combined force/stack, the overall movement allowance is reduced by one – two corps lose one point, three corps two points, and so on. Secondly, if the opposing player has a nasty card with nasty effects it can visit on an enemy stack, several corps can end up being compromised by the same card play. Finally, with too much on the same road, you run the risk of being sidled around and left with some key objective in your rear being grabbed at a very inconvenient moment.
So, to maximize movement and flexibility your want to move as individual corps – providing you still watch out for pushing too hard and piling on the fatigue, and providing you do not push a single corps too close to where anything like an army can make a play at it. Fatigue is something you ignore at your peril. Each corps has a fatigue track with eight spaces on it. At a fatigue level of one to four, there are no adverse effects, but once higher than four, the corps will lose a card in combat (all benefits and penalties for strength and fatigue thresholds are noted clearly on each corps’ tracks). Furthermore, if the fatigue track is ever filled past capacity, the corps disintegrates under the weight of its own exhaustion and logistical breakdown – not a good thing. What makes this all a matter for astute management is that a corps can go from relatively moderate fatigue to near dissolution rather swiftly – combat, even for the victor and even for the French, can pile on the fatigue cylinders and leave a corps or a collection of corps as a likely victim of even a modest force that can make a subsequent attack.
That we are dealing with a game that offers a serious depth and challenge in play can be seen by the sort of considerations that good army management is likely to demand. One notable challenge is how to complete the approach to battle, as even Old Prussia’s very old men are likely to stomp all over anything that marches singly into their midst. This in turn also raises some interesting aspects of hand management. At this very early point in the game’s life, I would tentatively suggest that good play implies recognizing that you are going to have to fight at least one major battle in the course of the campaign, and therefore it is a very good idea to have some useful cards stored in your hand over several turns waiting for the moment when they become relevant. Whether you can resist the temptation to play a card for some fleeting advantage at an earlier point, or whether you recognize some earlier point as gifting more opportunities than first it might seem, is likely to be something players will evolve their own philosophies about.
But in general terms, as you do not want to go into a potential battle location bit by bit – in case one or other of your bits gets blown to bits – having a card that can help you shift that bit more (like Force March) is going to be a real boon at this point. Likewise, nothing is likely to be as important as the battle that wrecks one or other of the armies, so you may wish to hold onto a card that adds to your combat effectiveness or gives you the prospect of a more debilitating pursuit. One other possibility knocking around in my early thoughts actually involves daring to send a corps forward to make the initial battle contact, confident that you still have plenty of whack in your main body and a couple of decent cards in your hand.
But why would you do this? The answer lies in the fact that a corps moving into a location occupied by what we can call an army does not automatically trigger combat. What is called a moving attack can trigger battle from that presently active side, and these can be useful at the right time. Otherwise, combat begins with a force that is already in the location and is eligible to be activated (right side up) deciding to offer battle. So, if a French corps moves into a location occupied by some substantial portion of the Prussian army, and does not declare a moving attack, the Prussian corps that are still eligible can use a subsequent operations phase to start the battle. This might sound like bad news for the French, but if the Prussian player overreacts and blasts away with everything, the rest of the nearby French force can then get into the location (en masse with the right movement card or corps by corps) with no likely danger of an immediate response – all the Prussians will be on their sleepy side.
And it might just be the case that you have the card representing the game’s take on marching to the sound of the guns, in which case, depending on how you assess the situation, you can shift one more corps into the same location as the first corps you put in and give your foe a surprise. There is also a “Reaction” card, which does not actually permit entering an enemy occupied area, but does permit a potential “army” move into an area closer to the action and therefore makes it easier to enter battle en masse the next time around.
This is not the end of the permutations by any means. If all or very nearly all the forces belonging to an enemy army have already activated prior to your shift, you can move in singly or in small groups without much risk. You might even consider biding your time waiting for a bigger movement card to appear, but this is tricky, as to remain active in the turn you will have to use and deactivate something somewhere, and there are not that many corps to work through.
I will offer an example of actual combat modeling a little later, but now I want to talk about the overall feel of the game and how the process of winning and losing is worked out. On a map that operates via locations on a network of roads, four particular locations are key – they are each worth a clutch of victory points and the French need most of them to win. These locations are: Bamberg (linked to what we may presume is the French LOC and therefore worth five points); Erfurt, worth four points; and then Leipzig and Halle that are each worth three points. At the beginning of the campaign game the Prussians control all but Bamberg, and to be blunt, the French better not lose it or “c’est fini, mon brave.”
One small thing to watch out for is that the map script does make the Leizpig and Halle “3” look very much like the Bamburg “5,” although the rules themselves list the values very clearly. The points tracker is essentially a tug-of-war between the two sides – French points gained for inflicting casualties and capturing locations pull the present total down towards zero; Prussian points for inflicting casualties and holding onto three of the four key locations nudge the total towards twenty – you get one point per turn as the Prussian for keeping possession, and both sides get one point per casualty. If the tracker hits zero before the end of the game, the French win; if the tracker is anywhere else at game end, the Prussians win – and they also win automatically if the marker hits twenty or if Napoleon is left alone (and possibly dead) in a battle/enemy occupied location.
All this strongly suggests a Prussian strategy of delay and self-preservation. The French do not have that much time to achieve their goals, and the Prussians probably do not need to offer a major battle unless they really have to. However, if anyone is thinking that the Prussians should merely hunker down around Leipzig and Halle and try to spin out time, there are issues with that. If the French are allowed to move unimpeded by anything other than a bit of bad weather right up to where the Prussians are set, they will demolish the Prussians more often than not, and that with enough time to work the numbers to a victory. Besides, the Prussian army is not being led by some version of Guderian in a powdered toupée, and thus getting to places ahead of the French is sometimes easier said than done.
Having said that, the game does provide some facility to impede the French onslaught – in addition to weather and some cards that stall French movement by various means linked to lapses in command, there are cards that permit the Prussians to blow bridges – although there is also a card-driven chance the French may rebuild. Getting a bridge demolition card and then destroying the right bridge at the right time is a bit of a skill. For a start, you need to have something next to the bridge, and you had better make sure that you do want the bridge wrecked as I am certain many of us have got stuck on the wrong side of woe in whatever game by being too keen with the demolition order.
So, until battle is joined, this is a game about the pace of maneuver, the direction and weight of maneuver, and the management of fatigue – all simply rendered, but with a definite air of realism. Then again, we all like a battle, so what kind of battle does the game offer us? Let’s say five French corps, including Murat’s cavalry corps, tackle five Prussian corps (including Blücher’s almost entirely cavalry formation) in clear terrain near Leipzig. The full list of corps we have slugging it out in our representative battle is as follows:
French Army
Soult: 7 Inf, 1 Cav +1 Fatigue
Bessières (The Guard): 2 Inf, 1 Cav + 0 Fatigue
Ney: 4 Inf (inc. 1 loss), 1 Cav + 2 Fatigue
Murat: 8 Cav + 0 Fatigue
Davout: 7 inf, 1 Cav + 0 Fatigue
There is also play of the “Guard” card (Bessières Corps must be present), adding one extra card albeit at the risk of adding extra fatigue if the French lose the battle. Napoleon leads the army.
Prussian Army
Blücher: 1 Inf, 4 Cav + 2 Fatigue
Brunswick: 6 Inf (inc. 1 loss), 1 Cav + 4 Fatigue
Louis: 2 Inf, 1 Cav + 5 Fatigue
Hohenhole: 4 Inf, 1 Cav + 0 Fatigue
Wurtemberg: 4 Inf, 1 Cav + 2 Fatigue
Also in play is the “Charge” card (Blücher required), adding one extra card for combat at the cost of putting two extra fatigue points on Blücher’s command. Feckless Fred is also in attendance – a bit like saying Alan Partridge is doing another boat commercial.
All the French corps are at or very near their starting strength, and none have any notable level of fatigue (not an unusual circumstance). This means the French player will draw thirteen cards for combat – this is owing to individual corps strength, certain quality corps commanders, the Guard card and Napoleon.
The Prussians draw nine cards – same calculation process as with the French, save I have ungallantly given Louis’ tiny little corps enough fatigue to negate its card draw altogether.
So, drawing thirteen French cards…
They hurt the Prussians to the extent of seven casualty points and twenty fatigue points. Ouch! Casualties and fatigue have to be shared out as equally as possible, meaning a couple of the Prussian corps are going to take two hits, and the rest one. The fatigue is going to work out at four points apiece, which is going to cause Louis to fall away to nothing and other Prussian corps in need of a sit down and some oxygen.
The Prussians, via their nine cards, inflict just two casualties and eight fatigue. So they have catastrophically lost, and must retreat the difference between the two casualty figures. And having lost, and because the French have more cavalry (causing pursuit), and because Murat (having an extra pursuit ability) is now in his pursuit element, the French also get to draw two more cards to inflict yet more fatigue points. This draw adds two more points, and when all is over, and with further casualties awaiting for corps whose fatigue is five or more come the recovery phase, the Prussian army is essentially a complete wreck with Blücher most likely off his horse and everyone else of consequence right off their trolley.
Had the French entered the Prussian army location making a Movement Attack – i.e. attacking at once, coming in “hastily” off the march – they would lose a combat resolution card (though in a case like this, it would hardly make that much of a difference). Note, if the French were indeed to have made this a moving attack, coming in from, say, two locations away, they would have needed to draw (without something like a Force March card to call on) a movement card with a value of at least five – four of those five points lost for moving five corps, but plus one point for Napoleon (who grants a movement bonus), making the two necessary.

Not every battle of size will go like this, but such a case rather makes the point – big battles are likely to have big consequences, so fight one at your peril…especially if your army is being led by the sort of walking dead no one really feels the need to fear that much.
And it is all rather splendid. I am, as at least some of you will be aware, a fan of much of Kevin Zucker’s work in the Napoleonic field. But where Kevin’s work offers you the detailed rendering of theme and scene, this is an impressionistic splash of quality, capable of being taught to a reasonably experienced gamer in five minutes, and readily serviceable as an entry-level game for novices and youngsters that are ready for the smaller pieces – perhaps under genial supervision. The range of attractive components will help in that latter regard, and if you do want a little more, there are rules in the later sections that, amongst other things, increase the fog (including going to a form of free set-up) and also introduce vedettes as a tool to blow some of that fog away.
This is where I have my one and only issue with the game – overall it is a great new system; the rules are pretty clear and the quality of English usage will not leaving you wondering what precisely was meant at any point. But I do not like the vedette rules. They work, but I just feel they lack subtlety. In a nutshell, vedettes (represented on their own blocks) must sacrifice themselves to peer into a location, and opposing vedettes in the same location will mutually annihilate. For me, this misses all sorts of opportunities in terms of how vedettes could augment the model – screening, raiding, scouting etc. – and maybe down the line there might be a rethink, as more such campaign games are in the pipeline. But what I should stress for now is that my issues with the vedettes are not a major problem. The game plays incredibly well in its more basic form (which, in terms of feel, is not that basic at all), and I am only one person with one particular view and others might feel differently.
To conclude, this is a very fine piece of design. If you want a game you can learn quickly, with quality components, some clever nuances, and that presents a valid treatment of its subject, this is well worth considering. I thoroughly enjoyed it.
A Few Salient Game Points and Characteristics:
There is some stickering to be done, but not very much as both sides only have a handful of blocks.
Dedicated dice are included if you do not want to randomize via card draw.
The player-sides of the game screens are full of handy information.
Despite the screens and the later fog-of-war provisions, my personal opinion is that the game is perfectly enjoyable solo.
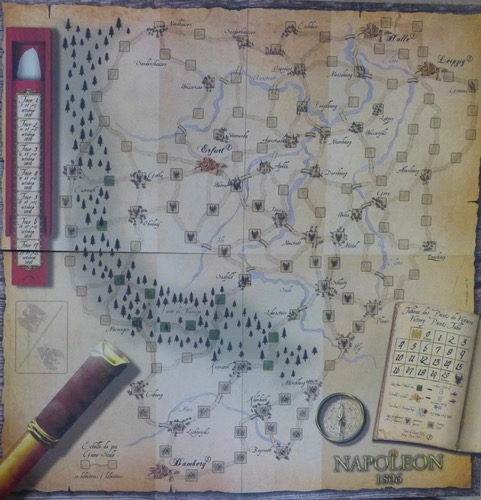
The map is mounted and portrayed in a style that suggests it has been set out on a campaign table – representations of a quill case and a field glass sit on the margins.
The map also holds the turn track (seven turns/two days per turn), the victory point track, and several map and icon keys.
Operations end when both sides have activated everything they can or wish. If a player passes, they can only play permissible cards for the balance of the turn – no actual movement of forces.
There is no limit on how many cards a player can hold.
Unlike many Kevin Zucker designs, you cannot shuffle strength between corps in the same location.
Terrain (like the locations comprising the Thüringer Wald) can affect combat – e.g. preventing pursuit and reducing combat card draws.
Distance between locations averages at about 20km.
Next up will be the 1807 campaign – larger (physically as well as in scope), with three scenarios covering the full campaign as well as Eylau and Pultusk.
About the Author

Paul has been involved in the hobby since the early 1970s. Of largely Belgian ancestry on his father’s side, and English (Yorkshire) on his mother’s, after finishing his education he worked in tourism and student services, and also spent some time in the former West Germany. He met his wife Boo in 1990, and they married a couple of years later.
Paul hails from a long line of former servicemen – one grandfather was a sergeant in the BEF of 1914, whilst two of his great grandfathers were killed serving with the Royal Navy. His own father, who was born in Britain, served with the army in Malaya in the early 1950s.
Paul’s book, “A Dicey Business,” can be purchased as paperback or Kindle eBook from Amazon sites worldwide.
A fun and often hilarious look at his time in the hobby, including the games he has especially enjoyed, the occasionally very odd shop he got them from, and all this and more accompanied by his own illustrations, the book is a journey from 1972 right through to the present – told throughout with a uniquely English take on things.”
Related Articles:
Napoleon’s Resurgence- theBoardgamingLife Review
The Pain and Drain Fall Mainly on the Spain-ish- A BoardgamingLife Replay of Wellington
Waterloo 1815: Napoleon’s Last Battle-A Boardgaming Life Review
The Year 1813 and “The Struggle of Nations” Comments on the Campaign and a Kevin Zucker Design
Waterloo 200: A Board gaming Life Review
Umpiring the Empire-TheBoardGamingLife Player Aid for Le Vol De L’Aigle
Legion of Honor – A first look by TheBoardgamingLife
Small But Perfectly Formed – A Boardgamimg Life review of W1815
Several Ways with The Hundred Days
Le Vol de L’Aigle – A Board Gaming Life After Action Report
Le Vol de L’Aigle (The Flight of the Eagle) Volume 3: A Board Game Review
A Real-World Approach to Understanding the Attack Sequence
Borodino 1812: Board Game Review

Nice review! I’ve already ordered the game, but, if I hadn’t, this review would have sold me.
Nice review! I’ve already ordered the game, but, if I hadn’t, you would have sold me.