by Paul Comben
Designer: Kevin Zucker
Publisher: Operational Studies Group
If you keep fighting battles and if those battles keep getting bigger, and if there is never any end in sight save the nagging feeling that sooner or later your luck must run out, eventually you are very likely to fail. Napoleon did not say this in the first bright twilight of his decline, at least not in so many words, but he certainly suspected it to be the case.
When precisely he first sensed it is open to conjecture, but it is impossible to think of the man in the high heat of a Russian summer in 1812 without his being occupied at various points in his mounted forays and carriage dashes by the first intimations of total disaster. All of a sudden, with his legions still advancing upon the dusty road to Smolensk, he declared that the war against Russia would be a three year affair – 1812 to see his army encamped between the Dvina and the Dnepr; 1813 an advance upon Moscow; 1814 a conclusion in Saint Petersburg.
But this was not the original plan, and it was not even some clever extemporization upon the original concept as events unfolded. It was a consolation. It was a pretense. It was, for all intents and purposes, a bulletin composed for his own benefit as well as for those who commanded the corps and the divisions he led to calamity.
But the emperor was right in one thing – the war against Russia would be a three-year war. 1812 would see this army utterly destroyed. In 1813 he would lead a new army against the same foe and returning foes, only not under the walls of Moscow but by the Elbe and the rolling lands of Saxony. And then, after disaster finally struck again, as it would do because his luck was all used up, he would conduct a glorious epitaph within earshot of his own capital. When that was concluded, the Tsar and the Tsar’s army would parade in the boulevards, and the pretty ladies of Paris gladly flutter their eyes at them.

Napoleon’s Resurgence, the latest offering in OSG’s Library of Napoleonic Battles, presents the spring chapter of the second year of Napoleon’s ill-fated Russian War. Including several battle scenarios as well as a small selection of mini campaigns, the game essentially covers the last best chance Napoleon had to bludgeon a nascent coalition of enemies into submission and to follow that with the signing of a favorable peace treaty.
The trouble was, he only had some of the tools to do the job.
Before beginning a look at how this design models “the job,” it will be useful to acquaint ourselves with the salient aspects of the first months of campaigning in that year of 1813. I offered a detailed historical perspective and game view (via another Kevin Zucker design, The Struggle of Nations), about two years ago, and that same piece can be found on this website. Here it will suffice to offer a brief outline before we begin to evaluate how this new opus gets things done.

In the early days of 1813, it would be hard to exaggerate just how comprehensively annihilated were Napoleon’s central group of forces by the time the last of the very little that was left straggled into Poland and Prussia. Initially, the emperor thought he might see as much as fifty percent of the men who had followed him out of Moscow brought back into the ranks. In actual fact, he did not get close to five percent in many cases.[1] Entire regiments had been lost to a man; elite cavalry regiments had not a single trooper or a horse left. In all, it was a level of destruction that would not be equaled (possibly) until the Soviet destruction of Army Group Centre in 1944.
Napoleon left the remnant of his command in the opening days of December 1812, travelled across Europe as inconspicuously as the heir to Caesar and Alexander possibly could, and after buying sugar plums for his son in a Rhineland market, was back in Paris before the end of the year. Undoubtedly, during that journey, as well as for a good time before, he was considering how he could turn his three-year war into a two-year triumph. Before long, he was fully briefed as to how very little of his army, the veterans of Friedland and Wagram, he could expect to get back. Whatever was put in its place would have to be created out of the military equivalent of thin air.
the game essentially covers the last best chance Napoleon had to bludgeon a nascent coalition of enemies into submission
But by the April of 1813, quite a lot had been created out of that very element. Draft classes were brought forward and essentially emptied; men in the navy were turned into soldiers for the army; the forces in Spain were raided for anything and anyone that could be creatively described as surplus to requirements in that bleeding and wasting theatre; and retired veterans of various degree were encouraged back into the ranks to help refill the ranks of the Imperial Guard as well as provide some kind of backbone to the new divisions. These efforts, plus contingents raised by the emperor’s remaining allies, and coupled by the efforts of French industry to make cannon, muskets (still being handed out on the eve of Lützen), bayonets, uniforms, and a host of other things meant that the forces mustering just east of the Rhine started to look impressive…at least in terms of raw numbers. Quality was quite another matter.
As much as Napoleon enthused about the keen enthusiasm of his new conscripts and how much faith he had in them, enthusiasm is not only a volatile commodity in itself, without experience and discipline in the mix, it is often of limited worth. Bowden sees this new Grande Armée as fundamentally lacking in the abilities that enabled Napoleon to fight campaigns and win battles in his accustomed style:[2]
– The army’s raw recruits, those given the sobriquet of “Marie Louise,” could not sustain the rate of march that was the hallmark of many a Napoleonic campaign.
– The army was not capable, through the want of training and quality officers and NCOs, of any the more complex battlefield maneuvers integral to fighting efficiency.
– The cavalry, such as it was, also lacked experience and was pitifully small in number.

There were also issues with the artillery (another matter of skill and experience), and indeed, with the emperor’s ability, as the campaign moved to its summer armistice, to recognize when things were about as good as they were going to get. But we can return to the above issues once we are into the game model; in the meantime, let us briefly look at the forces Napoleon would be fighting.
It is perhaps a little too easy to fix on the massive loss incurred by the Grande Armée in 1812 and pay too little attention to the very considerable losses suffered by the Russians over the same period – amounting to hundreds of thousands of men. From a number of perspectives, the new coalition facing Napoleon was in a rather shaky state. Alongside the matter of casualties already incurred was the opinion permeating much of the Russian hierarchy that they had done quite enough in pressing the invader back over the border and it did not behoove the nation to translate this into some broader crusade of liberation in the rest of Europe.[3]
the opinion permeating much of the Russian hierarchy that they had done quite enough in pressing the invader back
On the other hand, the Tsar had thoroughly given up on notions of eating potatoes in Siberia whilst watching his beard grow, and had successfully nurtured a daunting level of animosity for his former friend. One consequence of this was that it did provide some sparks to cast at the heap of inflammable Prussian tinder that had been gradually accruing over the previous few years. By contrast the Prussian king, essentially a damp squib with scarce enough volatility about him to go “phut,” had used that same period to compile a whole catalogue of reasons why it would be imprudent to raise the prospect of war with the forces his generals had been quietly raising for that very purpose.
It would take the more martial types, Russian and native to his own court, to nudge him into open conflict with the detested French. The Prussian army of 1813 had been substantially reformed over the fossil that had been walked all over by the French in 1806. But apart from those forces that had dallied around Riga as another dubious element in Napoleon’s 1812 adventure, next to none of it had any recent combat experience. Furthermore, here and there some units had had to make do with pikes; and while, again, there was enthusiasm driven by a thirst for glory and vengeance, and such qualities have their place, it would occasionally lead to trouble.[4]
Inevitably, Russian forces that had already marched over hundreds of miles, and often in terribly difficult weather, were going to end up being somewhat strung out and under strength. The situation was not helped by the want of a fully agreed plan, the debilitating but mercifully brief dotage of Kutuzov, and a tumbling impetus to prosecute an advance over the Elbe that was in danger of becoming a strategy of impulsive bits and pieces. Had Napoleon possessed any experienced cavalry arm of decent size, the Coalition might have found itself in very serious trouble. As it was, the emperor was left half-blind and groping for his opponent.
The first major result was the Battle of Lützen.
The Game – Introduction
It really is impossible not to see this as another example of late Napoleonic self-consolation. After having created a sophisticated combined arms approach to maneuver and combat, the emperor was now seeking to win the most important engagements of his career with one of those arms dangerously weak, and the other two lacking in campaign hardening and battlefield experience.
It will be an Egyptian battle – everywhere the French infantry must suffice.
Napoleon, Spring 1813.
To state the obvious, Germany in 1813 was not remotely akin to Egypt in 1798. A great deal of what happened over the ensuing months was an uncompromising vindication of that. But what do we see in the game?
First things first, let us take a look at what is in the box.
Napoleon’s Resurgence (the battles of Lützen, Bautzen, Luckau and Königswartha/Weissig) is the latest entry in an ambitious and ongoing series from OSG – The Library of Napoleonic Battles. The basics of the design model have a long history, dating back even as far as the early 1970s and Napoleon at Waterloo. However, the first and truest ancestor in terms of scope and system is Napoleon’s Last Battles (SPI 1976). Is this something to be concerned about? I will say more about this later, but for now it must be stated that the original system has been seriously augmented, revised and nuanced in the Library games, added to which it is worth pointing out that the basics of Advanced Squad Leader date back to the same era, and no one ever finds a negative in that.

Physically, the game comes with the latest version (7.0) of the series rules, a combined scenario and study booklet, two sheets of unit counters and markers, some very attractive period-style maps, player aid sheets containing a range of combat and terrain tables, orders sheets, a sizeable number of set-up cards and order of battle sheets, and two decks (French and Coalition) of optional event cards and their accompanying instructions for use.
Appreciation of game aesthetics is always somewhat subjective, but speaking personally the maps are very attractive, the counters clear and functional, and the series rules well set out and presenting no serious issues at first reading. The cards are equally well presented. The only possible issue I can see is how a broader range of individuals, newcomers to the series, will take to the maps. There are always various takes on the balance between art and functionality in wargame design. These maps, because of the nature of the terrain they depict and the style of graphics employed, might present a slight challenge here and there, but the detail is commendable and the look entirely commensurate with setting the scene and presenting the topographical realities of the campaign areas.
It is also worth noting that, unlike the maps for another series member, Napoleon’s Last Gamble, these maps do not all join together to make one campaign area. In nearly all its phases the 1813 German/Bohemian campaign was fought over a large area with a number of separate fronts. Thus, the maps here have limited actual combinations – two make the Bautzen scenario; two smaller offerings present engagements on the Berlin front and the prelude to Bautzen, and one dedicated map covers the Lützen battle scenario. To play the fuller Lützen campaign, you will need maps from the Leipzig series game. However, Napoleon’s Resurgence does offer its own full campaign game scenario – consisting of playing, with some extra input, the other provided scenarios in chronological order.
At the risk of stating the obvious, the “reach” of this design is very different to what one saw in The Struggle of Nations. The longer-term aspects of an ascendant or a failing cause, and the full ballet of grand maneuver leading to battle are not to be found in Napoleon’s Resurgence. Here it is the approach to battle, the selection of the terrain, deployment and subterfuge that have a sharper focus. On the other hand, there are certainly areas of common ground – fog of war, supply, quality of command and bringing “the big battalions” to the right place are as important here as they were in the older game. In fact, in this new design, some of those common properties come into sharper focus owing to the more intimate scale – a little over 500 yards per hex, and game turns measured by the hour during the day, and several hours at night. Weather can also have some drastic effects, as we will see in due course.
In order to present the workings of the game, I will explore the “game shape” of command and the armies, the broader and finer points of battle, as well as such extras as are provided by the use of the card decks.
However, I first want to pick out and analyze what I think is the signature design element of the game: fog-of-war. Whatever else transpires across the range of scenarios, the game system will first make you blind and then challenge you to restore some sight to your army and how it purposes to move. Getting this wrong can lead to some very uncomfortable surprises.
The mechanisms for this are relatively simple, and based on the simple premise that every enemy unit or stack of units is hidden (inverted to a uniform reverse side) unless some action permits the opposing player to see it/them. Units cannot be seen unless a friendly unit is within sighting range (three hexes) and the intervening terrain does not provide a problem – the usual things: woods, hills, towns, units etc. Although just about any unit can sight, through game turns of maneuver and approach, when armies are likely to be separated by a fair amount of distance, the job should be handed in most circumstances to the vedettes.

Vedettes are the eyes of the army. They are the product, at least in the main, of light cavalry divisions or brigades breaking down into their component parts and then sallying forth to spy out what the enemy is offering on any particular line of advance. They are nimble units, but have no combat ability whatsoever. But combat, even if they could indulge, is not what you would want to do with them anyway. These are busy units – that is, busy about their specialty purposes – and should usually be employed in as copious a number as your OOB will allow.
Vedettes are your prime means for spying out enemy dispositions. Conversely, they are likely to be your first line of defence against being pried upon. They may also, in terms of assisting your army’s “privacy” and supply, patrol around locations that equally combat-incapable enemy vedettes might very much want to get to. They also have a limited ability to damage river crossings – stone bridges are beyond their means, but more “rustic” constructions (termed trestles in the game) can be knocked around by the troopers.

One historical role they do not get to perform is acting as a relay of communications between separated contingents of an army. This, I must admit, was more a passing thought on my part rather than a confident assertion of “there is something missing.” One of the allegations leveled at Grouchy in the June of 1815 is that he completely failed to establish such a positioning of light cavalry units between his “Wavre Wanderers” and Napoleon’s main body – something the emperor specifically told him to do. In game terms, I do not think it would be too onerous a burden on the system to work vedettes into the order delivery/command mechanisms, but they do not act to such an end, and the designer may well have had some valid reasons for the omission.
One answer might be that they have quite enough by way of game functions already, but there are still some serious considerations linking them to the way game orders operate – command and orders are another game issue I will discuss at length later. In the meantime, without getting too far ahead, it should be understood that individual units and formations (mostly corps) have two means of rousing themselves into action – they receive an order from higher up the command chain or they act on their own initiative.
This system has certain similarities to the designer’s model for a whole range of operational Napoleonic offerings, but omits the actual dispatch of a “travelling” order and all the finer points linked to a functioning centre of operations, as here the scale is that much smaller. Orders in Napoleon’s Resurgence are only really travelling a mile or so at most; they are not being consigned to the dutiful care of a rider who is going to carry the thing half the length of the Elbe.

Vedettes can be moved by an order, but in the vast majority of cases that will be a complete waste of time. Orders are limited in number each turn (by commander rating), and when you have corps to shift into position, using one of these orders to move a few squadrons from one point to another is uneconomical in the extreme. Furthermore, given that the furthest an order can travel from issuer to recipient is four hexes, if you have vedettes that close to your main front, you are probably using them all wrong anyway. Vedettes need to range about – historically they would be up the wooded hill searching their surroundings with a field glass; questioning the locals; picking up enemy stragglers and wandering picquets; opening up consignments of mail, and basically looking for any opportunity to make a nuisance of themselves. Vedettes are rated high enough in initiative to give them a decent chance of moving of their own volition more often than not, and if one does opt to stand still and talk instead to the pretty peasant girls, if you still have plenty of others, you can cover for a bit of lethargy here and there.
The problem for the French historically, and as we can look for in the game, is that they had nowhere near enough cavalry of any description, and as such looking for the main thrust of the foe as well as batting away the incursions of pesky mounted raiders was often impossible. At various points in the campaign, contingents of Coalition horsemen were trotting around all over the place. Early on, this compelled Napoleon to establish corps of observation along the Main to prevent matters getting totally out of control. Later on, in a phase of the campaign beyond the term of this title, Napoleon was to have his lines of communication out of Leipzig either entirely cut or dangerously compromised.[5]
The Game Armies of Spring 1813
There is nothing too complex about the presentation of leader and combat units in the design – complexity largely arises from the range of uses many units have.
Leader units come in three sorts – commanders (the top marshals and supreme commanders); officers (mainly the corps commanders); officer commanders (those usually representing leaders at corps level who had a greater or lesser amount of independent authority – often because they were operating more or less alone on secondary fronts).
Commanders will seek to get things done on or approaching the field of battle by using their command points to issue orders – the better, more proactive the personality in question, the more points they will have, though nobody has that many (often in the scope of 2, 3 or 4) and in a six or seven corps assemblage of force, clearly entire formations might well go without on any particular game turn.
A more enduring form of order comes in the shape of a March Order. By issuing such an order to a formation, it will head towards a more distant location without having to be further prodded along each turn. Additionally, if you are playing one of the longer, multi-day scenarios, this order is the one element that will keep a column of troops moving through the otherwise dormant hours of night.
Officers commanding corps are largely limited to moving the units of their corps, and unless they get an order from above, they are going to have to shift for themselves – a matter of initiative, and some leaders are rated rather better than others in that regard.
Officer commanders, like Bülow and “I’m Nearly Ready” Oudinot at Luckau, can function as a supreme commander to their own corps, but unless everyone is packed up close together, some units are going to be out of command range (just a few hexes) in which case they will have to roll against their own initiative.

Initiative for actual military forces is the value nestling between combat strength and movement allowance. The term is perhaps a little misleading, but in all fairness, one would struggle to think of any better name for it. This rating gets to work in several ways, and depending on where it is applied in a game sequence, it can indeed be properly seen as the local commander having enough verve to get his unit on the move, or being considerably less than inspirational and dashing without someone to give him a prod.
However, it is important to note that all units, even those that are very well motivated, have the disappointing capacity to stand still and watch – this is, after all, the early Nineteenth Century, and distances of merely a mile can seem like another world on the battlefield, what with smoke blowing everywhere and no one thing looking the same from two different points.
One rather fun piece of initiative chaos is related to that in-game equivalent of a quantum particle – Cossack vedettes. Formed Cossack fighting units are immune to this, but if the mounted irregulars of the Don or Old Muscovy are in their vedette guise, a certain element of wanderlust can overcome them. As said earlier, in many cases issuing orders to vedettes looks like an uneconomical employment of a scarce resource; but in the case of Cossack vedettes, you are simply not permitted to “command” them at all. Instead, any activity by these units has to proceed from an initiative die roll…with the condition that if you roll a 6, the Cossack unit in question is removed from the map. A few instances of this, and the player’s opinion of these colourful drifters is likely to match that of the emperor himself. As to what precisely a “disappeared” Cossack vedette is up to, I think we can leave that to the imagination.
Where the term “Initiative” becomes a little less that the mot juste manifests in matters of combat. Here unit initiative, progressing on a 1 to 4 scale, better reflects how much training, presence and staying power that unit has. This applies at various points in combat, though perhaps most obviously via the Shock Combat procedures (a representation of when combat is getting to some seriously close-up nitty-gritty – aptly described in various other designs as a morale showdown), as well as in the inability of very indifferent units to perform particular tasks. In the Luckau scenario for example, the Prussians have one untrained infantry unit positioned in a forward village outpost – the village itself provides no combat benefit to the unit (a rule pertaining to units initiative-rated at 1 – green/untrained), but the same unit does benefit from the walls of whatever it is lurking in the same location classed as a “chateau.” Naturally, a raw unit kept together in an enclosed location has a better chance of gaining some advantage from being so ensconced rather than being spread out across a number of buildings and tight streets with no sense of cohesion and functioning local command.
One rather fun piece of initiative chaos is related to that in-game equivalent of a quantum particle – Cossack vedettes.
Staying with Luckau, although this will apply to many other instances in larger scenarios, keeping a corps tightly-knit in one comfortably commanded whole is a luxury neither side will be able to indulge in all of the time. Numerous Prussian units at Luckau start out-of-command via the restrictions of leader range, and as things shift across the field, demands here and there coupled with the inability of a corps commander to hold things together over distances of more than fifteen hundred yards are inevitably going to lead to the player(s) needing to rely on unit initiative to keep units active – and in other scenarios, this will combine with the predicaments of a corps commander having to think for himself if the attention of the supreme commander is elsewhere.
The player does have some latitude in terms of how to work around such challenges. One obvious example comes (across the entire series of titles) in those instances where a corps contains one or more units whose initiative is better than the fellow in overall corps command. If a formation like this is required to shift, the player needs to think carefully about how to work the command rolls. Adding to the challenge is the fact that you do not get second chances. If the entire corps is selected to attempt something via its leader’s best efforts, and that leader fails his initiative roll, that is possibly the entire corps (apart from what was beyond his range in the first place) essentially stalled for the entire turn.

The remedy can often lie in keeping quality units out of such efforts by designating them to roll against their own rating rather than that of the apparent dullard in charge and possibly in range. Indeed, one might consider keeping them well beyond his aura of military mediocrity from the get-go. Of course, even that measure has its negatives, for if the corps in question does get an order from above, those that are too far to one or other side are not going to be certainties to move while everything else does.
One other piece of small but interesting colour comes in the shape of putting Napoleon on the frontline, and thus benefitting from some handy modifiers. Perhaps we get a little used to depictions of the emperor sat way behind the lines with a foot on a drum (Borodino) or knocking back the snuff from a remote position at Waterloo, but in reality he was often right at the front, and there are plenty of instances of this from the later campaigns when he really had to show himself as crises came and went. At Lützen for example, with portions of his line of fresh conscripts wavering and falling back, he went in amongst them (literally), thumping them back into line, kicking out at those beginning to turn tail, and generally setting an example via his visible presence.[6]
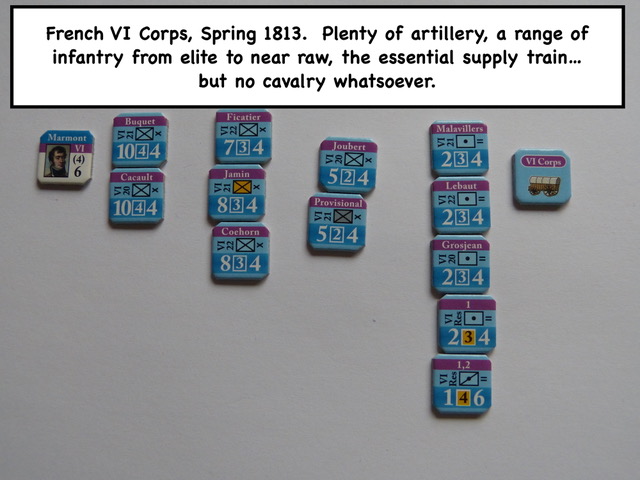
More will be said on combat effects, and what influences/assets can be brought to bear in due course, but for now let us take a brief look at a sample corps from the game – VI French Corps commanded by the eventual Monsieur Sell-Out, Marmont.
VI Corps is a sizeable formation, though Ney’s III Corps is bigger still, with its numbers bolstered by a fair number of lesser quality/less experienced and adept formations. Two obvious things to state in the light of what has already been presented:
– A big corps is going to face command/administrative challenges by simple dint of how much space it is likely to occupy in virtually any posture. You can have all the best intentions to avoid this, but frontages can have a habit of expanding, and someone somewhere is likely to have to stretch themselves thin.
– There is no cavalry worth speaking of.

There is a potential pitfall here that the player needs to be somewhat wary of. If you keep a large corps arranged so that anything out of command range is likely to be your better initiative units, you will not necessarily have them to hand for the key moments of decision; on the other hand, if you plant the mediocrities upon the corps’ distant and smoky peripheries, they could well end up being left behind if you feel the compulsion to move – either that, or the whole corps dallies and delays waiting for elements to catch up.
The obvious military solution is not to let a corps you want for serious assault purposes get too spread out – leave that warding role to something else. You also do not want to ensure that the average material is in command at the cost of impairing your combat options and responses. As with much else, there probably is not a perfect solution, and players will need to extemporize from turn to turn.
One extra element for consideration is the supply trains assigned to each corps, and the pontoon trains trundling along with the armies. Supply trains, to state the abundantly obvious, are essential to keeping an army sustained. They are hideously vulnerable if not protected by some kind of patrolling force and/or by keeping them well away from bother. On the other hand, game realities mean you really have to keep them on the road network, and not so far away from the front they might as well not be there at all.
Clustering several such trains around a convenient road junction can seem like commonsense if the maths work out, but it does create a sizeable target for opposition victory point acquisition if not adequately protected from incursions. Another possible consideration arises from any radical shift of position – including precipitous moves to the rear dressed up as tactical withdrawals. If your trains are not well placed – too far forward or entirely clogging up the roads – stacking issues (trains cannot stack with other trains or anything else), differing movement rates (trains do not move that fast) and adverse weather can end up causing a bit of a bother.
Finally, pontoons/bridging trains are the sorts of unit you might not readily miss…until you have not got any. Playing any game in this model well, or any of the designer’s related models, means understanding the effective use of bridge deployment and possession. During the ensuing campaign in eastern France in the early months of 1814, Napoleon’s ability to force the pace as much as he wanted and gain the sort of positional advantages he very nearly did was frustrated more than once by his lack of a bridging train. In Napoleon’s Resurgence such trains may or may not be available depending on the scenario in play, but when you have one, optimum play will often involve getting it effectively deployed.
Although it is hardly attention-grabbing stuff unless you are a real Napoleonic devotee, a not inconsiderable part of the story of 1813 in Central Germany involves the maneuver and struggle around river crossings. Read any decent account of the 1813 campaign and the importance of locations such as the Elbe crossings at Magdeburg and Torgau becomes clear. Amongst other things, major rivers, to drift into sporting parlance, can offer the facility of acting like the sidelines in gridiron or soccer – in the right conditions they can be used to ward a flank. Alternatively, they can become the rather fluid anvil you can hammer a badly deployed enemy against.
One rather fun piece of initiative chaos is related to that in-game equivalent of a quantum particle – Cossack vedettes.
A major river is not always necessary for this – smaller rivers can help if an enemy is incautious in shifting forces to their further side. This is all a bit subtle and refined, but if an opponent is trying to form a position on one side of any such river, bringing a smashing attack to bear against the crossed portion may deliver a telling blow before anything else has the time to get in position and help out. This might sound a bit fanciful, but perhaps we should not underestimate how fog of war and a river or two can play out in such game situations. Indeed, these sorts of considerations were vital at points in the 1813 campaign – at Bautzen Coalition commanders did not take proper advantage of Napoleon’s army being astride the river Spree; at Dresden (outside this game’s duration) Napoleon had his flanks secured by the banks of the Elbe, and at Leipzig (again outside of this volume’s duration) Napoleon’s army met disaster when some inadequate lower ranker blew the pathetic little bridge his army was seeking to retreat across (the river in question being the Elster).
The Game Shape of Battle
I rather suspect that many readers who are interested in how this system delivers will indeed have memories of Napoleon’s Last Battles. Whilst that ancestor of this present system was not quite “just bang the combat factors together” it really did not possess any of the finesse of its descendant. Actually, I need to qualify that – I have a nagging issue with something that was in that game decades ago that is not in this revised and augmented version…and I rather miss it.
We will come to that particular issue in due course, but in the meantime, let me first offer a basic notion of how this system handles combat:
– Whereas everything with NLB was done with just the one retreat/elim/exchange table, here there are four tables with a far greater range of potential combat results. These tables are a “standard” table for forces moving into an engagement; a shock table that is consulted after a Sk result on the first table – this is the closing-in stuff; a bombardment table that is for artillery firing, in most cases, from a range of two to three hexes from the target; and finally a cavalry charge table. Note, you can have artillery bombard from a hex adjacent to a target if the intervening hexside is impassable.
– Artillery, to elaborate on the above, can either make a “regular” attack from an adjacent hex, or it can bombard from further away, possibly in conjunction with other artillery units (and in many cases you will very much want other artillery joining the party).
– Cavalry can also make what we can broadly call a “regular” attack, but heavy cavalry, being all snort, shock and saddle, can make a cavalry charge, which carries its own specific modifiers and is meant, in ideal circumstances, to help blow an enemy off its ground and wreck him.
Putting these points together as a cohesive picture, what we are looking at here is the main thrust of the game model with regard to producing authentic tactical effects in combat. To appreciate how much of a progression this is from the original framework, it is worth recalling that in NLB the only notable tactical effects you had were a plausible combined arms provision (putting it crudely, attack with one of everything and get an odds shift) and a somewhat implausible bombardment provision. The combined arms facility, strictly speaking, is hardly different now to what it was years ago, but there is plenty more going on around it – such as those different combat results, the cavalry charges, and the greater range and better realism of the artillery bombardment process.

Before looking in more detail at how combat works, I just want to highlight two key differences in the bombardment procedure compared to in the past. First, artillery has been given that three hex bombardment range – or just about a mile. This is far more realistic than the old one intervening hex range, and gives artillery a chance to achieve something at longer ranges, albeit with strength modified by a reduction of 50% for firing at such a distance. Secondly, the old issue of units “defending” against artillery bombardment via their combat strengths has been got rid of – and rightly so as it was hideously unrealistic and essentially encouraged the defender to create massed targets.
Unfortunately, and rather incongruously, although there is now no benefit to stacking high in order to defend against bombardment, there does not seem to be any penalty (i.e. a favorable firepower modifier) for doing so either. It seems odd. There are other modifiers – such as for range, the occurrence of rain and some types of terrain – but nothing for creating targets where one shot can kill and maim twenty. To reiterate, it seems odd.[7]
The key thing is however, that the player has more options in terms of types of attack and their likely consequences. Part of this comes via understanding the precise sequence attacks are delivered in.
Within the scope of a player turn, artillery bombardment comes first. This is perfectly logical, given the one-hour duration of most game turns, and the fact that bombardment is a softening/debilitating instrument to prepare an enemy line for actual assault. Artillery also has no line of sight/line of fire through units, enemy or friendly, and so its effects have to be delivered prior to other forces going in.
With what I regard as a rather beautiful subtlety, artillery has one other ability that the new player might miss the significance of…at least for a while. In most cases, and that means what we can call regular odds and factors combat, a unit lost while at full strength has a decent chance of returning on a later turn at its reduced (flipped) strength. However, all within the same player turn, bombarding artillery can commence a process that will see a previously full strength unit annihilated beyond any chance of such a revival by the time that turn is over.
For this to happen, the artillery in question needs to obtain a result that reduces the target unit. Then, if charging heavy cavalry or a regular sort of factor clash obtains a second elimination/reduction, that is the end of that. Alternatively, the process of destruction can begin with a cavalry charge that gets a reduction, followed by a required, that is by rule, regular attack where just about any result affecting the defender will finish the job.
Cavalry charges have a game air of the spectacular among them, and if conducted at the right kind of target, the results can indeed be devastating. On the other hand, although they are one form of attack that can affect a defender when going in at less than brilliant odds, there is a fair chance of the thing going wrong and the cavalry itself being reduced. But if that does not happen, the purpose of the heavies is to overrun the hex, which then becomes impossible to retreat from, effectively handing the enemy occupants a death warrant as another adverse result will leave them with nowhere to go.
Integral to this is the requirement for a cavalry charge against a particular hex to be followed by a regular attack against the same target. Call it a “double-whammy” or “the old one-two,” but whatever terminology you choose, this is a powerful weapon to clear a portion of enemy line and potentially compromise a position.[8]
Ultimately, whatever the artillery and the cavalry do, ground has to be occupied by the traditional wargame processes of moving in and sorting the odds out. But even here, there are potential interrelations with earlier combat stages beyond what has just been described above. Bombarding artillery has the capacity to soak-off, a term that is not heard too often these days, but here refers to a bombardment counting as a hex having been attacked for the purposes of who is obliged to attack what later on. In other words, a stack of friendly units adjacent to two hexes will only have to attack enemy units in one of them if the other has already been bombarded.
A cavalry charge also counts as the cavalry component of a combined arms attack – an attack delivered by at least one infantry, artillery and cavalry unit. Bombarding artillery is not a qualifying candidate, and charging cavalry, having already “gone in,” does not get to attack again – save that one can imagine it hacking its way through a panicked and overrun enemy unit if the following “regular” attack is successful.
To assist those who have no familiarity with this system, I have created the following (admittedly somewhat basic) combat example:
1) The two French artillery units (ideally you need more than this) pound at the two Prussian infantry units with a bombardment strength of four, and not too surprisingly, get a no effect result.

2) The French heavy cavalry then charge, and despite having the raw odds against them (1:3) still have a one-in-three chance of getting an overrun. This they achieve, and the cavalry unit is placed on top of the two Prussian infantry units, sealing off any chance of a retreat.

3) The two French infantry brigades, following close behind, engage the Prussians at 3:1 (no combined arms bonus as this slightly clumsy attack lacks some cannon directly supporting the infantry), obtain a Dr (Defender Retreat) causing both the Prussian units to be eliminated and subjected to the processes by which they will await a possible return to the map at reduced strength.
In this example, the overall attack failed to permanently eliminate at least one of the Prussian units as the rather weak bombardment failed to produce a step loss. Had it done so, and had the rest of the attack followed the same pattern as above, the Prussian unit that was already reduced would have become permanently eliminated, whilst the other would have been removed awaiting the reorganization process.

If the attack, up to the point the French infantry went in, progressed along the same route as in the original sequence, and the French infantry had then rolled a Sk result, matters would move to the Shock Table. Here, as the name rather implies, it is either overwhelming numbers (looking at 3:1) or quality that can tip the balance. Both sides roll 1d6, and depending on the results, 0, 1 or 2 is added to that side’s best initiative rating. A further +1 for the attacker is applied if the odds were 3:1. There is no penalty here for adverse attack odds – they would have been catered for on the original combat table the players have now progressed from.
Shock of this kind does not happen that often – it comprises one result among six on the Combat Results Table in its columns from 1:2 to 3:1, and either side of those columns, it does not readily exist at all.[9] This well reflects, if I am right in assuming a premise, that shock was pretty rare on the battlefield. In blunt terms, the moment one side intimated that it was ready to close with the bayonet and looked imposing enough so to do, the other side was likely to scarper. Before that, combat was still going to be pretty adjacent – it had to be otherwise those muskets were not going to hit much of anything – but taking things to the next stage was rare. That one does not see any shock references on the CRT below or above the odds I have quoted above, must also largely reflect that impossibility of launching a credible show at one end of the table, and plain not needing to at the other.
So where does that leave an attack by the Imperial Guard? One might be tempted to say that combat factors remain just combat factors, and odds ratios are nothing more than what they seem to be, even when “La Garde” is approaching. But that is not quite the case once you delve a little deeper. “Staking the Guard” is the rule mechanism that gives such a combat its aura of being something special…or desperate. Apologies for quoting Waterloo again, but it does rather make the point. At that battle the emperor’s darlings were committed twice – first to clear and help defend Plancenoit, and then to break Wellington’s line.
Although the attack at Plancenoit was very important, it did not have the air of the dramatic set piece about it. The bands were not playing, the emperor was not at the head of the committed battalions, and the event was not preceded by word going around that something big and spectacular was on its way…plus Grouchy. By contrast, as the rule is purposed across series titles, the final French attack at Waterloo was very much staking the Guard. And we all know what happened next.
Bearing in mind what happened next, committing the Guard this way is risky. On the one hand the odds get shifted one column up, and if the emperor is with them, there is another column shift on top of that – and yet one more if it is a combined arms attack. Such a commitment of the bearskins is strictly a one-off, whatever then ensues. To be honest, I can well imagine the owning player being such a bundle of expended nerves after such a commitment they could never think of trying the same even if they could.


The thing is, a lot can go badly wrong – if the Guard gets repulsed or “roughed up” other contingents anywhere near the scene of the debacle can be pushed over their demoralization threshold. Good, realistic and colourfully relevant stuff, but it does carry a danger of getting into bouts of factor counting (if you know or have a very good idea what you are facing) before anything imperial gets shifted. Part of the problem lies in the fact that the Guard will trigger demoralization issues if it gets an Ex(change) result on the CRT – unless such a result also pushes the enemy formation over its threshold, in which case all bets are off. Therefore, I am somewhat fearful that staking the Guard is going to involve a lot of mulling over all potential results in a manner that has nothing to do with military decision-making.
And on the face of it, one is also faced with the incongruity of not wanting to make a Staking The Guard attack at what should be far more favourable odds (4:1+) as that is where the Ex results lurk, and lurk in greater number the better the attacking odds are.
The only case I can make for having more Ex results populating the better odds columns is that the attacker is going to be bit more blasé about trading losses because he has more stuff to throw in. On the other hand I cannot easily accept this as something a player should be skirting around in order to keep his Guard attack all safe and sound.
One extra complication here arises if an eligible Guard unit goes in with sufficient accompaniment to make a combined arms attack. This is supposed to be good tactics, but if it pushes the odds above 3:1, the Guard unit could be exchanged/translated into a bit of “sauve qui peut!” – in which case it seems like very bad game tactics. Furthermore, in the rules as written I cannot readily see the ability of a player to decline a combined arms “advantage” if an attacking stack/group of units qualifies. But then, why should they have to? It does not readily make sense. On this theme, I also vaguely recall (could be wrong) that in the older, ancestor model, a player could voluntarily fight at lower odds than the factors involved suggested – but gamey, very gamey.
Is there an argument that in any way answers the above? Possibly. One might well argue that staking the bearskins is “vraiment une affaire extraordinaire” …or something like that. As such, a high emotive sense of unreality will pervade such a commitment, including the perception that the more likely things look to succeed, the worse the repercussions if something hiccups. This does make some sense to me, but I still think matters could be a little more nuanced. The Guard winning ground after an “all-in” attack resulting from an exchange is not the same as what happened one June evening in Belgium. Why not, at the very least, roll one more die in such circumstances – 1 or 2 the effects are as presently described; 3 or 4, the demoralization drop only effects formations over or within X number of points of their demoralization level; 5 -6, nothing happens.

One last aspect of risk naturally involves putting Boney where he might have some holes put in him. Why the rules keep referring to Napoleon being captured rather than killed is a bit of a mystery. He had a pretty good chance of being killed during the early part of the 1812 retreat, saw colleagues nearby mortally wounded during 1813, and had his horse eviscerated by an exploding shell in 1814. The game does say that if you lose Nap, that is game over, but it would have been nice to have some colour built around that.[10]
Before leaving the processes of battle, we should now briefly look at the way weather works in the design, the recording and management of losses, and the assessment of victory.
The coming and passing of weather has a sound and realistic feel about it. There is no bland “It is raining/It is not raining” aspect to this process. Instead, at various random points, things improve, get worse or stay the same. By the simple means of ensuring that weather determination rolls do not occur at fixed points in the game cycle, weather has a life and a sense that events in the skies are in constant flux – within the context of the time of year the scenarios of this 1813 game are set.
Through those scenarios in that German spring, things are likely to remain dry. But if the skies do cloud over, the alternatives are rain and heavier rain – thunderstorms – with the possibility of one or the other tweaked by small margins in the different battle situations. For example, it is slightly more likely to rain or for storms to blow in at Bautzen than at Hoyerswerda, and there is no chance of storms at all at Lützen. However, if rain in whatever degree settles in and hangs around, it is likely to have a major effect on an army’s ability to prosecute a battle – especially frustrating if overall realities have placed an onus on one particular side needing to press the offensive.
Rain or thunderous downpours, as well as the ensuing wet ground, affects infantry strength, cavalry charge, line of sight and bombardment. To give an example, with rain coming down in bucketloads, the infantry will struggle to fire a shot and there will also be a greater difficulty in maintaining formation. All this means a cut of fifty percent in combat strength, and if such a change in weather is accompanied by a bad news duration roll (2d6 applied to the relevant table to see how long it is to the next weather roll) you could end up with up to four turns largely written off.
What this means in particular engagements I will address a little later.

Another enduring aspect of the model is the tracking of casualties by parent formation – again, usually a corps. Whenever a given formation’s losses reach the trigger level (it varies considerably from corps to corps) that formation is demoralized and loses fighting capability – like cavalry charge the broader option to advance after combat. Mass dissolution is not something you will witness however – the phenomenon of seeing an army fall apart beyond recall. Corps can recover from demoralization if returning (at reduced strength) units bring the total below the trigger, and here I need to refer back to that one little rule I recall from all the way back in 1976.
In NLB a corps could not return units that had been lost while at full strength if an enemy unit was too close. More than a taste of this sort of proviso has also been present in the Napoleonic 20 series. However, in the OSG Library series there is no proximity rule, which effectively means that you can attempt to return units to the map under most circumstances in any qualifying turn – i.e. weather check turns and/or night.
Problem?
Well yes, at least in my opinion if you are looking to express in the fullest terms why Napoleon found it so difficult to translate battlefield victories that spring of 1813 into complete campaign triumphs. Ney offered it as an excuse on at least one occasion (no cavalry, no pursuit) and the want of cavalry (and not just numbers but their level of training) was one major reason for the emperor seeking the summer armistice – to put those things right. On the eve of Borodino Napoleon had predicted a smashing victory but that it would mean nothing if he did not take prisoners. In fact, he got next to no prisoners, due in part to the fact that his ground-down army was in no shape to launch a pursuit of an enemy too ground-down to fight another day.
In 1813 a couple of fresh, decently trained French light cavalry corps, or anything like, could have made a serious difference to the aftermath of both Lützen and Bautzen. Translating this into a game model basically means having units that are swift enough to hang around a clutch of retreating enemy corps and deny them the opportunity to get their eliminated units out of the relevant holding box and back onto the map. In the longer scenarios, putting the (French) player in the situation where they would like to pursue but cannot is surely an instructive element. It is present in the designer’s work the next scale up, and it was present in the NLB campaign game that only lasted three days and was likely to be especially relevant in the turns covering June 17th – its second day.
As I said earlier, I miss it because it plain is not there doing a relevant job. Indeed, I can even quote from the present game’s study folder here, which in turn quotes at one point from the Russian Marshal Peter Wittgenstein: “Because of our great superiority in cavalry, we will never suffer a decisive defeat.”
Following on from matters of pursuit, we can now discuss the way the game evaluates victory and defeat.
My feeling is that this is not a design framed around exclusively fixing on one or more key objectives, loss levels or anything else for that matter. It seems to me, if I put it in rather whimsical terms, that players make, or at least try to make, their own blend of winning ingredients. Some of those ingredients are to be prized more than others, and some build at different rates to particular totals. It is worth getting a feel for how the victory elements balance out in given scenarios – e.g. a given geographical objective is the equivalent of how many eliminated units on this map or that map and so forth.
Such assessments may help the player put the elements of a plan together, and work around such issues as assaulting a seemingly unassailable points harvest at a particular location – get those points another way…if you can.
I do like the distinct intimation that victory works with how the end of battle feels, and indeed how the battle itself has progressed beyond mere “crush this” or “seize that.” That said, one thing I found myself looking for in the scenario details and not really finding (many apologies if I have missed something here) is needing to pass a given points total before you can claim a higher order of victory even if the final ratios otherwise work out. If we were at “historic” Napoleonic battle XYZ and that battle, between very sizeable armies, had concluded with a number of the enemy works in French hands for a total cost of five thousand casualties against ten thousand enemy, what kind of victory would it really have been? A pretty nondescript one you might well think. But applying this game’s victory assessment model, the French would have just about all the territorial possession points plus some extras for inflicting more casualties than suffered. Based on this, a ratio calculation might award them the equivalent of a second Austerlitz. It does not feel right to be honest, and even as I write this I am still thinking I may have missed something somewhere.

One thing I know I have not missed is the part the play of the optional cards has in a victory assessment. When I was thinking about how I wanted to play this game, I looked through the cards for both sides (the decks are slightly asymmetrical in terms of distribution and types of military events and possibilities for both sides) and decided I might use them at a later date…or perhaps not at all. Some of the cards have great effects and game accents on them, but overall I have problems with cards, which at least in certain cases, become my only license to do things I think my army would have done anyway. And if I do use them (and here I am talking about the full catalogue of card actions and events included through the series) I do not see why employing them should come at a varying penalty in victory points.
Such matters run alongside why there is no Grand Battery card in Napoleon’s Resurgence but there is one in Napoleon’s Last Gamble? Yes, I could make a point, possibly correct, that the gunners in spring 1813 were not quite up to the demands of such massed fire in its most telling form, but why I need to have a card (at cost) to best mass the guns in 1815 is matter I am rather unsure about.
Ultimately, my main issue with the cards is that they could have done with a bit more (actually a lot more) campaign/contextual colour – and there was surely plenty of colour to choose from. I am, however, painfully aware that is an easy thing to offer criticism without also offering some kind of alternative. My alternative, even if the cards were kept absolutely “as is” would be to offer some relevant random events. In that vein, to give an example, if a committed Napoleon dodges a bullet/shell when up with the men, you would roll to see if something else happens – on a 6, his truest and closest remaining friend, Duroc, meets something like the fate he did historically, and as a consequence, Napoleon cannot be brought forward for the rest of the day, and his orders rating is 0 for the next turn. It is simple. It is realistic (I think), and it may or may not happen – like much else in the hectic throes of battle.[11]
Conclusion
The two big battles in the box are precisely that – they involve sizeable armies, and fronts that have both breadth and depth. If you are playing a larger/longer scenario on one or more of these maps, good play will mean handling the advance and positioning of an army as well as the skills to wield your formations effectively on the field of combat.
Overall, I do feel that mini-campaign maneuverings on these maps will be a rich and rewarding experience, and one where the model’s fog of war provisions will be seen at their best.
One proviso I have (again tentatively) is with another aspect of the victory determination process, and this while the game is still in progress. I have already spoken of how players can make their own mix of victory ingredients – prompted by the fact that there are so many means by which you can build your score. However, it is hard to look too far past the serious haul of points you can hug to the bosom of your cause by putting your foot and your flag where your bosom already is. In other words, nothing seems to build points like holding the right parts of the map.

To the south (roughly speaking) of Lützen there is a cluster of hexes (villages) marked for a total of 25 victory points. To put that into context, you would have either to demoralize a great chunk of the opposing army (six to seven major corps) and/or have a casualty difference in your favour that is quite astronomical in order to reach total a figure that could match their sum.

At Luckau (worth ten points in itself in a one corps per side action) you probably cannot win at all, certainly not as the French, unless Luckau is in your possession.
On other maps and in other scenarios the realities of territorial possession alter yet again. At Bautzen the two most obvious locations to aim for, including Bautzen itself, are a considerable distance from each other, and the actual Bautzen location, by rule, is not an active points winner in the battle scenario. Indeed, scenario type – battle, approach to battle, mini campaign – with their varying durations, victory determinants, difference in sense of pace and priority is likely either to play up or at least slightly diminish the need to grab control of places on the map.
Weather, needless to say, has more scope to play a part in the longer games because you are going to roll for it that more often. If it starts to bucket down in a shorter scenario as something that is more than a brief passing shower, who has the points already – and location points first and foremost – is likely to be more than half sat in the winner’s seat already. If it rains/thunders late, and one side still has catching up to do, that may well be game over. From the play point of view that may well be frustrating, but it is reality pure and simple.
Physically, this is a very attractive game.
You will often have more scope to overcome delays in the campaign games, and that includes if you are presently stuck in the mud a fair distance from a ten-point location or some trailing enemy corps you would like to chew up. But here I must also admit to a nagging feeling that the whole issue of point locations is too arbitrary. We have surely all played games where our decisive battle has not occurred anywhere near where conclusions were drawn historically, and while not a few of those games would still assign values to locations based upon some fundamental of the campaign – a capital, a vital supply conduit etc. – we would not appreciate having our alternative game events bent and twisted to suit any overt form of scripting.
I cannot help think that the broader scope of campaigning on these maps, full of the potential to carry an army’s weight this way or that, would benefit from a system that would either work with fixed locations but have changeable values depending on the campaign story, or else have processes and markers to identify the key locations as the game story progresses.
And that is quite enough criticism from me.
Time to get back to the positives:
– Physically, this is a very attractive game. To my eye, the maps are fully functional works of art, invite study and play, and are certainly not the glossy horrors that have a habit of bouncing light and units all over the place. Yes, there are also a lot of support/aid cards, but even I, with limited space, was able to get things comfortably and usefully into position. Set-up may take a bit of time, but if you are the sort of person well disposed to play this sort of design, you will happily work through that.
– Do you get an authentic feel of the armies and campaign of spring 1813? For the most part yes you do, with reference to the odd caveat I have made here and there.
– Combat has a lot of elements, but the resolution process is hardly a chore. In fact, I would consider it rather entertaining.
– Any bothers about the model having an ancestry back to the days of Kojak and the last days of Glam Rock? No. Far too much quality has been added to that robust early framework, and there is something very positive to be said about one rather straightforward and fairly short set of series rules that will serve as an entry to a large and growing range of titles.
– Regarding that range of titles, the only thing I could see missing from the existing and proposed designs was anything situated in Egypt. If any campaign was as much colour as military events this was it. It has been done before elsewhere, but given the amount of coverage thus far, there is plenty of room for another.
The 1813 campaign was, in its own way, just as massive and dramatic as anything from the previous year. In fact, in not a few ways it took campaigning and battle to a level not seen in Russia – there were far more battles of note, and as a sign of what was lurking in a bloody future, artillery came to the fight in truly daunting numbers time and again. Combining ease of comprehension and game management with a serious look at the theatre, it sits comfortably and alluringly beside the Europa Simulazioni (Napoleon’s Nemesis) and Canons en Carton (Allemagne 1813) – those offerings working at roughly the next scale up – as well as the mighty but daunting Struggle of Nations.
The campaign itself might not be box office, but it is a fascinating and pivotal European military event. The game works in a lot of the reasons why that was the case, and whatever you think might be missing, the model is robust enough to carry a house rule or two.
A quality design – but then, I hardly expected anything else.
Footnotes:
[1] Scott Bowden: Napoleon’s Grande Armée of 1813.
[2] Readers may care to study works such as George Nafziger’s Imperial Bayonets and Brent Nosworthy’s Battle Tactics of Napoleon and His Enemies to get an idea of the complexity of unit management on the Napoleonic battlefield.
[3] Dominic Levien Russia Against Napoleon.
[4] A little out of context, but Tim Clayton cites examples (Waterloo – Four Days That Changed Europe’s Destiny) of how raw Prussian recruits at Ligny proved deaf to the orders and instructions of their NCOs and got themselves killed far too easily dashing about in impulsive forays. The same also applied to many of the raw French infantry, and may explain why D’Erlon launched his initial attack in such a collection of clumsy and compact formations – to give some semblance of order to battalions that might otherwise fall apart on the approach.
[5] Andrew Roberts: Napoleon The Great.
[6] Elting and Esposito: A Military History and Atlas of The Napoleonic Wars makes a brief reference to the emperor going in with his boot at Lützen. However, certain occasions of imperial risk-taking during 1814 seem to have been driven more by despair than by military necessity.
[7] Modern scholarship (Barbero/Clayton) strongly suggests that D’Erlon’s I Corps’ attacks at Waterloo was preceded by a bombardment from close to a mile away from Wellington’s centre and left.
[8] “How can a man go forward with the cavalry without infantry support?” No two guesses where that line comes from, but within the context of this game series, it seems Ney wanted his charges without reading the rules!
[9] Ar* results, on columns 1:5 to 2:1 (Ar usually being a plain, straightforward attacker retreat), are converted to shock in storm turns or in terrain such as wooded. Design notes stress that different factors could apply to how such applicable combats progressed, based on the different nature of the battle environment.
[10] After the death of Bessieres in the spring of 1813, Napoleon was at pains to stress that his wife should be assured that he and the marshal were a good distance apart when a cannonball struck him in the chest. He was, however, far closer to Duroc at short time later, and to Saint-Maurice in 1815, when both met a gory end.
[11] Historically, Duroc was disemboweled by a cannonball during an action occurring between Lützen and Bautzen, and died a very painful and lingering death. Napoleon was at his side for much of that period, and despite the fact that the forces were in contact, he essentially called off the action and then sat bereft and alone for the rest of the day.
About the Author

Paul has been involved in the hobby since the early 1970s. Of largely Belgian ancestry on his father’s side, and English (Yorkshire) on his mother’s, after finishing his education he worked in tourism and student services, and also spent some time in the former West Germany. He met his wife Boo in 1990, and they married a couple of years later.
Paul hails from a long line of former servicemen – one grandfather was a sergeant in the BEF of 1914, whilst two of his great grandfathers were killed serving with the Royal Navy. His own father, who was born in Britain, served with the army in Malaya in the early 1950s.
Related Articles:
“This One’s Going to Take Careful Timing!” A Boardgaming Life Review and Analysis of Vento Nuovo’s Bloody Monday“This One’s Going to Take Careful Timing!” A Boardgaming Life Review and Analysis of Vento Nuovo’s Bloody Monday
Waterloo 1815: Napoleon’s Last Battle-A Boardgaming Life ReviewWaterloo 1815: Napoleon’s Last Battle-A Boardgaming Life Review
The Year 1813 and “The Struggle of Nations” Comments on the Campaign and a Kevin Zucker Design
Ships of the Line:Trafalgar 1805
Ships of the Line: Trafalgar Part 2
Waterloo 200: A Board gaming Life Review
Le Vol de L’Aigle – A Board Gaming Life After Action Report
