A Review of Trafalgar Editions’ Game of Nelson’s Epic Battle
by Paul Comben, Designer:Crisanto Lorente Gonzalez, Publisher: Trafalgar Editions
Part One: Components and the Basic Game
There is always a certain challenge facing designers looking to create games relating to the things men make to fight in – be it ships, be it tanks, be it aircraft, the challenge remains the same: just how much detail should be included?
Players love detail, but too much in inappropriate places, and games go wrong. Systems simply work better if things are kept to a manageable scope – pitch a handful of anything into combat, and you can probably have as much detail as you want; by contrast, if you want to recreate the battle around the Gazala Cauldron, or a mass dogfight over Kent, or epic action on the high seas, it is a prudent move to reduce the detail and turn up the colour and the tone.
 Trafalgar 1805 certainly has plenty of colour – sixty minis (supplied painted if that is your purchase option, and flaunting their national ensigns from the stern) will deploy on ten sea-effect tiles, whilst their crews will bustle around on ship logs dedicated to each of those sixty ships, loading different types of ammunition (advanced game), fighting fires, fighting enemy crews, and taking axes to fallen masts, canvas and rope in order to clear the broadsides and ready the ship once more.
It sounds promising, does it not, but do not expect all of it to be in the first half of the rules. The basic game is meant to introduce you to the fundamentals – how to get your ships to move and turn, speed up and slow down; where to put your ship to do the most harm; the better things for a crew to do on a hard-pressed vessel; and when is the right moment to gather your scurvy knaves about you and prepare to board your grappled opponent.
Well, that is quite a lot of colour, but certainly not all the detail. We will come to that in part two; in the meantime, let us have a good look at the components:
Overall, there is a lot in the box, and game preparation may take a bit of time. Each mini is about an inch and a quarter long, and a completed ship, ready to go, will consist of the plastic hull, three masts with their sails already attached, and an identifying flag to fly from the stern – the number on the flag corresponding to a relevant entry on the logs. All the minis are identical in size and design – nationality in the painted version being also shown by a red hull band on British ships, blue for French, and yellow/orange for Spanish. In the unpainted version (the paint job is just to render a basic, but serviceable, effect) the minis are red for British or blue/yellow for the Combined Fleet. The masts with their array of sails are initially fixed to sprues; they are easily removed (you will not need a knife) and designed to fit into recesses in the deck.
Regarding the masts, there are a couple of issues to watch out for: you may find, like I did, that just a few masts will not readily fit the holes; and in addition to that, while the mainmast is slightly taller than its partners, it is not that obvious and you may wish to store your mainmasts separately. The problem with a few ill-fitting masts is probably best solved by putting a very small amount of blue or white tack into the hole; that is what I did and it worked perfectly well for the very small number of models that needed it. Do not glue masts in, as a feature of the game is the removal of masts as combat gets serious and the battle progresses to battered hulks and valiantly enduring men o’ war. Some masts can be coaxed in with a bit of gentle pressure, but avoid pressing directly down from the top of the mast as you may well damage things – you do get some spare masts, and they are fairly robust, but pressing directly down is not a good idea.
Trafalgar 1805 certainly has plenty of colour – sixty minis will deploy on ten sea-effect tiles
Beyond that, it is worth adding that my sixty minis were all decently rendered – no blobs, broken bits or failures in the molding.
Adding the flag finishes the model. These are on peel-off sheets, with the flag to be carefully folded at its centre point (the backs are adhesive) and then fixed to the sturdy little flagpole on the stern of the ship. Avoid flattening the entire flag prior to fixing, as you need a bit of space to slide the flag onto the pole – then pinch and the model is complete. N.B. The game also comes with a complete set of spare flags.
With the ships of such a modest size, the actual play area accommodating them is also relatively small. The rules do not expressly specify how to set up the sea tiles, but a 3×3 arrangement with one spare seems optimum. A compass rose on one of the tiles, when coupled with the arrow marker, shows the wind direction. The tiles, individually, measure approximately 11.5” x 8”, giving a play surface of around 34.5” x 24” – so about the size of your average one sheet wargame map.

However, adding quite considerably to the space needed are the log sheets, and because these use cardboard markers on various tracks, you have to keep them set out and flat somewhere near the battle area. The logs do profile each ship in some detail[1] – gunnery and boarding strength, hull status, crew allocation and crew fatigue – but one minor gripe is that one or two of the tracks are a little difficult to identify because there is no key in the rules, and I was left sorting through both the rules and the example of play booklet to be certain what was what. This especially applied to the crew fatigue and crew task allocation tracks, which can run to different lengths and so one needs to be clear you are marking the right thing (in actual fact, the fatigue track is the one with the exclamation mark depicted on the crew figures).
This is small stuff admittedly, but I do suspect that board wargamers like things to be a bit more nailed down than those working with minis, and thus, supplying a player aid, or a key in the rules, where all these matters are clearly defined, would have been preferable. As it is, most of the markers (nice quality, on punchboards) used on the tracks are only depicted in the part of the rules that pertain to them, and there is no diagrammatic representation of what any ship’s broadside can take in by way of a field of fire beyond what is directly perpendicular to the ship’s port or starboard facing. Yes, the rules urge players not to get too fussy about such things, and they also stress that the guns on these ships had a very limited traverse, but again, giving players some kind of clear indication of how much of an angle you can put on broadside fire would have been appreciated.
By contrast, set up for the game is via a perfectly workable diagram – and if you do not fancy Trafalgar, more scenarios are to be posted on the company’s website, and beyond those, there is nothing to stop you setting up a few ships and having whatever kind of sea fight you fancy. As for Trafalgar, the set up diagram shows the general array of the ships, with key measurements at key points (in the game’s “units of measure” scale) to assist you in getting your initial alignments within the right parameters. Here, I would subscribe to the designer’s appeal not to get overly fussy; providing your ships are in historical relation to their friends and foes, whether things are a shade this way or that is simply not worth bothering about.
In broad terms, the game begins just as the van of the two columns of Royal Navy ships (plus the somewhat wayward Africa), are nearing the range where the ships of the Combined Fleet can open up on them. The time is around 11:45am, and the leading RN ships are going to have to endure around two to three turns of fire (the scale is fifteen minutes per turn) before they can really start dishing out some punishment themselves. This fits the historical record, and of course, the Victory was hardly in tip-top condition by the time she broke the enemy line and was looking inflict some serious hurt.
I will say more about combat a little later, but for now I want to concentrate on how you maneuver your ships. Certain potentially complicated things are avoided in both sections of the rules (such as ships, by dint of their position, taking the wind from other ships), but the advanced rules do offer a few extras regarding variable wind strength (for non Trafalgar battles), loss of sails, deployment of sails, and options for pitching against the wind. Overall however, I rather get the impression that the game is meant to be more about blasting than blowing. In the basic game, what this amounts to is a simple depiction of movement ability defined by wind direction in relation to current ship facing. This is combined with a few procedures for changing speed or even stopping altogether. The ethos seems to be, quite understandably, that nothing happens that fast in the Age of Sail, and certainly precious little happens the moment you want it to.
 However, there are a few issues with the way this has been presented – not least that the illustrated movement example in the English rules…is in Spanish. It is not entirely incomprehensible (numbers are numbers) but it is not as helpful as it should be – and adding to the problems is that it is in too small a print. I have also had a bit of a struggle with the compass rose wind/movement diagram; it is meant to be nice and simple, but there are a few things on it without a clear explanation as to their presence, and some other things which just may belong to that easy-go practice of the minis world. In any case, I have written for clarifications even as I am writing this piece, and in full expectation that answers will come very quickly, I will add them as a footnote as soon as I have them.
The game is meant to be more about blasting than blowing
In the meantime, beyond deciding how much wind you have in your sails, movement itself is performed by placing the same “Units of Measure” strips in front of your model as were employed in the company’s Waterloo game. It is also much the same sort of thing as you have with games like Sails of Glory and Wing of War – set out a path with the components provided and then move your ship/Sopwith along it.
One issue of practicality about this, is that if you do get the pell-mell battle Nelson intended, laying out the UM strips may not be that easy; many ships are likely to be bunched closely together, and it is not difficult to imagine ships getting knocked if you are trying to set up a path in a particularly crowded area. Then again, with a bit of practice and genial indulgence by players, you can forgo the use of the strips, working the whole thing out by eye instead, and thus leave the fiddly stuff for when it is truly needed. Besides, in the Trafalgar scenario itself, the Combined Fleet is hardly likely to be engaging in stunning evolutions of course; what wind there is making it just as difficult for their van simply to turn about as build up enough speed for a spot of waterskiing.


That, of course, was integral to Nelson’s plan; that by risking a slow approach to battle he could then isolate the rear two thirds of the enemy fleet, and achieve their total annihilation before the remaining third could effectively intervene. That can make the whole Trafalgar scenario look like a forgone conclusion, and when you then consider what actually happened, it could look even more that way. But one of the realities of Trafalgar’s basic game is that several of the historic British advantages beyond Nelson’s plan are not in effect. The two that are present are a +1 to initiative die rolls and a greater number of veteran crews. These are not negligible factors – initiative enables the player to see the enemy commit to moves before responding, and veteran crews will work a ship rather better than average complements. But the full representation of British tactical prowess is not going to come into play until the relevant mechanisms are present, and even then, if you have not worked out the essentials of how to use them, you will never get the best use out of what you have.
So, the Combined Fleet may have a better chance in the basic game, and one key to that is how much hurt it can deliver to the British ships as they move in. This, of course, leads us neatly into the basic game’s combat mechanisms.
Two forms of combat exist in the game; with the difference between the basic and advanced versions consisting of what precise tactical options you have in play. Cannon fire and boarding are the essence of age of sail naval combat, and although matters get rather more involved in the advanced version, the fundamentals of processing the battle remain the same.
For cannon fire, each ship is given a base firepower depicted in the number of dice it can roll to obtain hits. The number of dice reflects the inherent firepower of the ship in question – how many cannon it has to either broadside. At longer ranges, the template’s range bands indicate modifications to this number – so, at long range, you roll two less dice than your base figure. On the other hand, extra dice and extra hurtful nastiness awaits a ship subjected to a stern (or to a lesser extent) a bow rake.
Once the number of hits is ascertained (on a 4 – 6 for average crewed ships at point blank range, 5 – 6 otherwise; veteran crews always hit on 4 -6), a separate roll is made for each hit to see what damage it has done. Most of the time (rolls of 1 – 5), you will be hitting the hull; however, on a 6, you score a critical hit, and this is where you find the chance of masts tumbling, rudders being rendered useless, fires starting and explosions occurring.
One thing absent from the process of cannon duels in both versions of the design is any sense of national doctrine – to put it in simple terms, the British aiming largely for the enemy’s hull, whilst the French or the Spanish were more likely, at least at the longer ranges, to aim for the rigging. Ammunition selection does play a part in the advanced version, and we will come to that in part two; here however, one simply rolls to hit, and the relevant table will tell you what has happened.
Boarding is a risky business, and the rules go out of their way to describe it so. To board you must grapple, and if that is achieved, to will go to a simple boarding process, refined by whether just the one side is being the aggressor, or both sides are seeking to gain possession of their opposite number. Results include gaining control of the target ship, or the opposing sides remaining locked in a dispute of sharp implements and the close range discharge of firearms. Boarding, like cannon fire, is further refined in the advanced rules.
Although there is logic to how the advanced version of combat builds upon the basic version, there are one or two potential anomalies that should be acknowledged. Nelson wanted decisive battles; decisive battles meant getting in close and avoiding long range pounding matches by two lines of ships. British doctrine was largely about having the upper hand when things got up close and personal; but, with certain relevant mechanisms only appearing once you are working with the advanced rules, the British player might not be disposed to get quite as close in the basic game as Nelson would have wanted.
What this boils down to is that the British have more veteran crews, and therefore can hit their targets more often at a base 4 – 6 chance at any range, than Combined Fleet ships that can only hit at this die range once the target is at point-blank range. In the advanced game, there are mechanisms that can make it desirable for the British to get in closer, but within the permutations of an ever changing battle, with ships moving all over the place, there may be circumstances in sections of the battle area where the British closing in could look like risking a winning hand. This, I stress, is not a hard and fast reality of how your battle is going to go, but it is certainly in the mix, and definitely worth considering.
Before moving to my initial conclusions, I want to give some depiction of the game’s pulse of battle.
Although the game works in fifteen-minute turns, I am disposed to see this as open to interpretation – i.e. with different actions in different parts of the battle having a varying relation to this stated timespan.
One of the best examples I can give of this involves the simple process of firing “a broadside” at the enemy. Clearly, within a fifteen-minute turn, cannons could be discharged and reloaded numerous times; on the other hand, just one point-blank rake could be sufficient to cripple a ship utterly. What this means is that the process we might call “standard fire” actually consists of the sum of multiple broadsides fired over the course of a turn; a point-blank rake, on the other hand, is likely to be one set piece blast delivered within the context of a game turn – so time about the location of the rake is moving at a different pace to fire delivered at a vessel in other circumstances.
I make mention of this not to indicate some flawed aspect of the design, but merely through a desire to remind readers that all wargame designs work with abstractions in one shape, form or another. To offer an example from an entirely different design series, The Great Campaigns of The American Civil War has its own rather free interpretation of both the passing and the lingering moment. Battle time in the series does not equate with operational time; so the dates offered on the turn track are merely approximations and not immutable representations.
This only becomes a problem if, within the overall context of any particular design on any given subject, things happen too fast or too slowly…or at least should happen at some moment but then never happen at all. One test for the basic version of Trafalgar (and also of course for the advanced version) is how successfully the British can complete their closing maneuver. Historically, the Victory was rather badly damaged by the time of her breaking the enemy line, and then, as both history and legend concur, she was only saved from receiving a deadly blow by the immortal “Fighting Temeraire” coming to her aid. So, if the battle goes too quickly, or takes forever to get nowhere; or if too many British ships get badly damaged too often on the approach, or not enough realistic damage is done, we may have a problem.
After some experimental plays I also felt there were a couple of things missing from the log for each ship – in particular the loading/ammunition designation for the port and starboard broadsides. You can use the point-blank and sinking status broadside boxes, but that is a bit ad hoc. Unfortunately, although it looks nice, there is a generic ship silhouette on each log taking up the room which could have been used for this purpose
As I said earlier, the Victory has at least two, or more likely three turns of enemy fire to endure before she can begin “mixing it.” Precisely how much incoming fire she must endure, and exactly when the “mixing” begins will vary. Looking at the actual approach, it is important to understand that the British ships did not hit the Combined Fleet line (actually a shallow concave crescent), at ninety degrees; rather, the approached was more at a mild diagonal, which, in game terms, meant that the British ships were not going to be bow raked, could exchange some fire before their final closing-in, and had a greater latitude in choosing either their target or the gap they wished to aim for.
How we see this process depicted in the game can be demonstrated by recreating Victory on that approach, with fire coming in from both the Santisima Trinidad and Bucentaure. What the game does do, even in the basic version, is display just what a risk Nelson was ready to take, and just what sort of punishment his flagship was going to be vulnerable to. And frankly, even with these few ships, and with several options not in play, the exercise was both instructive, easy to handle, and above all else, fun:
1) Victory, on its fateful approach, enters medium range of Santisima Trinidad. Subsequent fire from the impressive Spanish ship puts three hull hits on the Victory – out of the twenty-four hull boxes she has (with the last five denoting that she is then in a sinking state). Victory does not fire owing to her present arc, and for the same reason, neither does Bucentaure.


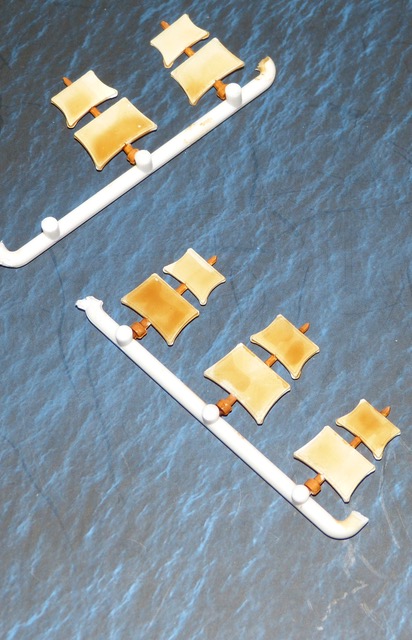
2) Now things get nasty as the Victory closes. The Spanish and French ship, at point-blank range, riddle the Victory’s hull with a further eight points of damage; furthermore, two of Victory’s masts fall to her port side in a great tangle of canvas, rope and wood – in a formal game, you would use a couple of sail markers on the playing surface to indicate this. Fire is simultaneous, so Victory can fire back this turn, but before she can let loose again from her port broadside, her crew must clear away the debris now hanging over her gun ports. In the meantime, Victory fires at the Spanish ship and puts four hull hits on her – out of a considerable twenty-eight.
Ships of this period, barring freak occurrences, were not going to be lost that quickly unless things got up close and brutal.
Thus, Victory has lost nearly half her hull boxes, but, in the broader context, she has some chance of stern raking Bucentaure – if only the fallen rigging and sail can be cleared away. I rather suspect Victory’s hull damage in this little example is not so far away from what she took historically – but here she has taken serious damage to her masts as well. Not unrealistic; not improbable; and like she did historically, she must hope the following British ships can come up swiftly in support.
One other thing that is obvious is that ships of this period, barring freak occurrences, were not going to be lost that quickly unless things got up close and brutal. A range of options and provisions would further shape and colour this example had we been using the advanced rules, but that is all for part two. Here, suffice it to say, that British close range advantages would have added one more hull hit to the Santamisa Trinidad, that crews would have had to be more precisely allocated to the task of clearing away the masts from an encumbered and slowing Victory, and that different types of ammunition might have wreaked further havoc – double shot, chain shot, grape etc.
To be continued….
About the Author

Paul has been involved in the hobby since the early 1970s. Of largely Belgian ancestry on his father’s side, and English (Yorkshire) on his mother’s, after finishing his education he worked in tourism and student services, and also spent some time in the former West Germany. He met his wife Boo in 1990, and they married a couple of years later.
Paul hails from a long line of former servicemen – one grandfather was a sergeant in the BEF of 1914, whilst two of his great grandfathers were killed serving with the Royal Navy. His own father, who was born in Britain, served with the army in Malaya in the early 1950s.
Related Articles:
Iron and Oak – A Boardgaming Life Review
The Tide at Sunrise: Naval Rules (Review)
Legion of Honor – A first look by TheBoardgamingLife
Flawed Commander Nimitz? A BoardgamingLife Review
Battleships Do Not Themselves a Battle Make – A Study of Naval Warfare in the Great War Era
