Indian Tactics for Game Turn 1

Overview
Success, for the Indian player in King Philip’s War seems to be heavily dependent on competent play during the first 3 game turns. If King Philip and his War Bands cannot make serious headway during these vital turns, defeating the English becomes nearly impossible. But what is the best strategy to employ to maximize the chances for success? Do you hunker down and defend your territory until other tribes can be activated via “Indian Diplomacy”? Do you aggressively attack every colonist and settlement within reach? This article discusses a tactical option for the Indian player on Game Turn 1.
Situation Evaluation
The game starts with 11 full strength English infantry units versus 10 full strength Indian Warriors, and so grants a small advantage to the Colonists. But, more important, is the geography of the starting positions. With the exception of the string of Wampanoag and Sakonnet villages in the south, stretching from Massachusetts Bay to Buzzard’s Bay, the other Indian villages are separated from each other by English settlements. This means that while the Indians enjoy a mobility advantage in the early turns of the game (i.e. 6 movement points, compared to only 5 for the Colonists), they’re really kind of hamstrung by geography. So how do you capitalize on the mobility advantage?
There are two other English restrictions, prior to Church’s arrival, that provide the key to unlocking the Indian advantage:
- 1. The English player may only move 3 companies per turn.
- 2. The English may only move along “1-pip” connections unless they have a Guide with them.
This prohibition of 2- and 3-pip movements means that an attentive Indian player can position some of his units such that they are virtually unassailable by the English.
Starting Positions
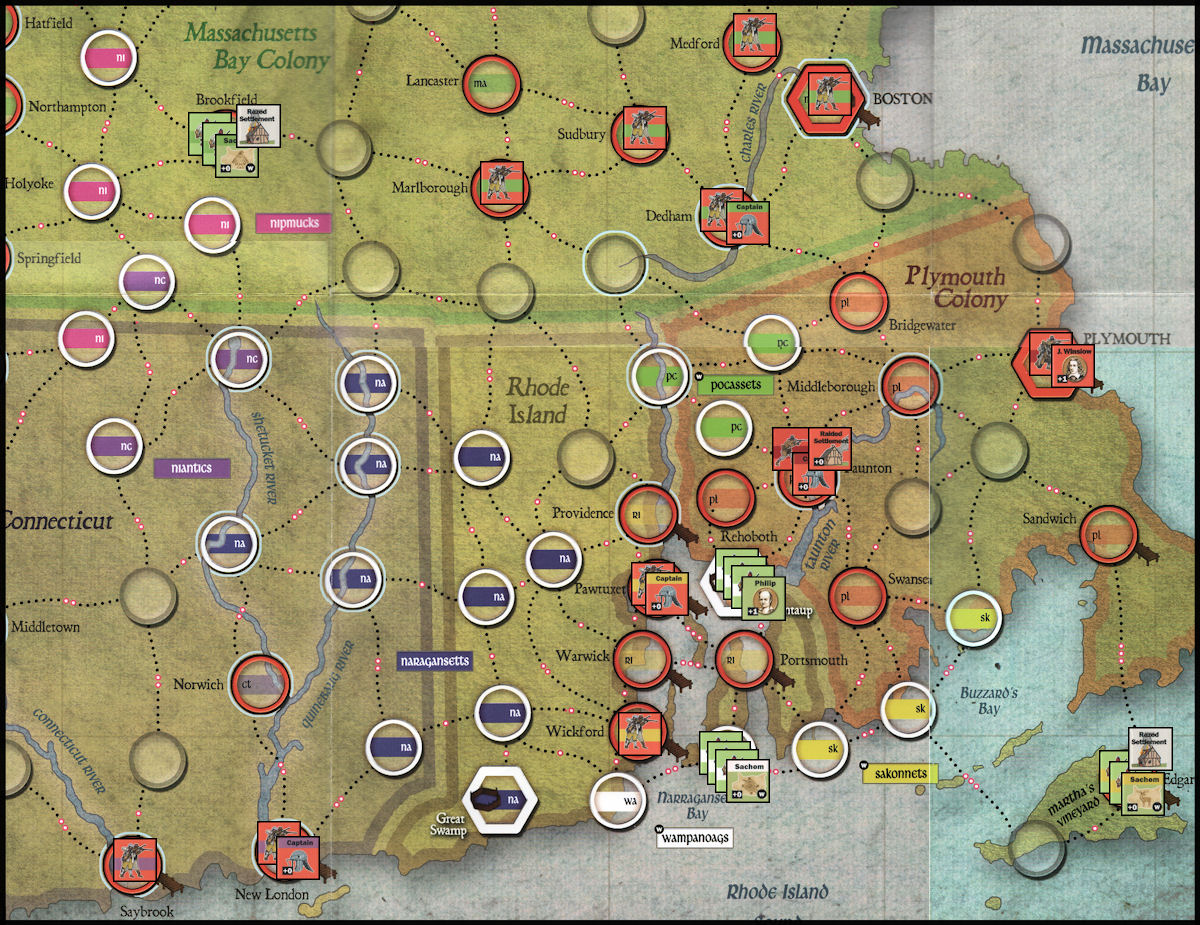
The following graphic shows the starting positions as they actually were for a game I recently played, where I was the Indian player. The English player must set up first and therefore is at an immediate tactical disadvantage. In addition, the English are restricted to placing a maximum of a single Soldier unit per hex whereas the Indian player has no such restriction and may therefore concentrate units for local superiority at any point.

The English in Plymouth Colony have set up to protect the town of Plymouth. By placing Winslow and a Soldier in the town itself and placing a Soldier/Captain in Middleborough, the approaches to Plymouth town, as well as the town itself, are guarded as well as they can be given the English forces available. All the Massachusetts forces are huddled in the southern part of the colony, waiting to rush in to Plymouth colony as needed. The Rhode Islanders, rather than attempting to fortify Portsmouth which is easily surrounded and crushed, all set up west of the river in Wickford and Pawtuxet. The English inability to traverse 2-pip and 3-pip connections on this turn (unless they get lucky and snag a Guide during an Indian-initiated battle) means that the Rhode Island colonists will be essentially stranded on the west side of the river but will be fairly mobile up and down the west side. Also, the ports along the west side of the river should remain under English control, allowing for reinforcements to be brought in from Connecticut, if needed. Finally, the Connecticut forces are both positioned in ports (New London and Saybrook) where they can be quickly rushed to any hotspot that may develop in Plymouth Colony or Rhode Island.
The plan, for my Indian Warriors, is two-fold:
- 1. Raze at least two colonial settlements; preferably three.
- 2. Send a powerful force deep into western Massachusetts Bay Colony.
Razing three settlements will allow me, on the Indian Alliance phase of Game Turn 2, to either bring the Narragansett or Nipmuck tribes into the war on my side. Razing only two means that only the Narragansetts can be coaxed into joining me (see the Indian Alliance Chart), which limits my options. But even just the Narragansetts should be sufficient for my “early game” plan. Ending Game Turn 1 without razing even one settlement would be a total disaster, but the odds are against that happening if the Indian units are set up properly.
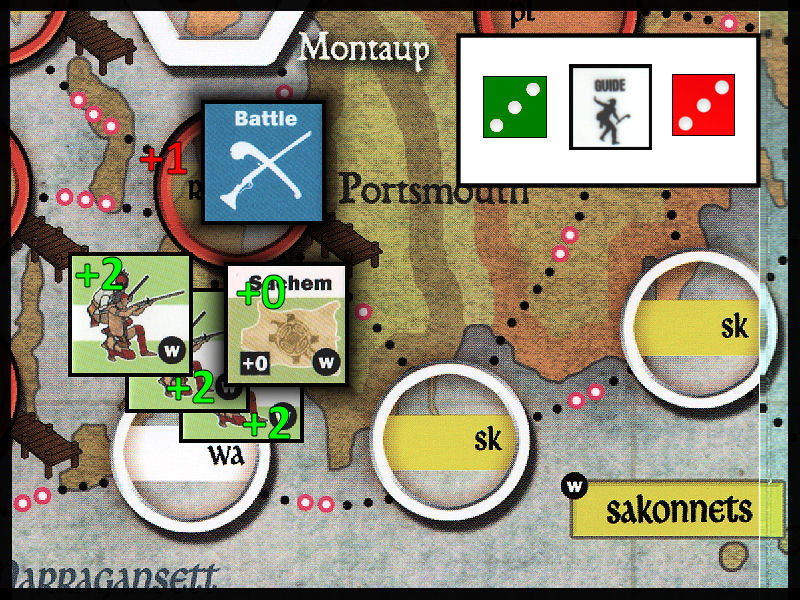
First, both Sakonnet Warrior units set up in the middle of the three Sakonnet villages, near Buzzard’s Bay, in preparation for a move into Martha’s Vineyard. Next, all three Pocasset Warriors set up in the western-most Pocasset village, along the border between Rhode Island and Plymouth Colony. This stack will form the “shock troops” that will move into western Massachusetts. The six Wampanoag warriors are split between Philip and the un-named Wampanoag Sachem, three apiece. Philip will start in the Indian Fort of Montaup. Having this powerful force in Montaup affords me the option of striking out in any direction to challenge the Colonists, or of hunkering down in the Fort, rendering it impregnable for at least several turns. I set up the other Wampanoag Sachem with three Warriors in the village just south of Portsmouth (RI). From here, this War Band can move north to raze Portsmouth, since it has been left without soldiers defending it.
As mentioned earlier, we are ignoring the possibility that Church may arrive on Turn 1 for purposes of this example and, since no one receives reinforcements on Turn 1 and there is no Indian Diplomacy Phase on Turn 1, we may move directly to the Indian Movement Phase. The next graphic, and description that follows, show the details of my movement:
- The Pocasset “shock troops” traverse four neutral/open spaces, heading first southwest into Rhode Island and then driving northwest into Massachusetts Bay colony. An Interception attempt by English Soldiers in Marlborough fails, allowing my War Band to spend 5 movement points which includes the movement point required to place the Battle Marker at Brookfield.
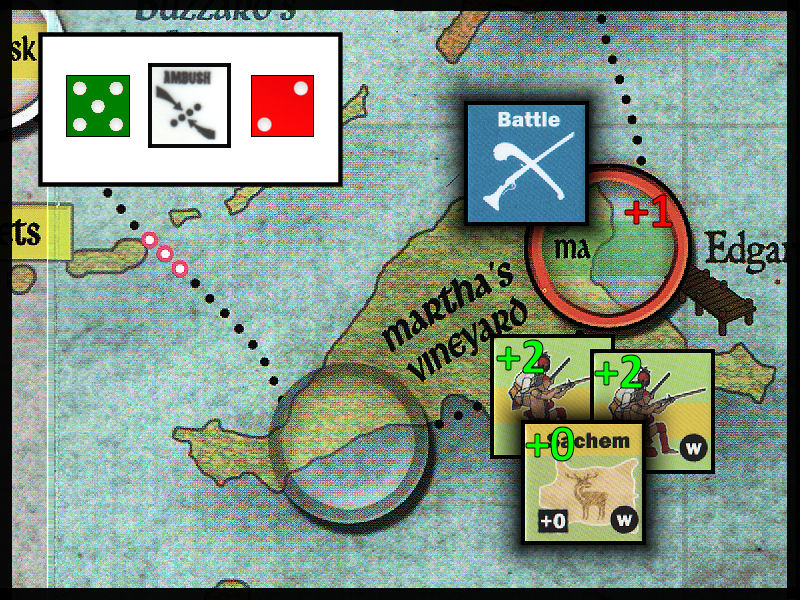
- The Sakonnets cross the 3-pip connection across Buzzard’s Bay into Martha’s Vineyard, and then spend a fourth movement point to place a Battle Marker outside of Edgartown. No colonial units were in position to Intercept or interfere with this movement in any way.
- The Wampanoag Sachem and three Warrior units turn their sights north and place a Battle Marker against Portsmouth.
- Finally, Philip and his three Wamapanoag Warriors leave the safety of the Fort and move northeast into the English settlement of Taunton, placing another Battle Marker. Since the connection between Middleborough and Taunton is only a 1-pip connection, the English Captain and Soldier in Middleborough are eligible to attempt interception, which they do successfully. Philip must now attack a reinforced Taunton.
The stage is set for the Combat Phase.
Combat
There are four battles to be resolved:
- #1 – Brookfield
- #2 – Taunton
- #3 – Portsmouth
- #4 – Edgartown
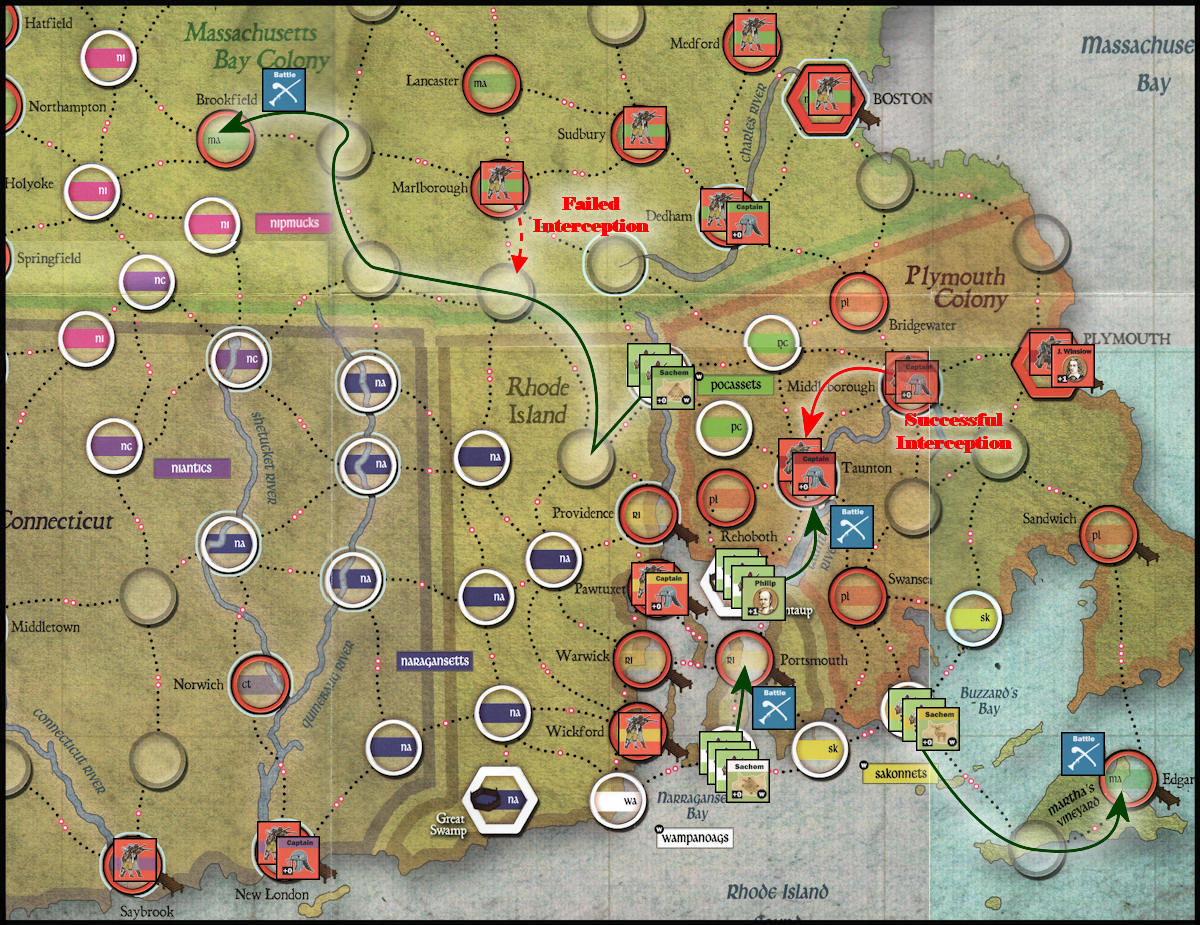
Brookfield – The town of Brookfield contains no soldiers and so will fight with only its inherent strength of 1. The two full strength Warrior units are worth two strength points each for a total of 4. The dice are rolled and the results are: Green die = 6, Red die = 2, Event die = “Panic”. The total of the Red and Green dice is 8, which is an even number, thereby making the English the “affected” player. The English SP total is reduced by 1 to zero. Looking up the results on the Combat Results table, we find that the English suffer 2 hits; enough to raze the settlement. The Indians suffer no hits at all.
A “Razed Settlement” marker is placed on the town of Brookfield, and the Indian forces advance in. That’s one of the two razed settlements that I need this turn…
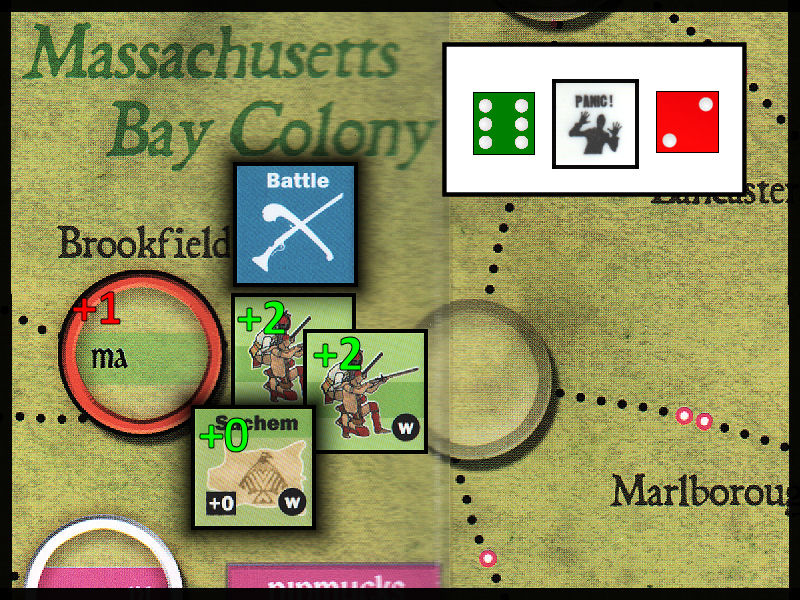
Taunton – The attack on Taunton is the most powerful attack the Indians can make on Game Turn #1. Three Warrior units with a 2 SPs each plus Philip’s combat strength combine for a total of 7 SPs. Unfortunately for Philip, the English were able to successfully intercept and so rather than fighting a nearly defenseless town, he must also fight the colonial soldiers, a combined strength of 3 SPs (2 for the soldier and 1 for the town). The dice are rolled and the results are: Green die = 4, Red die = 5, Event die = “Spy”. The total of the Red and Green dice is 9, which is an odd number, thereby making the Indian the “affected” player. At the end of this combat round, a “Spy” counter will be attached to Philip, but there is no effect on this combat.
Cross referencing the combat strengths and die rolls on the Combat Results table, we find that the English suffer 2 hits, and the Indians suffer only 1 hit. The English absorb their two hits by flipping the soldier to his half strength side, and placing a “Raided Settlement” marker on Taunton. This prevents the Indian from scoring victory points for either an eliminated soldier or a razed settlement. The Indian player takes his loss by flipping one of the Warrior units to its half strength side. The English retain control of the town and Philip must fall back to the Fort of Montaup.
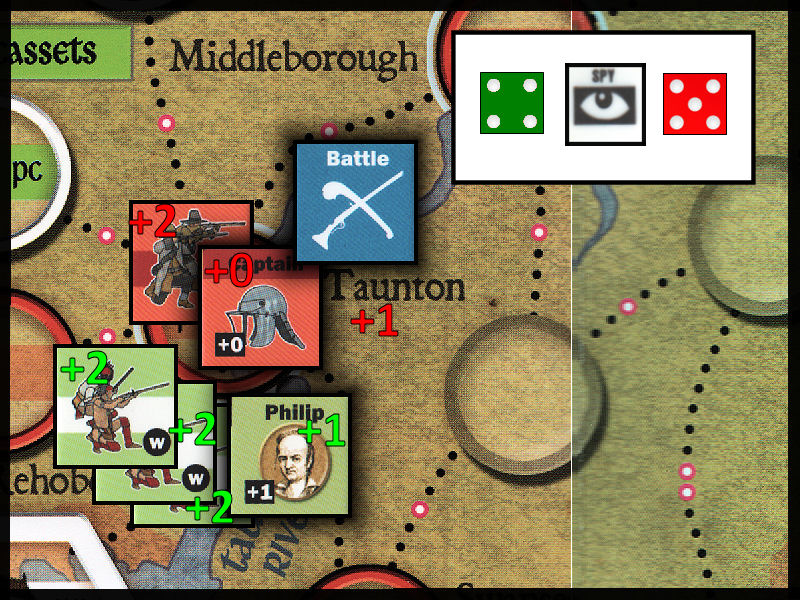
Portsmouth – I have three Warriors in my War Band for a total of 6 strength points against a minimally defended town, so I expected this to be a walkover. Didn’t turn out that way. The worst thing that could happen, happened. By rolling doubles (3 and 3) on the Red and Green dice, the combat ends immediately without a winner.
No hits are assessed and no units advance or retreat. There goes my chance for scoring a second “easy” razed settlement.
Edgartown – Another one that should be a walkover. I have 4 strength points of Warriors and the English have only a single SP for the settlement’s inherent defense strength. This attack is designed to accomplish two things:
- Score another razed settlement.
- Position my Sakonnets to move north to threaten the settlement of Sandwich, and then Plymouth itself.
In addition, both Edgartown and Sandwich are ports, so neutralizing them will restrict English mobility a bit more in the east. The dice are rolled and the results are as follows: Green die = 5, Red die = 2, Event die = “Ambush”. Since the total of the Red and Green dice is an odd number, the Indians are the “affected” player which, in the case of “Ambush” means they are the ones who got ambushed. Fortunately for me, the combination of English low strength points and low die roll assure that the Indians will suffer no hits, so the Ambush advantage is wasted. The British are assessed two hits which is what is required to raze the town. And that gives me razed town #2, and a victory point as I advance my Warriors into Edgartown.
The Combat Phase is concluded.
Assessing the Results
Even though I caught a bad break by rolling doubles in the Portsmouth battle, I still met my objective of razing two English settlements. In addition, I also met my other objective of sending a “flying column” into western Massachusetts Colony. Having razed two settlements, I will be able to activate the Narragansetts during the next Indian Diplomacy Phase. I’m feeling pretty good about the results of my Movement and Combat Phases, and I’ll explain why:
- King Philip’s War Band is still strong and centrally located in Montaup. He is positioned to intercept the English in any number of different directions, and will inhibit their movement greatly.
- The Connecticut Companies in New London and Saybrook will have to think twice about coming to the aid of Rhode Island or Plymouth Colony, since they may have Narragansetts all over them next turn. It’s likley they will remain in Connecticut.
- The Rhode Islanders, while catching a big break by not losing Portsmouth, also must now look over their shoulder for Narragansetts next turn. They are also lacking sufficient strength and mobility to have a good shot at razing a Sakonnet or Pocasset village during their turn. The risk of weakening themselves on futile attempts to raze villages may be too great.
- The Massachusetts men will have to content themselves with picking off some low hanging fruit by razing a Pocasset village, but they’re certainly not likely to forget Philip’s powerful War Band lurking close by.
- Finally, and most importantly, the Pocasset raid into western Massachusetts now gives the Massachusetts colonists something to think about. Normally, these guys head straight down into Plymouth Colony and effectively shut down any hopes that King Philip might have had about dominating there. They must now consider that there is a powerful force of Pocassets that has just razed Brookfield and could easily swing back east to inflict more damage. Next turn, the newly arriving Narragansetts may also decide to drive north into Massachusetts and gum things up there. So, at least part of the Massachusetts colony force will have to remain there to keep a lid on things.
Can you imagine if I’d been able to raze three settlements? Then I’d also be able to opt to activate the Nipmucks next turn. Their territory is positioned astride the string of western Massachusetts settlements from Northfield (in the north) to Springfield (in the south). They could raise holy hell among those settlements, as they did historically, and there would be very little the English could do about it, short of diverting Massachusetts power out west, leaving Plymouth Colony in the lurch.
Returning back to my “keys to unlocking the Indian advantage” mentioned earlier in the article… what is the English player to do now? He’s only allowed to move three Companies. How does he:
- Provide support to Plymouth colony?
- Defend Connecticut which will be threatened by Narragansetts next turn?
- Run down the rampaging Pocassets in western Massachusetts?
- Defend Rhode Island which will be seriously threatenend by a combined Wampanoag/Narragansett pincer next turn?
- Keep the town of Plymouth safe and secure?
- All of the above?
It won’t be easy with only 5 movement points and the inability to cross anything more than a 1-pip connection. In fact, due to the 1-pip restriction only one Massachusetts soldier unit (the one in Marlborough) can possibly even reach the Pocasset War Band that razed Brookfield! So Turn 2 Massachusetts reinforcements will have to be dedicated to meeting this threat, thus taking some heat off of King Philip in Plymouth Colony.
How should the English react? That will be the subject of a future article…
Summary
This article discussed some tactical options that can be employed by the Indian player on the first turn of the game in order to get King Philip and the Indians off to a good start. A “good start” in my opinion means not allowing the English to focus their power on Plymouth Colony by creating credible, non-ignorable (if that’s not a word, it should be), threats from the southeast corner of the map (Edgartown –> Sandwich –> Plymouth) to the northwest corner (i.e. western and north western Massachusetts). I was able to do that successfully on Turn 1, although it could have turned out even better.
I will be writing follow up articles to describe how this early game strategy actually turns out, as well as other articles related to early game play for both the Indians and Colonists. If you’ve got an opinion about this article or have one of your own you’d like to see published on TheBoardgamingLife.com, please click the “Contact Form” link, on the right, and let me know what you have in mind. (Note: You don’t have to fill in all of the information on the contact form: just a name, an e-mail address and a comment of some type, hopefully constructive).
