Tactics for Proper Employment of U.S. Special Forces in Victory Games Gulf Strike
Overview
One of the most overlooked and misused U.S. assets in Gulf Strike are the U.S. Special Forces (specifically, in this game, 5th Special Forces Group and a Battalion of the 75th Ranger Regiment). Until you’ve actually played your way through the entire Scenario 2 or 3, it’s hard to understand the full impact of the Soviet “avalanche comin’ down the mountain” towards the hapless Iranians and light American ground forces. As the U.S. player you need to maximize each advantage the game presents you. One such advantage in Gulf Strike is the U.S. Special Forces. Provided that they’re used correctly. This article examines the various usages of U.S. Special Forces and provides some specific examples of how they can be put to best use in Scenarios 2 and 3.
Special?
First of all, the U.S. player does have the option of using either or both Special Forces unit as conventional combat units. Highly trained warriors used as minor speed bumps. Hmmmm…. Nothing “special” about that. So, let’s discard that idea right from the start. Break down both of your Special Forces units into detachments as soon as they become available.
Having broken down your Special Forces units into 9 detachments each, how best to utilize these detachments to slow the Soviet advance? First, let’s review the available Special Forces missions:
- LRRP (Long Range Recce Patrol)
- Raid
- Ambush
I think that most Gulf Strike players would agree that that managing SF Detachments is almost a full time job (anyone who’s tried to manage Soviet Spetsnaz detachments in Aegean Strike would certainly agree). The Gulf Strike rules simply instruct you to write down the detachment assignments on a piece of scratch paper (see “Player Aids” for a formatted player aid sheet that contains a detachment organization sheet), and there are 18 possible detachments. But it’s not just the mission assignment task that takes the time, but also watching the map during the course of the turn to ensure that SF Ambushes are triggered properly, and to ensure that the LRRP targets have not moved, and to check that all the conditions for a Raid are still met. It really does require focus. If you have enough players on each team you can split command as follows:
Air Force Commander – Manages all air operations including Air Transport and B-52 ops.
Ground Commander – Manage all conventional ground combat units and operations.
Navy Commander – Manages all naval operations and is tasked with the destruction of the Soviet Navy. Since there are relatively few naval units that need management, particularly after the Soviet navy is destroyed, the Navy Commander should also manage SF Detachments.
If you’re playing one-on-one, you’ll just have to take your time in planning the missions and staying focused until execution of the missions. But what missions should you assign detachments to? Just throw them all out on Ambush missions and hope the Soviets stumble into them? That doesn’t sound very “special” either. Let’s examine the three possible missions in detail.
LRRP (Long Range Recce Patrol) Mission
This single detachment mission provides a +3 to a U.S. attacking unit’s Bombardment strength in the hex where the SF detachment is located. This can really make a difference when targeting enemy units in cities or mountains, offsetting the defensive modifiers inherent in those terrain types.
The downside of this mission is that it’s linked to a particular hex, not a particular enemy unit. So, unless the U.S. player has the initiative and is therefore assured of being able to execute bombardment strikes before the enemy can move, your LRRP missions may go unused. If you, as the U.S. player, do not have the initiative (and, at least in the early part of the game, you won’t), then don’t waste your LRRP mission detachments on targets that are likely to move, such as Truck units or front line combat units like armor/mech divisions or engineers. Concentrate instead on more stationary targets like Airbases, Supply Depots, or Air Defense units. Although these units are capable of movement (or being transported), they are less likely to move than other combat units. Enemy combat units that are currently engaged in combat with your units are also prime targets for LRRP missions.
LRRP missions are also the only mission that entail no risk. Your assigned SF detachments cannot be eliminated as they potentially can on both Raid and Ambush missions.
Raid Mission
A Raid mission requires commitment of 3 SF detachments, making it the most expensive of the Special Forces missions, so care must be taken when planning the mission.
Unlike LRRP missions, Raids may not take place in hexes that contain any enemy assault units (all armored and infantry units, including Engineers, are considered “Assault Units”). This mission is designed to strike at enemy Supply Depots, first and foremost, and secondarily Air Bases and Truck units. These three target categories provide the highest positive modifier for the attacking detachments.
Also unlike LRRP missions, they do not require any outside support from Air Units to do damage; they can inflict hits all by themselves. If the target is an Airbase or Truck unit, the chance of scoring 3 or more hits, thus eliminating the target entirely, is 60%. For Supply Depots, the chances increase to 80%. These are awesome odds, making the Raid a tempting mission. (Safety Tip: Avoid enemy HQ units as they present the least chance of success due to a -2 modifier).
The down side (knew there had to be one of those, didn’t you?) is that the Raid is also the most dangerous of all the SF missions. Each mission must undergo Air Defense fire before executing the mission, although defensive units’ Anti-Air ratings are reduced by -1. Make sure the prize is worth the risk before launching your Raids!
Ambush Mission
My favorite… cost effective (only requires 1 SF detachment), combat effective (hinders enemy movement and can potentially score a hit on an enemy unit), and minimally risky (only 10% chance of losing the SF detachment).
Although it is my favorite SF mission, the Ambush also requires the most fore-thought and planning to be effective. You have to get a bit “Gretzky” to effectively run these missions (you remember the “Great One’s” ability to always locate himself not where the puck was but where the puck was going to be?). You too must think in terms of where the enemy combat units will be during the course of the upcoming turn’s movement phases, and plot your mission accordingly.
The Ambush Mission can be quite powerful, particularly when combined with road Interdiction (Air missions). Let’s take a closer look at an example of how the two can be used to slow the Soviet advance to a crawl… and maybe give them a bloody nose to boot!
Underhanded Soviet Tactics
You should expect your Soviet opponent to exploit every potential seam in the rules to his advantage. In the case of Interdiction, the rules say that any unit, except for Engineers or a stack containing Engineers, entering the interdicted hex must pay an additional 2 movement points. So, the Engineers do NOT pay the extra 2 movement points. Other units/stacks without Engineers pay the cost of entering the hex plus the 2 extra interdiction penalty points. In either case, the interdiction marker is then immediately removed after the unit has passed through.

Let me digress for a moment to express some annoyance at the fact that the game provides no Interdiction markers. The black and white number markers get used for just too many purposes in this game, so I always use the Interdiction markers from Victory Games Vietnam: 1965-1975, which are just perfect for this purpose.
The Soviets have no shortage of Engineers. Not enough to embed one with every stack moving across the battlefield, but certainly enough to ensure the vanguard units have Engineer support. The U.S. player might, understandably, begin to question the effectiveness of using scarce air units for Interdiction missions. A crafty Soviet opponent (like my last Soviet opponent) will even draft his Truck units into Interdiction-Clearing duty! Underhanded? Yes. Against the rules? No. Although it probably should be. Truck units possess a 16 movement point allowance. You can clear quite a few Interdicted hexes with that many movement points.
Don’t despair, U.S. player! Proper usage of Interdiction combined with Special Forces will earn them the right to be called “Special” again.
“Special” Forces… Really.
The key is in proper positioning of your Special Forces Ambush Missions relative to the placement of Interdiction markers. For our first example, let’s assume a Soviet stack in hex 3921 containing a Mech Division and an Artillery unit. Moving along a road in Movement To Contact formation, this stack will pay 2 movement points per hex. Each unit has a movement point allowance of 8 so the stack will generally be able to move a total of 4 road hexes (Option 1). Our crafty Soviet player is in a hurry, however, and may decide to switch into Travel formation for 1 movement point, and then spend the remaining 7 points moving along the road at a cost of 1 movement point per road hex (Option 2).
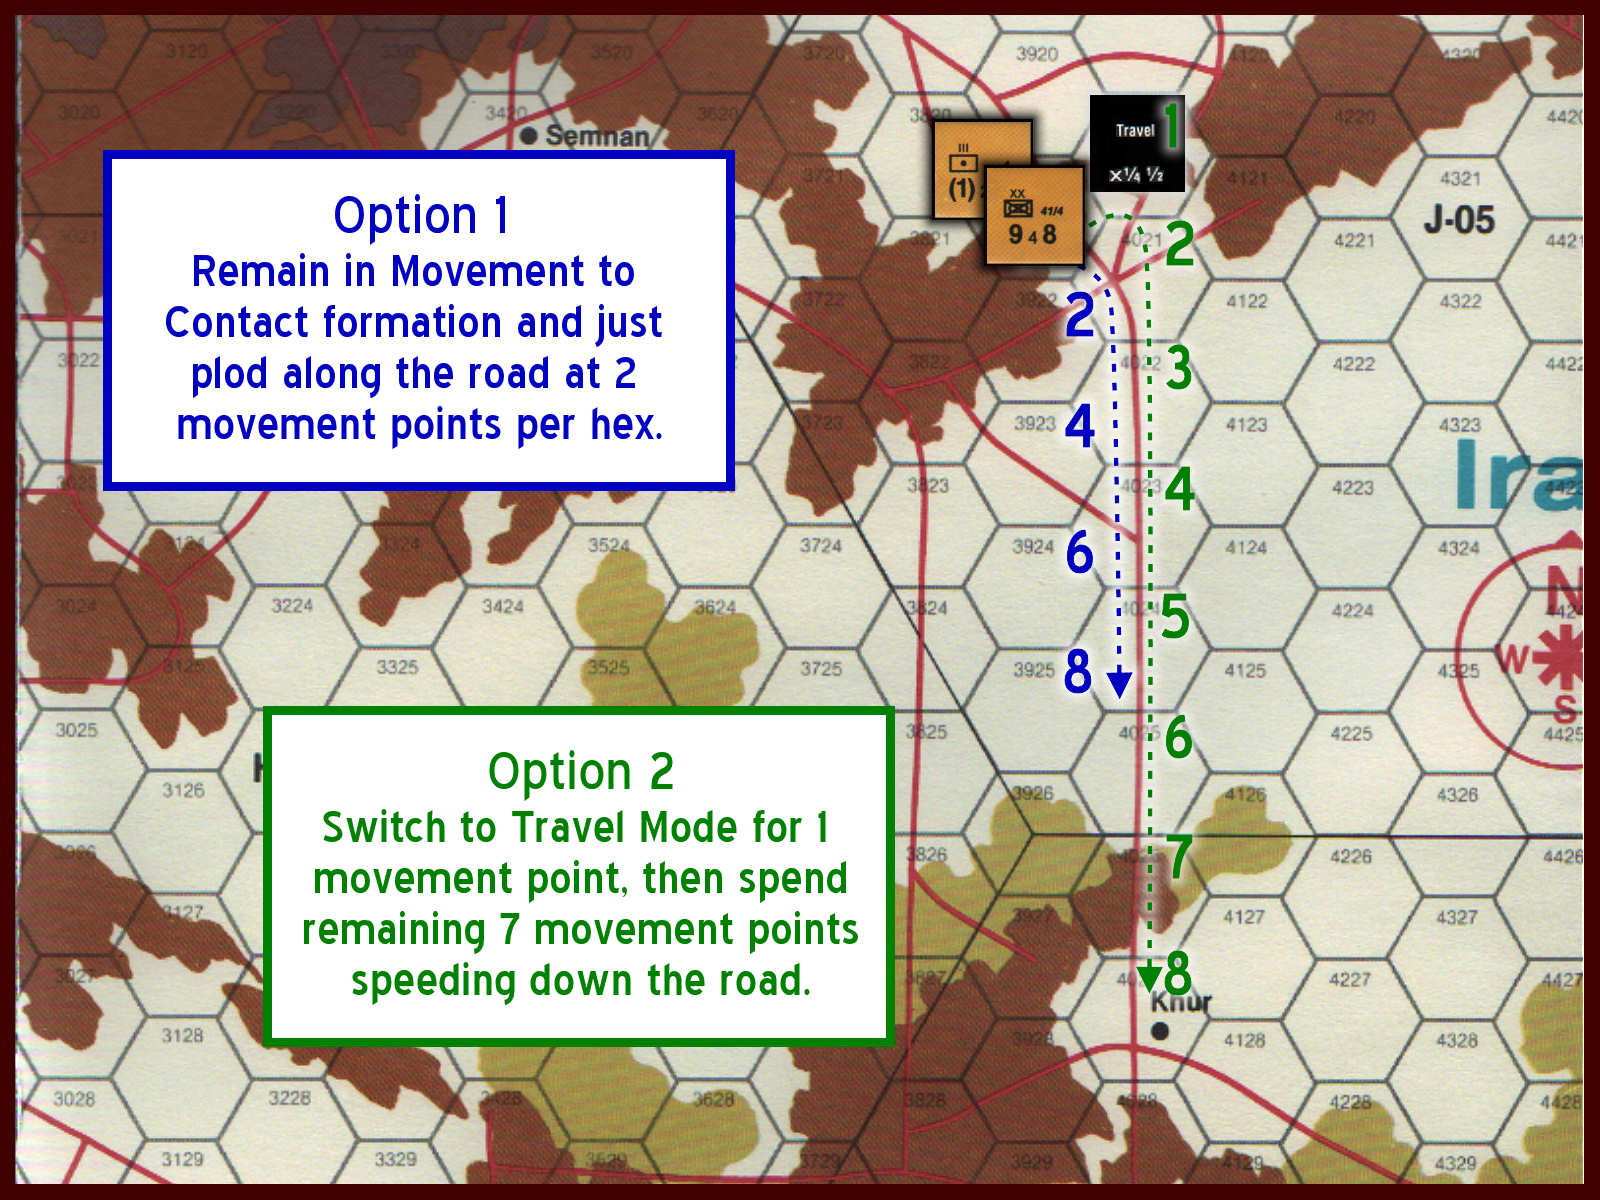
The U.S. player needs to inflict the maximum delay possible on the stack, regardless of which option the Soviet player chooses. Without any type of resistance, these Soviet troops will be dancing the Macarena with the good folk of the town of Khur by sunset. Delay can be imposed most effectively with a combination of Interdiction and a Special Forces Ambush Mission. Let’s review the situation:
- The Soviets will most likely take the most direct route south, in this case the 4000 hex row (i.e from 4021 down to 4022, 4023, etc.), towards Khur as the diagram shows. The U.S. player must insure that no matter which formation the enemy units choose, the delaying actions will succeed.
- Hex Interdiction adds 2 movement points to the cost of entry.
- Ambush Missions cost the moving/triggering unit an additional 4 movement points to enter the hex.
The most important part of the Ambush rule is that if the moving unit does not have sufficient movement points remaining to pay the 4 movement point penalty, the unit must back up to the previous hex and suffers a Special Forces attack which may inflict a hit. If the unit does have enough movement points remaining to pay the penalty, they may remain in the Ambush hex or continue moving without suffering the Special Forces attack. Therefore it is critical to position our Ambush missions in such a way that the moving enemy unit will likely NOT have sufficient movement points when the Ambush is triggered.
In our example, the ideal spot to place the Interdiction is hex 4022, with a supporting Special Forces detachment on Ambush in hex 4023. Use a U.S. or (better yet) Iranian air unit to place the Interdiction. Since that hex is not enemy occupied and is outside the detection range of the Soviet units (and we’ll assume there’s no Soviet TU-126 Early Warning aircraft in the vicinity), the Interdiction placement is automatic. Just pay for the mission and place it. The Ambush Mission, costing 1 Special Forces mission detachment, must be recorded.
I chose hex 4022 for Interdiction for two reasons:
- The Soviet player sees it and reasons that he will have sufficient movement points remaining to get past it in either Movement to Contact or Travel formations. Lure him in. He may just see it as an annoyance and nothing more.
- The fact of the matter is that after paying the costs to move into the Interdicted hex, in either formation, he will have insufficient movement points remaining to pay the 4 movement point penalty for the Ambush, so you will get a shot a scoring a hit on him and pushing him back one hex.

Starting in hex 3921 and proceeding in Movement to Contact formation, he will have to pay a total of 6 movement points to get into hex 4022: 2 for hex 4021, 2 for hex 4022 plus the 2 point penalty for the Interdiction in 4022. This leaves insufficient remaining movement points to cover the movement point penalty of the Ambush in hex 4023. If he switches to Travel formation it will cost 5 movement points to get into hex 4022: 1 to switch to Travel formation, 1 for hex 4021, 1 for hex 4022 plus the 2 point Interdiction penalty. Again leaving insufficient movement points to cover the Ambush penalty when he moves into hex 4023.
So the U.S. ends up with the desired result; the Soviet stack ends up only moving a total of two hexes (remember that after the Ambush he has to back up to the hex from which he entered the Ambush hex, pushing him back to hex 4022), and there’s a 30% chance of scoring a hit on the Mech Division (must roll and 8, 9, or 0 to score the hit).
Using this technique will almost certainly scare the Soviets into NOT using Truck units to clear Interdicted hexes. If a Truck unit triggers an Ambush and has insufficient remaining movement points to pay the 4 point penalty, the U.S. Ambush attack roll gets a +5 modifier, making the liklihood of success 80%! Now that’s “SPECIAL”!
A few parting thoughts on this example:
- If this situation occurred in an actual game, you could not really be sure that the enemy would send the units directly south as they did in our example. If this was a Soviet vanguard unit that was looking to break out, I would likely also place Interdiction in hex 3922, with supporting Ambush in hex 3923, just in case they decided to head southwest after passing through hex 4021. Of course, they could just head off-road and totally screw up your Ambush, but then they’d be paying at least 3 movement points for each Clear hex entered, which would have the same net effect as your Interdiction (less the Ambush attack of course). Hell, if you can scare the Soviets off the road net, you’ve got the game in the bag!
- If there was a Soviet Engineer in the stack, then there would be little point in placing any Interdiction markers since they would simply have no effect at all on the moving stack. In such a case, it’s just a matter of adjusting the placement of the Ambush to insure the enemy does not have sufficient movement points remaining upon reaching the trigger hex.
- You really want to discourage your Soviet opponent from using Truck units to clear Interdiction markers. This strategy will make him think twice before doing so, as he desperately needs those Truck units to maintain his supply network, and really cannot afford to have them blown up in Ambushes!
- Keep in mind that you, as the U.S. player, are not forced to reveal your Ambush when enemy units pass through the trigger hex. This gives you a bit of flexibility if you miscalculate. You may find it smarter to allow a stack to pass by unmolested in order to possibly Ambush a Support unit or Truck unit later on (due to the greater odds of scoring a hit; +2 for Support units and +5 for Trucks, as mentioned above). Just something to keep in mind.
Summary
In the end, Scenarios 2 and 3 of Gulf Strike are won by the U.S. player who can keep the Soviet steamroller away from the Bandar Abbas area long enough to successfully land his “heavy” ground reinforcements in that vicinity. You simply cannot allow the Soviet player to neutralize one of your key delaying tactics, clearing your Interdiction markers with relative ease (i.e. Truck units or Engineers). Therefore I believe there is no better usage of Special Forces detachments than Ambush missions, particularly when enhanced with the Interdiction technique demonstrated in this article.
