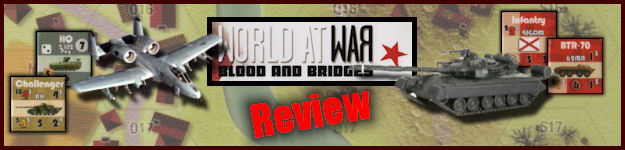
Our “First Look” at Lock ‘n Load Publishing’s
World at War: Blood and Bridges
Overview
Do you remember the Cold War, NATO and the Warsaw Pact? After the fall of the Berlin Wall and the collapse of Communism, new board games on this era vanished as quickly as Mikhail Gorbachev. That was 20 years ago and now the modern Armed Forces of the Western democracies are faced with grinding conflicts of asymmetric warfare. Do you long for the clarity of the Cold War where the enemies were known and their military capabilities provided fertile ground for huge clashes of tanks, infantry, artillery and helicopters? If so, then Mark Walker’s World at War series, published by Lock ‘n Load Publishing, is probably for you.
Learning the Game
Blood and Bridges is the latest entry in this excellent and approachable game series all of which share a common system depicting platoon level combat between NATO and the Warsaw Pact in the 1980s. Blood and Bridges features the British Army of the Rhine fighting to prevent the fall of northern Germany.
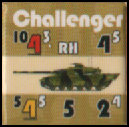
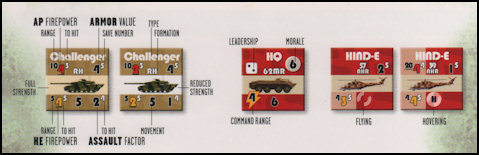
For those of you unfamiliar with the system, each unit represents a platoon of infantry or armored fighting vehicles with some counters for support weapons thrown in. Most units are rated for their Armor Piercing (AP) firepower, High Explosive (HE) firepower, Assault factor and movement. Each firepower rating is associated with a Range and the number needed to roll to hit its target. For example, a typical Challenger tank platoon has an armor piercing firepower of 4 with the range of 10 and a To Hit value of 3. Essentially this means that it can fire its armor piercing firepower at a range of 10 hexes (if the firepower value is underlined the unit can fire at reduced effectiveness out to twice the range) rolls 4 six sided die and hits on rolls of 3 or more. Units also have a defending Armor Value and a Save Number. The armor value determines the number of dice the defender rolls when attempting to ignore hits by the attacker. Of course, the save number then determines how high these rolls must be in order to succeed. The first hit on a unit disrupts it, the second hit on a unit flips it to its reduced strength side and the next hit eliminates the unit entirely. The combat system is designed to ease play without consulting complicated charts to determine casualties. In fact the elegance of the entire game design is that it focuses players on the utilization of proper strategy and tactics without bogging down in the complexities of armor piercing weapons, armor thickness, penetration indexes, etc. The straightforward combat system makes the World at War series extremely approachable and enjoyable for experienced Grognards and neophytes alike.
Units are organized into Formations, usually companies for the British and battalions for the Soviet player. Each formation has a headquarters with a Morale Rating used to Rally disrupted units. Headquarters also give command to subordinate units and provide some bonuses in combat. Each formation is activated by a chit pull system. When the formations chit is pulled, you must decide whether to activate the formation or throw the chit back into the cup and pass. There are two End Turn markers in the cup and once the second one is picked, operations end. This creates a great deal of tension because a formation’s chit may be pulled before you want it to activate however throwing the chit back in the cup means there is potential for the unit not to activate in the present game turn. There is no fear of unlucky formations being prevented from activation turn after turn because, if a formation does not activate, the player gets to hold one of the End Turn markers out of the cup until his dormant formation activates, when he then tosses the End Turn marker back into the cup.
When a formation activates, it goes through a sequence before performing Operations of Movement or Combat. The first step is Housekeeping which removes all Operations Complete markers and Out Of Command markers from the formation. Next the formation checks Command status. Units within the Command Range of their formation HQ are considered “in command”. Units not within the command range must make a morale check by rolling 2D6 against the morale value of the formation’s headquarters. This is done hex by hex and not unit by unit. If the morale check fails, the hex is marked with an Out Of Command marker preventing them from moving or firing during the current formation’s impulse. It does not prohibit them from doing Opportunity Fire.

The third step is Rally where in command units attempt to remove Disruption markers. Out of command units are penalized by adding one to their morale check dice roll. Finally, the formation performs operations with units in command. Units can move, load or unload other units or enter an enemy occupied hex for either Assault combat or Overrun combat. They can perform ranged fire combat with direct fire weapons and antitank missiles (that have a chance of becoming Ammo Depleted). Once a unit has activated in its formation’s impulse, it is marked with an Ops Complete Marker that prevents it from performing any further action in the current game turn including Opportunity Fire.
If units move into an enemy occupied hex they can perform assault combat. This is resolved similar to any other type of combat where the unit rolls a number of dice equal to its Assault factor and hits by rolling equal to or greater than its Assault “To Hit” number. Armored fighting vehicles are disadvantaged if attacking infantry in City or City Ruins hexes and not accompanied by their own infantry support. In assault combat, the defender gets to counterattack utilizing the same procedure and then both sides resolve the hits. Whoever received more hits must retreat out of the hex with ties going to the defender.
Armored Fighting Vehicles (AFV) can attempt to overrun enemy infantry in Clear or Hill terrain. The platoon pays one extra movement point and must be able to retain enough movement points to exit into an adjacent hex. The overrun is resolved exactly as assault combat except if the armored fighting vehicles are disrupted they are retreated into the hex from which they entered.
Un-disrupted, inactive units that have not yet been marked with an Operations Complete marker in the current game turn and have a Line of Sight (LOS) to a moving enemy unit within its firepower range may initiate Opportunity Fire. The procedure is the same as regular ranged fire combat. Once a unit performs Opportunity Fire it is marked with an Operations Complete marker.
In many tactical level games, Line of Sight has always been a complex affair because of the inherent difficulty in simulating a three-dimensional environment on a two-dimensional map board. The World at War series stays true to its philosophy of keeping things straightforward. Very simply, there are only two levels of terrain – you are either on a Hill or you are not. Line of Sight is, of course, blocked if your LOS goes through Smoke, Woods, City, City Ruins or a Hill. Woods have a one hexagon shadow and City or City Ruins hexagons have a 2 hexagon shadow when fired upon by a unit on a Hill hexagon. There are no difficult calculations for multiple levels of terrain. Again, the focus is on tactics and fighting and not intricate observation and line of sight rules.
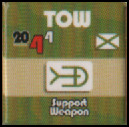
Infantry units (and some armor units) may have Support Weapons attached. Support Weapons are represented by individual units that stack with the “owning” unit. They can fire in the unit’s impulse at the same or different targets as the infantry’s conventional fire. Artillery fire missions are assigned in each scenario and have a fire power and to hit number just as any other type of combat. There are six types of artillery fire including High Explosive, Smoke, Field Artillery Scatterable Munitions (FASCAM),Chemical, Dual-Purpose Improved Conventional Munitions (DPICM) and Multiple Launcher Rocket Systems (MLRS) strikes. Artillery must be requested as the first action in formation’s impulse to any hex where a line of sight exists. The firing player designates one hex and, on a die roll of 1-5, it lands on target, otherwise the fire mission scatters into an adjacent hex designated by your opponent. The different types of artillery missions affect the target hex and possibly adjacent hexes in different ways so that there are restrictions on who may fire certain types of missions. For example, only NATO has FASCAM and DPICM missions while only the Soviets can do Chemical Fire missions. Each has its own advantages and limitations.
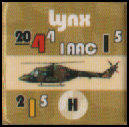
Helicopters are one vehicle units that are always considered in command and automatically un-disrupt. They have two modes of movement, Flying and Hovering with default mode being Flying. They can change mode once per Impulse as their first action when their formation is activated. Helicopters may enter enemy hexagons as long as there are no other enemy helicopters in the hex. Just as other units, they have an Armor Piercing fire value and a High Explosive fire value when hovering but, when flying, the Armor Piercing firepower is absent since the antitank guided missiles represented by this number were impossible to control in midflight. Helicopters can make pop-up attacks. They can be fired on by antiaircraft units that have a blue firepower factor at full strength while other units may fire either their armor piercing or high explosive firepower at half strength. The first hit on a helicopter disrupt it and the second hit eliminates it.
There are rules for Close Air Support, Air Cover, Jamming of communications and even Battlefield Chaos where two Chaos markers are added to the chit-draw cup. When these chits are drawn, 2D6 are rolled and the Battlefield Chaos table is consulted. Some results are beneficial while others are not. The Chaos markers are removed from play if the die roll is 4, 8, or 10 otherwise it is placed back in the cup. On a roll of 4, 7 or 10 a special scenario Event may be triggered. These include Air Cover, Withdrawal of Forces, Reinforcements or changes in Objectives.
The rules for this game can be read and digested in 45 minutes and owing to their clarity and inherent simplicity, players can be playing their first scenario within one hour of opening the box. The graphics quality is nothing short of superb with full-color silhouettes of each armored fighting vehicle on the armor units and NATO symbology for infantry and support weapons. Despite the fact there are a plethora of numeric values on each counter, they are all clearly distinguishable and color-coded. The maps are mounted and graphic quality is the same, if not superior to, Advanced Squad Leader. The rulebook is essentially 17 pages of high quality gloss paper with ample full-color illustrations and lots of white space making them an easy read. The rest of the rulebook is a collection of 12 scenarios and one Order Of Battle listing for the various formations. It is an extremely high quality product!
Playing the Game
So how does it play? We broke out the game and set up Scenario 1, Separation. The basic premise of the scenario is that elements of Soviet 93rd Recon and detachments of the 62nd Motor Rifle Division become intermingled during the night with elements of the West German 1/613 Panzer and 2/182 Panzer Grenadiers. Come sunrise, they find themselves in confused, close quarters, combat. Victory conditions direct the Soviets to exit units off the west edge of the play area and the West Germans to exit via the east edge. The random setup table can (and did) cause these units to find themselves set up on opposite ends of the map from where they need to exit.
Although we fumbled with the rules quite a bit and made some mistakes, it was a decent scenario. The Soviets eked out a narrow victory.
With this learning experience under our belts, we moved on to the next scenario.
We found Scenario 2, First Contact, to be much more interesting, as it’s a classic Cold War confrontation, with the Soviets rushing forward to seize control of the crucial Rhine River bridges and NATO doing all it can to stop them. The British Royal Lancers are allowed 2 Smoke Missions and 2 FASCAM Missions (represented by “MINE” markers). Special Scenario rules direct players to start the game with both End-of-Turn markers and one of the Royal Lancer markers out of the Chit Cup, to insure that both players get at least one Impulse before there’s any possibility of the game turn ending. The Chaos marker will remain out of the Chit Cup until game turn 2.
Victory conditions are simple and brutal: destroy enemy units and (for double the victory points) exit your units off the opponent’s starting map edge.
The following section provides a brief description of the first few Impulses of the scenario, just to provide a “feel” for the game and how it plays.
Setup
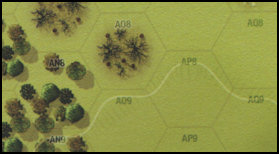
The Soviets set up first and decide to place the bulk of their power in the northeastern-most hexes of their allowable setup area, AS1 and AT1. The hills to the west and the town of Faulbach itself should provide good cover for the advancing Red Army. Once securely in Faulbach, they’ll have a commanding view of all of the available British approaches to the town as well as the eastern map edge. The lightly armored BRDM-ATs with their formidable AT capability will be set up further south, in hexes AT4 and AT6, at the very edge of their HQ’s Command Range. They’re assigned the double task of preventing the Brits from trying an “end-run” to the south and/or hitting them in their exposed flanks should their Scimitars attempt to advance on Faulbach under a covering cloud of smoke.
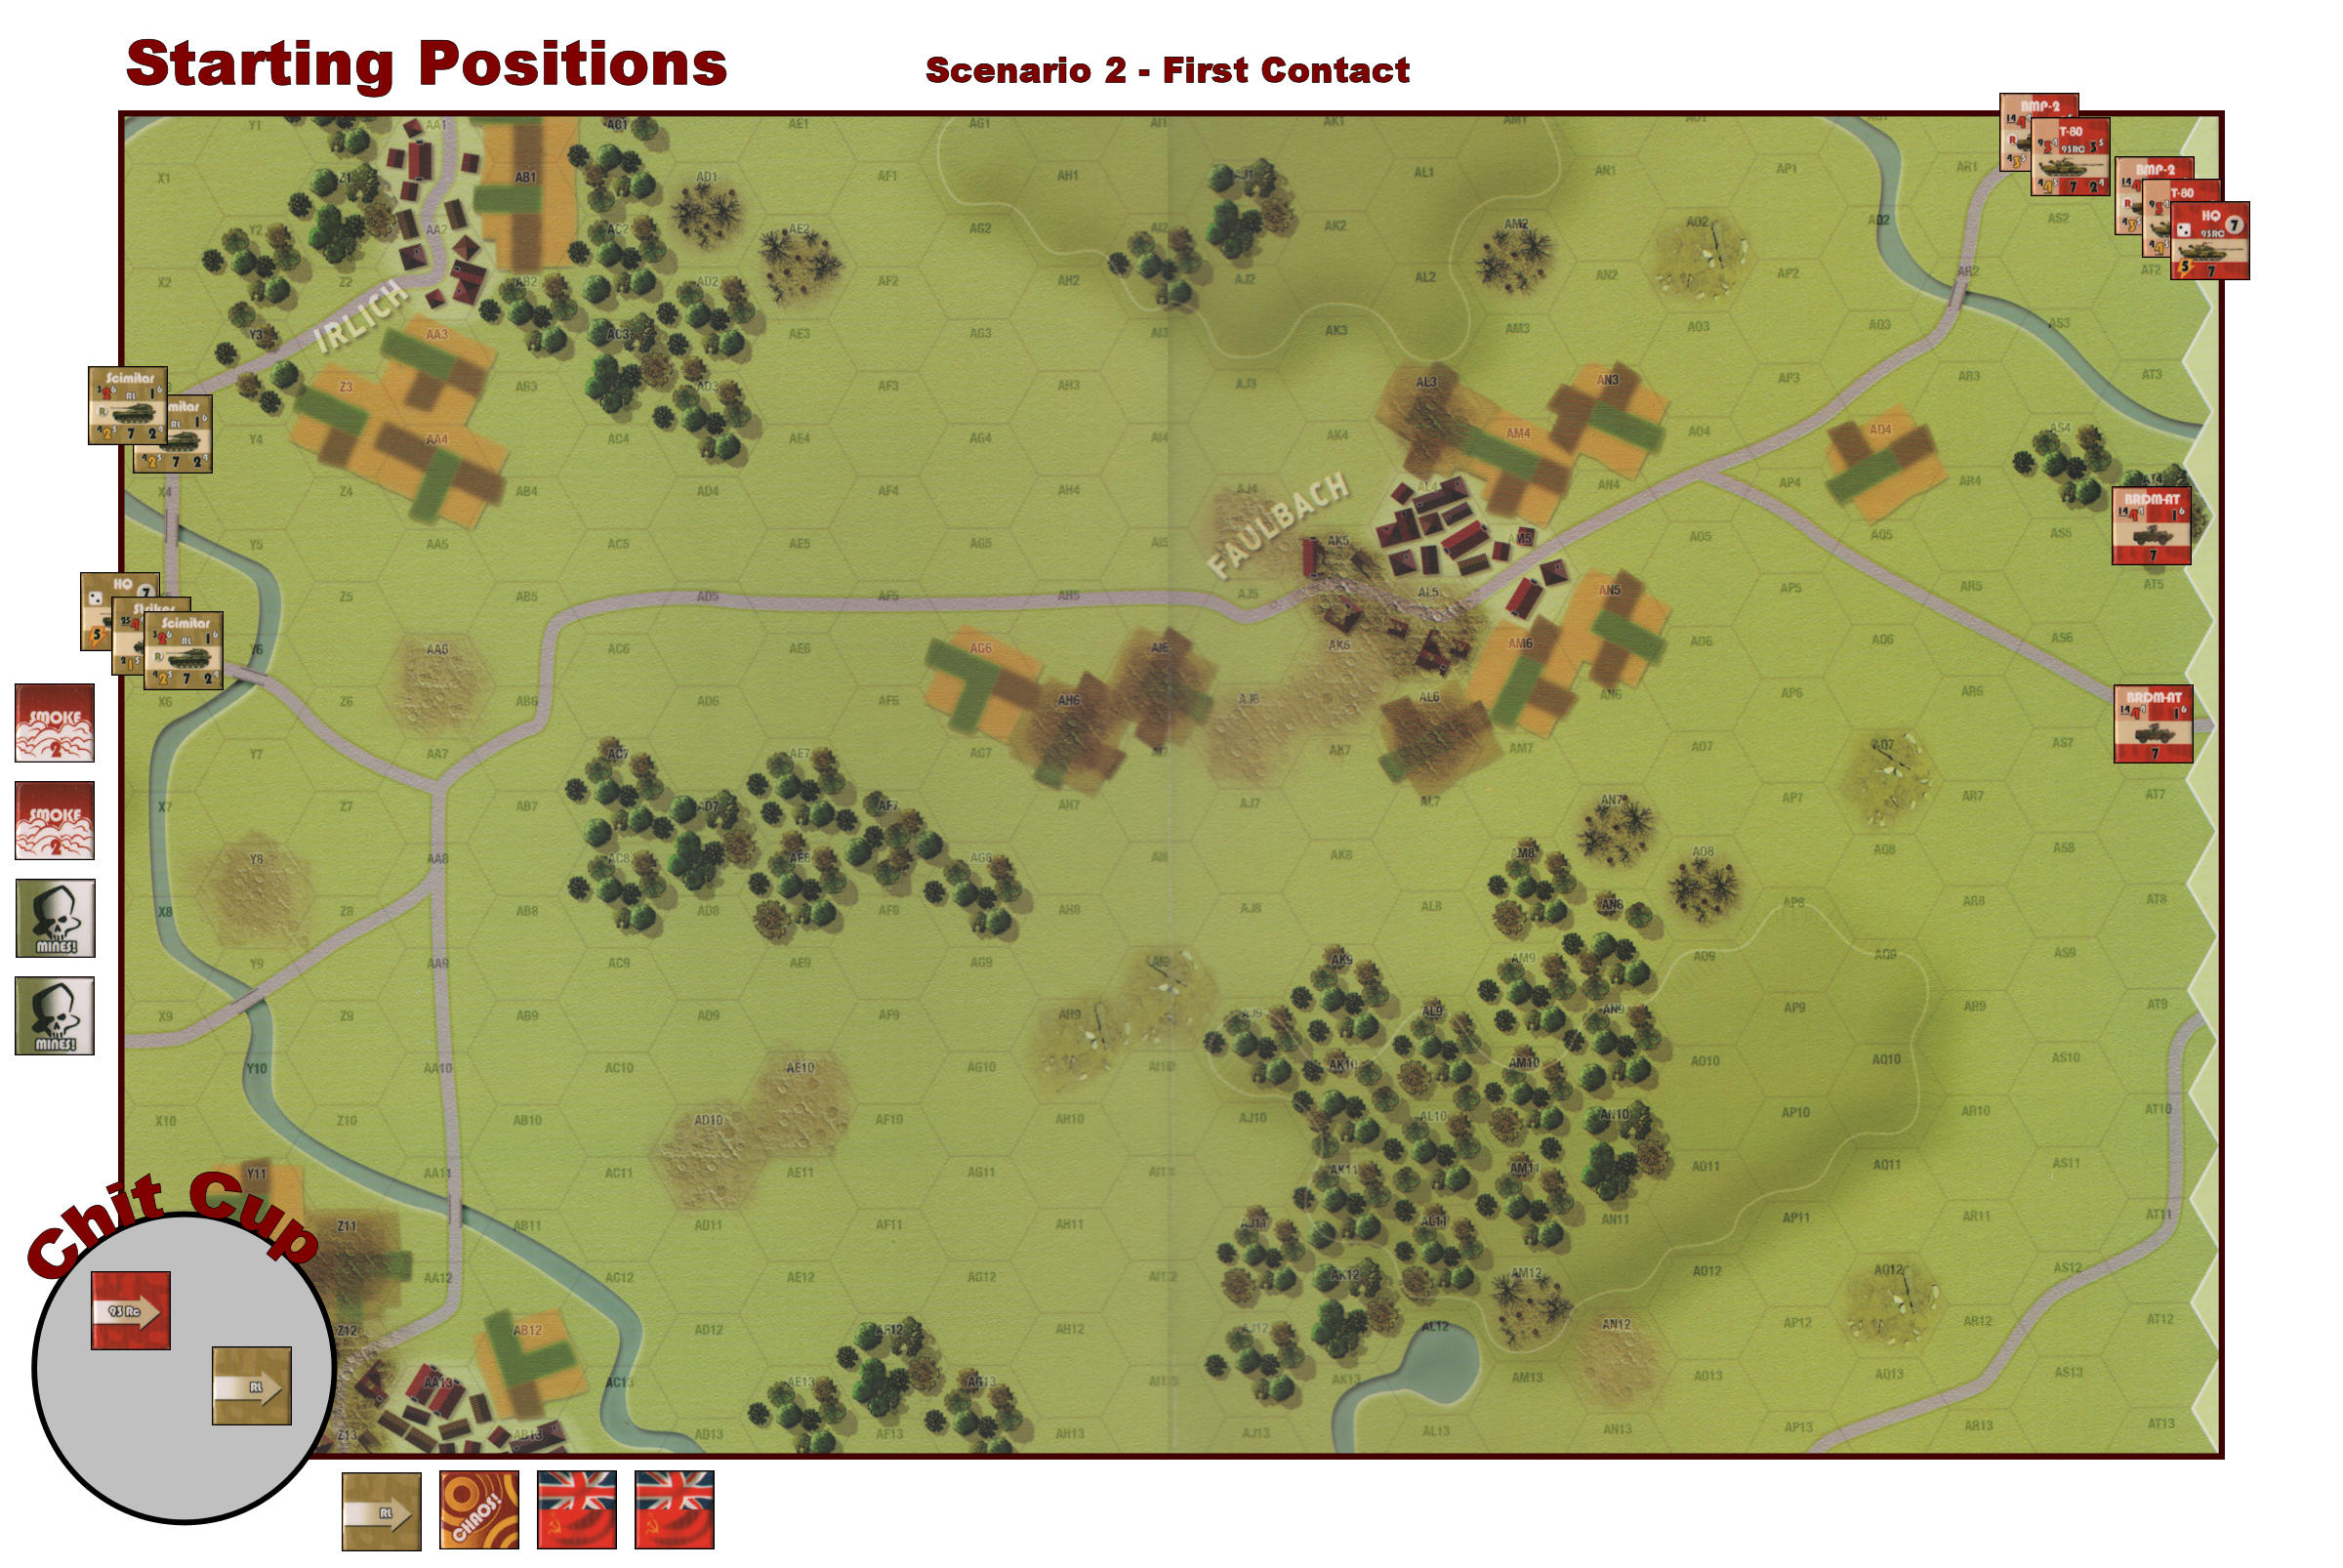
The British could have opted for safer starting locations, like hexes X1-X3, but their commander has chosen a bold course and is determined to use his advantages to best effect. He plans to use the scenario-allotted Smoke and FASCAM missions to pin the Soviets down and make their fire ineffective, while his Scimitars and Strikers rush to secure the town itself. He hopes this will leave him in the best position to dominate the battlefield, as well as putting his forces closer to the eastern edge of the map and thus in position to exit for double the victory value (i.e. exited units count as TWO enemy units destroyed). Positioning the HQ in hex X5 gives it the deepest LOS view into the enemy’s initial approaches.
The stage is set, and the two sides prepare to draw chits. Remember that, due to the special scenario rules, both players are guaranteed to have one Impulse before any of the End-of-Turn markers are put into the Chit Cup. If the British don’t get the first Impulse, however, it will be quite a feat to keep the Soviets from securing the town first.
Game Turn 1
Game Turn 1 – First Royal Lancers Impulse
The “luck of the Lancers” is strong today, and they pull the first Impulse chit. The initial order of business is to call in the two allowable artillery missions for the turn. So the British commander called in the FASCAM missions. If successful, they will leave a minefield that the Soviets will have to brave in order to get to Faulbach. The Lancer’s HQ has hexes AR2 and AO3 in its line of sight and so may target those hexes with FASCAM. Both rolls are < 6 and so the missions are placed in those hexes. Any Soviet unit that moves in or adjacent to either of the FASCAM markers must undergo an attack with a 50% chance of suffering a hit (as well as a 33% chance that the FASCAM munitions will possibly remain in the hex to attack again!).
So far, so good. The Soviet units in the northeastern corner cannot cross the river except at the bridge hex, which means they must brave the minefield if they hope ever to get in the game. The second FASCAM belt really completes the gauntlet that Ivan will have to run to secure the town.
Finally, all units move towards Faulbach at maximum speed, completely disregarding the fact that they’re travelling over open ground. Unfortunately for them, this does not go unnoticed by the Soviets. The Soviet units may be hemmed in at the moment by the FASCAM barrier, but that won’t prevent them from indulging in a little Opportunity Fire. The BMP-2 in hex AS1 has an AP range of 14, which is exactly the distance to the British HQ, Striker and Scimitar as they move into hex AE5. The BMP-2 has not yet moved and is eligible for operations, so they proceed with Opportunity Fire.
The Lancers are beyond the reach of the T-80’s 9 hex range. The Soviets could opt to double the T-80’s range to 18 and suffer a “To-Hit” number increase of 1 (from 4 to 5). While tempting, the Soviet player declines to use the T-80, because Opportunity Fire renders a unit Ops Complete and he has plans for that T-80.
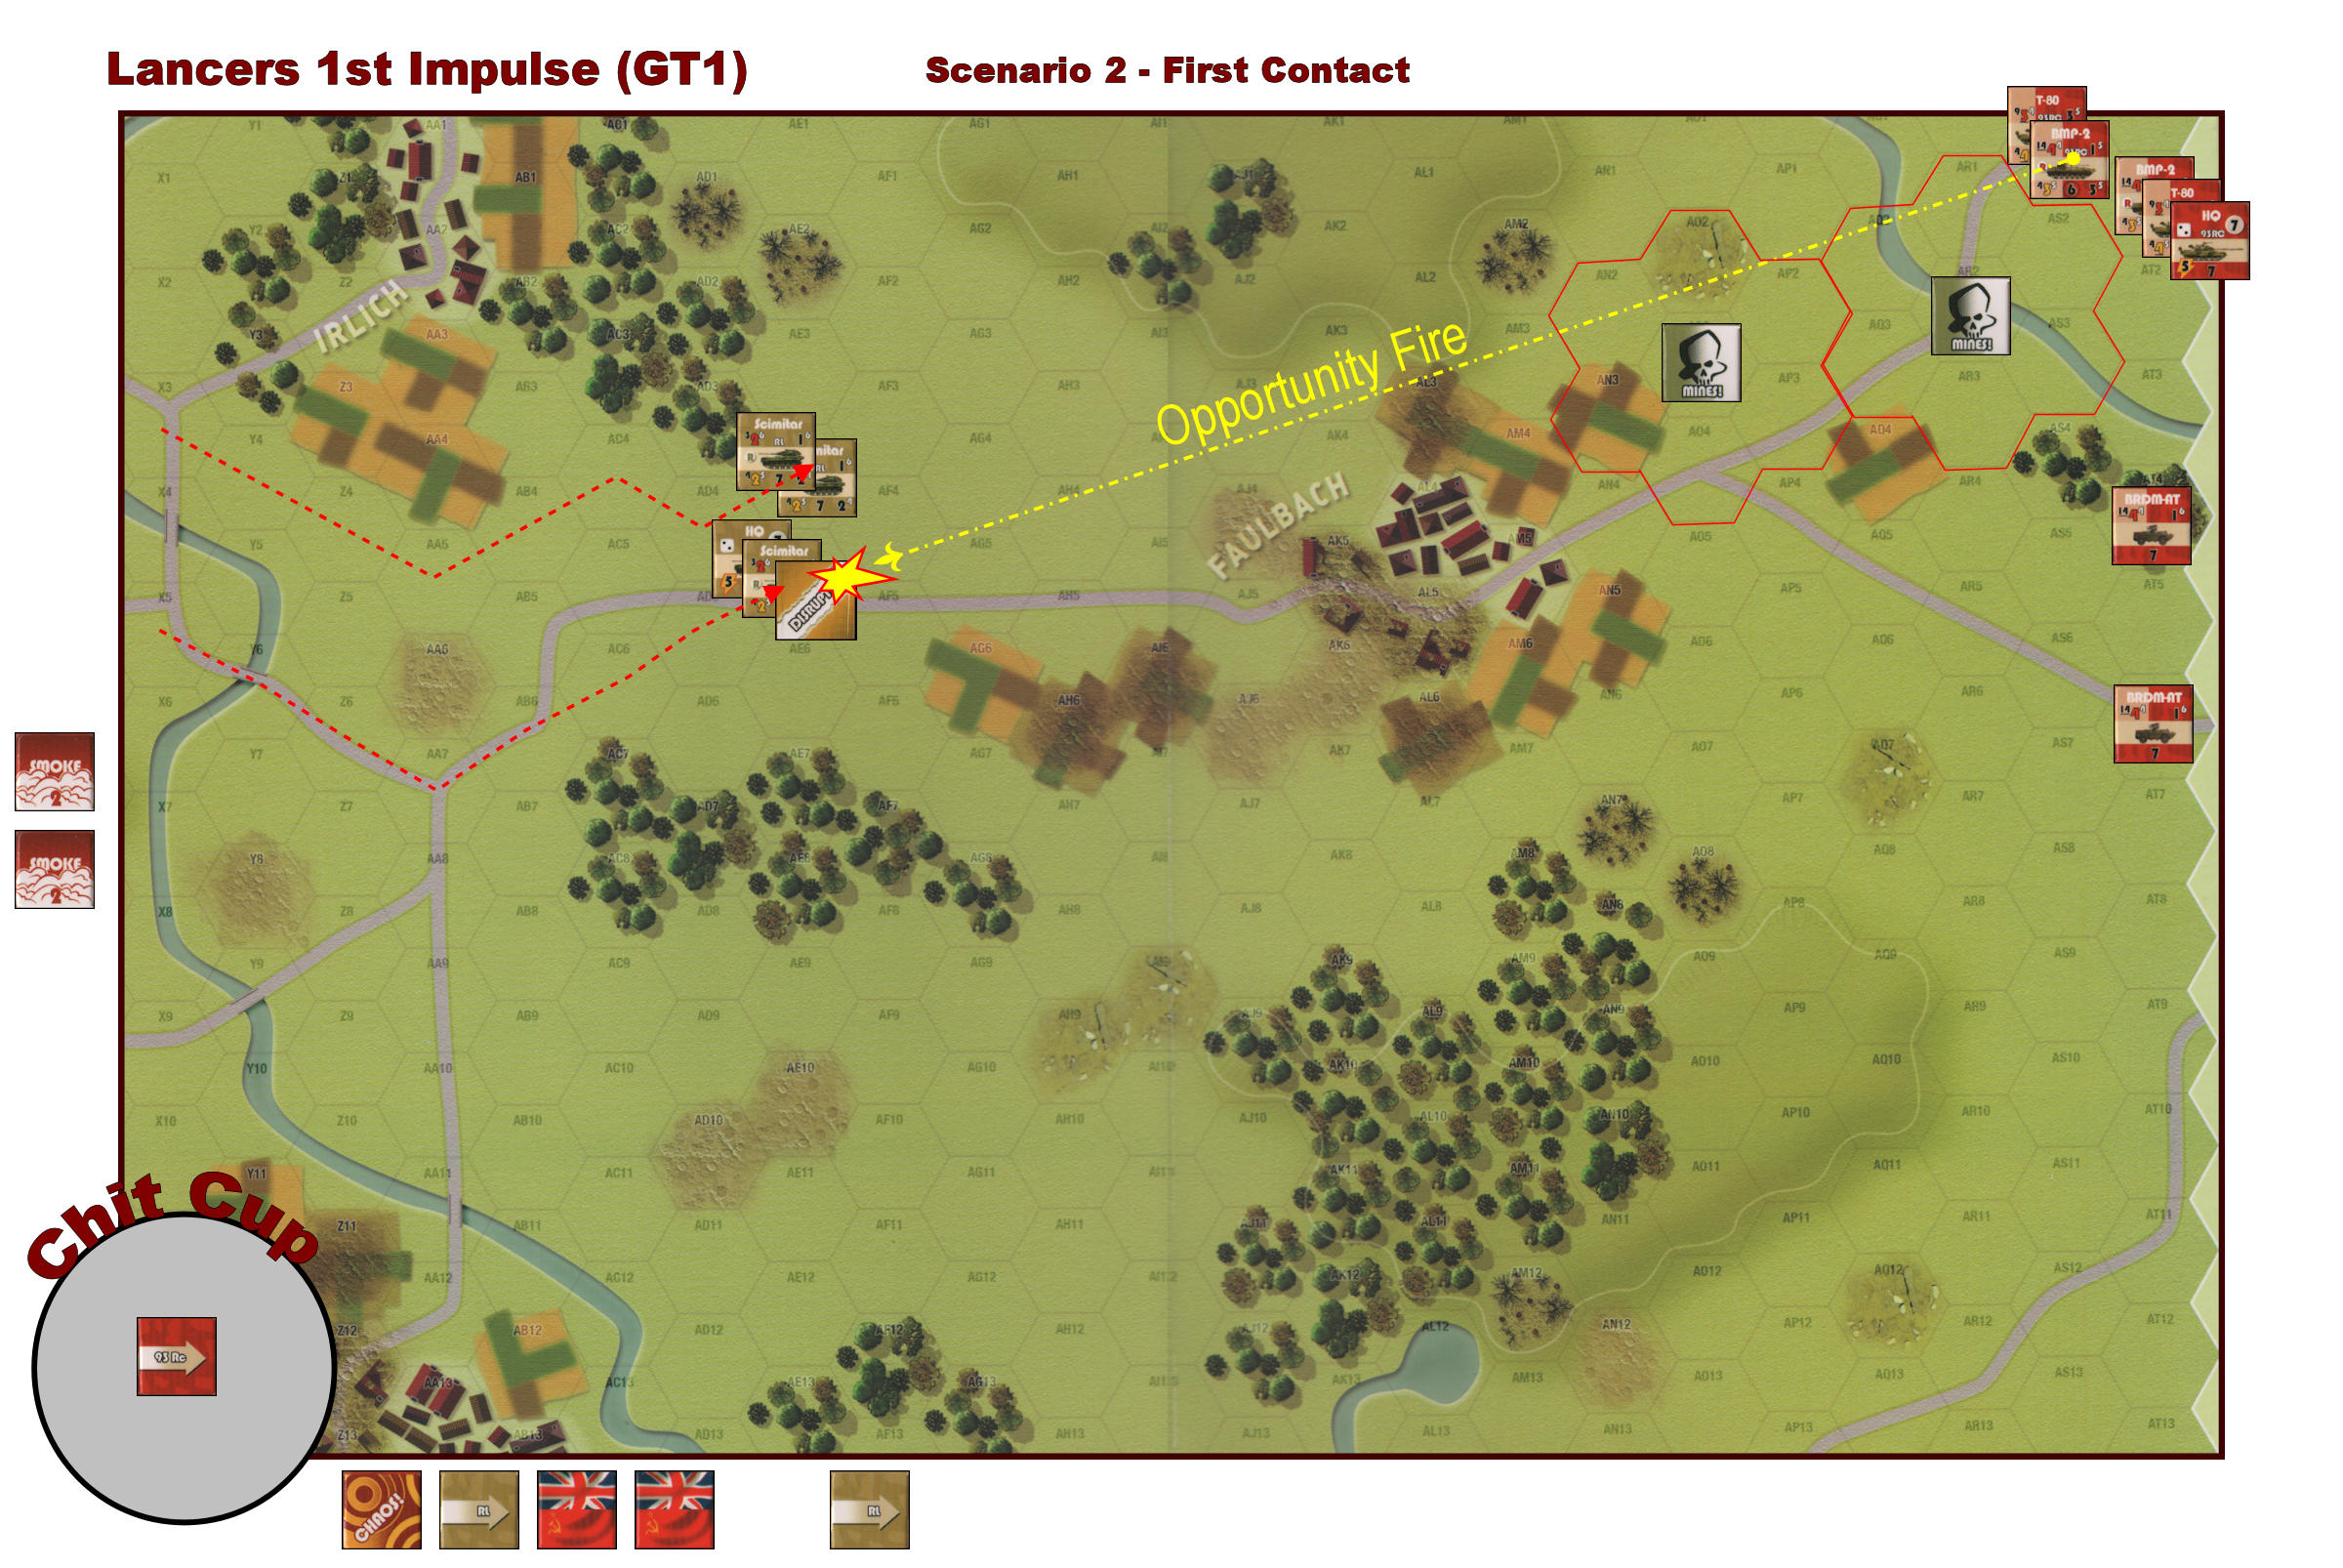
Combat in Blood and Bridges is a pretty straightforward business. The BMP-2’s AP Firepower is 4, indicating that 4 dice will be rolled, and the “To-Hit” number is 4, indicating that a 4 or greater must be rolled to score a hit. The selected target is the Striker. The BMP-2 has no additional modifiers (such as co-location of a HQ in its hex) and so 4 dice are rolled, with the following results: 2, 2, 4, and 6, netting two potential hits. The Striker is a lightly armored vehicle and only has an Armor Value of 1 with a Save Number of 5. This means that the Striker will only roll one die and will “save” a hit if a 5 or 6 is rolled. Other factors, such as terrain defensive bonuses and Concealment could potentially allow for additional “Save” dice to be rolled, but since the Striker is out strolling across the open meadows, there will be no defensive benefits. The Brits (luck still holding out!) roll a 5 and reduce their combat result to a single hit. A Disrupt marker is placed on the Striker.
Finally, because the Lancers HQ was in the hex with the Striker, there is a possibility that the HQ may be affected. The British player rolls a single die and, if the roll is 1, the HQ is reduced (i.e. flipped). The Brits roll a 3 so the HQ is safe. The Soviets mark the BMP-2 with an Ops Complete marker, and the British mark all their moved units with Ops Complete markers. The British Impulse is now concluded.
Game Turn 1 – 93rd Recon Impulse
Being the only one left in the Chit Cup, the Russian 93rd Recon chit is pulled. There’s no need to perform the Housekeeping phase as this is the first Impulse. All units are within the Command Range of the 93rd’s HQ, so there’s no problem with command status.
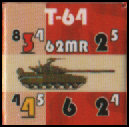
The 93rd is in a tough spot. They have no choice but to power their way through the FASCAM mine field. The T-80s are the most heavily armored units the Soviets have, so the T-80 in hex AS1 is chosen to breach the mine field, and is activated for movement.
The T-80 moves into hex AS2 and is attacked by the FASCAM. If the NATO player rolls an even number, the T-80 will be Disrupted. NATO rolls a 4 and Disrupts the T-80. However, each time the FASCAM marker attacks, there is a possibility that it will be removed (due to minesweeping and/or minefield depletion). If the Soviet rolls a 1-4, the FASCAM marker will be removed, but he rolls a 6 and the FASCAM marker remains. The T-80 is now Disrupted and the rules state that, while it can move, it may not move closer to an enemy unit (while in their LOS), so it is effectively done.
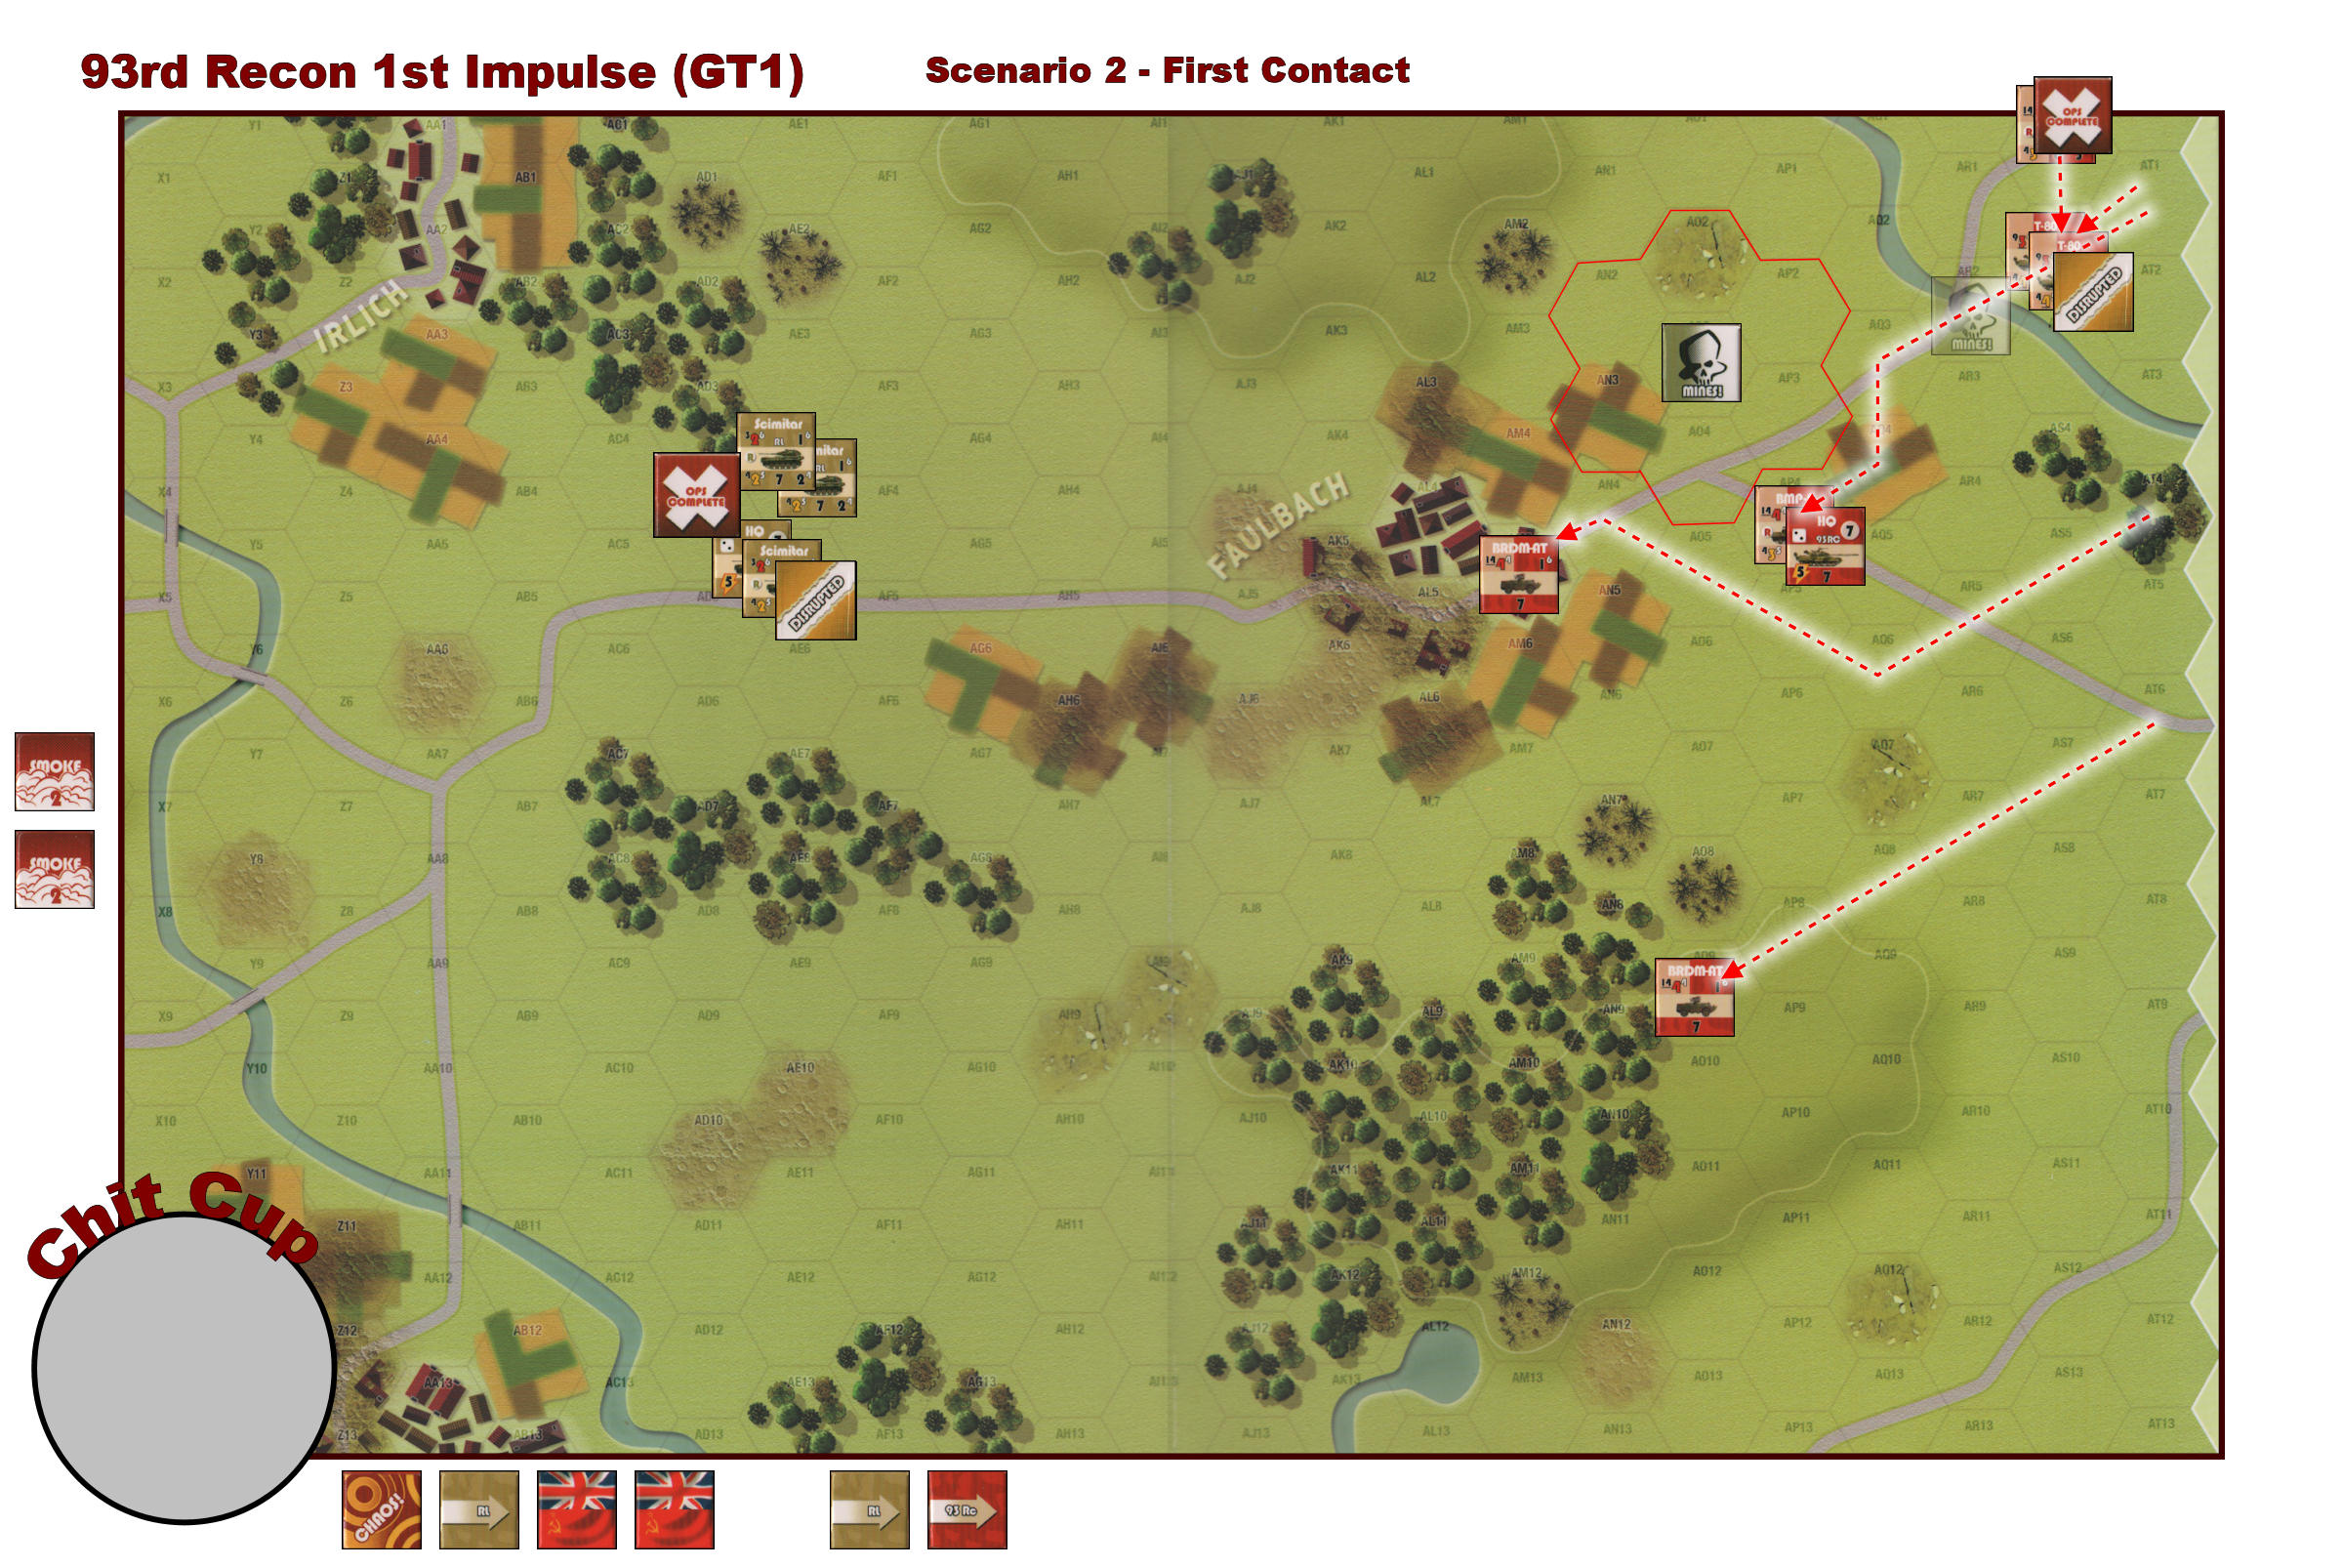
Never ones to give up easily, the Soviets decide to have another crack at the FASCAM mine field by sending in the other T-80, which also moves into hex AS2 and is attacked by the FASCAM marker. This time, the NATO die roll is 6 which Disrupts this T-80 as well. Whether the FASCAM scores a hit or not, the T-80 may attempt to remove the FASCAM each time it attacks. This time he rolls a 4 which does, in fact, remove the FASCAM. Now the path across the bridge is unblocked, but at a cost of two disrupted T-80 units!
Next, the HQ and BMP-2 unit start moving quickly in the direction of Faulbach, but are slowed down by having to circumvent the mine field radius of the remaining FASCAM marker. The southern-most of the two BRDM-AT units begin swinging southwest to take up positions astride the flanks of the likely British approaches to Faulbach. The other BRDM-AT moves directly into the town itself. Both units remain within the 5 hex Command range of the 93rd HQ. All Soviet units are marked Ops Complete and the Impulse ends.
Following scenario instructions, the other Royal Lancers Impulse chit as well as the two End-of-Turn chits are placed into the cup. If the two End-of-Turn chits are pulled before the Lancers chit, the turn will end without the Lancers getting another Impulse. The Soviets can hope for this outcome but the odds are against it!
Game Turn 1 – Royal Lancers 2nd Impulse
The laws of probability being what they are, the Royal Lancers chit gets pulled after the first End-of-Turn marker, so the Brits will get one more Impulse this turn. The “Formation Impulse” is executed as follows:
- Housekeeping – All Ops Complete markers are removed from the Royal Lancers units.
- Command check – All units are well within the 5 hex Command range of the Lancers HQ, so no problems there.
- Rally – In order to Rally the Disrupted Striker unit, the British player must pass a morale check. If the sum of two dice is less than or equal to the formation HQ’s morale, the Rally succeeds and the Disrupted marker is removed. Fortunately for the Lancers the total of 2d6 is 5 and the Disrupt marker can be removed from the Striker.
Now that all the administrative stuff is out of the way, the Operations Phase can begin.
Even though the Soviets have actually gotten a unit into Faulbach, the Lancer’s commander is still committed to the strategy of taking the town. He hopes to be able to follow up this Impulse by pulling a Lancer’s chit first on game turn 2, thus giving him a double turn. Both Russian T-80s are disrupted, so there will probably never be a better time to be bold and aggressive.

If the Smoke missions available to the British are used now, they will be degraded one step at the beginning of game turn 2, which is coming up immediately after this Impulse, and will be removed entirely at the beginning of game turn 3 (when I say “degraded” I don’t mean that the smoke’s effectiveness is reduced. It just means that it’s halfway to removal). And since the Soviets really don’t have anyone in position (or eligible) to perform Opportunity Fire, it may seem like a waste. However, the first turn has made the Lancer’s command cautious so, just on the off-chance that the Soviets get first Impulse next turn, he wants to have that protective layer of smoke in place.
Two Smoke missions are declared: one for hex AK4 and one for AL6. Frustratingly for the British, both Smoke mission rolls are 6s, and so the mission does not land directly in the targeted hexes. Instead the Soviets may reposition it to any hex adjacent to the original target hex. For the AK4 targeted mission, they choose to shift the Smoke to hex AJ4, and the AL6 targeted mission is shifted to AK7. At first glance this doesn’t seem to help the Soviets much but keep in mind that Soviet units are not allowed to fire into or through hexes in or adjacent to Smoke markers. The wise Soviet commander wants the eastern-most hexes of Faulbach free of Smoke so they can be targeted by his units. Now for the movement of the units.
The HQ and accompanying Scimitar don’t have quite enough movement points to get into the town because the City Ruins hexes cost 3 movement points for vehicles, so they are forced to stop just outside the town. Again, the hope is that they’ll get the first Impulse next turn. The Striker is staying behind to provide overwatch and to cover the formation’s flanks should the Russians make any bold moves either north or south. The remaining two Scimitars head southeast to find safety behind the smoke. This completes the British impulse as well as the game turn.
Game Turn 2

Per scenario instructions, all Impulse chits are put in the Chit Cup as well as a Chaos! marker which, if drawn, will spark a random event and provide one of the players with a Support Mission of some type. The very first chit drawn is an End-Of-Turn marker. Drawing another of these will cause the game turn to end immediately. The second draw is the Chaos! marker. Two dice are rolled and the Battlefield Chaos Table is consulted. The 2d6 result is 9, which says that the next formation drawn will receive a random Support Mission.
During the Marker Removal Phase, all Ops Complete markers are removed and all Smoke markers are flipped to their “1” side (during the Marker Removal Phase of next turn they will be removed entirely).
The Lancer’s hot streak is still intact as their Impulse chit is drawn next from the Chit Cup. Following the Chaos! instructions, 2d6 are rolled by the British player, with a result of 4. Checking the “Support Mission” column of the Battlefield Chaos Table, we find that the British will receive an Air Strike marker. The marker, represented by the Tornado aircraft (for the British) is thrown into the Chit Cup for future use and the British proceed with their Impulse.
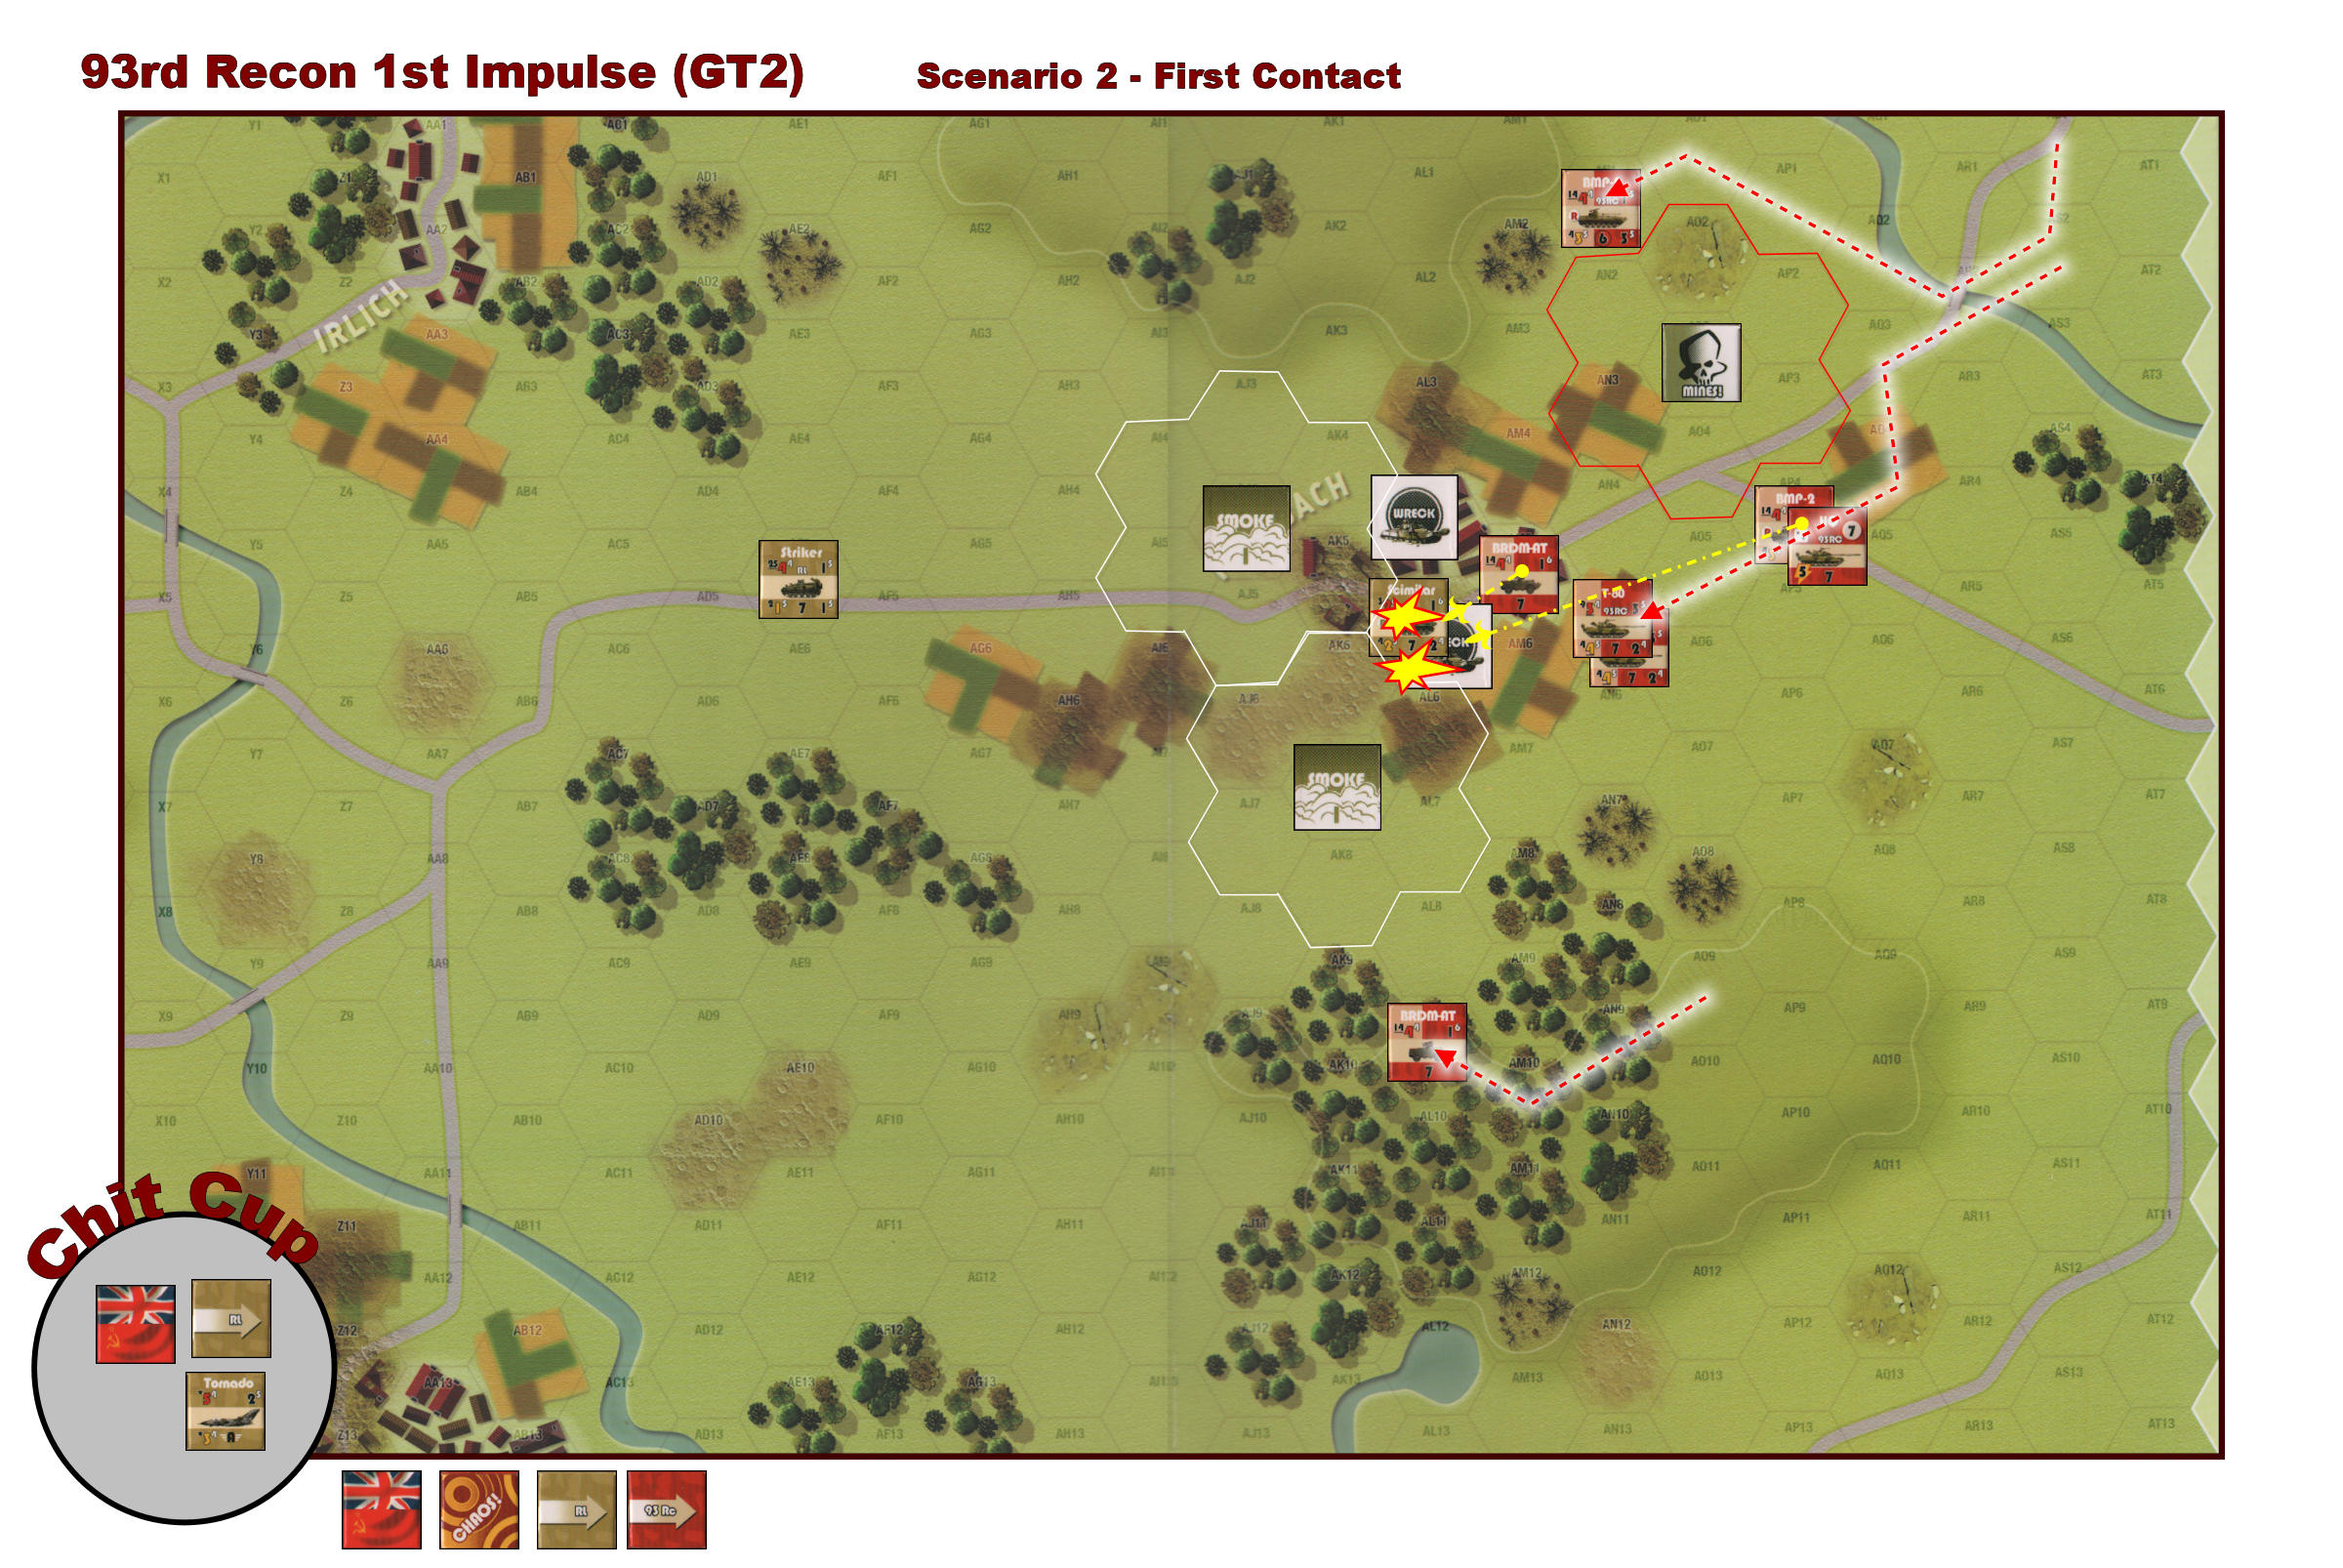
Turn 2 – Lancers 1st Impulse
All British units are within Command range of the HQ, and none of them need Rallying, so we can skip directly to the Operations phase. The two Scimitars in hex AJ6 charge straight into the heart of Faulbach. Upon reaching hex AL5, they fall under the gaze of the adjacent Soviet BRDM-AT unit who executes Opportunity Fire. Note that the BRDM-AT’s AP Firepower will not be doubled even though the target is at less than half range. Units that have their AP Firepower number underlined neither benefit from short range nor suffer penalties for shots from longer ranges.
The BRDM-AT rolls 4 dice and scores hits on rolls of 4 or greater. The rolls are 2, 3, 4, 4 for a total of 2 hits on the top Scimitar. The Scimitar has an inherent Armor Value of 1 with a Save Number of 6, so he may roll one die and needs a roll of 6 to “save” a hit. As the Scimitar is in a City Ruins hex, it gets two additional die rolls. It will not benefit from Concealment because it was moving at the time it was attacked. (Note that the maximum number of extra dice hard/armored units can accumulate is 2, so the Concealment benefit would have been disallowed anyway.) Unbelievably, the British player rolls a 5 and two 6s for two saves, and escapes unscathed! The Soviet BRDM-AT is marked Ops Complete and the British Impulse continues.

Maintaining the momentum, the Lancer HQ and Scimitar in hex AJ5 dauntlessly charge into the heart of Faulbach. This does not go unnoticed by the Soviet HQ and attached BMP-2 unit who also elect to Opportunity Fire at the Brits as they arrive in hex AL4. The BMP-2 may roll 4 dice and needs rolls of 4 or better to score hits. In addition, the HQ adds its Leadership Rating (in this case, 2) to the AP Firepower (or Assault Factor) of one unit with which it shares a hex. So the BMP-2 may now roll a total of 6 dice. The six rolls are 1, 1, 2, 4, 4, 6, for a total of 3 hits! The target (the Scimitar) has an Armor Value of 1 but gets an additional die roll for the City terrain defensive bonus. The HQ is no help on defense, and there will be no Concealment bonus because he was moving at the time he was attacked. So the Scimitar gets two dice and must roll 6s to save hits. Finally, the luck of the Lancers has run out as the British player rolls 2 and 5. Now he must absorb all three hits, which totally eliminates the Scimitar (i.e. the 1st hit Disrupts, the 2nd hit causes the unit to be reduced, or flipped, and the 3rd hit is “lights out”).
Every time a unit suffers a hit, any HQ in the hex must also check for damage. A roll of 1 or less will damage the HQ as well. But in this situation all of the units stacked with the HQ were eliminated, so the HQ is eliminated as well. Not a good result for the gutsy Brits. All future Command checks will be difficult to pass now that the HQ is gone (until it is replaced on the next Marker Removal Phase). A Wreck marker is placed in the hex.
The British once again decline to move the Striker, so it is left in position in hex AE5 and the British Impulse ends.
Turn 2 – 93rd Recon 1st Impulse
The next chit pulled from the cup is the 93rd Recon Impulse chit. They perform Housekeeping, which allows them to remove all Ops Complete markers. Next, they may attempt to remove Disrupted markers from their badly needed T-80s. The T-80s are within Command range of their HQ so there will be no penalty to the morale check. The first T-80 rolls a 7 and the next T-80 rolls a 6. Both of these rolls are less than or equal to the HQ’s Morale rating of 7, so both units are no longer Disrupted.
The Russians decide to unleash hell on the Scimitars in Faulbach and begin with a volley from the adjacent BRDM-AT. Again, the BRDM has 4 die rolls and scores hits on rolls of 4 or greater. He rolls 1, 2, 4, and 6 for a total of 2 hits on the top Scimitar. The Scimitar will roll three defensive dice, one for its Armor Value and two for the City Ruins hex it occupies. No Concealment Bonus this time either because it is adjacent to a good order Soviet unit. The save rolls are 3, 4, and 6 which results in only one “save” so the Scimitar must absorb 1 hit by placing a Disrupt marker.
Next the BMP-2 in the hex with the 93rd HQ will shoot at the same Scimitar. Remember that the co-location of the HQ affords the firing unit a bonus equal to the HQ’s Leadership Rating, so the BMP-2 will roll 6 dice and score hits on rolls of 4 or greater. The rolls are 2, 2, 2, 4, 5, and 6 for a total of 3 hits! The best the Scimitar will be able to do is negate 2 of those hits because it will only get 2 defensive dice (one for Armor Value and one for City terrain), but he must negate two of them or he will not survive the battle. The Scimitar rolls two 3s and therefore is blasted out of existence, to be replaced by a Wreck marker underneath the sole remaining Scimitar. All the Soviet units that fired are marked with Ops Complete markers.
Needing to press his advantage, the Soviet player moves his newly un-Disrupted T-80s directly towards the action. The BMP-2 in hex AS1 starts moving north in an attempt to flank the British Striker next turn. Finally, the BRDM-AT down south continues its cautious movement through the woods with the objective of flanking the Striker from the south.
Suddenly, things are not looking so great for the British. They’ve lost too many units, including their HQ, and probably will fare best if they retreat and take up defensive positions in the woods to the north and/or south. The Soviets no longer have any chits in the Chit Cup, so the best thing that can happen for them is that the final End-of-Turn chit is pulled.
British Air Strike
Soviet hopes notwithstanding, the next chit pull is the British Air Support/Strike marker, which entitles the Brits to an air strike on a Soviet unit of their choice.
The defending player is only allowed to shoot at the Air Support counter with on-map anti-aircraft units (or with special “Air Cover” units). The Soviet player has no such units so the air strike proceeds. The British player chooses the BMP-2 unit in hex AP4 (with the HQ unit). The Tornado air unit has an AP Firepower value of 5 and a To-Hit number of 4, so the British player rolls 5 dice: 1, 1, 4, 5, 4. In Airstrike situations, the defender is only allowed to roll a number of defensive dice equal to the defensive bonus of the terrain. The BMP-2 is out in the open in Clear terrain and so gets no defensive bonus. The 3 hits are applied, totally destroying the BMP-2. Once again, as per rule 1.3.3.2 “HQ Combat”, when all units stacked with a HQ are eliminated, the HQ is also eliminated, so the 93rd Recon HQ is removed.

The final step in an Airstrike mission is to determine the status of the aircraft unit. The British player rolls a die and, if the number rolled is greater than the number of hits just inflicted by the aircraft, the aircraft counter goes back in the Chit Cup at the start of the next turn. If not, the aircraft is permanently removed from the game. The British roll a 4, so the Tornado will be able to strike again.
The elimination of the Soviet HQ seems to level the playing field a bit, and the retention of the air strike counter gives the British some hope. But the British are still at a considerable disadvantage both in total units and firepower. The smart money is betting on the Soviets to win but, in World at War: Blood and Bridges, the tactical situation can change very quickly, so never count your opponent out until victory is certain.
This ends the brief example of play. Although we did not even come close to covering all its aspects, we hope that it has given you a better sense of how the game plays and if it is something you might enjoy.
Summary
This system contains a number of interesting mechanics that add flavor and fun to a game:
- Chaos! – The Chaos marker throws a few curve balls into the game; some good, some bad. You may instantly lose an Impulse, gain unexpected Support Missions, or suffer changes in weather.
- Support Weapons – We like the idea that Support Weapons don’t have to be assigned to a particular unit until it actually uses the weapon. This prevents players from deliberately targeting units that have Support Weapons, when there is no way in the real world that they would have known the unit had such a weapon until it was actually used. To keep things balanced, there are also rules that may cause Support Weapons to be lost (before usage) if you wait too long to assign them.
- Artillery – An abstract artillery mission capability that allows for deployment of other special abilities such as chemical weapons, FASCAM munitions, Smoke, DPICM, and MLRS. The rules for deployment of these weapons don’t add any significant complexity to the game, but add a lot of flavor and unpredictability.
Harvey has some issues with “Saving” throws. Not that this is any less valid a combat resolution system than any other. It just smacks too much of Dungeons & Dragons for him, but he admits that it’s “just a personal quirk and really doesn’t impact game play or enjoyment”.
The counters have a lot of numbers on them. This is a blessing and a curse. It’s great that all the info for movement and combat is right there on the unit without resorting to complex look up tables. The curse is that all those numbers with their color coding and small fonts can cause some squinting and an occasional curse directed at your opthalmologist. We’ve read this complaint elsewhere but think it’s really overblown, as most of the time the numbers are clear enough (except maybe for the difficulty of distinguishing between the tiny “3” and “5” numbers…)
This game is not for the modern tank aficionado interested in angles of deflection, different characteristics of APDS rounds, armor characteristics, range finder attributes, differences in stabilized gun systems or missile guidance systems, etc. However, its strength is that players don’t get bogged down in such minutiae and it does make players use realistic tactics of maneuver and fire, overwatch and suppressive fires. Mark felt the level of realism was fine and true to the designer’s intent. The bottom line: for someone to jump in and just start playing, it is excellent. If you want a more detailed treatment of WW3 tactical combat, find another game.
Overall, we enjoyed playing and find it to be a good game for anyone interested in modern tactical warfare games. It is easy to play and has a consistent, systematic rule set that incorporates all the varied elements of modern conflict in a playable way. We have not been through all the scenarios yet, but expect that we’ll be following up with strategy articles and tactics tips as we become more proficient at playing this game.
