Strategy, Success and Failure in ‘Raid on Iran’
by Mark D. & Tony Stroppa

Overview
RAID ON IRAN, published by Steve Jackson Games back in 1980, has become one of my favorites over the last 30+ years. I don’t consider it a brilliant design or a showpiece of conflict simulation, but I do find it enjoyable, challenging and possessed of a depth that allows for virtually unlimited replay without getting stale. And that’s good enough for me.
Having already posted a review (see my “Raid on Iran: 30 Years Later”), I wanted to publish some strategy articles or game replays. Coincidentally, I was contacted by Tony Stroppa regarding my review, and he told me that he was currently playing RAID and was enjoying it very much. This article is based on one of Tony’s games. It was an unusual game in that it was over faster than usual, but I also thought it was a good example of how things can go so well for one player and so badly for the other. It is sprinkled throughout with Tony’s commentary and thoughts on strategy (for both sides), but is also a narrative of how the game progressed from start to finish.
It is assumed that readers are familiar with the game, so no basic rules will be discussed. If this game is a complete blank to you, then please read my review first for a bit more background.
Starting the Game
Each player in RAID ON IRAN is faced with a specific set of handicaps and a specific set of advantages. The American player begins the game not knowing where, exactly, all the hostages are located, but possesses unmatched firepower and mobility. The Iranian player has limited control over the initial disposition of his poorly trained forces, but retains the greatest advantage of all: time. The burden is on the Americans to rescue the hostages before a combination of human and mechanical attrition makes the objective unattainable.
Iranian Setup
With these basic facts in mind, the Iranian player must set up his units first, subject to relatively narrow constraints. A key consideration at this stage of the game is the selection of his “Special Advantage”. Only one of the following five “Special Advantages” may be chosen:
- Better Communications – The Iranian reinforcement schedule is accelerated by 3 turns.
Tony’s opinion: “The least valuable option because, unless the Americans are sleepwalking, their helicopters will still likely be on the ground and loading up rescued hostages before those reinforcements arrive. The Iranians can’t count on just speed to turn the tide in their favor; they must generate some friction and that means killing Americans and shooting up helicopters sooner rather than later.”
- Extra Manpower – The Iranian player starts with 140 militants instead of 120.
Tony’s Opinion: “More units at start are helpful, as boots on the ground now will prove a more decisive factor than twice the number of reinforcements later. To paraphrase Rumsfeld, you go to war with what you have at hand.”
- Extreme Fanaticism – Militants are extreme fanatics. They are less susceptible to American offers to negotiate, and are far more likely to execute the hostages.
Tony’s Opinion: “Extreme Fanaticism is generally a good option for the Iranians as it allows for a better chance of eliminating hostages, thus denying the Americans critical victory points. It also makes Negotiation very difficult even under optimal circumstances. Fanatic militants ensure there will be no free lunch for the American commandos.”
- Booby Traps – Wooded areas on the Embassy grounds may be secretly mined.
Tony’s Opinion: “Booby Traps seem fairly useless at first glance considering the number of wooded areas. But there are some woods that are natural approaches for commandos looking to stealthily infiltrate the Residence. Some players feel that the possibility of early warning, due to the noise of the explosions, and maybe even some American casualties may make defense of the Residence a little more viable. I am not one of those players.”
- Changed Hostage Location – One hostage counter, representing up to 10 hostages, may be set up inside any building area.
Tony’s Opinion: “Further dividing the hostages seems like a really good idea, as this forces the Americans to divide even further and can draw them even further into more heavily defended areas. They can be drawn closer to the sleeping militants, farther away from the most promising helicopter LZs, and farther away from the other hostages.”
Final Iranian Special Advantage Choice: Booby Traps
American Setup
The American player has quite a bit more latitude in where he sets up his units, and how the assault will be conducted. The American choice of “Special Advantages”, however, can be the key to the success or failure of the mission. His choices are:
- Extra Explosive Charges – Player starts with 50 satchel charges instead of 10.
Tony’s Opinion: “Limited usefulness. I’ve never run out of satchel charges before. Defenders on the Chancellery roof could drop them on militants trying to maneuver to the lawn LZs, so they could be part of a more elaborate defensive plan.”
- Farsi Speakers – Commandos are accompanied by friendly Iranian agents. Improves American chances at successful Negotiation or Deception.
Tony’s Opinion: “I like this option when attempting to infiltrate as a fake supply convoy. If it works, it’s a beautiful thing. Farsi speakers improve the likelihood of success. It’s not so useful for Negotiation you still only have a 2/3 chance of success at best. I generally plan on not negotiating anyway.
- Extraordinary Diversion – Elaborate diversions outside the embassy will delay militant reinforcements.
Tony’s Opinion: “My motto is ‘get in and get out quickly’. If you plan on sticking around for an extended fight with Iranian reinforcements, you may as well just choose the ‘Special Weapons’ advantage.
- Mole in the Militants – One of the militants is a CIA agent. The American player begins the game knowing the exact location of all the hostages.
Tony’s Opinion: “Probably the best all around option. In April 1980 the Americans apparently lacked internal intelligence on conditions inside the embassy. Knowing where the hostages are before making a plan sounds pretty fundamental to me!”
- More Special Weapons – The American player may take either two more mortars or one .50 caliber machine gun.
Tony’s Opinion: “This seems a little excessive unless you plan to make a stand on or near an LZ and mow down hordes of advancing militants. Speed is a major advantage for the Commandos, and slowing things down by bringing more special weapons that require a crew to move and fire doesn’t seem like a good plan. Until you get pinned down on an LZ. Better to have a .50 cal and not need it, than to need a .50 cal and not have it.”
Final American Special Advantage Choice: Mole in the Militants
Strategy
The Iranian Plan
According to game rules, 25 “sentries” must be placed – 10 in Road 12, the main gate road, and 5 in Road 1, the rear gate. Placement of the remaining 10 sentries is discretionary; they can be placed in any “Road” area. The last 10 sentries are placed singly to act both as “trip-wires” and to wake other sleeping militants. One sentry is placed in each of the following map areas:
- Road 22 – Bordering the south wall of the Residence and Road 6 just east of the Residence. These sentries’ job is to catch any American attempting to approach the Residence quickly along the roads.
- Road 11, south of the Chancellery, Road 17, the south end of the main road that runs from the main (south) gate to the rear (north) gate, Road 20, just west of the Chancellery and Road 21, the road leading through the woods to the south entrance of the Chancellery building. Their job is to prevent an unopposed commando approach to the Chancellery. At least they’ll have a chance of raising the alarm.
- Road 2 and Road 3, north of Building #5. These militant sentries will have the task of waking any sleeping militants in Building #5.
- Road 14 and Road 15, west of Buildings #1 through #4. Again, the job is to wake up all the sleeping militants in those buildings.
The hostages are split up into two groups of 25 each. One group is placed in the Residence basement and the other group is placed in the Chancellery basement (both mandatory locations for at least a portion of the hostages). Each group is assigned 5 “guard” militant, which is the maximum allowed per hostage group.
In an effort to confuse things a bit two “fake” hostage groups, representing no real hostages, are placed on the map with 5 militants each. The first fake hostage group is placed in the “Chancellery Second Floor East”, and the second is placed in the “Residence Second Floor” area. These were deliberately not placed on the ground floor because militant placement rules allow another single militant unit to be placed on the ground floor level of every building that does not already have one present. This allows the militants to potentially get a bit more firepower in the buildings that contain hostages. (I say “potential” because there are 9 “Decoy” units mixed in with the militants, and they are all placed face down, so one never knows which unit will end up being a Decoy counter).
A judgment call was made that the Americans would not try to infiltrate on the north or west side of the compound, thus the emphasis on placing as many militants in buildings other than those on the west side of the compound. After every building’s ground floor area has at least one face-down militant unit placed, the balance of the militants are distributed evenly (also face-down) in Building #1 through #5. They are presumed to be asleep.
The three woods areas chosen for Booby Traps are: Woods 40, Woods 48 and Woods 19. Woods 40 and 48 are natural routes for commandos trying to enter the Residence by stealth. Booby traps in Woods 19 may also surprise some commandos falling back from the Residence to the Chancellery or vice-versa. These placement decisions also mesh with the general Iranian strategy of making the Americans pay a heavy price in securing the Residence hostages. Normally, these hostages are seen by the militants as “lost causes” and are likely targets for execution. But not today. Today, the militants want a fighting chance at keeping those hostages and their associated victory points.
The militants are ready to go.
The American Plan
In order for a plan to have a chance of success, proper intelligence is required. That’s why the “Mole in the Militants” option was chosen. Armed with certainty as to the location of the hostages, the American plan becomes something akin to a “smash and grab”.
The American player starts with 90 commandos. They are designated missions as follows:
- 30 commandos designated as “Alpha”, will attempt to infiltrate the Residence. The first detachment of 10 (“Alpha Det-1”) will go over the wall on to Road 7 and attempt to silently neutralize the militant sentries in Roads 6 and 22. The other 20 commandos “Alpha” commandos (“Alpha Det-2”) will climb over the compound wall, 10 at a time, and attempt to enter the residence via the woods on the north side of the building (i.e. the aforementioned Woods 40 and 48).
- 30 commandos designated as “Bravo”, will attempt to use deceit to transit the front gate disguised as a supply convoy and move via road to the Chancellery. A bold move, indeed. They will have to fool the main gate sentries as well as the individual sentries in Roads 17 and 20. (Note: There are no “supply truck” units in the game; the commandos are just assumed to have local help in procuring the trucks and helping with the deception, but not the super-duper expert help they’d have if they had chosen the “Farsi Speakers” option)
- The remaining 30 commandos designated as “Charlie”, along with the two mortars, will remain just outside the main gate. Their job is to act as a quick reaction force if things go to hell in a hand basket or, if things go smoothly, to secure LZs for the extraction. In the event the game does not move as speedily as a “smash and grab” should, Charlie will have the additional burden of intercepting the awakened militants streaming out of Buildings #1 through #5 and the Library.
A pretty simple plan with very few moving parts. There is, however, one great leap of faith involved in believing that Bravo can just waltz in to the compound without any of the militants getting wise, but we’ll see.
In a final frenetic burst of optimism, the American player has chosen to have the helicopter arrival times “predetermined” (versus calling for them when needed, albeit with a 5 turn delay and a heads-up to the militants). He has chosen to have them arrive on game turn 7, based on his estimated timeline of events.
Tony’s Timeline: Elements “Alpha” and “Bravo” should be in position outside their target buildings on game turn 3. They will have two turns (4 and 5) to enter the buildings, charge to the basement, neutralize the militants there, and secure the hostages. Finally, turns 6 and 7 will be dedicated to the exfiltration of the rescued hostages. Thus, all helicopters will arrive on station on game turn 7.
The Americans are ready to go.
The stage is set for a dramatic contest of skill and command. It’s not just a matter of success or failure. For both sides, the most likely outcomes will be either brilliant success or disastrous failure.
The Mission
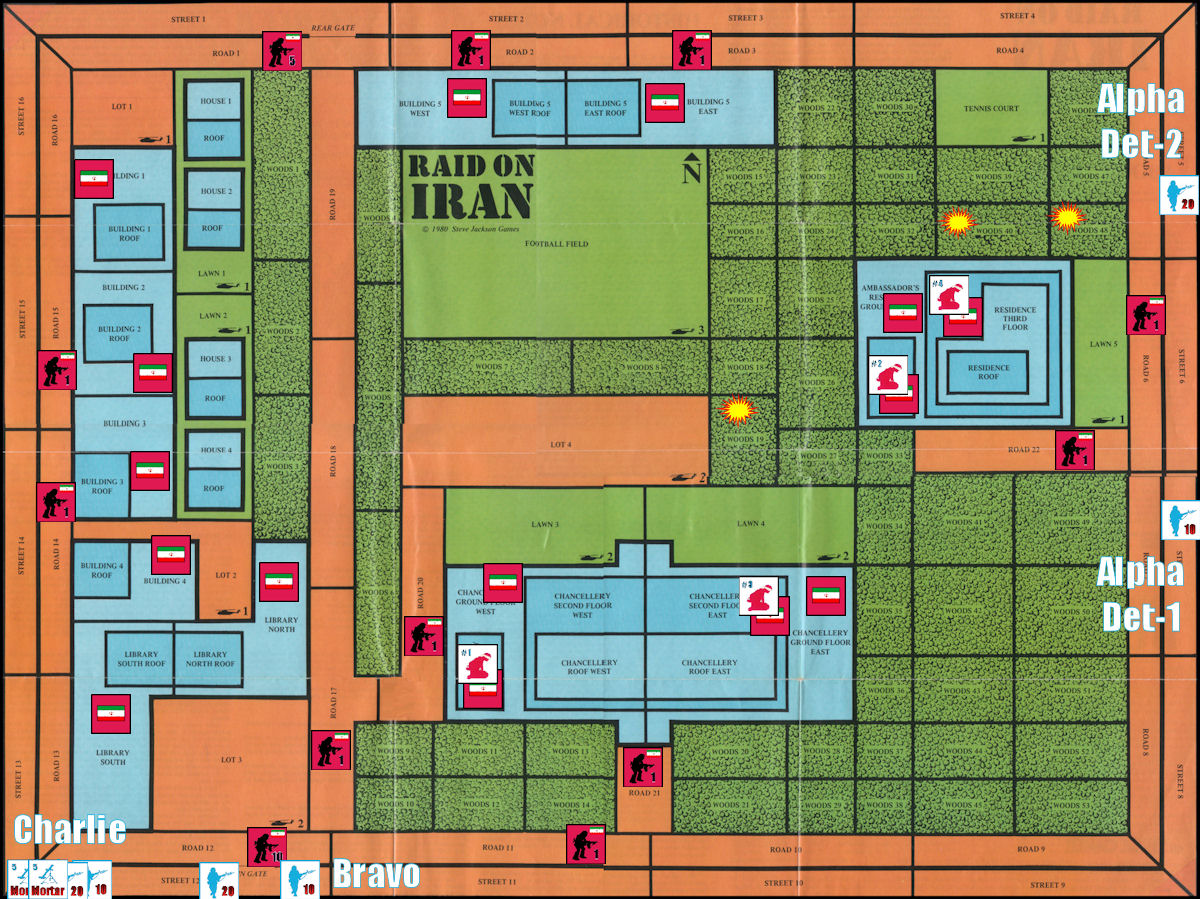
Game Turns 1 through 3
The initial phase of the operation worked like a charm. Alpha was able to get all 30 commandos over the wall and silently neutralize both sentries outside the Residence without being discovered. Judicious use of the commando “double move” allowed Alpha Det-1 to get over the wall, neutralize the sentries, get inside the Residence and discover that the face-down militant unit there was a decoy. Alpha Det-2 needed two turns to get over the wall (10 men per turn) and decided to wait until they were all together before proceeding into Woods area #48 just outside the Residence. This delay proved fortuitous for the commandos.
Just seconds after Alpha Det-1 found the first floor of the Residence clear, the sound of an explosion rocked the Residence, alerting all the militants inside the building. Alpha Det-2 suffered 3 KIA and 3 wounded due to the Booby Trap in Woods 48! Since there were no militant units close to the explosion, no others were alerted. If the Alpha Det-2 commandos had double-moved and gone directly into the woods before the sentries had been neutralized by Det-1, every militant sentry in the compound would have been alerted, changing the whole complexion of the game. Definitely a lucky break for the Americans.
Even so, things will start to get a bit dicy now that the explosion has alerted the militants in the Residence. They are turned face up to reveal that they are 5-strength each (5 on the second floor with the empty hostage counter and 5 in the basement with the 25 real hostages). Since the Americans know exactly where all the hostages are, the commandos won’t be fooled into splitting their forces in the Residence. The militants up on the second floor will be ignored; unless they come down and fight. Instead they launch weak, ineffective ranged attacks against the commandos, and do no harm.
Meanwhile, back at the main gate, American good fortune was even more evident in that the “Bravo” element successfully talked their way past the main gate sentries, and was able to silently neutralize the single sentries in Road areas #17 and #20!
So, at the end of turn 3, the Americans are slightly behind the estimated timeline in that “Bravo” is not actually inside the Chancellery yet. However, they still have a good chance of being ready for a game turn 7 extraction.
Next turn, the commandos will likely be forced to “go loud” in/near the Chancellery. This will trigger the awakening and activation of all the militants who have thus far been twiddling their thumbs, waiting for a break.
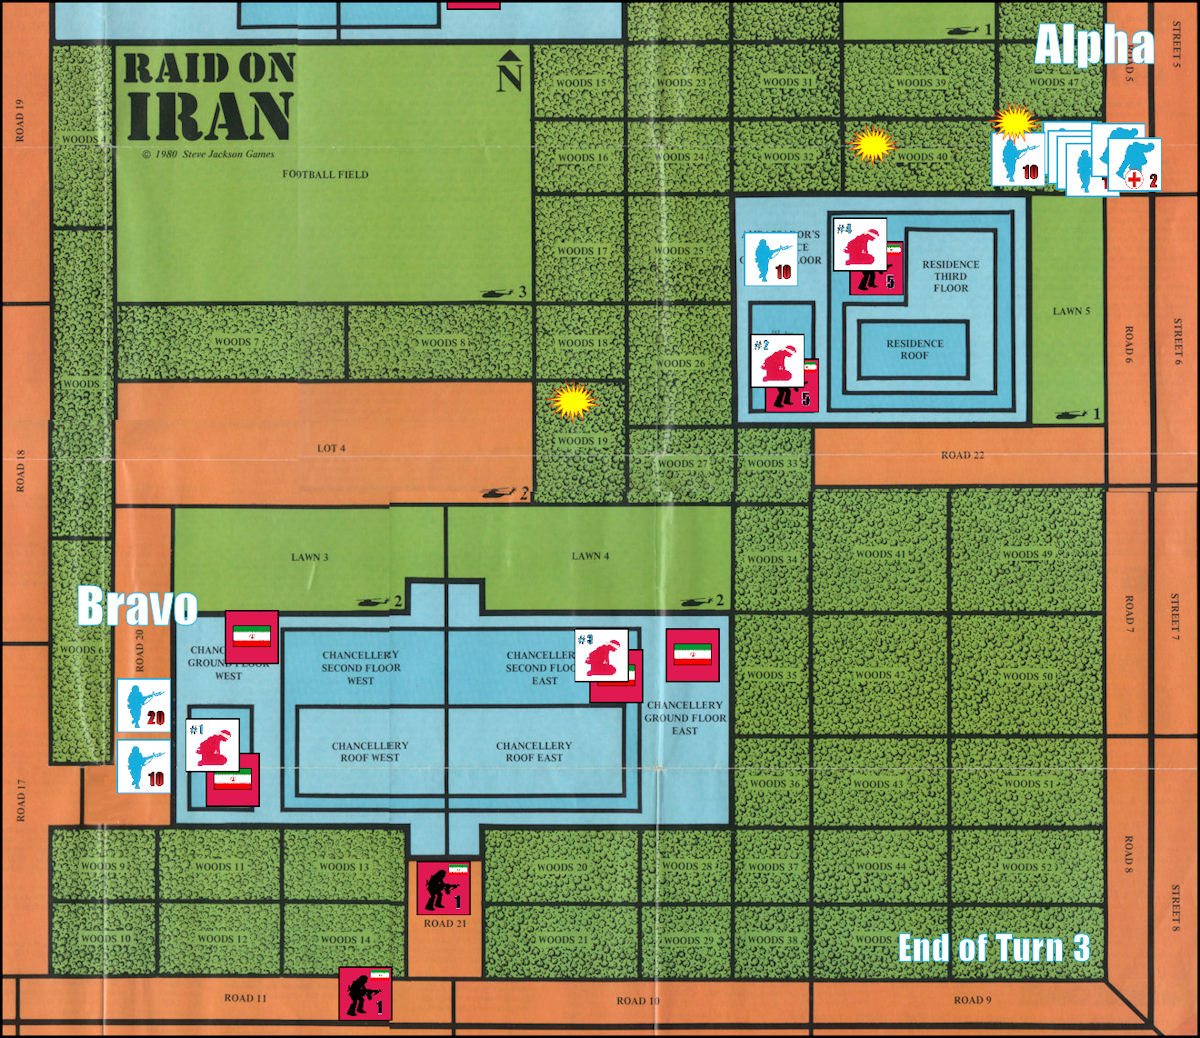
Game Turn 4
The commandos, a bit jittery after the booby trap in the woods, decide to rein in their aggressive impulses and use game turn 4 to gather forces for the main assault to seize control of the hostages. In the Residence, the 24 remaining healthy commandos (and 3 WIA) gather on the first floor. The 10 commandos who began the turn on the first floor make a ranged attack against the militants up on the second floor, scoring one hit.
The commandos near the Chancellery, still undetected, use this turn to gather on the first floor (west) of the building. The face-down militant in this location is revealed to be a 1-strength unit and is quickly dispatched by the 30 commandos. Since this single militant is not a “sentry” in a Road area, the rules prohibit execution of a “quiet attack”, so the gunfire alerts all the militants in the Chancellery, as well as the two sentries in the nearby Road areas. And if one sentry is alerted, they are all immediately alerted! All hell is about to break loose.
All the face-down militants in the Chancellery building are now alerted and revealed as follows: 2-strength unit on the Second Floor East, 5-strength with the fake hostage group on the Second Floor East, and another 5-strength unit with the actual hostages in the Basement.
Now free to move and attack with their alerted/activated units, the militants respond with alacrity. All the sentries begin moving toward the sleeping militants to alert them. Sleeping militants in Building #5, East and West, are successfully alerted, revealing a total of 23 militants and a few decoys. Those in Buildings #1 and #3 are not successfully awakened. (don’t ask me how you can fail to awaken someone when you’re screaming and yelling and you have a gun, but the Iranian player only has a 50% chance of awakening sleeping guard units, and the dice just went against him…)
The militants in the residence basement threaten to execute all the hostages! Fortunately they roll a 3 on a six-sided die, which indicates that they scream and threaten but do not actually follow through with the executions. Had the die roll been different, some or all of the hostages could have been killed. The luck of the dice has prevented a major disaster (from the American point of view).
It’s obvious now that the hostages must be secured on Turn 5 in order to save their lives.
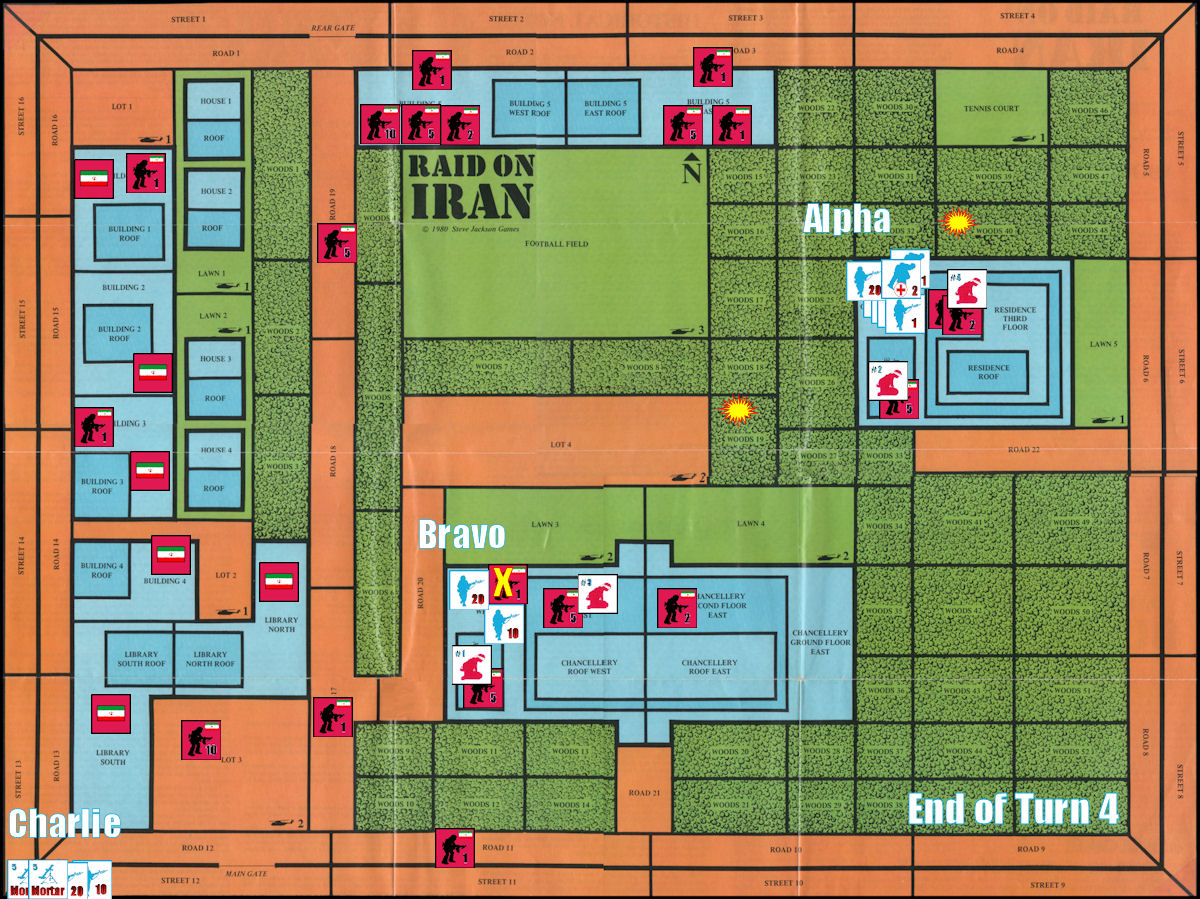
Game Turn 5
During Ranged Combat, Charlie puts the mortars to work, manning each mortar with 2 commandos, shelling the 10-strength militant unit in Lot 3 (just south of the Library) and inflicts 2 casualties. The remaining 26 commandos of Charlie element execute a “double-move” and engage the remaining 8 militants in Close Combat. The 3-1 odds Close Combat inflicts 5 casualties on the militants and none on the commandos. But the resulting noise awakens all the militants in the Library as well as Building #4. Fortunately there are a few “decoys” in there, but Building #4 is has 25 militants! Things are getting uglier by the minute for the Americans.
10 Commandos of Bravo launch a completely ineffective Ranged Attack against militants on the Chancellery Second Floor West, while the remaining 20 commandos charge directly into the basement, kill all 5 militants there, and secure the hostages without suffering a single casualty.
Over in the Residence, 20 commandos charge into that building’s basement and also kill all the bad guys while securing the hostages and suffering zero casualties themselves. So far, things have gone extremely well for the Americans in the Residence and the Chancellery. All 50 hostages are unharmed and under American control.
The 5 militants in the Chancellery Second Floor west execute a failed Ranged Attack against the 10 commandos on the first floor. However, the 4 militants on the Second Floor of the Residence get hot with the dice and manage to inflict a single casualty on the Americans on the first floor, thus killing one of the wounded soldiers. (Note: That’s 4 commandos KIA so far, and 2 additional wounded for those of you keeping score at home)
During Iranian movement, all units generally begin converging on the Chancellery. Units from up north in Building #5 begin moving south to the Football Field. A large block of militants move into the Library North building. A total of 7 more militants are awakened in Building #3. Building #1 had only “decoy” units. This leaves only Building #2 with sleeping militants yet to be awakened.
Turns 6 and 7 promise to be very tense turns.
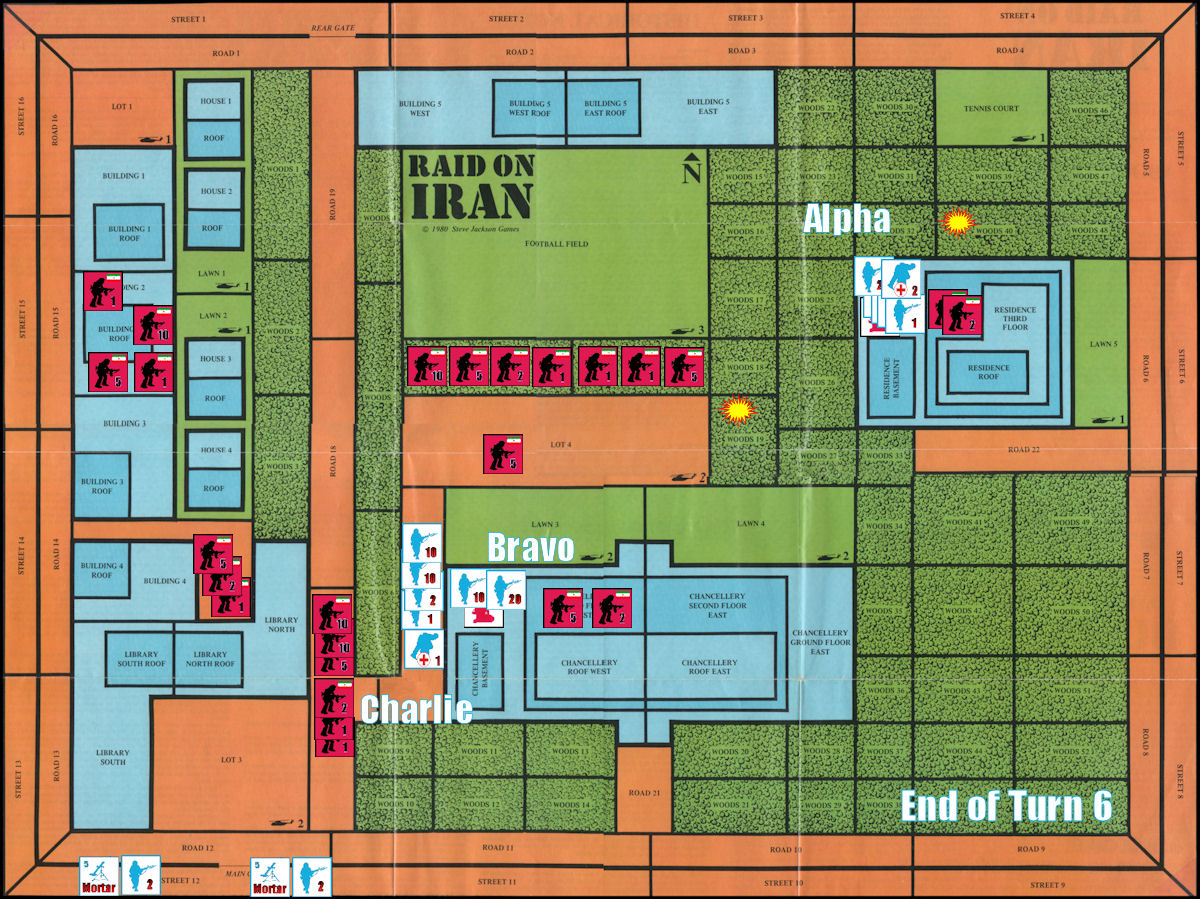
Game Turn 6
During Ranged Combat, the American mortars target, and eliminate, the single militant unit in Road 17. The 10 commandos on the ground floor of the Chancellery take a ranged shot at the single militant in Road 20 and eliminate him as well. In the Residence, the 4 commandos on the ground floor (the wounded guys can’t fire) blaze away at the militants on the second floor, but do no damage at all.
With all the hostages secured, there’s nothing to do during the movement phase but move toward the helicopter landing zones and prepare to get outta Dodge! Alpha commandos now move everyone, including the 25 hostages up to the ground floor of the residence. Bravo commandos all congregate on the Chancellery Ground Floor West. The 26 commandos of Charlie element perform a double-move so they end up in Road 20, momentarily safe from the crowd of militants in the Library. The four mortarmen from Charlie will remain with their weapons for one more turn to provide that last bit of cover before scooting for the nearest LZ. Everyone is in decent position to exfil on Game Turn 7.
Militants on the Chancellery Second Floor West take a pot shot at the commandos down in the Road (#20) and get lucky, scoring two casualties: one KIA and one WIA (latest tally: 5 KIA, 3 WIA). The 4 militants in the Residence are not so lucky and miss their targets entirely. All other militants rush toward the Chancellery. The apparently inebriated militants in Building #2 are finally awakened… and there are 16 of them.
Turn 6 ends with all American commandos positioned to board the helicopters that are scheduled to arrive on Game Turn 7 (but remember that the Iranian player doesn’t know this), and with 60+ militants bearing down on the Chancellery and its vulnerable helicopter LZs.
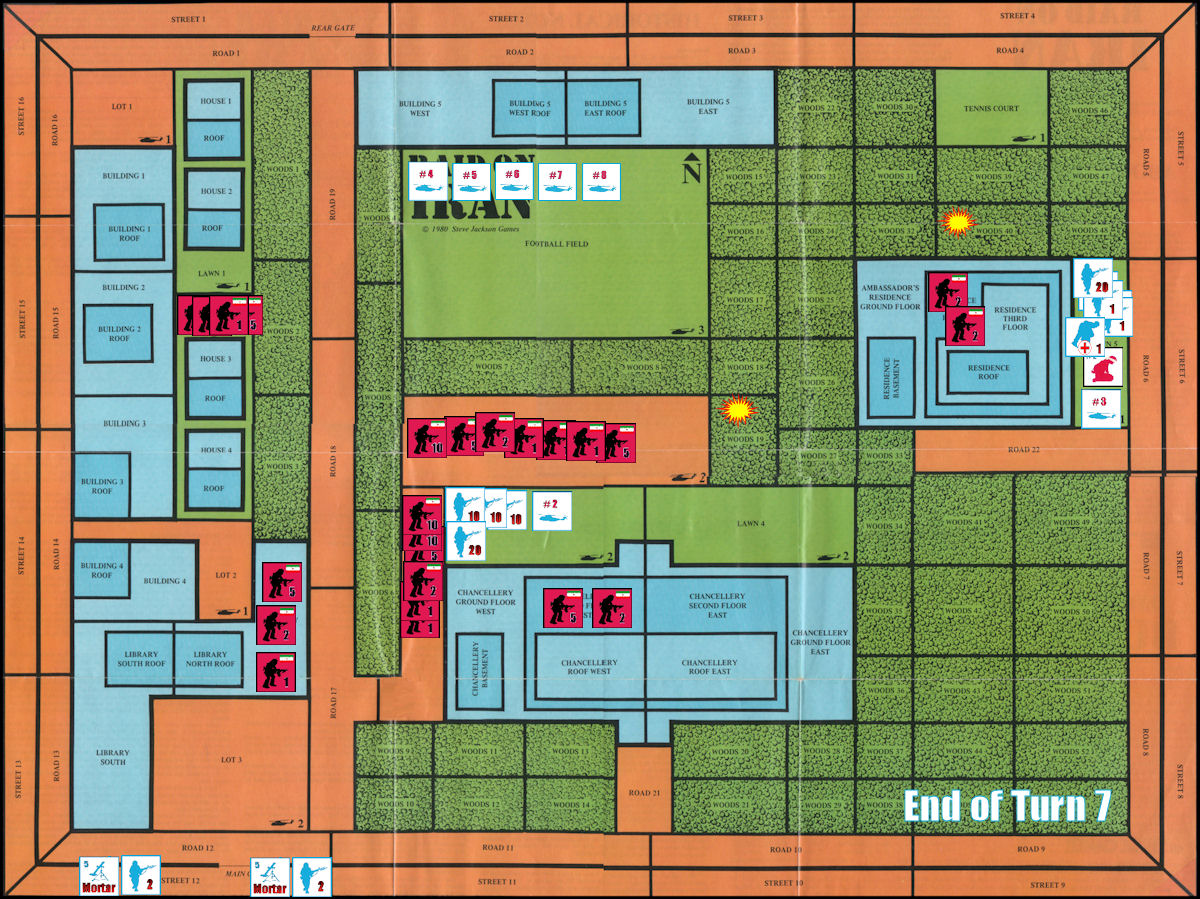
Game Turn 7
The American mortars boom for the last time as they attempt to silence the 5 militants in Lot #4, who are the only militants at the moment who can physically interfere with the Chancellery LZs. The die roll is “6” which causes the elimination of all 5 militants. (Is anyone else keeping track of the luck the American player is having today?) There’s no other Ranged Combat because all the commandos need to be able to move toward the helos this turn, and the one allowable double-move is being reserved for the Bravo element and the 25 hostages under their care.
Eight RH-53D helicopters appear on the horizon! Two of them touch down on Lawn #3, the LZ to the northwest of the Chancellery. One of them touches down on Lawn #5, east of the Residence. Due to the helicopter capacity printed on the map at each LZ, no additional helos can be landed at these LZs at the same time. The remaining helos hover high above the embassy compound to act as a reserve and to be prepared to extract the balance of the commandos and mortarmen.
Note that the American plan is actually one turn behind his own schedule. Normal movement will allow all the commandos of Alpha, Bravo, and Charlie (minus the mortarmen) to move to the LZs, but it costs another move to actually board the helicopters. So only the group that is performing the double-move this turn will be able to actually board the helicopter.
The wounded commando, 25 hostages, and 3 healthy commandos perform a double move and board helicopter #1 (There is a 30 person max capacity on the helos and units performing a double move must all start and end in the same location, so 25 hostages + a few commandos were the max that could meet all the requirements). But they’re not out of the woods yet, as they must roll to see if the helicopter can take off successfully. The roll is successful, and 25 hostages are winged to safety!
The entire Alpha contingent, plus 25 rescued hostages move out to Lawn #5 outside the residence and prepare to board the helicopter on Game Turn 8.
Furious at the latest turn of events, the militants lash out as best they can. The 4 militants on the second floor of the Residence fire Ranged Combat at the commandos on the lawn, and kill 1 commando, taken from the wounded soldiers. (home gamers: 6 KIA, 2 WIA). Since there are hostages in the area, they get to fire a second burst at the hostages and opt to do so, killing one hostage as well!
The 7 militants on the second floor of the Chancellery attempt the same revenge, this time they target helicopter #2, scoring a hit. This may seem like a minor “ding”, but it will cause a negative die roll modifier when this helo attempts to take off, and therefore may prove critical to the Iranian effort.
With all their possible Ranged Attacks exhausted, the militants move forward, continuing to “close the ring”. Turn 7 ends with just about 60 militants in position to fire on the Americans in front of the Chancellery on Game Turn 8. It’s become an “escape or die” situation for the commandos.
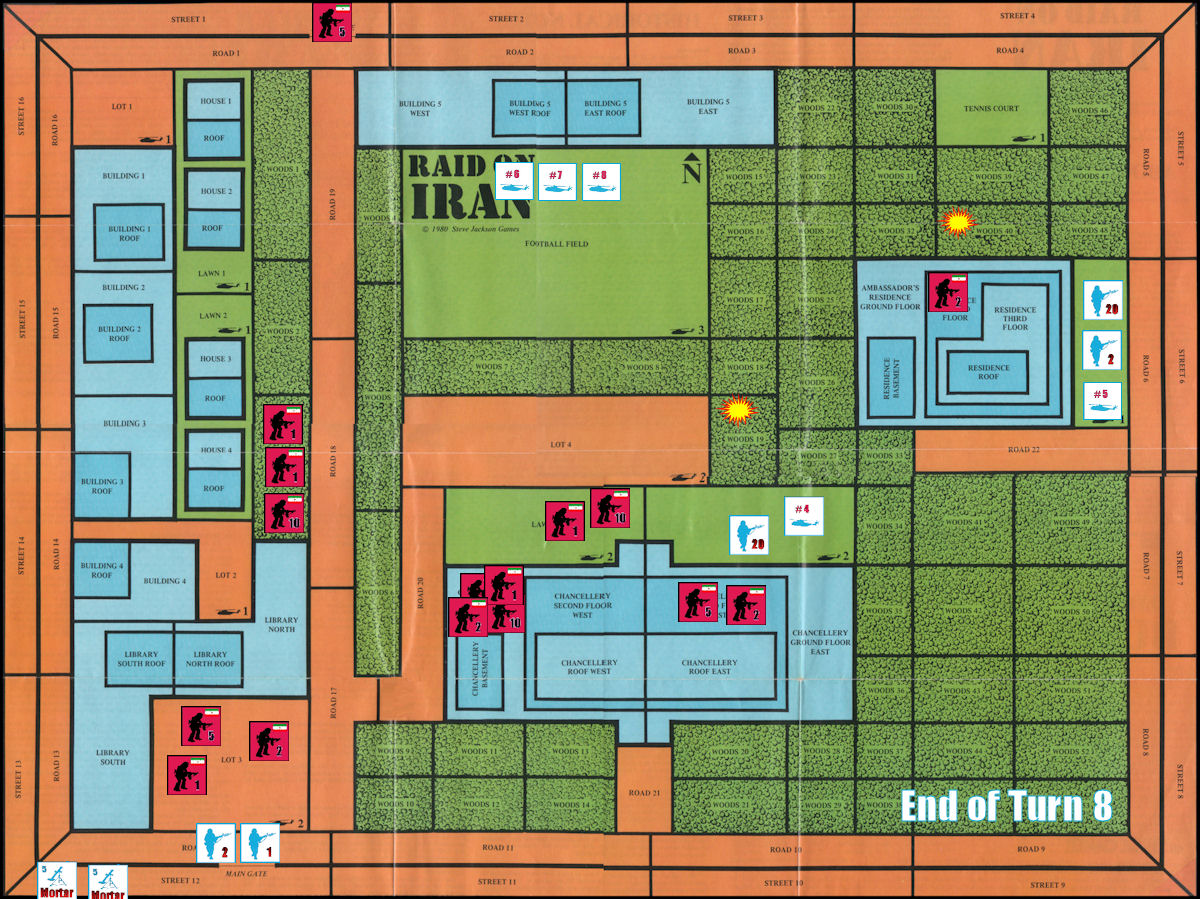
Game Turn 8
In front of the Chancellery, 30 commandos and the helicopter (fire combat strength of 10) make a ranged attack against militants in Lot #4. The combat result is an “X” which means that every one of the militants in that area is eliminated! No other Ranged Attacks are made.
Next, helicopter #4 lands in Lawn #4. During movement, the 30 commandos who fired ranged combat exercise their double-move to enter helicopter #2, which takes off successfully even after factoring the penalty for taking a hit earlier.
The remaining 20 commandos fall back to Lawn #4 next to the helicopter that just landed. They’re hoping for a Game Turn 9 extraction.
Because they did not fire the mortars this turn, the 4 commandos/mortarmen begin moving into the compound, leaving their mortars behind.
Finally, over at the Residence, 25 hostages, 2 healthy commandos and 1 wounded commando board helicopter #3 and evacuate safely. Much to the relief of the American player, he may now report that a total of 49 hostages have been rescued and are safely on their way home!
The Iranians are eligible to roll for reinforcements this turn (due to the arrival of the helos), and may roll twice because there are helos hovering. They get a “Mob” in any street area, which they place just behind the 4 commandos in Road 12. The other roll nets them 5 militants at the Rear Gate. The appearance of this Mob puts the 4 commandos in jeopardy. They may have waited too long to abandon their mortars and get out…
Iranian Ranged Combat from the Residence windows is ineffective and the commandos there are unharmed.
A bit gun-shy, after what will henceforth be known in Teheran as the “massacre in Lot #4”, the Iranians opt for splitting up a bit during movement so as to not present such a juicy target again. Sensing the possibility of an easy kill, 8 militants move south from the Library toward the 4 former mortarmen, hoping to finish what the Mob will start.
The Mob moves into Road 12 to engage the commandos in Close Combat. The Mob is dispersed but does kill 1 Commando in the process. (KIA: 7, WIA: 2, Hostages Killed: 1)
Game Turn 9
During this turn, all the remaining commandos outside the Chancellery and Residence board helicopters and safely evacuate. The 3 remaining mortarmen opt for a “Ground Evacuation”, performing a double-move to make it outside the compound, and are assumed to have been spirited away by friendly agents inside Teheran.
Post-Mortem
The final tally: 49 Hostages rescued, 1 Hostage killed, 7 US Commandos KIA, 2 US Commandos WIA, and no one left behind. And an indeterminate number of militants killed.
In terms of Victory Points:
- American: 471 = Hostages rescued: +10 each (+490), Hostages Killed: -2 each (-2),
Commandos Killed: -2 each (-14), Commandos Ground Evacuated: -1 each (-3) - Iranian: 14 = Commandos Killed: +2 each (+14), Hostages Held: +10 each (0)
471 American Victory Points minus 14 Iranian Victory Points equals a net difference of 457 points, which scores as a “Very Successful” American operation. (note: 500 is a “perfect” score).
Tony’s “Lessons Learned” – Americans
The American attack worked mainly as planned, wrapping up on Game Turn 9 versus the planned Game Turn 7. Not bad at all. Since there is no time limit in this game (see Mark D’s thoughts on that in his review), initially bringing 10 commandos at a time over the wall seems needlessly risky. Better to come over 5 at a time and reduce the risk of discovery by 25%.
The chosen American strategy this game depended on getting in and getting out quickly, in classic commando fashion. But luck also played a major part in the overall American success on several occasions.
- It was very risky attempting “entry by deceit” disguised as a supply convoy, when the “Farsi Speakers” option had not been chosen. There was nearly a 2/3 chance of failing that attempt.
- He came within inches of having as many as 25 hostages executed. This would have cost him 250 victory points, and any possibility of a higher level victory, in one die roll!
- Near the end of the game, another lucky break, triggering the “Massacre in Lot #4”, could have turned out differently and resulted in 60+ militants blazing away at the rescue helicopters.
As a minor point, the commandos manning the mortars should have begun making a break for it a turn earlier. They’re extremely vulnerable once Iranian reinforcements start coming in, and nothing could be worse for the Americans than to have commandos captured.
The final objection to the American strategy is that there was no “Plan B” at all. A decent fallback option might have been to bring along the .50 cal machine gun and have a crew of 5 on standby to create “Fortress Chancellery” by mounting the MG on the roof. That kind of firepower would definitely give the militants second thoughts about approaching the LZs north of the Chancellery. They’d probably opt for a slower approach through the woods to the east of the building, thus providing the delay the Americans might need at that moment.
Tony’s “Lessons Learned” – Iranians
I think the whole Iranian premise of trying to make the Residence a tougher nut to crack, including the choice of “Booby Traps” for the Special Advantage was misguided. The Residence is just too remote to be effectively defended.
In the Residence, your best bet there is to place the minimum required number of hostages in the basement and then place some on the Residence Third Floor. Then hope you’ll have enough time to execute some hostages before the American commandos can get to you.
But I still like the “Booby Traps” option because it can’t be negated by an American option (e.g. “Changed Hostage Location” can be negated by American “Mole in the Militants” option, etc.) but I’d put one Booby Trap in Woods #6 or #5 which are popular spots for commandos to use to protect their flank from “awakening” militants streaming in from the west towards the Chancellery.
At first opportunity, split the hostages up into smaller groups. If a group of hostages had been placed on the Residence Third Floor (as mentioned above), and then half of them were move to the Residence roof, there’s no way the American player would have been able to keep to the Game Turn 7 timetable for exfil. Don’t make it easy for your opponent to pull off a “smash and grab”!
Same thing with the Residence. It’s never a good idea to put all of the hostages in one place, particularly in the basement where there’s only one point of egress!
Sentry placement could have been done better as well. Single sentries on the roads are just too easy to kill with “Quiet Attacks”, so why bother using them as trip-wires? Put them alongside the buildings where the bulk of the militants are sleeping (Buildings 1 through 5, and the Library). Put one each in Roads #21 and #22, just so that if the commandos screw up and make some kind of noise, at least someone will be there to hear it and raise the alarm. But don’t get your hopes up; it’s likely they’ll be taken down in “Quiet Attacks”.
I know they’re only half-trained “militants” and “students”, but did they have to be rushed headlong directly into a hail of American lead? Use a bit of cover and/or concealment. Woods #19 or #27 are safer places to cover the Lawn #4 LZ. If possible, it’s also better to try to get inside the buildings and move to a higher floor where you have extended range. For example, from the Chancellery Second Floor West, you can lay down fire on the LZs in Lawn #3 and Lot #4. True, it may take an extra turn to get in position, but if you get mowed down in the open, you’re no help to the team anyway.
Summary
This was an uncharacteristically short game, where the American player just got all the breaks. In most games that we’ve played, the Americans could always count on a bad break or two (a hostage execution event, or a failed helicopter takeoff), so you should expect that to be the norm.
However this replay was interesting in that it showed how an audacious American plan, boldly executed, can succeed in spectacular fashion.
Optional Rules
The game comes with several “Optional Rules”, two of which are worth considering, in my opinion:
- Hidden Movement – Allow the American player to keep his units face down until it is first fired upon by enemy units.
- Reduced # of Helicopters – Can the American player make it if he starts with seven helicopters? Six?
The third Optional Rule allows the commandos to mount mini-guns on the helicopters. But they already have such an advantage in firepower that mini-guns would just throw things completely off kilter.
Tony’s Ideas for Additional “Special Advantages”
- Better Helicopter Maintenance – Helicopters take off successfully on a roll of 3 or better (instead of 4 or better).
- Pasdaran (Revolutionary Guard) Units – A cadre of Pasdaran is present to provide the militants with better leadership, and to distribute support weapons (like RPGs, SAWs and GPMGs) among the “students”. Militants fire with only a -1 modifier (instead of -2).

WOW… gonna have to find this game. Phenomenal write up
Like you, enjoyed the game and played it fresh many times. I was a playtester for old Strategy and Tactics when they were on 23rd. Street and they had several “Iran” type commando games before the Hostages. I met and thought Dunnigan very brilliant. They had Iranian scenario for Cityfight…the “rout of the Javidans”…which led to the fall of the Shah directly. They moved from 23rd. street to another location and the games became less focused.