By Paul Comben
Publisher: VentoNuovo Games
Designer:Emanuele Santandrea
Well, I have not got any lamps I can let go out, but I might just start a few alarm bells ringing – 1914 Germany at War, covering the opening months of conflict on the Western Front, uses much the same system as was seen in Vento Nuovo’s previous game, Waterloo 200.
Are there any bells ringing? Perhaps a few. Those of us whose first experience of the hobby was via the Avalon Hill “classics” will probably recall with an odd mixture of warm nostalgia and mildly cold shuddering the diverse titles which fell into that classification – diverse titles, but essentially the same game, blithely oblivious to period, technology, tactics, and just about anything else historians and gamers tend to think are rather important to getting things right.
So what makes 1914 GaW, as a diceless block game, different from its predecessor? The ambience of 1914 is certainly present through a series of game features, but if we want to talk about similarities, the best answer I can offer is that this system, running across two very different eras, emphasizes matter that is common to all military experience – armies that move and fight are armies that are wearing out, be that in a day of intense action or through the course of weeks of campaigning; and furthermore, as one historian put it, the knack of seeing what is on “the other side of the hill,” is here portrayed through the conundrum of what is on the other side of the opponent’s block. This is what 1914 GaW really has in common with Waterloo 200, so please do not become overly fixated by a similarity in look and a not too enlightening pick through the two games’ mechanisms: these are both games about planning, timing, and focusing effort; and without wanting to sound overly blasé, they are about winning…before you lose.
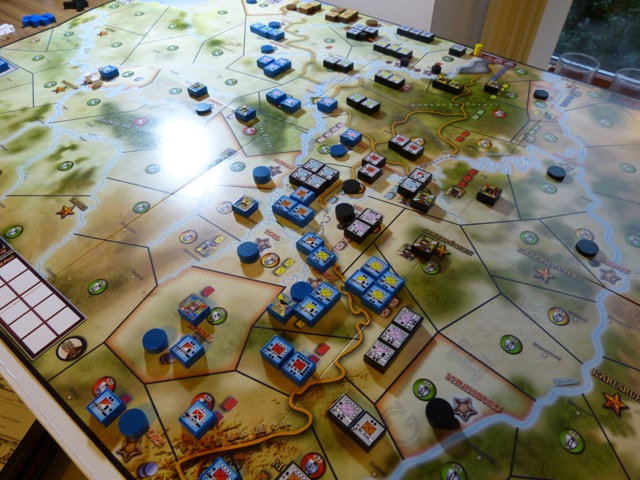
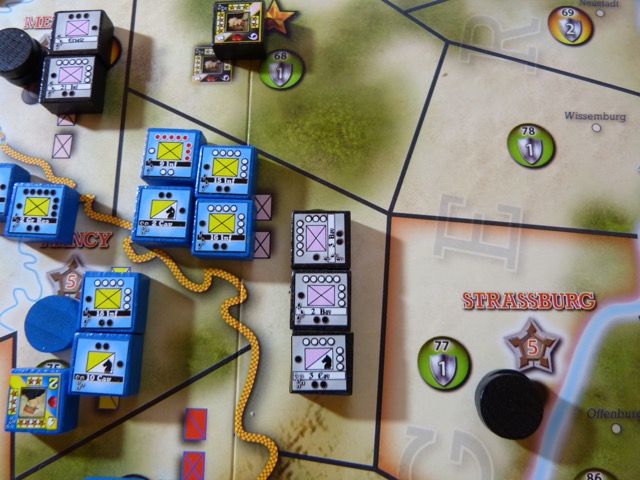
 Owners of previous Vento Nuovo designs will know that the company works to a high visual and physical aesthetic, and this new game is no exception. The colourful but highly functional map matches very well with the block and sticker designs, and the whole package offers a big enticement to set up and play. The standard production map is on thick stock; the limited edition map has a lovely finish and is fully mounted. Divided into areas, the map presents a portion of Europe from the Rhineland to those regions of France immediately south and west of Paris. Alongside the natural terrain of rivers, forests, marsh, hills and mountains (the Vosges), there are numerous fortress locations, the two BEF landing areas (Calais and Le Havre), the various national and state capitals, and a number of other city locations. Hardly any of this terrain, natural or not, is there for purely decorative purposes, and as we get into the meat of the game’s operations, these features will come into focus. The one other map feature that must be mentioned, and which is fundamental to understanding and playing the game well, are the area terrain modifiers. Presented within colour coded icons, green, yellow and red, these depict the military characteristics of every area, with green areas representing “clear” terrain, highly suitable to manoeuvre but potentially subpar for defence (more on this anon); yellow areas that are representative of more broken/rolling terrain, with the same movement costs as green, but with better defence modifiers coupled with a stacking limit brought down from four per side (green areas) to two per side; and red areas, which depict the most awkward terrain, with favourable defence modifiers, but a two unit per side stacking limit and restricted movement.
I would recommend any player new to this game to get to know the map thoroughly. Bottlenecks and other mishaps stand in the way of manoeuvre, and if you do not pay attention to what is going where, especially when it comes to placing the all-important leader units in the present turn, and thinking also of where they need to be in the next (leader command radius is vital to getting units to move and fight), you will end up in a mess. And there are other accidents waiting to happen: with injudicious play, especially what might broadly be called lunging at objectives, you can crowd your commanders out of viable positions, and leave units unable to progress their intended roles.
Then, on another, quite subtle issue, if you look at the French border with Belgium you will see two things clearly; and perhaps, if you look a bit harder, you will see one lurking horror. The obvious features consist of the fortress positions along that portion of that border nearest to the Channel, and a little further south, the natural “fastness” of the southern exits from the Ardennes – both of these potentially very useful to the defence of France. However, in between, there is nothing but a green icon gap, with no defensive benefit and “Doorway to France” written all over it. In one of my early try-outs, a very large chunk of the French 5th Army was destroyed here through a combination of this want of inherent defence, and of my four deployed units, the two average quality ones hardly compensated for the dearth of any merit in the other two (reservists), apart from that they were filling up space…for a time.
But before we go too far with talk of maps and manoeuvres at this stage, let us take a proper look at the two armies, and a certain question of valour.
With all units except leaders, raw military strength is expressed by a number of dots printed around each side of the unit’s type – infantry or cavalry. As the unit (all essentially corps) loses strength, its reduced values are represented by rotating the unit to show that new strength level on the topmost side. Actual troop quality is depicted by colour of dot – red for elite, white for average, black for raw troops and territorials. Red dot units are not particularly abundant for either side, though the BEF is an initially formidable force; albeit with one possible weakness apart from its sheer lack of numbers – again, more on that a little later. The French army, by itself, is significantly outnumbered in a pure count of deployed military force at game start. Furthermore, although initially it is in good defensive terrain, other factors tell against it – stacking concentrations are often reduced by terrain restrictions; a number of its units are echeloned further back and can become a chore to bring up; and although it has this defensive terrain, it is not on this ground that it really needs to be, as the main German thrust is going to come in from much further north.
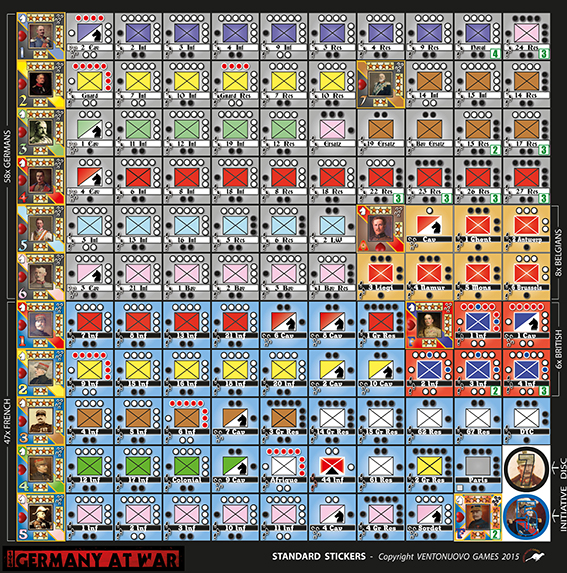 The pure numbers issue can appear at least partly solved by adding in the units of the Belgians and the British to the French order of battle, but this is not much of a palliative. The Belgian army is hideously weak in terms of numbers and quality, and the BEF has to get to France before it can do anything. Without doubt the BEF is the best unit for unit force in the game, at least initially, with its red dot corps and a +1 bonus to its defence strength via “The Mad Minute Rule,” but it can lose its edge for reasons other than casualties as the game moves on. This brings us to another key aspect of the game – the gaining of Valour Points.

Valour has two operations in the game: by capturing enemy major cities and fortresses, you gain valour, and with each point of valour comes a combat modifier (combat is all about having the most strength to deliver hurt, and alongside that, having the quality to absorb whatever hurt comes your way without taking too much real damage); furthermore, if you gain ten points of valour, you will win the game there and then. For the Germans it is easy to see the attraction of this. Belgium is littered with valour-related objectives, and very little is standing in the way of getting them. Add the border fortresses of Northwest France, and the rewards can be substantial in combat power alone. Getting to ten points is another matter, as that will entail either advancing much deeper into France, or successfully taking the French fortresses along the common border with Germany, and that is a far more difficult task given the initial deployment of forces and the nature of the terrain.
Before continuing with valour, it is worth saying a few words about fortresses and the part they play. Having worked through a few opening moves, my impression of these positions changed a fair bit. Reflecting the reality of 1914, most fortresses, with their meager garrison provision and the want of quality supporting units (very much the case in Belgium), are easy pickings for the Germans. On the other hand, if the garrisons are boosted (garrisons are represented by wooden discs), and if there is a decent supporting (mobile) military presence in the same area, they can become a serious impediment to progress. By a variety of actions in a turn, fortress garrisons can be increased (more discs) up to a maximum of five. For the Germans, seeing any fortress getting to two discs, let alone any further increase, should act as a serious wake-up call. Each disc adds five strength to the fortress, all of which is unaffected by the area capacity limitations, meaning that a substantial fortified position with a decent presence of supporting corps is going to be near impossible to take on. The attacking side will not be able to muster enough strength to make any real impression, even if they augment their attack with the assets inherent in leader units (the big guns). In short, going for such a position head-on is likely to be a futile and resource-consuming exercise that is best avoided by taking the position well before things get to such a pass, or if that fails, seeking to wear away the nuisance by attritional isolation.
But now, back to valour, and having indicated how the Germans get their hands on some, the obvious question to ask is how is it done for their foes? In answer to that, it is important to point out that each combatant nation gains its own valour points, and for the Entente that is, of course, France, Britain and Belgium. The common means for each to gain valour is by major city and fortress capture, just like the Germans. But if you are playing with the optional rules, which do appear to be favoured, the French can also be rewarded for launching themselves into Germany (as per Plan 17), with valour being gained for each new engagement they initiate east of the border. This, at first look, can appear like an open invitation to “giving it bucket loads of outrance” all the way from Metz to Mulhouse. But, not for the first time, what the game gives with one hand, it likes to snatch away with the other. Of course, it is handy to have a bit of valour available to the French, but it comes at a price – unless you really do stumble upon any notable weakness in the German deployment, the negatives associated with giving vent to your élan will be depleted commander units, semi “stuck” French corps along the border, and other army-specific corps trailing behind out of command range – the French leader command radius is only one area, while for the Germans it is two. This is not to dissuade you, as the French, from making a push for valour, but just to understand that it is likely to come with problems as well as opportunities.
And on that question of opportunities, it would have to be said that the Entente’s ability to accrue any serious number of valour points is pretty limited. The German fortresses have got numerous German corps in the way of getting at them; the terrain is often difficult; and, at the end of the day, with the Schlieffen forces most likely plunging towards the Channel and the fields of northern France, getting too enamoured with leading a phalanx of bayonets towards the Rhine might well be equated to putting your head right in the noose. What you really have here as the French is a balancing act – advancing into Germany is the one serious chance the French have of getting some valour to set against the likely German totals, but there may be a time to abort the operation, and if you are against a canny German player, you must be aware of the danger of getting lured into positions you will find it very difficult to get out of.
And what of the Belgians and the British? To put it bluntly, the Belgians have about as much chance of getting a valour point as the Kaiser had of winning a charm contest. That is hardly a major surprise, but the main issue really lies with the British. On the face of it, the BEF is a formidable outfit, but it will really struggle to augment its starting strength with any valour additions because it is not in that sort of campaign environment; and not only that, but by the time the Germans are meeting up with the Tommies for the first time, the Germans are likely to have a clutch of valour points to throw into the battle. One of the best answers to that is to keep the BEF where it can be helped by “terrain,” and especially by a fortress with an augmented garrison. Relating history to the game, that is what the BEF did at Ypres (a game fortress) in late 1914, and what you can do by placing the quality British units in a place where they can hunker down and plain get in the way. With a decent defensive position, and with their forces massed, they will be difficult to shift, and that is possibly the main thing to do with them.

So, the game might offer a lopsided take on things when it comes to valour, but then there are factors that are very much in favour of the Entente – providing they are given their chance to be effective. One of these is giving the Germans every opportunity to wear away their command resources in ways that achieve nothing or very little towards the German victory conditions. Among the techniques that need to be mastered here are knowing when and how to give ground, when to call a general retreat (a withdrawal from an area pre-combat resolution by all the forces on the defender’s side – needs initiative disc), and always seeking to use the terrain to best advantage. This final point entails more than merely situating your units on good defensive terrain – in fact, it might mean passing through the good terrain simply to get the benefit of it working as an intervening speed bump between your forces and the pursuing Germans. Think of the advantages this way: the enemy may now not have enough movement points to pass through that terrain and still reach you (note: it is also +1 to movement costs to enter an enemy occupied area), so the enemy move degrades its leader but does not touch you; and if the force has to stop in the “good” terrain, then, with its reduced stacking capacity, you have, at least to some extent, broken up the formation of the enemy units approaching you.

This is what I was referring to earlier in this article when I hinted that the defensive value of terrain might be rather subtler in interpretation and use than simply setting down your units on the highest defensive value terrain you can find. Almost without exception, higher terrain values for defence are concomitant with lower stacking values, so you have to be careful about what is really the best use of terrain. Yes, the stacking restrictions also affect the attacker; but if the attacker is likely to bring leaders up in support, and has a clutch of valour points as well, putting a couple of nondescript units into such terrain rather than beyond and behind it might not do your chances that much good. On the other hand, you should not miss a chance, when in a defensive posture, to disrupt the enemy’s approach, and that can mean being a bit more inventive in how you take advantage of what geography has to offer.

And then there are the leaders themselves, and this is where the French do have one considerable positive in the person of Foch. Behind his mild mannered “looks like all the other commanders” outer guise, this game Foch is an absolute terror. Once on the board (he arrives as a reinforcement), he can:
At or near his non-depleted strength have a vastly superior command range, bringing a considerable number of French units under his control.
- Command any French unit – i.e. he is not restricted by army designations.
- Enable the player to initiate a “Foch Special Attack” that doubles the strength of all French units attacking one particular area.
Given how difficult it can be to accrue valour as the Entente player, and that your other leaders are incapable of commanding anything more than one area from whichever chateau they are in, Foch is major plus that, it almost goes without saying, has to be used carefully and not squandered away on fruitless escapades.
There is one other nuance of gameplay that I want to highlight before looking at particular game details within the “pulse” average game turn. This aspect is do with the handling of reinforcements, both in terms of what the game system “invites” you to do, and what you might actually prefer to do. As with other particulars of this design, falling in with an apparently easy method of handling reinforcements can land you in difficulty. If we leave aside the matter of getting the BEF to France just for now (that is something, I feel, belongs within the structure of a game turn), what we have is two pools of reinforcements, one for each side, from which forces are blind drawn just as they are for the initial placement of forces. Many of these forces are army specific (i.e. they can only be commanded by the leader to whose army they belong), but, in the case of the French, quite apart from the effect of Marshal Foch, you have a number of reservist/territorial units that are of poor quality but do at least have the merit of being capable of command by any leader within range.

Both sides can draw up to their “Strategic Value” during a game turn’s preliminary reinforcement phase, or by using a “Strategic Action” as an option during the body of that same game turn. What this means in practice is that the Germans can blind draw up to seven units during the reinforcement process, and the Entente up to five. I rather suspect that not a few players, at least to begin with, will want to grab every last reinforcement unit they can, and that at the earliest opportunity. There are, however, a few potential snags to doing this, which can be summarized as follows:
Neither side can be that sure what they will get from a blind draw made out of a pool blindly put together. You answer, “so what?” Well, the “what” is that if you do not know what you will get, you might get some awkward moments regarding where units end up.
- Many units for both sides, those bearing army designations, have to go on one of that army’s initial deployment areas. Again, “so what?” you might ask.
- So, by the time you have moved the army leader to be in support of the men up front, the reinforcements placed to the rear might well be out of command range. Alternatively, the deployment areas might be filled to capacity, leaving you to fit the unit(s) in a variety of alternative locations even further away from the front.
- Ah, but perhaps you will play a Pass Action, and get at least one unit on a train (optional rule) and off to where it is needed. Then again, you might play a Strategic Action and move the lot…but playing Strategic Actions in bunches is not really possible, as you need the initiative disc, which you may well have given away to get the reinforcements in the first place.
- Very well, you’ll just have to stick with the limitations of a Pass Action and be patient. Not always easy, eh?
- Non, Nein, Nope…if your opponent is in a less than generous mood, seeing your reinforcements out of position, and you trying to sneak Pass Actions into the phasing, he might just declare a Pass himself, and consecutive passes effectively end the turn, leaving you with a glut of lagging forces still needing to be moved…next turn. On the other hand, he might let you pass and pass and pass whilst he gets on to moving viable formations to the attack.
None of the above is meant to be immutable doctrine; they are simply my first thoughts regarding what might be worth factoring in to how you handle reinforcements…and anything else. And yes, with reinforcements, there may well be occasions when you will rightly call for everything you can put your white gloves on; the trick is to knowing when that time is.
The Pulse of the Game
When you get into the to and fro of a turn’s impulses, the overall pace of things will be largely decided by the following:
Who has the Initiative Disc?
- Will that person want to play a Strategic Action?
- How are both sides’ forces placed in relation to their leaders, and to the enemy?
- In what state are those leaders?
- Are there still reinforcements in the respective pools, and are the British at least largely ashore?
- The likelihood of Pass Actions.
- The temperament of the players.
- Who looks to be winning?
By now I really hope I have made it clear that this design is not Waterloo 200 on a different map, and we will see some more differences just a little later. But by way of a Waterloo reference, I am going to shoot back to 1970 and the film Waterloo, which, as an aside, seems to get better each time I watch it. But what I want to draw from that experience is one line given to Wellington as the massed forces of d’Erlon’s I Corps drew closer to Picton’s line. “This one’s going to take careful timing” is what Christopher Plummer’s duke said, and this rather sums up a lot of how this system works. It is not enough to see the good moves; it is also necessary to know when to play them.
As part of my Waterloo 200 article on this site, I remarked on how the possession and employment of initiative/advantage in this series differs from a model such as that which encompassed Courtney Allen’s and Don Greenwood’s range of area/impulse games back in the 1980s. In those, as was stated in some strategy pieces, the main point of holding the initiative/advantage was simply to deny it to the enemy. Initiative/advantage in those designs (Storm Over Arnhem, Thunder at Cassino. Turning Point Stalingrad and Breakout Normandy) was often largely about mitigating bad combat rolls and other slices of bad luck; it was not actually integral to the game process in terms of managing the deployment and function of units. The most obvious employment of the disc here, by way of “making the game work,” is to kick off the German offensive with the combat and movement modifiers designed to replicate the beginnings of the German campaign. In other words, just as you might never play a convention without having your snacks close by as part and parcel of the event, you simply cannot play this system well without knowing when to spend the disc. If you like, another way of putting it, is to see the giving up of the disc as the same as returning a tennis ball to the opponent’s side of the net – put plenty of whack into the delivery and give him something difficult to chase after.

Strategic Actions are linked to having the disc; you can play the disc to gain the strategic option at just about any time you embark upon turn impulses, and it can give you a chance to perform tasks necessary to tidy your overall position. Two broad options lie within the play of the disc this way – make a range of strategic movements, including rail movement or getting the BEF ashore en masse; or alternatively, call for reinforcements (bearing in mind the issues I raised earlier).
Whatever you decide, a Strategic Action is not a “fighting” pulse; it is more a prepare or repair pulse, ideally to be conducted when you are not, to use my tennis analogy again, about to play some nondescript soft delivery across the court.

Moving on, playing the perfect game is never likely to happen, as sooner or later random factors will eat away at your ability to calculate the advantages of numbers and position. Where you can constantly can do better, certainly in terms of the upkeep of your forces, is by paying attention to where your leaders are in relation to their commands. If you look, for example, at the starting alignment of the German 1st Army, there is trouble brewing if you get too eager to pack the line with what is closest to your first line of march. Klück, the army leader, is a long way back, perhaps saying his farewells to the folks, and a number of the areas in his vicinity are already packed to capacity. Not helping the matter is that you are facing a chokepoint straightaway: the Maastricht “appendix” hangs unhelpfully over your right (northern) flank, and the Ardennes clutters the south. As if that is not enough, the units of the 2nd Army are packing out areas too, and three of your corps, possibly, given the hazards of the blind draw, some of your best forces, are still east of the Rhine…with all manner of womenfolk fixing flowers in the buttonholes of your heroes.
In all, this is one of those instances where consideration of the terrain and the necessities of manoeuvre are of greater weight than achieving some crushing concentration of force just to show off – in this case, against the ordinary/weak opposition initially found at Liege. While you may not know what is precisely accompanying the garrison there, you certainly know what its maximum quality/strength will be, and as that is all very much on the weak side of poor, my inclination is that you have no need to stuff the fortress area itself with combat units, for if you do plump for overkill, consider this possibility:
You put four German units into Liege, and prod Klück into area 22 with three other corps. Fine. Liege falls to a massive assault backed by Klück’s Big Berthas. Great. Then whoops! Assuming the German cavalry was with the Liege attack, it can advance (impetus – a rule for this particular title), maybe heading to area 8 – area 20 might also be possible, but leads to the same consequences as below, whilst going to area 21 fragments the army and plain gets in the way of other units from other armies. Anyway, going with the cavalry to area 8 or area 20 looks reasonably clever because it means Klück can almost certainly enter Liege the next German impulse (there will now be room for him, so you think), and thus be ready to support an attack on Namur…but moving the quality German cavalry corps in this way is risky, as it will become the one unit the bulk of the Belgian army can actually engage with success via a rather sizeable attack. There are then only two options for the Germans: if you stand with the cavalry in that following Entente impulse, it will be wrecked; if you can retreat it back via a pre-showdown withdrawal, the only path is back to Liege, and then, to put it in blunt terms, you have got Klück rather stuck.
This is an early thought, but I hope it does indicate how sometimes more haste really does equal less speed within this system, and while there are a myriad of other contingencies I could offer here, I rather think this one rather makes the point. And what goes hand in hand with this is the simple fact that any leader activation that does not lead to a tangible positive is really a small victory for the other side. Chasing after your own forward units, whilst lagging units chase after you, is not an optimum employment as such situations are likely to be rife with inefficient movement and equally inefficient combat. So take heed!

Talking of which, let us look at what the leader units represent – which is not really the leader as a personality (and with not a few of the 1914 types, personality is not something that one would not readily associate with the breed anyway). Rather, what we are talking about is the pressure of maintaining supply, and with that, impetus. The more you move, the more everything from material resources to nerves get used up, and there is not an unlimited supply of anything. Ideally, your battles should be well-directed pieces of action rather than vague pushes; and wherever possible, you should aim to clear up the battle in one resolution. If you do get held up, fighting through later rounds is often pretty clear evidence that you could have done better to attack somewhere else rather than chew through your limited logistics and some old chap’s heart condition.
What actually happens to a leader when he completes an activation is that he is rotated to his next downward level of function/support. Replenishment comes in the next Reinforcement Phase, but after a time of pushing here and there, there simply will not be enough resupply to go around, and some leaders are going to have to do without. For both sides, there will be a need for economy, so even on turn one, if you really do not need to move an army, do not move it just for the sake of it. Going into the final stages of the game with impoverished commanders is not a good idea at all, and as an absolute maxim, unless you have a vastly important and totally irrefutable good reason (like it is pretty much the last impulse of the game), NEVER activate a leader who is on his final (heart) level; you will lose him completely and that army will then be hideously limited in what it can do.
Regarding reinforcements, I have already said a few things, to which I will simply add that if you cannot think of any clear reason to bring them on right at this point, then it might be wise to wait and see how matters develop. With the British it is a different matter; for with just about all the French army out of position to deal with the Schlieffen wheel, getting the British into France via Calais is usually a good idea to be acted upon as the Entente’s first use of the Initiative disc. But be careful, as there are probably some game situations where landing the BEF in Calais is going to put them straight in the path of overwhelming German force, and if that has happened (perhaps you were not able to use the Initiative disc straightaway because of some nasty crisis elsewhere), you might have to consider the Le Havre option and pick your moment to enter the front. But all told, given the likely swift and wholesale annihilation of the Belgian army, you do not want the initial balance of power disparity to be made worse by delaying the BEF arrival more than is truly necessary.
Playing a Pass Action can signify a couple of things: if you are up to speed with the game’s nuances, feel at least relatively secure in your position, and maybe are looking at a winning situation on the game board, playing Pass Actions can put a lot of pressure on your opponent to do something to prevent the turn or even the game from ending. All game situations will be different, but as a general rule, the Entente, with less inherent need to take up the offensive, will profit from a judicious play of a Pass Action rather more than the Germans. More will be said on this in just a moment. In the meantime, the other thing Pass Actions are likely to indicate in the state of play is that one (or indeed both players), have brought their army leaders to the brink of exhaustion, and have done that still with things to do. This might not be so dire if the player(s) have a clear enough idea of what they are going to aim for the following turn – there is nothing too much wrong, I believe, after early play, in going into Pass Actions if you are about to shift the emphasis of your attack and wish to conserve the strengths of the relevant leaders, or alternatively, you want to press again with the depleted leaders next time around, and so intend the restoration of depleted levels in the next Reinforcement step being largely or entirely devoted to them.
The Germans, potentially at least, have more of an active/passive division of force than the Entente, which, as I have said before, is seriously out of position and will probably need to move wholesale in the early running. During this phase of the game, and maybe even later, if you, as the Germans, feel that the front in Alsace/Lorraine is not presenting any particular threat, why press too many activations on its army leaders – in fact, in some situations, why attempt any at all? The priority for you is to traverse Belgium and enter northern France, and that is primarily the work of armies 1 to 3 – let the others move only when it is truly worth moving them.

Inevitably, play of any game will reflect the style of those at the table – as well as what they have learnt of the game, and how confident they feel in their approach. How much action, or to be more precise, how much quality, relevant action, any turn will witness will depend on these factors. If you are winning, help your opponent to waste time. If your opponent is being overly aggressive, help him to burn out his army. Of course, both players might be feeling their way into the game, in which case, paralyzed armies with exhausted leaders will all be part of the learning process – providing one or other is actually in the mood to take a lesson on board.
So, how do you win? Within the game’s course, being first to gain ten valour points wins immediately, as do the Germans if they have eliminated twenty Entente units, or the Entente if ten German units are no more. Gaining all seven victory areas will also win immediately. Alternatively, at the end of the game, if you possess at least four of those seven areas, you win a marginal victory. As was the case for Wellington’s army in Waterloo 200, this essentially means that the Entente are winning at least a marginal victory at game start, and a great deal of the pacing of the game will depend on how, or if, that situation changes as the turns progress. Being realistic, one would have to say that controlling all seven victory areas is asking a great deal of either side. Achieving ten valour points is certainly possible for the Germans, but the French would need a massive amount of stuff to go right. Eliminated units in the requisite amounts is certainly feasible – the Belgians can be points in the bag for the Germans in many circumstances, and a poorly coordinated shift north can leave the French strung out and vulnerable around under resourced border fortresses. The safe option, certainly for the Entente, is to watch, ward, and not lose the winning position you already have. But one spanner you can throw in the works, and a very handy one if you can manage it, is to take Strassburg. By achieving this, you accrue some useful valour, you will also have a victory area in hand for the final count, and it may well cause a minor meltdown in the German player’s sense of wellbeing. But game positions will vary, and one must be aware that the door to the Rhine could also prove to be a dead end.
Conclusion
I started off in the hobby nearly half a century ago with Avalon Hill’s 1914. That game had fog of war and step reduction amongst many other things, but it was a real slog to play, and I doubt that you could say that it did either of those things, the fog and the falling away of strength, as slickly as in this new design. Looking at the two games is, in so many ways, a testament in itself as to just how much time has gone by. 1914 Germany at War makes no claim to be the ultimate 1914 game; it simply features those aspects the designer wanted to bring into the mix (e.g. there are no “Tannenberg” withdrawals), keeps it all pretty light in terms of mechanical complexity, and lets the players get on with it. At that level it is a fantastic experience – lovely components, short rules, and a blast to play; what more could you want? Returning to a more personal note, in fairness to readers I should point out that I had a very small input with this game just prior to its finalization – the Plan 17 rule was my main contribution, along with the naming of “The Mad Minute” rule. I trust readers will understand that having a contributing credit for this game, and that an altogether new experience for me, means something extra special, seeing as how my very first wargame was on precisely the same subject. Ironic yes, but in a rather wonderful way.
Article written via a review copy. All cartoon artwork by the author, and done via the Mischief art application.
Related Articles:
Masuria: Tannenberg’s Little Brother – The Boardgaming Life Review https://theboardgaminglife.com/category/masuria-1915/
Alarm on the Marne– A Boardgaming Life After Action report on Turning Point Simulations “The Marne” https://theboardgaminglife.com/2015/07/12/alarm-on-the-marne/
We like to hear from you. Please feel free to leave your comments below.
About the Author

Paul has been involved in the hobby since the early 1970s. Of largely Belgian ancestry on his father’s side, and English (Yorkshire) on his mother’s, after finishing his education he worked in tourism and student services, and also spent some time in the former West Germany. He met his wife Boo in 1990, and they married a couple of years later.
Paul hails from a long line of former servicemen – one grandfather was a sergeant in the BEF of 1914, whilst two of his great grandfathers were killed serving with the Royal Navy. His own father, who was born in Britain, served with the army in Malaya in the early 1950s.

These are fantastic reviews, and it seems like you really like the system. I just tried this one out solo for the first time and found it interesting, although it ended as a decisive German victory with a 20:1 kill ratio. I’m going to chalk that up to inexperience manipulating terrain and combat as the defender. I think the way you played the Plan XVII rule probably makes for more interesting play than the rule as written, but clearly nothing was going to help the Entente in this game.