Review of the Optional Naval Rules in “The Tide at Sunrise”
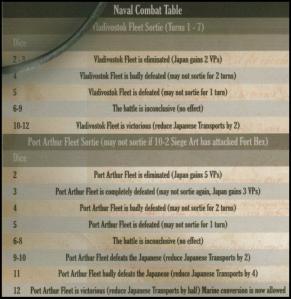
The Tide at Sunrise, a recent board game release from Multiman Publishing covering the Russo-Japanese War of 1904-05, has quite a following among war gamers, myself included. In the standard rules, the entire Naval aspect of the war is totally abstracted out to a set of “Naval Combat Tables”. Japan has one Fleet and Russia has two Fleets: Port Arthur and Vladivostok. Using the Naval Combat Tables, the best case scenario for Japan would be total destruction of both Russian Fleets accompanied by an award of 7 Victory Points. The worst case scenario for Japan would be repeated loss of up to 50% of available Transport Points each turn, follow by a loss of 5 Victory Points if the Russian Port Arthur Fleet ultimately escapes to Vladivostok.
A die roll or two each turn and, voilá!, you have your Naval War resolved.
Why Even Bother with Optional Naval Rules?
After playing the game several times, however, the significance of Russian naval victories (however small) became more and more apparent, as they influenced the land war by reducing Japanese Transport capacity. Although the game plays just fine with the abstract naval rules, I began to feel that I’d like a bit more control over my navy than “rolling the bones” will allow. The experience of losing the entire Russian Port Arthur Fleet to a single roll of the dice troubled me enough that I decided to print out the naval rules and give them a whirl. I figured that if there’s a competitive sub-game within those optional rules it would be well worth the time spent learning it, and worth the extra playing time added to each game turn. That’s why I even bothered to try.
Problems with Original Naval Rules
Clearly it was odd that the game had shipped with over 50% of its unit counters dedicated to a Naval sub-game, but no associated Naval rules in the box. The last paragraph of the rule book mentions that there are optional Naval Rules for download, but there is no other mention of the Naval counters or rules. Apparently some people had difficulty downloading the rules from the Multiman web site. And, after they were able to download them, were almost sorry they did.
The Naval Rules, as originally released, were a total disaster. I don’t think there’s ever been so much confusion, ambiguity, and error packed into four measly pages of rules. I won’t go into all of the details because (a) it’s really not relevant as Multiman Publishing have corrected the errors and (b) the errors have all been discussed and (at times) addressed in other forums (BGG, Consimworld, etc.) if anyone is curious to know the history.
I guess the problem for me was that the publisher (or at least one of the developers) was of the mind that the optional naval rules and associated unit counters were a bonus offering from the publisher and therefore we shouldn’t complain about the poor quality of said offering. Not having followed any of the discussion that took place in the various game forums, my (fresh) perspective was, and is, that if you pay for a game, the game should be complete and accurate to the best of the publisher’s ability. It’s my opinion that this was not the case. ‘Nuff said on that subject.
Overview of the Naval Phase
Even after the rules corrections, I still feel that the rule book’s description of the “Optional Naval Phase Sequence” is a bit confusing. Once again, my preference to “light a candle rather than curse the darkness” compels me to run through a sample Naval Phase, at least as I understand it.
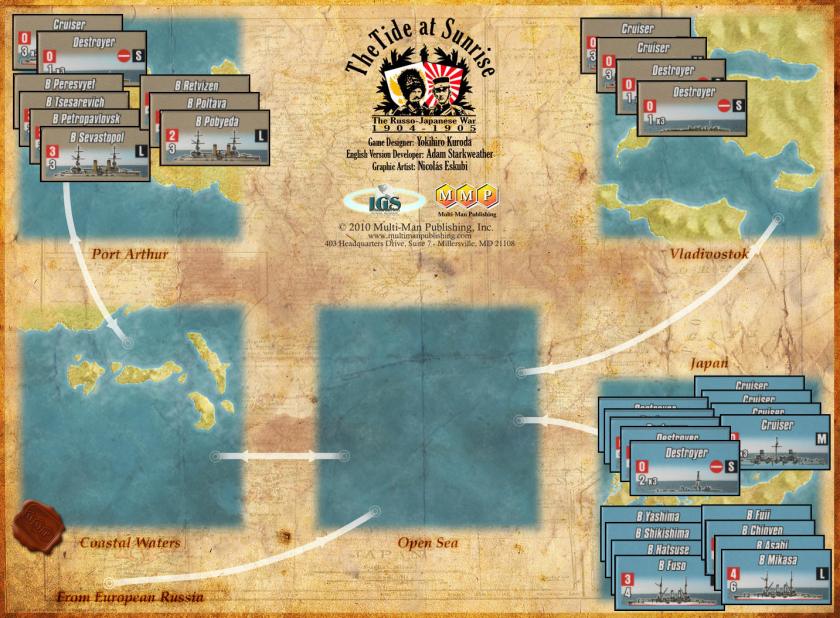
The map used for all the Naval action simply contains five areas of importance:
- Port Arthur – Home of the main Russian Fleet.
- Vladivostok – Home of the secondary Russian Fleet.
- Coastal Waters – The waters between Port Arthur and the open sea.
- Open Sea – The great wide open water spaces between the Coastal Waters and Japan.
- Japan – The home islands and base of the entire Japanese Fleet.
The Naval Sequence, as laid out in the rules, is very confusing. It gives the impression that the “Sortie Segment” is carried out for all units, then the “Combat Segment” for all units, and finally the “Recovery Segment” for all units. That is not correct. The “Sortie Segment” and the “Combat Segment” must be executed for the Vladivostok Fleet first. Next the “Sortie Segment” and “Combat Segment” for the Port Arthur fleet is done. Finally, after completion of “Sortie” and “Combat” segments for both fleets, the “Recovery Segment” is performed (see ConSimWorld post #538 under The Tide at Sunrise Forum).
I have renamed the Phases, below, in a manner that I think makes more sense. I believe the Phases and Steps below will make the process a bit clearer. In the interest of clarity, the descriptions below are a bit wordy, and I’m not much of a technical writer, so hopefully it won’t just make a confusing process even more confusing. If anyone finds any inaccuracies in the follow sections, or if I’ve misinterpreted the rules in any way, please let me know.
Phase 1 – Vladivostok Fleet
- The Russian player declares whether he will sortie the Vladivostok Fleet or not. If the Russian Vladivostok Fleet is NOT sortied, this phase is over and play moves on to Phase 2.
- If the Vladivostok Fleet does sortie, the Russian player secretly chooses the fleet units that will sortie, and places an “Unspotted” marker in the “Open Sea” box. The Japanese player must now decide if any of his ships will sortie. If the Japanese Fleet is NOT sortied, the Russian player reveals the number of ship units he secretly selected to sortie and Japanese player loses one Togo Point for each unit. Proceed to Phase 2.
- If the Japanese player does decide to sortie naval units, he places the chosen units in the “Open Sea” box and the Russian player must then reveal the naval units he secretly selected, also placing them in the “Open Sea” box.
- Now that all units are revealed, the Russian player may choose to Withdraw. If he does Withdraw, the Japanese player gains 2 Togo points. If the Russian player does NOT Withdraw, the Japanese player may choose to Withdraw. If the Japanese Withdraw, the Japanese player loses 2 Togo points. If either player has withdrawn, all units (both Russian and Japanese) in the “Open Sea” box are placed back in their respective bases and Port markers are placed on them. They are ineligible to sortie again this turn.
- If neither player wants to Withdraw, then proceed to the Combat Sequence and resolve combat.
Phase 2 – Port Arthur Fleet
- The Russian player declares whether he will sortie the Port Arthur Fleet or not. If the Russian Port Arthur Fleet is NOT sortied, this phase is over, the restrictions of rule 8.3.1 are NOT in effect for this turn, and play moves on to Phase 3.
- If the Port Arthur Fleet does sortie, the Russian player secretly chooses the fleet units that will sortie, and places an “Unspotted” marker in the “Coastal Waters” box. The Japanese player must now decide if any of his ships will sortie. If the Japanese Fleet is NOT sortied, the Russian player reveals the number of ship units he secretly selected to sortie and Japanese player loses one Togo Point for each unit. In addition, the Japanese Transport points for this turn are cut in half. Proceed to Phase 3.
- If the Japanese player does decide to sortie naval units, he places the chosen units in the “Open Sea” box.
- The Japanese player must then decide if he will move into the “Coastal Waters” box to engage the Russian units there (still at unknown strength). If he decides to engage the Russians, all Japanese naval units must then move into the “Coastal Waters” box. For each of his ship units that enters the “Coastal Waters” box, the Japanese player must roll a die (i.e. the Mines roll). On a roll of 6, the ship must return to the “Japan” box. All ships that survive the Mines roll remain in the “Coastal Waters” box. If the Japanese decide NOT to move into “Coastal Waters”, the Russian player may decide to go out into the “Open Sea” box to engage the Japanese fleet there. In this case, it is the Russian player who must make the Mines rolls for each ship moving out to”Open Sea”. Apparently, the Russian battleships are more susceptible to mines and so each battleship that rolls 5 OR 6 must be returned to port. Cruisers and Destroyers must return to port only a roll of 6.
- If the Japanese refused to move into “Coastal Waters” to engage the Russians, and the Russians decline to chase the Japanese out in the “Open Sea”, then there will be no combat. All units of both sides are returned to their bases and have “Port” markers placed on them. The restrictions of rule 8.3.1 ARE in force for this turn. Proceed to Phase 3.
- At this time, all Russian naval units are revealed and placed in the “Coastal Waters” box or the “Open Sea” box, depending on where the engagement is happening.
- Now that all units are revealed, the Russian player may choose to Withdraw. If he does Withdraw, the Japanese player gains 2 Togo points. If the Russian player does NOT Withdraw, the Japanese player may choose to Withdraw. If the Japanese Withdraw, the Japanese player loses 2 Togo points, and also has his Transport points for this turn reduced by -4, if the confrontation is taking place in the “Coastal Waters” box, or -6 if taking place in the “Open Sea” box. If either player has withdrawn, all units (both Russian and Japanese) are placed back in their respective bases and Port markers are placed on them.
- If neither player wants to Withdraw, then proceed to the Combat Sequence and resolve combat.
Note: If the Russian player declined to sortie either fleet, the Naval Phase ends, and the restrictions of rule 8.3.1 are NOT in force for this turn.
Combat Sequence
The Combat Sequence may take place during “Phase 1 – Vladivostok Fleet”, “Phase 2 – Port Arthur Fleet”, or both phases, and the same sequence of events is followed in either case. Note that the game rules put the “Passing the Minefields” action within the Combat Segment. I have moved it out of the Combat Sequence. The game rules are contradictory. The “Sortie Segment”, item 7, indicates that the Minefield die rolls happen before ships are revealed and before the decision to Withdraw (or not) is made. This makes more sense to me and so the Minefield rolls will not be part of the “Combat Sequence” in this article.
Other than the removal of the “Passing of the Minefields” step, I have no real problem with the Combat rules as written by the publisher, so I will not reiterate them here. The “Maneuver” and “Combat” steps remain as shown in the game rules. I will, however, refer extensively to the Combat rules in the example of play, below.
Phase 3 – Repair and Recovery
After all sorties and combat rounds are completed, ships may be repaired and/or recovered as follows:
- First, any ships that are under a Port marker, and are not damaged may attempt to Recover. The term “Recover”, as used here, simply means the removal of the “Port” marker, indicating that a ship is ready and eligible to return to sea for combat. Note that Cruisers or Destroyers with Hit markers on them do NOT count as “damaged”, and may roll for Recovery. Only battleships can be “damaged” for purposes of Repair/Recovery. (Russian ships Recover on a roll of 1-3 if at Port Arthur, 1-4 if at Vladivostok; Japanese ships Recover on a roll of 1-4)
- Next, players may attempt to Repair any “damaged” Battleships. Only Battleships can be Repaired. Cruisers and Destroyers may never have Hits removed. Any Battleships that are Repaired here are flipped back over to their front side and may roll for Recovery on the next turn’s Repair and Recovery Phase. (The Repair rolls are identical to the Recovery rolls, above)
Naval Phase Example
In this section, I’ll provide a brief play-through of Phase 1 – Vladivostok Fleet mentioned above, including the associated Combat Sequence. The game begins with 2 Russian Destroyers and 2 Russian Cruisers in Vladivostok, and 7 Russian Battleships, 1 Cruiser and 1 Destroyer in Port Arthur. The entire Japanese navy is deployed in Japan. No units start out in “Coastal Waters” or “Open Sea”.
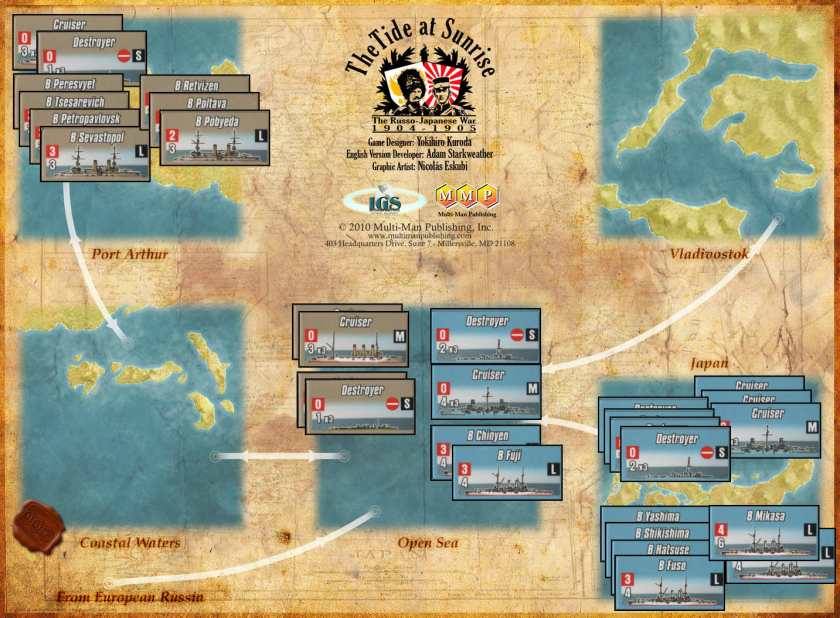
During Phase 1 – Vladivostok, the Russian player decides to sortie the Vladivostok fleet and secretly chooses all 4 naval units there. He places an Unspotted marker in the “Open Sea” box. The Japanese player also decides to sortie and selects 1 Destroyer, 1 Cruiser, and 2 Battleships (the Fuji and the Chinyen), placing them in the “Open Sea” box. The Russian player now reveals his 4 units and places them in the “Open Sea” box, replacing the “Unspotted” marker.
The Russian player declines to Withdraw, as does the Japanese player, so the action moves to the Combat Sequence.
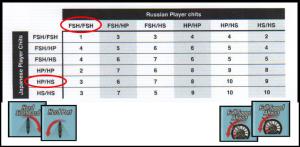
The Russian player secretly picks two Maneuver chits, both “Full Speed Ahead” (FSH). The secret picks for the Japanese player are “Hard Port” (HP) and “Hard Starboard” (HS). These picks are cross-referenced on the Maneuver Matrix to arrive at a number which will determine the Range of the combat to be fought, the number of rounds to be fought, and any broadside advantage that may be acquired by either player.
Cross referencing the Japanese “HP/HS” maneuver chits with the Russian “FSH/FSH”, results in a value of “3” which translates into “Short Range, Japanese have broadside, two combat rounds“. A “broadside” result can possibly be upgraded to a “Crossing the T” result, so the Japanese player rolls a die, hoping for a roll of 1-4, and rolls a 2 for a successful “Crossing of the T”. This immediately gives the Japanese player +3 Togo points, and will also provide favorable modifier throughout the upcoming Combat Sequence. We now have all the information we need to begin the first combat round.
The first combat round begins with the Russian player placing all his ships in a line. The Japanese player engages the Russian ships by setting one of his ships opposite each Russian ship. If there are more Russian ships than Japanese ships, the Japanese player gets to select which Russian will be targeted, and which will not be engaged. If there are more Japanese ships than Russian ships, the Japanese player first engages every Russian ship, then can double up on every Russian ship until all have two attackers engaging them. If there are still more Japanese ships, he can triple up on each target ship, etc. In our example, there are 4 Russian ships and 4 Japanese ships so there won’t be any odd combinations.
First we’ll check for combat modifiers, looking at the Range Effects, Maneuver Effects and Damage Effects lists in the rule book. Since the battle is taking place at Short Range, there are no Range Effects. The Japanese did get a “Crossing the T” Maneuver result, so they’ll be subtracting 2 from all armament (except torpedo) attack die rolls. No one is damaged yet, so there is no Damage Effect modifier.
Starting from left to right, the Japanese Battleship Fuji fires at the Russian Cruiser. The battleship fires once with Primary Armaments (i.e the number inside the red box; 3 in this case) and once with Secondary Armaments (the lower left hand number; 4 in this case). The die roll is a 5. After the -2 modifier for Crossing the T, the modified die roll is 3, which is <= its Primary Armament number (3) and therefore causes a hit on the target. The Fuji then fires its secondary armaments, rolling a 3. After subtracting 2 again for the maneuver modifer, the modified die roll is 1, which is less than the battleship’s secondary armament rating of 4, thus causing another hit. Cruisers and Destroyers register hits by placing Hit Markers and may absorb up to 3 hits before being eliminated. The target Russian Cruiser has taken two hits total and will be marked accordingly.
The table below contains all the combat rolls and results after Japanese fire of the first Combat Round. Notice that the Cruisers and Destroyers roll 3 dice for their Primary armaments and 3 dice for their Secondary armaments as well. It’s as if the counter represents 3 distinct ships.
| Attacker | Target | Armament (Hit # x Die Rolls) |
Die Rolls (Modified) | Combat Result | Notes |
|---|---|---|---|---|---|
| Fuji (Battleship) | Cruiser | Primary (3) | 5 (-2) = 3 | 1 Hit | |
| “ | “ | Secondary (4) | 3 (-2) = 1 | 1 Hit | |
| Chinyen (Battleship) | Cruiser | Primary (3) | 6 (-2) = 4 | – | |
| “ | “ | Secondary (4) | 6 (-2) = 4 | 1 Hit | |
| Cruiser | Destroyer | Primary (0 x 3) | 6 (-2) = 4 1 (-2) = -1 5 (-2) = 3 |
1 Hit | Only one of the three rolls scored a hit (0 or less). |
| “ | “ | Secondary (4 x 3) | 5 (-2) = 3 5 (-2) = 3 4 (-2) = 2 |
3 Hits | All three rolls resulted in hits (4 or less) |
| Destroyer | Destroyer | Primary (0 x 3) | 2 (-2) = 0 6 (-2) = 4 2 (-2) = 0 |
2 Hits | Two of the three rolls scored a hit (0 or less). |
| “ | “ | Secondary (2 x 3) | 5 (-2) = 3 2 (-2) = 0 4 (-2) = 2 |
2 Hits | Two of the three rolls scored a hit (2 or less). |
So first round Japanese fire leaves a pretty well shot-up Russian Vladivostok fleet. Combat is simultaneous, however, so the Russians will get to fire back before actually allocating their casualties. The combat now continues with the Japanese player placing all his ships in a line. The Russian player engages the Japanese ships in the same manner as the Japanese did earlier. The Russian has a tough choice: does he set his 2 Cruisers against the Japanese battleships, with their stronger Secondary armaments (3 die rolls with a hit number of 3)? Or does he turn the task over to the Destroyers who can use their Torpedo capability (hit number 4 or less, but only 1 die roll), since the combat is at Short Range? Both Russian Destroyers are shot to pieces and will be eliminated after this combat round, so he decides to use the Torpedo capability while he can.
The Destroyers will be used to engage the battleships and the Cruisers will engage the Japanese Cruiser and Destroyer. There will be no modifiers at all to the Russian die rolls. The battle is taking place at Short Range, so no Range Effects apply. The Russians did not get a maneuver results (i.e. Broadside, Crossing the T) as the Japanese did, so there will be no Maneuver Effects. Since the damage the Russian fleet has sustained does not take effect until after they return fire, there will be no Damage Effects. Next combat round, however, each remaining Cruiser or Destroyer that has Hits on it will have the number of combat dice it can roll reduced by the number of Hits.
The following table summarizes the die rolls and combat results of the Russian 1st round fire.
| Attacker | Target | Armament (Hit # x Die Rolls) |
Die Rolls (No Modifiers) | Combat Result | Notes |
|---|---|---|---|---|---|
| Destroyer | Fuji (Battleship) | Torpedo (4) | 3 | 1 Hit | Note that there is no Secondary armament fire when Torpedoes are used. |
| Destroyer | Chinyen (Battleship) | Torpedo (4) | 1 | 1 Hit | No Secondary armament fire. |
| Cruiser | Cruiser | Primary (0 x 3) | N/A | – | Without negative modifiers, it’s impossible to roll a zero or less. |
| “ | “ | Secondary (3 x 3) | 1 6 5 |
1 Hit | Only 1 hit out of 3 rolls. |
| Cruiser | Destroyer | Primary (0 x 3) | N/A | – | Not possible to score a hit without negative modifiers |
| “ | “ | Secondary (3 x 3) | 1 6 3 |
2 Hits | Two of three rolls scored hits (3 or less) |
Note that Battleships do not carry Hit Markers. They are simply flipped over after taking 1 hit (the reverse side shows the same information except that the graphic of the ship has smoke rising from it). After taking a second Hit, Battleships are eliminated.
The result on the Maneuver table, before the start of combat, indicated that this would be a 2-round combat, so we must proceed on to the second round. But, first, we must clean up all results from round 1. All hits are now applied and eliminated units are removed. Each Cruiser and Destroyer has it’s number of fires reduced by the number of Hits it’s currently carrying. Therefore, any Cruiser or Destroyer with 3 or more Hits is effectively destroyed and must be removed from the game. Therefore only the two Russian Destroyers need be removed.
In between combat rounds, each player has the opportunity to Lay Smoke; first the Russian player, then the Japanese Player. “Laying Smoke” has the effect of increasing the Range by one level. In this case, it would change the range from “Short” to “Medium” which would trigger a unhelpful Range Effect modifier to both players ships. Additionally, “Laying Smoke” will prohibit the Russian ships from firing at all this round. Even so, the Russian player is in survival mode and hopes to escape with his ships intact, and so he declares that he is “Laying Smoke”. The Japanese player declines to Lay Smoke (if he had done it as well, it would have increased the range by another level, to Long Range, and also prohibited Japan from firing, thus effectively ending the combat).
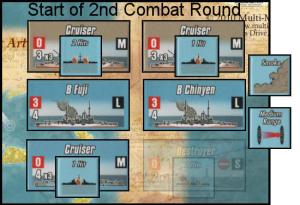
Proceeding on to combat round 2, we go back to the top of the batting order again, where the Japanese units line up and the Russian player selects the engagement match ups. This time there are 4 Japanese units and only 2 Russian units, so the Japanese player is allowed to “double-up”, selecting two Japanese units to attack each Russian unit, starting with the battleships and then forming a second echelon of attack with the Cruiser. Note, however, that the Destroyer has a maximum range of Short and thus may NOT fire at Medium Range.
The Japanese player retains the -2 bonus for Maneuver Effects (Crossing the T) but now has a +1 Range Effect modifier because the battle is now being fought at Medium Range, due to the Smoke. So the net modifier for Japanese battleships will be -1 (-2 for Crossing the T, +1 for Medium Range). The Japanese Cruiser and Destroyer will also have this modifier but will also suffer a reduced number of die rolls for Hits they are carrying (one less for the Cruiser and two less for the Destroyer). The Russian Cruisers will also have the +1 Range Effect modifier and will suffer reduced die rolls due to Hits they’re carrying, but they will have no Maneuver Effect modifier.
The table below summarizes the combat die rolls and results:
| Attacker | Target | Armament (Hit # x Die Rolls) |
Die Rolls (Modified) | Combat Result | Notes |
|---|---|---|---|---|---|
| Fuji (Battleship) | Cruiser | Primary (3) | 3 (-1) = 2 | 1 Hit | |
| “ | “ | Secondary (4) | 6 (-1) = 5 | – | |
| Cruiser | Cruiser | Primary (0 x 2) | 6 (-1) = 5 2 (-1) = 1 |
– | Only two die rolls due to Hit marker. Both misses. |
| “ | “ | Secondary (4 x 2) | 4 (-1) = 3 3 (-1) = 2 |
2 Hits | Sinks Russian Cruiser! |
| Chinyen (Battleship) | Cruiser | Primary (3) | 3 (-1) = 2 | 1 Hit | |
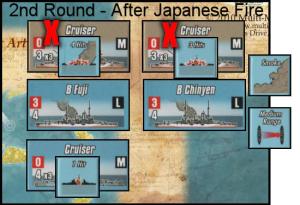
| “ | “ | Secondary (4) | 4 (-1) = 3 | 1 Hit | Sinks other Russian Cruiser! |
Since the Russian player “laid smoke”, none of his ships are eligible to fire at all, so the 2nd Combat Round ends. The Russian attempt to make their getaway behind a curtain of Smoke has failed, as both Russian Cruisers are sunk.
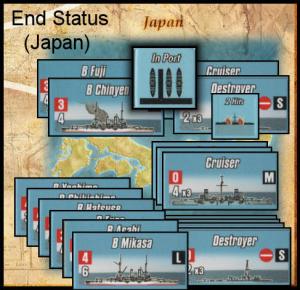
The four remaining Japanese fleet units are moved back to the “Japan” box and have a “Port” Marker placed on them. Since the Fuji and Chinyen Battleships are damaged, they may not attempt Recovery this turn, although they may attempt Repair. The Cruiser and Destroyer, however, may attempt to Recover later on in Phase 3 – Repair and Recovery.
If we were going to continue or example, the next step in the Naval Phase would be Phase 2 – Port Arthur Fleet, where basically the same process would be repeated for the Russian Port Arthur fleet. Finally, after all combat for both Russian fleets, we would perform Phase 3 – Repair and Recovery.
As you can see from the example above, the Naval Rules are a bit more complex and certainly more detailed than the main game itself.
Other Considerations
Excessive Complexity – While I don’t find the Optional Naval Rules complex in an absolute sense, they are a lot more complex (and kind of “fiddly”) than the main game itself. The Naval Rules just don’t fit with the larger game. Others may disagree, but I just don’t think the rules for a sub-game should ever be more complex than the rules for the main game.
Added playing time – Use of the optional Naval Rules will add about 2 to 10 minutes to each game turn, assuming that there is any naval combat to resolve. Even if both players decide that they don’t want to engage in any naval combat on a particular turn, there will still be a minute or two of consideration before arriving at that conclusion. So, there’s no escaping the fact that implementing these rules will add a decent chunk of play time. Even allowing for an average of 2 minutes per turn still adds 24 total minutes to a full 12-turn game. For a game that usually takes 2-3 hours to play (sans Naval option), 24 minutes is a lot of time to add.
Victory Point Imbalance – The naval sub-game provides allowances for the Japanese to gain or lose “Togo Points” which are points that are converted into victory points at the end of the game. They are awarded for events such as one player withdrawing from battle, sinking of enemy battleships, “Crossing the T“, etc. The Japanese player is granted 10 Togo Points at the start of the game and the total is never allowed to go below zero. So, for the Japanese player, there is limited downside risk and there is no “ceiling” on how many points they can earn! It seems to me that the burden of achieving naval superiority rested squarely on the shoulders of the Japanese, and the Russians should have been the ones favored by the Togo Point adjustments. Or, better yet, no Togo Points at all. I think it would have been best to let the naval battles impact only the number of Transport points available. Granting a one-time victory point bonus at the moment the entire enemy fleet is destroyed would be a sufficient reward for a naval job well done. In my opinion, allowing the Japanese to get 3 victory points each and every time they “Cross the T”, without putting a cap on the award, will throw the game out of balance.
Maneuver Chit Manipulation – The Maneuver Chits are just too easy to manipulate. For example, either player can guarantee that the battle will be fought at “Short Range” by selecting two FSH Maneuver Chits. How could a small force of Destroyers guarantee that they would be able to engage a gaggle of battleships at short range? It seems likely that this would be a long-shot rather than a certainty.
Summary
There are some highlights to the Naval system, as demonstrated by The Battle of Tsushima that is conducted at the end of the game. It’s basically a “battle royale”, involving 4 rounds of combat between every remaining Japanese naval unit and every Russian naval unit, including those brought in from the European fleet just for this battle. Makes for interesting play. For those who appreciate “flavor” additives like this, the optional rules may be worthwhile for you.
Initially, I was totally on-board for the Naval sub-game and was rooting for it to become an enhancement to an already good game. While certain aspects, such as the hidden sortie rule, do add an element of excitement to the naval sub-game, overall I’d have to say the Naval Rules really don’t add any tangible value. They favor the Japanese player by providing Japan unlimited upside and very little downside and, in general, take up too much time for too little benefit.
The Tide at Sunrise is a really enoyable game; don’t spoil it. Just let the “Optional Naval Rules” lie, and play the game using the standard “Naval Combat Tables”.




Well didn’t the Japanese almost comlpletly destroy the Russian fleet anyways?