A Complete DTP Game
By Christopher Salander
Overview
The Battle of Mollwitz, April 10, 1741, was the first field battle between the Austrians and the Prussians in what the Prussians called the First Silesian War. While the Austrian Empire was in the throes of a succession crisis and was threatened by other countries, “Frederick the Great” (Friedrich II of Prussia) seized the Austrian province of Silesia. When the Austrians did react, they placed an army between Frederick and Prussia. Frederick turned and approached the Austrians in a snow storm. He had to defeat the Austrian army to re-establish his lines of communication.
The Austrians had been asleep, but Frederick gave the Austrian commander Niepperg time to rouse and deploy his troops. Just before the battle started, the Austrian light cavalry rushed the Prussian army and overran their rear area, looting and causing much mayhem. Frederick left the field and the battle was fought by the most senior Prussian commander, von Schwerin.
When the Prussian army advanced, the left wing Austrian cavalry circled around and hit the Prussian right flank. Although the Prussian infantry was very well drilled, the Prussian cavalry at this time was definitely inferior to the Austrian cavalry. Frederick knew this and interspersed infantry with his right wing cavalry, but that did not prevent the Prussian right wing cavalry from losing and fleeing the field. The Prussian infantry formed a square with multiple regiments, drove off the Austrian cavalry, and then defeated the Austrian infantry.
Editor’s Note: I played around with Chris Salandar’s Desk Top Publishing (DTP) game,The Battle of Mollwitz and thought it was an interesting beginner-level hex game. We all felt that it would be useful for introducing non-gamers to the basic concepts of wargaming. It also has enough depth to make it enjoyable for an experienced gamer.This is the first game (DTP or otherwise) that we’ve ever published on The Boardgaming Life, but it’s something we’ve wanted to do for a while.
We’re grateful to Chris for allowing us to publish Mollwitz here.Download Chris’s Battle of Mollwitz, April 1741, rules and graphics in one 469k PDF file.
Game Rules
Stacking
You can only have one unit in each hex.
Historical Set-up
Units are placed on the letter that matches their troop type (cavalry, infantry, artillery, light infantry, light cavalry). Austrian units are placed on hollow letters, Prussian units on solid letters. The Austrians are placed first, the Prussians move first. Do not place the Austrian light cavalry unit. Grenadier units can be placed on any “I”.
Free Set-up
The two sides alternate placing one unit at a time, starting with the Austrians. Austrian units are placed on a hollow letter, Prussian units on a solid letter. The unit type does not have to match the letter.
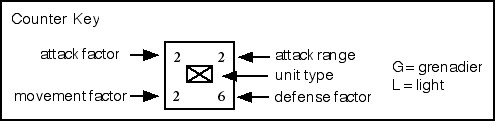
Counter Key
Terrain
Units must stop when they enter a town, woods, or marsh hex, unless they are using the optional road movement. Cavalry units cannot attack enemy units from town, woods, or marsh hexes. Town and woods hexes block line of sight and add 2 to the defense value of a unit. Units in town and woods hexes that are flipped do not have to retreat.
Turn Sequence
Both sides alternate, beginning with the Prussian turn. On his turn a player may first move up to three units. Then he may attack with up to two units. No unit with a range value greater than 1 may attack after movement. Flipped units may neither move nor attack. At the end of a player’s turn he may flip any of his flipped units back to their active sides if they are not in an enemy zone of control.
Movement
A unit may move up to its movement in hexes. Units may not end their movement on another unit. You may move through units from your side, but not enemy units. The six hexes surrounding a unit are its zone of control. Flipped units do not have a zone of control. Units have to stop when they enter an enemy zone of control. Units may not move from one zone of control hex to another in one turn.
Attack
The defending unit must be within the attacker’s range in hexes. Other units block line of sight. If an attacking unit is in an enemy zone of control, it may only attack adjacent unflipped enemy units. If two units attack the same target on the same turn, their two combat factors may be added to one die roll.
Sum the attack factors and the roll of 1d6 and compare it to the defending unit’s defense factor. If the attack sum is equal to or greater than the defense factor, flip the defending unit over, and if possible, it has to retreat one hex away from the enemy and not into an enemy zone of control. If the defending unit was flipped over already, it is eliminated. If the attack sum is two or more greater than the defense factor, eliminate the defending unit. Defeated units may only retreat into empty hexes. Units that cannot retreat are eliminated.
After the retreat or elimination of a defending unit, one attacking unit with a range greater than 1 that is adjacent to the abandoned hex and not in an enemy zone of control may enter the hex.
Victory Conditions
One side has won as soon as the other side has only two unflipped units left on the map.
Special Scenario Rules
If at the start of the Prussian turn no Prussian units are within their attack range of an enemy unit, at least one Prussian unit must be moved to within attack range, if possible, or the Prussians lose the game. (The Prussian army had to attack or it would be cut off and in trouble.)
Additional Optional Rules
- 1. Cavalry cannot attack town or woods hexes.
- 2. Road Column Move – Units that follow one continuous line of roads and do not enter an enemy zone of control can move one more hex than usual. Units moving this way do not have to stop in any type of terrain.
- 3. During set-up, place the Austrian light cavalry unit next to any already placed Austrian unit.
- 4. The light infantry unit does not have to stop when it enters any terrain type, just zones of control.
- 5. Snow Storm. Start the game with all of the units flipped over, representing their concealment. Use a 90 degree rotation of a counter to represent “flipping” (disorder). Units cannot be attacked at distance. A unit cannot be revealed or attacked until an enemy unit moves next to it. All units become visible at the beginning of turn 3.
Map and Counter Graphics


Mollwitz Design Notes
The design for the Battle of Mollwitz was inspired by the postcard game Hohenfriedberg, which was done by a guy in Germany who, in turn, was inspired by the “Postcards from the Revolution” series of two AWI battles. I liked Hohenfriedberg, and kept waiting for another similar game, but it never appeared and he brought down his web page. So, I decided to make my own, using the same rules.
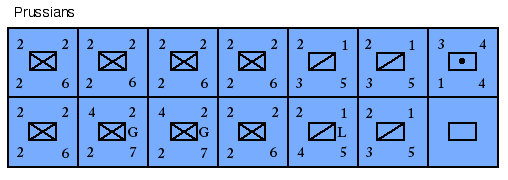
My first goal was to stay as close to the system used in Hohenfriedberg as possible. Prussian units may have been able to shoot more quickly, but Austrian units were 1/3 larger. So no infantry value changes. Units represent about 1.5 brigades each.
The light infantry unit represents the famous Croatians. The higher defense value for that unit reflects the light troops’ ability to use any available cover and to avoid combat if necessary. The attack factor for the Prussian cavalry is 2, to reflect their poor performance.
Since I find no value in fitting a game onto a postcard, I made the map one entire page in size to make it easier to play on. I used the most common national coat color on the counters. I chose 18th century fonts for the map and counters. I cannot draw figures, so I used the NATO unit symbols on the counters instead. I also am not skilled enough to decorate the map with shrubs and farms. But I feel that a white map is reasonable, since the ground was covered with snow during the battle.
The Austrian light cavalry was not available for the main battle, but players may want to see if the battle would have gone differently if the Hussars had stayed with their army.
The optional rules are ideas that I thought were reasonable and interesting, but which were not in the original “postcard” rules.
Advice to Players
Austrian: Support your cavalry with your infantry or your cavalry will die quickly and late in the battle you will find yourself with only infantry left; i.e., not much striking power. In the free set-up, take steps to protect your artillery unit.
Prussian: Mix your different troop types close together to support each other. Avoid attacking a town or woods.
