Overview
For the last two weeks, I’ve been spending quite a bit of time with Hermann Luttmann’s latest design, Duel of Eagles, which features an August 1870 battle between the French and Prussians during Franco-Prussian War in the vicinity of the town of Mars-La-Tour, France. Two Prussian Corps went up against the entire French Army of the Rhine, commanded by Marshall Francois Bazaine. The Prussians were victorious.
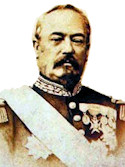
There are conflicting stories regarding Marshall Bazaine’s performance during the battle. He, by all contemporary accounts, had an unblemished reputation up until that point and is still regarded highly by the French Foreign Legion where he held his first commission as an officer. Some say that he inherited a situation beyond repair, was unable to trust his junior officers, and had no confidence in his troops.
The designer chooses to believe another possible scenario. That of indecisiveness and bizarre behavior on the part of Marshall Bazaine which lead to ultimate defeat and disgrace. The French high command of the time certainly believed this, as he was court-martialed and found guilty of surrendering to the enemy before doing all that duty and honor required.
We will never know exactly what Marshall Bazaine did or did not do during this battle. What is beyond doubt, however, is that the performance of the French Army of the Rhine during the battle was poor.The French had numerical superiority as well as superior weaponry and, given a little less timidity, surely could have won the day.
The game initially appealed to me for several reasons:
- The battle of Mars-La-Tour began as a meeting engagement, with Prussian cavalry stumbling across the vanguard of the French army. The Prussians thought they were seeing the rear guard of the French army. The French thought they were encountering a far-flung Prussian reconnaissance unit. Thus, the fog of war was thick and, in my opinion, that always makes for interesting gaming contests, assuming the game is able to successfully model “fog of war” without introducing too much complexity. More about this subject later.
- The French outnumbered the Prussians, at times as high as 5-to-1. They should have won the battle, but did not. It really got me thinking about exactly how this happened, and I wondered again if the series of events leading to the upset could be gamed successfully.
- The historical defining moment of this battle was the “death ride” cavalry charge by Prussian Major General von Bredow’s 12th Cavalry Brigade. It was unusually successful and earned the brigade a slice of immortality. I love a good cavalry charge.
This battle has not received much attention from board game designers over the years (I could only find one other game on BoardGameGeek), so Hermann has really carved out an unexploited niche, and it’s possible many gamers may rush to fill the gap in their game collections.
So, I was primed to play. The next step was to set the game up and actually play it. Let’s find out if it really is necessary for gamers to “rush to fill the gap in their game collections”.
Game Map and Counters
When reviewing a recently produced game, I normally don’t spend a great deal of time talking about the quality of the map or unit counters because all the major game companies generally put out top quality maps, units, charts, etc., and Duel of Eagles is no exception. I have not yet, however, seen a game with thick laser-cut counters like these. I’m told the laser-cutting will become the standard at Victory Point Games and I think that’s great. The equipment they use to cut the counters will totally eliminate any prior limitations on counter shapes and sizes. The thick counters are easy to handle and, fortunately, there’s not a lot of stacking in this game, so you won’t see any 3″ high unit towers.
As I expected, the counter and map art-work are top notch. The map hexes are roomy and everything is clear and well-differentiated, even the different colors for terrain elevations. Another thing that I’m seeing for the first time (maybe I just don’t get out much) is color-coded hex center dots that also indicate the elevation. So, if there’s any confusion about the shading of the hex itself, you can check the color of the center dot to know for sure.
Finally, this is the first product I’ve seen from Victory Point Games that actually comes in a box. No zip-lock for Duel of Eagles!
The Rule Book
I always look carefully at the rule book and game setup instructions. Nothing irritates me more than vague or confusing setup instructions. If you can’t get the game started without a hassle it does not bode well for the actual game play. So, I was quite happy that a separate setup card was provided, with French and Prussian setup instructions and reinforcement schedules clearly defined. In about ten minutes I was set up and ready to play! Perfect.
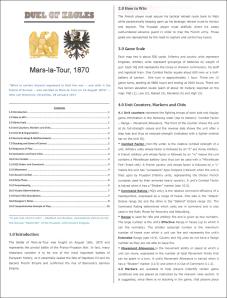
The rules are mostly clear and concise. Of the twelve page booklet, only about six pages actually contain rules that must be learned in order to play the game. The remaining pages are packed with useful information about the game:
- Detailed Event Chit descriptions – Because the Events are so important to the game, these extended descriptions help put them in context and make it easier to remember what each event does. I found this “history behind the chit” info useful and informative.
- Designer’s Notes – Covers all the salient points of the actual battle and links the historical events with game rules and events.
- “Important Points to Remember!” – This bulleted list summarizes many of the small rules that often get forgotten or misinterpreted during game play. For example, I kept forgetting the rules governing movement eligibility for units that fired during the Fire Combat Phase. One of the points on the list says, “Note that Infantry units can fire during the Fire Combat Phase and still move during the subsequent Movement Phase. Horse Artillery can only fire half and still move. Foot Artillery that fires cannot move.” A quick glance at this list now and then usually furnished the reminder I needed.
- Comprehensive Example of Play – This two and a half page example was truly “comprehensive”, covering the pull of five Chits and following the resulting action for each one. The example contained a mixture of formation Activation Chits and Event Chits, exactly as players would encounter in a real game.
The only thing I might have done differently, from an organizational point of view, would be to keep everything for a particular category grouped together. For example, rather than having separate rules sections for “HQ Orders and Command” (11.0) and “HQ Units and Combat” (13.9), my preference would be to have everything about HQs under one rules section and reference that section in other areas of the rules. Others might prefer to have everything about combat under a universal “Combat” section so you don’t have to flip back and forth in the rule book. It’s just a matter of personal preference and not a big deal at all.
At least a half dozen times during play I came across an odd situation that I was sure would not be covered in the rules. Each time I was wrong. As you play, you’ll see what I mean. Every little “gamey” thing that I attempted to use to gain an advantage was addressed in (and forbidden by) the rules or the Event description. And, as I said, there’s only about six pages of rules (plus the Event Chit description cards), so I was impressed.
It’s my opinion that the Rule Book just radiates craftsmanship and pride of ownership. You can tell that the designer doesn’t just want you to BUY the game, he wants you to PLAY and ENJOY it as well.
Fog of War
The game uses a “Chit Pull” system, which means that neither player is ever sure who will have the opportunity to make the next move. In the context of this game, “Chit Pull” means that each formation (Corps or Brigade) has an Activation Chit that is dropped in a cup at the start of the turn. These Chits are randomly selected from the cup one at a time, and the players are allowed to activate only the formation whose Activation Chit was drawn.
If an Event Chit is drawn instead, the player who owns the Chit may perform the actions specified for that particular Chit. All Event Chits fall into one of two categories: (1) actions that take place immediately or (2) actions that can be executed at a later, hopefully more opportune, time.
Any game that attempts to simulate or model 19th century warfare has got to incorporate “fog of war” effects as much as possible. In truth, 20th and 21st century warefare simulations require “fog” as well, but in the age prior to instantaneous communications, it was especially “foggy”. A Chit Pull mechanism is outstanding in this capacity. How so? Well, let’s say that both armies are rushing toward a particular objective, and both are within striking distance of the objective. The order in which they move is a critical distinction and will determine who gets there first and, quite possibly, who wins the game. This simulates a situation where a orders did not get through to a subordinate commander, or were misinterpreted… or were just ignored! So, Chit Pull is used in many war games.
The Chit Pull system has one major flaw, however, that dampens the effect. After a unit or formation is activated, you know that it will not be activated again until the following turn. This can lead to odd situations in which your opponent dances around your activated formation, which lays there like a lox, powerless to interfere. Duel of Eagles addresses this flaw by means of the Event Chits, which leads us to a discussion of Events.
Events
Events in Duel of Eagles are definitely not an afterthought thrown in to give the game period “flavor”. They are one of the core elements of the design. As Hermann Luttmann describes in his Designer’s Notes, his greatest design challenges were those that involved the unpredictable and often bizarre behavior of the French commanders. We can speculate that Marshal Bezaine had some type of nervous breakdown during the critical days leading up to the battle (he was wounded as well), but what is certain is that the actions of the units under his command were so misguided and wrong they may as well have been issued by the enemy. (At this point, I can almost picture a light bulb appearing over Hermann’s head!)
To model this, one of the Prussian events, appropriately titled “Bazaine’s Malaise”, affords the Prussian player an 83.33% chance of preventing the activation of one French Corps. Yes, you heard right. The Prussian player may select a French Corps that he wishes to prevent from activating and, assuming he rolls 1-5 on a six-sided die, will prohibit its activation. “Bazaine’s Malaise”, along with every other Event Chit, may be drawn once for each of the twelve game turns. So, depending on the timing of the Chit pull, a French Corps could theoretically be prevented from ever moving during the entire game. In reality, this is not likely to happen, but the power of this Chit should not be underestimated.
Another Chit, belonging to the French player, is titled “Feu de Bataillon”. The French player must assign this Event to one of his Infantry Corps and the effects are implemented immediately. It shifts the Corps to an extremely defensive posture which improves its firepower for the turn but, most importantly, limits each unit’s movement allowance to a single hex. This effectively prevents another French Corps from being able to maneuver freely. At least the French player is allowed to choose the Corps, rather than the Prussian player, but the net effect is just as damaging. (Note that this event must be assigned to an Infantry Corps that has not yet activated, if any. Sorry, but the designer already anticipated that trick…)
Of course, it’s not completely one-sided. The French have an event called “Prussian Aggressive Tactics” that allows them to direct the movement of a single Prussian Infantry unit that is within two hexes of any French non-HQ unit. What this does is allow the French to goad an overly aggressive Prussian unit into making a bad decision (“Hey, let’s charge that artillery battery over there on the other side of the wide open field!”). Of course the French player must exercise caution that the “bad decision” doesn’t backfire and end up in a successful Prussian attack!
Let’s return to the major flaw in the Chit Pull system, mentioned in the “Fog of War” section, above. As I mentioned, the flaw is the fact that, once a formation has activated, both players know it cannot activate again, which clears up the fog a bit. And that’s not the desired result. So, rather than devise any complicated or goofy process to ameliorate this, the designer once again turned to the Event Chits.
Several of the Event Chits allow a unit to fire and/or activate out of sequence, even if they’ve already activated. For example, Prussian event “Auftragstaktik” permits the Prussian player to move any two infantry units of the same division (even those that have already activated for the turn) up to half their movement allowance and then, if in position, to engage in Assault Combat. This is no minor annoyance as two powerful Prussian divisions can wreak havoc on a French formation that’s not prepared to withstand an assault.
Likewise the French “Mitrailleuse Fire” event gives the French an immediate Fire Combat action with any Mitrailleuse equipped (e.g. with an “m” on the counter) artillery unit, even if the unit has already activated.
These powerful events help put the “fog” back in “fog of war” because neither player can ever be sure that the units facing them are truly spent for the turn.
For all the reasons listed above, I reiterate how important the Events are to competent play in Duel of Eagles and I urge you to take the time to read the “French Events” and “Prussian Events” charts carefully as well as the “Event Chit Descriptions” (section 17.0 in the Rule Book) and etch them into your brain before starting the game.

The most famous action during this battle was the legendary “Death Ride” cavalry charge of von Bredow’s brigade to silence French artillery and forestall a French cavalry charge. von Bredow’s statement that “it will cost what it will” was surely borne out, as the brigade suffered nearly 50% casualties. But the charge itself was a success and is sometimes credited with giving “cavalry” a new lease on life, and perpetuating the existence of horse-mounted warriors for another 40 years.
Activation Example
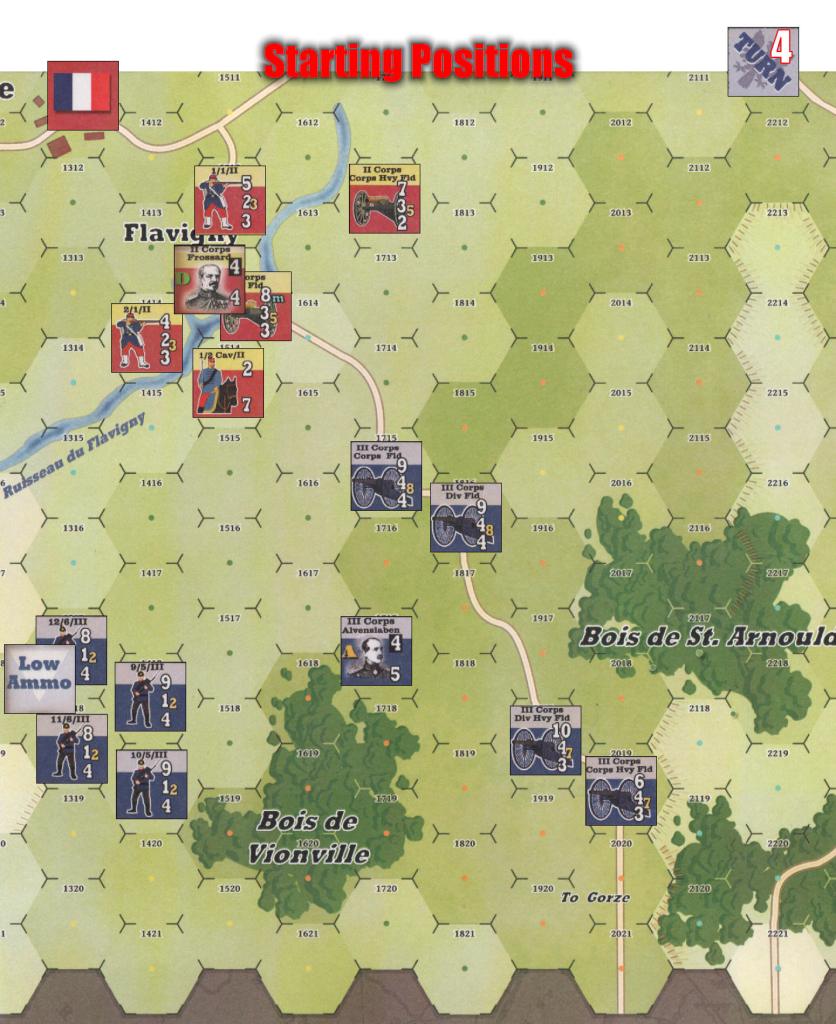
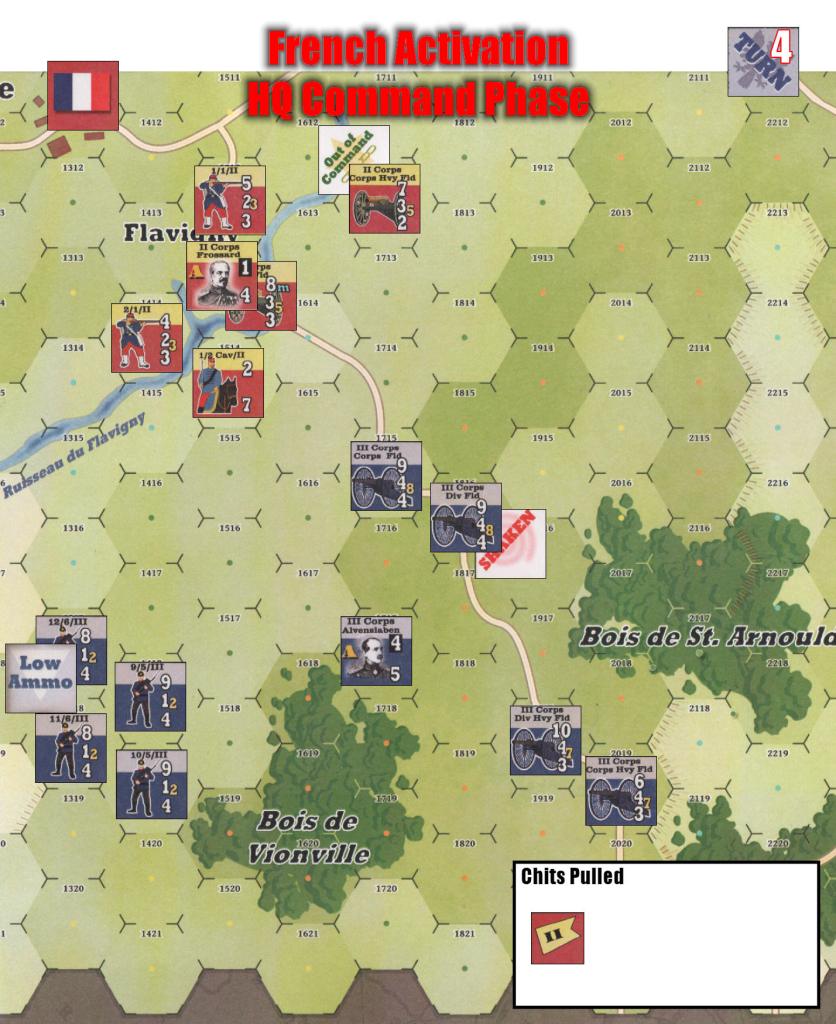
Nothing imparts a “feel” for a game like seeing it in action. I’ve put together a brief example that will give a fair sense of how the game plays. The movement and combat mechanics are both pretty simple, leaving you free to concentrate on strategy. We pick up the action in Game Turn 4. The French II Corps under the command of Frossard is in position to defend the town of Flavigny, one of the secondary objective cities. The Prussian III Corps, commanded confidently by Alvenslaben, are moving into position to contest the town. Neither formation has been activated yet this turn. The Prussian 12/6 Infantry unit in hex 1317 has a Low Ammo marker, accrued during an earlier turn.
The next chit drawn is the French II Corps. Frossard sees the powerful Prussian Corps closing in on him and decides that he must take some preemptive action to blunt the assault before the Prussians get all their artillery in line and trained on the town. Accordingly, he moves to the first phase of the turn, the Fire Combat Phase.
II Corps – Fire Combat Phase
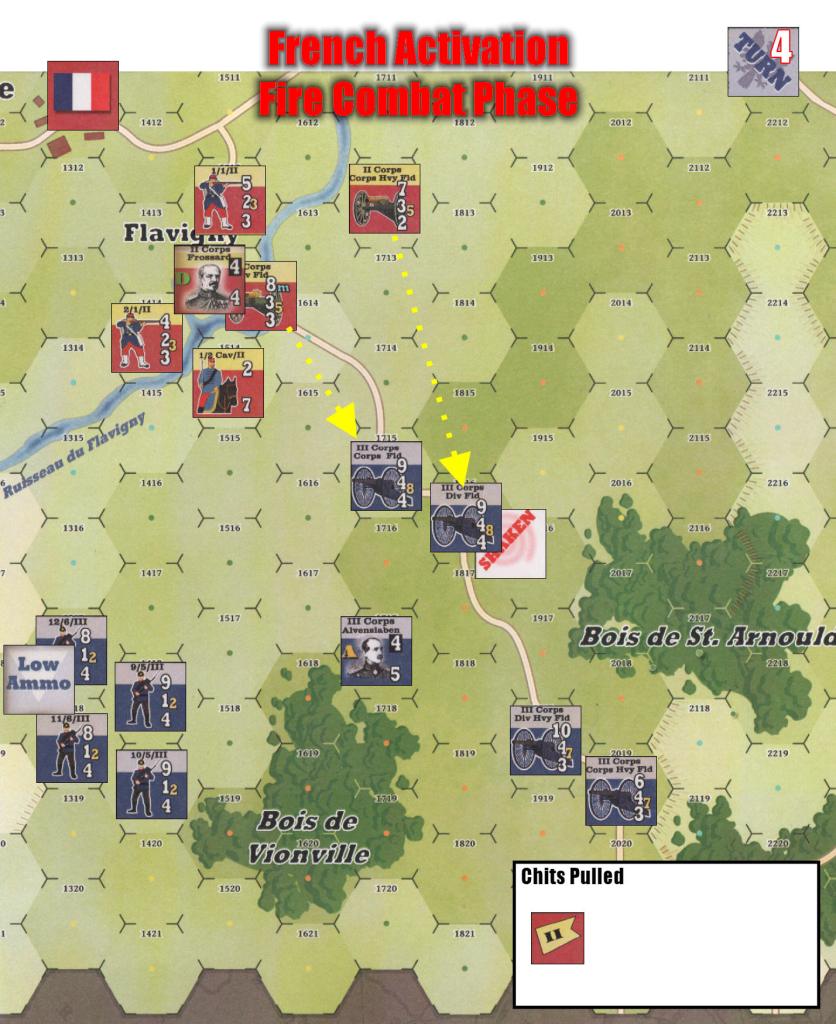
First, the “Corps Hvy Fld” artillery in hex 1712 fires at the Prussian “Div Fld” artillery unit in hex 1816. The middle two numbers on the right hand side of artillery units list the normal range and extended fire ranges. In this case, the French unit’s normal range is 3 and the extended range is 5. The Prussian artillery unit is 4 hexes away which is outside the normal range of 3 hexes, but still within the extended range of 5 hexes. So the artillery unit must apply a -2 die roll penalty to its Fire Combat roll. The Combat Factor (aka firing strength) is the top right number, which is a “7” for this French unit.
There are no blocking units or terrain features so the fire combat may proceed. Frossard rolls a 6 on a six-sided die, subtracts -2 for the Extended Range, and consults the Fire Combat Table. None of the other modifiers below the table apply so he checks the “4” row of the “6-7” column and sees the result is “SH”, which means the target unit is Shaken (more about this later). A “Shaken” marker is placed under the Prussian unit and Frossard continues with the Fire Combat phase.
The French “Div Fld” artillery unit, in hex 1513, fires at the Prussian “Corps Fld” artillery in hex 1715. Again, no special modifiers apply and the die roll is 2. The firing unit has 8 combat strength so the “8-9” column of the table is checked. A roll of “2” yields an “MT” (Morale Test) result which normally requires the target unit to perform a morale check comparing a die roll to its Combat Factor. Since the Prussian target unit has a Combat Factor of 9, it can’t possibly roll a higher number on a six-sided die so the Morale Test is passed and there is no effect to the target. (Note: The inability of certain units to fail Morale Tests is by design)
Both of the French infantry units are allowed to fire during this phase but both have their line of sight blocked by friendly units, and the unit in hex 1512 is too far away (extended range = 3) to even attempt a shot. So, the Fire Combat Phase is concluded.
II Corps – HQ Command Phase
Headquarters (Leader) units have a Command Rating located in the upper right corner. This is the number, in hexes, their command range extends. Any of their subordinate units that are outside this range are considered Out of Command and will have their movement allowance halved. In addition, any units Out of Command may not Rally (i.e. have their Shaken or Low Ammo status repaired) during the Rally Phase.
Leaders have varying Command Ratings. The higher the number, the more effective the historical leader was. Leaders also have two sides: an Attack Orders side and a Defend Orders side. Attack orders allow the commanded formation more latitude in engaging the enemy, but the Command Rating number is always lower. An HQ on the Defend Orders side will have greater command range but the units under its command will be restricted (e.g. they cannot move adjacent to enemy units).
Frossard wants badly to engage the Prussians so during this HQ Command Phase, he flips from his “Defend” side to his “Attack” side. Notice that his Command Rating has dropped from “4” to “1”. Any units more than one hex away from him are considered “Out of Command” and are marked accordingly. Only the “Corps Hvy Fld” artillery unit is in this situation.
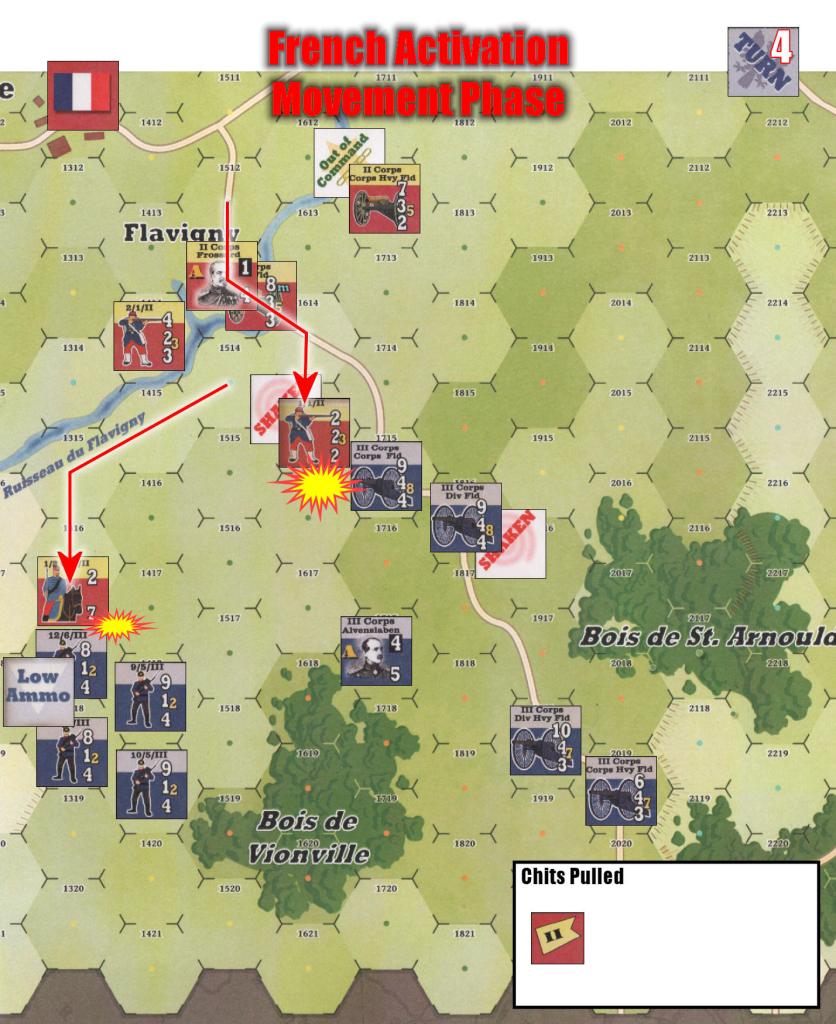
II Corps – Movement Phase
The Movement Phase is more than just movement. The non-moving player is allowed Opportunity Fire at moving units that move adjacent to his infantry or artillery units. Continuing our example, the French player decides to be uncharacteristically (at least for this battle) aggressive and announces a Cavalry Charge against the Prussian 12/6 infantry unit in hex 1317. The cavalry unit must have sufficient movement points to move directly into the hex with the Prussian unit (assuming it survives Prussian Opportunity Fire), and it does.
When the French Cavalry gets adjacent to the target infantry unit, the defender takes an Opportunity Fire shot. Looking again at the Fire Combat Table, we see that there are some modifiers for this combat. The target is a cavalry unit (but not a French Cuirassier) which earns the Prussian a +2 to his die roll, but since he has a Low Ammo marker, he accrues a -2 to the die roll. The net result is zero and so no mods will be made to the die roll. The powerful, 8 Combat Factor, Prussian infantry unit fires by rolling a die. The die roll is “2”. Checking a roll of “2” on the “8-9” column of the table shows the result to be “MT”.
The French cavalry unit must roll equal to or less than his Combat Factor of 2 and, amazingly, he rolls a 1! Therefore he is not shaken and the Cavalry Charge may proceed as planned during the Assault Combat Phase.
Shifting our attention to the other Opportunity Fire situation created by the movement of the French 1/1 infantry unit into hex 1615 which is directly adjacent to the potent Prussian Corps Fld artillery. This time, the French are not so lucky as the Prussian player rolls a “5”. A +2 is added to this roll due to the fact that an artillery unit is firing at an adjacent target, so the net modified roll is “7”. Cross-referencing the roll of “7” with the “8-9” column, we find a result of “SH+C” which means the unit is first Shaken and then has a step loss (casualty) applied (i.e. flip a full strength unit over, or eliminate a half strength unit). So the French 1/1 infantry is flipped and shaken!
Note that the French 1/1 infantry may still assault the Prussian artillery in the Assault Combat Phase, but its attack power is now greatly reduced, from “5” down to “2” for being flipped over, and then cut in half again for being shaken for a final effective combat factor of “1”! It may be best for this unit to sit tight for a bit before attacking.
This concludes the French Movement Phase and we now proceed to the Assault Combat Phase, where the close combat situations created by the movement will be resolved.
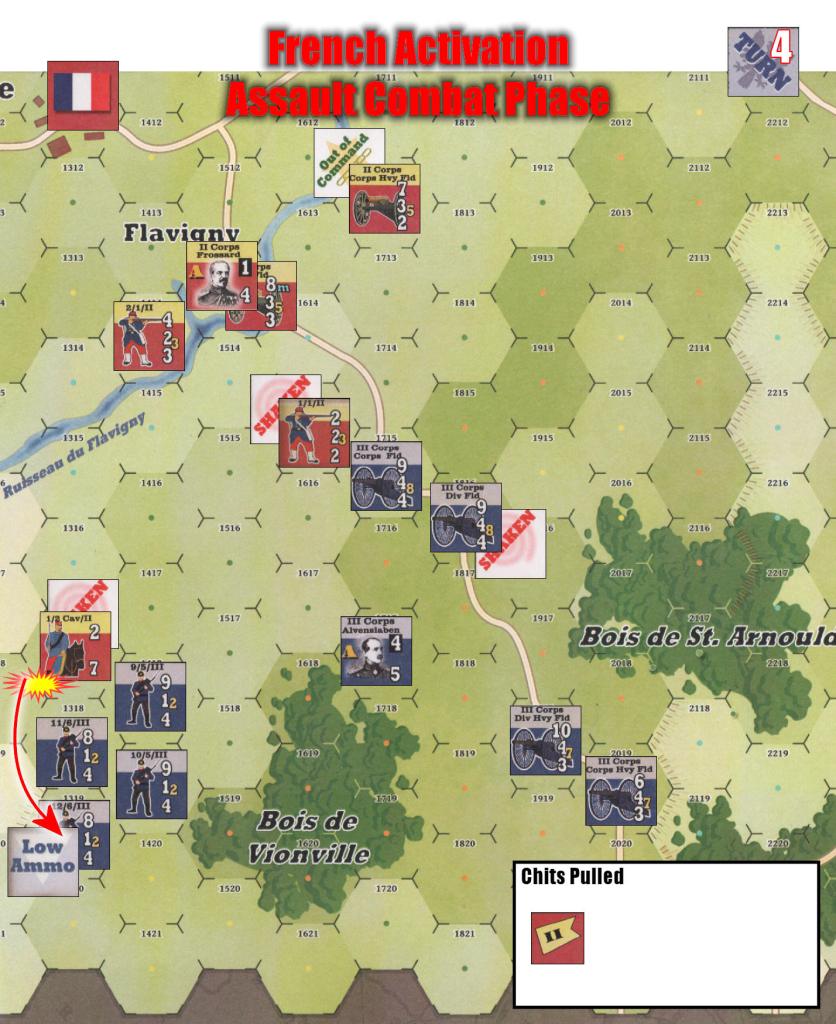
II Corps – Assault Combat Phase
There are two assaults pending, but the French player is only obligated to complete the Cavalry Charge in hex 1317 so we’ll begin with that one.
Because this is a “Cavalry Charge”, the French cavalry’s Combat Factor is doubled to 4, but that still makes the Combat Factor Differential -4 (4 factors attacking – 8 factors defending), so the French will be rolling on the “-5 to -4” column of the Assault Combat Table. There are no die roll modifiers so the French need a high roll and, miraculously, he rolls a “6”! (this is my example… I’ll create however many miracles I like)
A quick glance at the table shows a result of “D1” in the “6” row of the “-5 to -4” column. “D1” indicates that the defender must take 1 hit on one of his units in the battle or must retreat all of his involved units 1 hex. There is a special rule however that states the defending unit must retreat at least one hex if the “D” result is caused by a Cavalry Charge. So the Prussian must retreat! Ending a retreat over-stacked is not allowed so the defender retreats over his 11/6 infantry and ends his retreat in hex 1319 (let’s assume for purposes of this example that he was prevented from retreating into hex 1218… work with me, here).
Finally, the charging cavalry must accept a “Shaken” marker. Every unit that performs a “Cavalry Charge”, even a successful one like this, is assessed a “Shaken” marker. The cavalry charge combat is completed.
The only other possible assault is the French 1/1 infantry unit versus the Prussian 9-factor artillery unit. Even a 19th century Prussian military man wouldn’t attempt that one and so the Assault Combat Phase ends rather quickly.
Next Chit Drawn – French Event Chit
The next chit pulled from the cup is a French Event Chit. One side of the chit shows BattleField Conditions, which is a defensive marker and the other side shows Artillery Barrage. The French player must immediately choose which of the two events he will use and how he will use them.
“Artillery Barrage” is more appealing right now because it may be played in one of two ways:
- Immediate Opportunity Fire – Entitles the French to one free Fire Combat with any of his artillery units, even one that has already been activated this turn (as both the French artillery units have).
- May be held for future use as “Interdiction” fire against any moving Prussian unit, at any time during the turn, that is at least two hexes away from the firing artillery. Includes a +1 fire modifier for this one shot only.
- May be held for future use as “Return” fire. Allows immediate return fire from any French artillery unit that is fired upon by the Prussians during the turn. Also allows a +1 modifier.
Frossard opts to hold the “Artillery Barrage” chit for future use and announces this to the Prussian player.
Next Chit Drawn – Prussian III Corps Activation
The next chit drawn from the cup is (not surprisingly) the Prussian III Corps Activation Chit. Note that there are 5 two-sided Event Chits for each player and all ten of those chits are mixed into the cup each turn. So, at least in the early part of the game, there are more Event Chits than formation Activation Chits. It would not be unusual to pull multiple Event Chits in a row.
But, for purposes of this example, let’s say we’ve pulled the Prussian III Corps Activation Chit. Let’s proceed to the first phase of the Prussian activation which is the Fire Combat Phase.
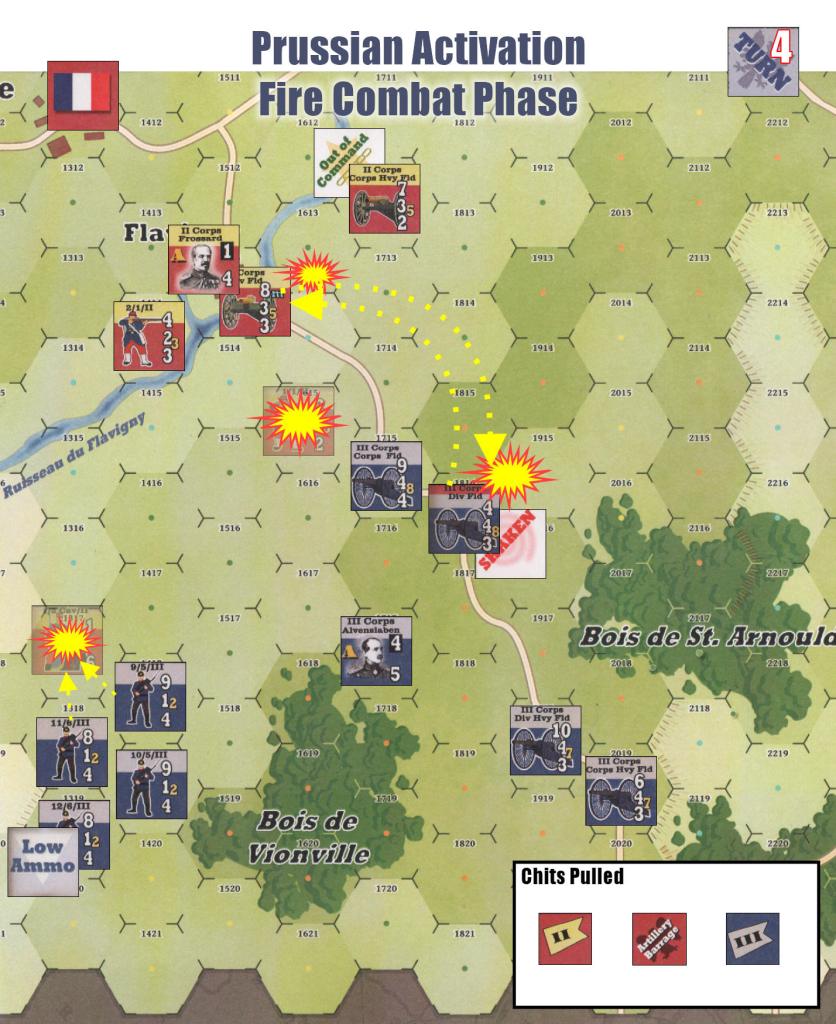
III Corps – Fire Combat Phase
The Prussians have two infantry and two artillery units that are in position for Fire Combat. He chooses to begin with the infantry, and is determined to make the French Cavalry pay for their charge last turn. Both the 11/6 and 9/5 Prussian infantry units may both fire at the French Cav unit, but they do so one at a time.
First the 11/6 infantry will fire. Combat Factor is 8. Die roll modifier is +2 because the target unit is cavalry. The first Prussian die roll of the example is “2”. Add +2 for the modifiers and then check the “4” row of the “8-9” column of the “Fire Combat Table”. The result is “SH” so the cavalry unit is Shaken again. Because the unit already has a Shaken marker on it, it must take a step loss (can’t have two “Shaken” markers).
Now the 9/5 infantry unit fires at the same cavalry unit. Its strength is 9 and the unit is awarded the same +2 die roll modifier. The roll is “3” plus the modifier is “5”. The “5” row of the “8-9” column shows a “C” result. The cavalry unit must take a step loss and, since it is already on its reduced side, it is eliminated. The unit is removed from the map and is placed on the game turn track two turns ahead, when it may be possibly be reconstituted. The daring French cavalry is no more! (You may take this as a cautionary tale about the dangers of charging powerful Prussian infantry)
Moving along to the Prussian artillery units, we see that the Prussian III Corps Fld artillery has the rash French 1/1 infantry unit dead to rights in a wide open field. The only consideration here is that, if the artillery unit fires, it may not move at all in the upcoming Movement Phase (horse artillery may fire at half strength and then use half movement, but foot artillery does not have that option). The Prussian player cannot resist and decides to take the shot. This fire will be executed under the “8-9” column of the Fire Combat Table. There will be a +2 die roll modifier due to artillery firing at an adjacent target. The die roll is “2” with a +2 becomes “4”, netting an “SH” result.
The French 1/1 infantry is already shaken, so the additional “SH” result must be applied as a step loss. The infantry is already on its reduced side, so the entire unit must be eliminated instead. Another one bites the dust…
The last unfired Prussian artillery, the division field (“Div Fld”) unit in hex 1816, is directed to fire at the French artillery that is stacked with Frossard in hex 1513. The friendly artillery in hex 1715 does not block the line of sight because the firing unit is on higher ground. Because it is “Shaken”, it may only fire with half strength (rounded up) which is 5. The die roll will be modified by +1 for “Plunging Fire (from higher to lower terrain level)”. The die roll is “2” modified +1 to “3”. In the “4-5” column of the Fire Combat Table, a roll of “3” nets an “MT” result, requiring the target to undertake a Morale Test. However, the target unit’s Combat Factor is 8 and is therefore immune to Morale checks (can’t possibly roll higher than an 8 on a six-sided die). Keep in mind, however, that if the French artillery was currently Shaken, it’s Combat Factor would be halved for Morale Test purposes as well.
Not only did the Prussian fire not cause any damage, it’s also what the French have been waiting for. Frossard now declares that he is playing the Artillery Barrage Event Chit to “Return Fire”. According to the terms of the chit, he may immediately issue fire against the enemy unit that just fired on it. The “Artillery Barrage” chit is set aside in the pile of used chits for the turn, and the French artillery returns fire.
The normal range on the French artillery is 3 and the extended range is 5. The Prussian target unit is 4 hexes away so the French die roll will suffer a -2 for using extended range. However, the terms of the “Artillery Barrage” chit grant a +1 die roll modifier, so the net modifier is -1. The French player rolls a “4” which is modified to “3”, which applies an “SH” result to the target Prussian artillery unit. Because the target is already Shaken, the result becomes a step loss. The target unit is flipped over to its half strength side. This concludes the Prussian Fire Combat Phase.
III Corps – HQ Command Phase
Notice how much better a leader Alvenslaben is than Frossard. Even on his “Defend Orders” side, Alvenslaben still has a HQ Command Range of 4 and so all of his units are considered “in command” for the game turn. So leadership does play an important role in the game. If any of Alvenslaben’s units were “out of command”, their movement allowance would be halved and they would not be eligible for “rally” at the end of the turn.
This concludes my brief example of the game turn sequence. The game rule book itself contains an excellent 2+ page example of play, as I mentioned above. It is far more detailed than mine and gives you a really good feel for the flow of a game turn in Duel of Eagles.
Summary
Ever played a game where you think you’ve got everything under control, and then one turn later it seems that everything is falling apart? This is one of those games. You’ve really got to stay on your toes, because if your opponent gets hot with the dice, and the activation chits go his way, the entire tactical situation can be turned around very quickly.
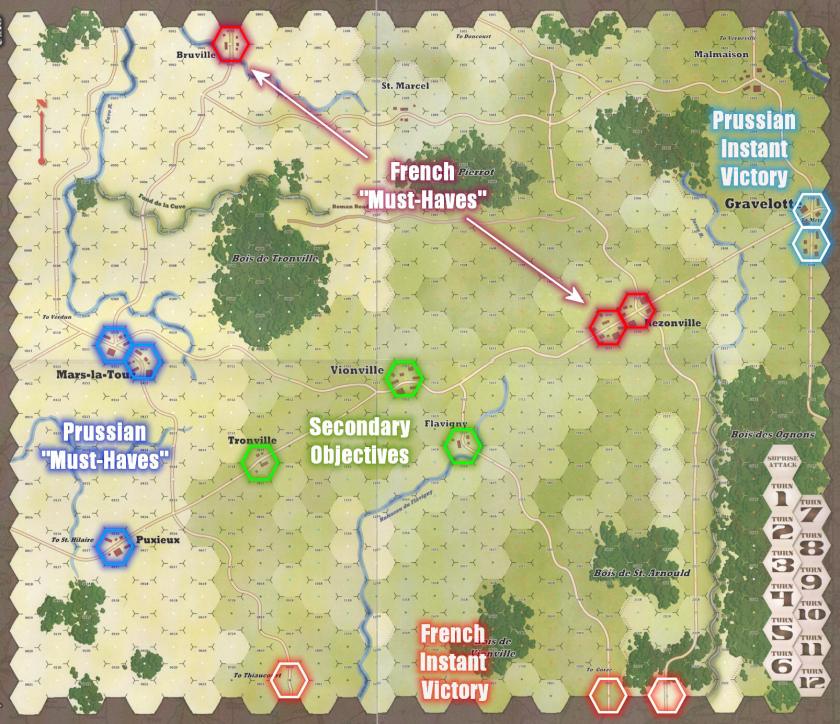
The tactical situation is somewhat static because the two sides are fighting over the same victory objectives in every game. But I give it high marks for replay value, due largely to the Chit Pull system and the Event Chits. Additionally, the Victory objectives themselves are quite clever and add to the tension of the game. Each player has two cities that they must control in order to achieve any level of victory. For the Prussians they are Mars-la-Tour and Puxieux and for the French, Rezonville and Bruville. These cities are closer to the starting locations of the respective forces and therefore should be easier for that side to control.
Assuming that both players control their “must have” cities, the contest becomes a battle over three other secondary objective cities near the center of the play area (Vionville, Tronville and Flavigny). To win, a player needs to control his “must have” cities and two of the three secondary objective cities. These secondary objective cities can, and will, change hands a few times before the game ends, which creates tremendous tension and makes the game very exciting.
Players are not constrained to any particular course of action by the rules, and are free to focus on any objective they wish. For example, I may decide on a strategy of denying my opponent one of their “must have” cities which will preclude them from achieving any level of victory. Even if my plan does not succeed, it may catch my opponent off guard and throw him completely off his game.
As if that’s not enough, there are also instant victory conditions! For the Prussians, it’s control of the city of Gravelotte. For the French it’s control of three road hexes (0920, 2021 and 2221) on the edge of the map. Instant victory objectives are, understandably, difficult to attain, but not at all impossible.
The game is relatively easy to learn and play, but it is definitely NOT a “beer & pretzels” game. You will not win based on a few lucky die rolls (unless those lucky rolls come right at the very end of a long, hard-fought game). The game is a bit lengthy (5-6 hours) for some, but it’s that length that provides protection from the “lucky roll” victory. Any luck with the dice will be balanced out over the duration of the game. Nonetheless, I think that some shorter scenarios could and should be devised to reach that “three hour limit” demographic.
(I have some ideas for shorter scenarios and will try to get them tested and published when time permits. In the meantime, please feel free to let us know if you come up with alternate scenarios you’d like to share with other gamers)
The game is finely balanced; a result of considerable play testing and subsequent design adjustments. I believe that insufficient play testing is the most common reason horrible board games make it to store shelves. I’ve experienced many games that, with a bit of tweaking, could have been turned into great games, but ended up mediocre at best. So it was refreshing to see that a decent amount of time had been devoted to testing and fine tuning.
I’m not a fan of the period, and didn’t know much about the Franco-Prussian war, so Duel of Eagles really came to me with a disadvantage. I was prepared to not love it. But I have to say I thoroughly enjoyed the game and it has sparked my interest in the period and the war. It’s got it all: desperate cavalry charges and infantry assaults, withering artillery fire and flagging morale. I think that Duel of Eagles just gets it right. There’s plenty of action, and the game is often undecided until the very last turn. That’s the mark of a well designed, well developed game.
I give Duel of Eagles two thumbs up and would like to thank Hermann Luttmann, White Dog Games, and Victory Point Games for a job well done.
Notes
Full disclosure: I know Hermann personally. But I would not hesitate to write a negative review of one of his games if I really didn’t like it. He knows this and still we remain on good terms. If some day I have to slam him with a bad review, I’m sure he’ll take it like a man. Although I suspect he will retaliate by naming a particularly hideous character in one of his Zombie games after me.






Dear Mark,
Thanks for this great review!
I am the owner of this game and was planning to write a review myself. I recently discovered this site and thought it would be great if you could share this review on Boardgamegeek as it provides valuable insights.
If you mention the boardgaming life, it is also a great advertisement to your site.
If you have no time, I can do it for you, mentioning you and the boardgaming life explicitly.
I posted a similar comment on the Amateurs to Arms review.
Anyhow, thanks for your review and keep ‘m coming!
Harro
Nicely illustrated, explained (example of play), and thoughtful analysis. Thank you. HOpe you will cross post this review and your others at BGG (did not spot this one there under ‘reviews’).
Luke
Luke,
The folks at BGG prefer that we don’t put links to our reviews in the Reviews forum, and ask that we submit it to the “Web Links” section at the bottom of the BGG page. You can find our link there as well as on Grognard.com (http://grognard.com/titled.html#d10001). Thanks for the kind words. +Mark