A review of “First Blood: Second Marne”, published in Strategy & Tactics Magazine #248
Overview
First Blood: Second Marne, designed by Ty Bomba and published in Decision Games “Strategy & Tactics” magazine issue #248, is a low complexity, two player, war board game which simulates a World War I assault by combat-tested German troops of the 10th and 36th Infantry divisions against the relatively green 38th Infantry Regiment of the US 3rd Infantry Division. Fought along the Marne river in France in July of 1918, the Germans had to make a contested river crossing to attack the Americans, a clear disadvantage. The Americans, although well trained and led by 56 year old Colonel Ulysses Grant McAlexander, were entirely inexperienced in large scale combat, hence the “First Blood” moniker.
The battle simulated in this game was actually part of one of five large German offensives designed to shatter Allied morale, take the British out of the war, and force the French to negotiate a settlement, before the Americans became engaged in large numbers.
German tacticians no longer gave credence to the orderly pre-20th century belief of advancing on a unified interlocking front, but rather allowed their spearhead forces, known as “storm troopers”, to penetrate deep into enemy territory, disrupting enemy logistics and command. Follow up forces could then reduce bypassed strong points at their leisure. This presaged the “blitzkrieg” offensives of WWII and is replicated in the game by means of special German victory conditions (more below).
Of course, being a World War I simulation, massed artillery attacks are represented in the game. In the actual battle, standard high explosive artillery was employed to good effect, particularly by the Americans who opened up with counter-battery fire against German units on the north side of the Marne River about 10 minutes before the German batteries were scheduled to open fire on the Americans on the south shore. As most of the initial barrages had been pre-sighted, they inflicted much damage on both sides but, as the day continued and communication between front and rear echelon units degraded, artillery became much less effective.
Poison gas rounds, although used extensively by both sides, had become so routine by this stage of the war they were practically ineffective, and the entire 30th Division reported only 70 gas casualties during the entire battle.
So, in the end, the Second Battle of the Marne was an infantry contest, with small unit leadership and tactics the deciding factors of the day. Although outnumbered by the Germans (the companion S&T Magazine story states approx 4,000 Germans vs. 2,800 Americans), the American defense in depth was able (barely) to prevent any significant German breakthroughs until the end of the day, when the Germans were ordered to retreat and regroup. It was, however, a very near thing. Colonel McAlexander had to put “cooks and clerks” up on the firing line to staunch the German advance, but the job got done.
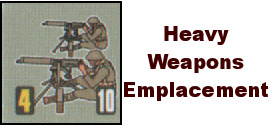
The game recreates this situation well. All German units are infantry units. Of 57 total American units, 48 are standard infantry and the remaining 9 are called “Heavy Weapon Emplacements”, essentially heavy machine guns with extended range, but firepower equal to standard infantry units. Artillery is a factor in the game, but not a decisive one. It can facilitate a breakthrough here and there, but will be less and less effective as the game goes on. The burden of victory falls squarely on the shoulders of the infantry.
Game Rules and Components
The game components are high quality, nicely rendered and easy on the eyes. The light gray of the German combat units may be a bit too close on the color wheel to the light olive drab of the American units but, surprisingly, I never had any difficulty distinguishing between the two (and it helps that the gray units have pictures of Germans on them while the olive drab units have pictures of American soldiers). The unit counters are also 5/8″ in size which provides a lot more clarity than 1/2″ units.
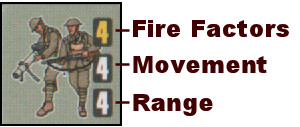
Each infantry unit has three numeric values: Fire Factors, Movement Allowance and Range. The Range is the maximum distance, in hexes, that a unit can see and effectively target with fire factors. American Heavy Weapon Emplacement units are only slightly different in that they don’t have a Movement Allowance since they are prohibited from moving once placed. They have identical fire power, but much longer Range than standard infantry units.
All American infantry units have identical values for Fire Factor, Movement and Range (4, 4 and 4), while Fire Factors for German units will range from “1” to “7”. German units are generally pulled randomly from a cup, so even the German player cannot plot to have a unit of a certain strength appear in a pre-designated time. Germans have no unit types other than standard infantry.
Since the publisher went through the trouble of back-printing the unit counters, I may as well mention that each unit has a “carnage” flip-side that depicts several dead soldiers. The idea is that, when a unit is eliminated, you flip it to its carnage side where it remains for the rest of the game. Carnage units have no purpose and are strictly for adding some World War I “flavor” to the game. I find it a bit goofy and opt to remove units from the map when they’re eliminated. It doesn’t offend me, but I’m just playing a strategy game and don’t really need graphic reminders that thousands of men died in the real battle. Besides, I hate unnecessary map clutter…
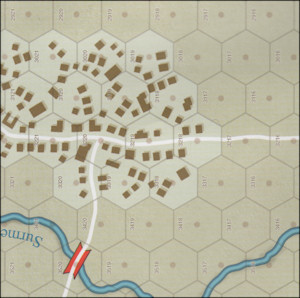
The game map is well drawn and uncluttered. All required charts and tables are easily visible and clear. In this game a unit’s defensive strength is drawn from the terrain the unit occupies, not from any value of the unit itself (e.g. “1” strength German units are just as hard to kill as “7” strength units), so a clear, well-defined map greatly facilitates game play.
All German units (with a few possible exceptions due to random events) enter the game by being placed along the southern shore of the Marne River, which is located at the northern end of the map. In general, the German player’s units will be driving south, attempting to engage and destroy the American units while also attempting to exit the south edge of the map. Running north/south down the middle of the map is the Surmelin River Valley, which contains a few small towns and is beset east and west by woods.
Both players should get to know the map well, because proper axes of advance can be the key to victory for the Germans, as can suitable defensive positions for the Americans. As mentioned earlier, terrain provides defensive strength for units under fire. Prepared Position hexes provide the best defense followed by Town, Wooded Hills, Marne River Bank, Railroad, Surmelin River and, weakest of all, Clear hexes.
Setting Up For Play
The Setup
American setup is critically important, as it will influence that player’s ability to react to German movement and assaults. Placing a dozen American units in the middle of the Bois de Conde will likely keep them safe from German fire, but it will certainly preclude them from taking any effective part in the overall American defense!
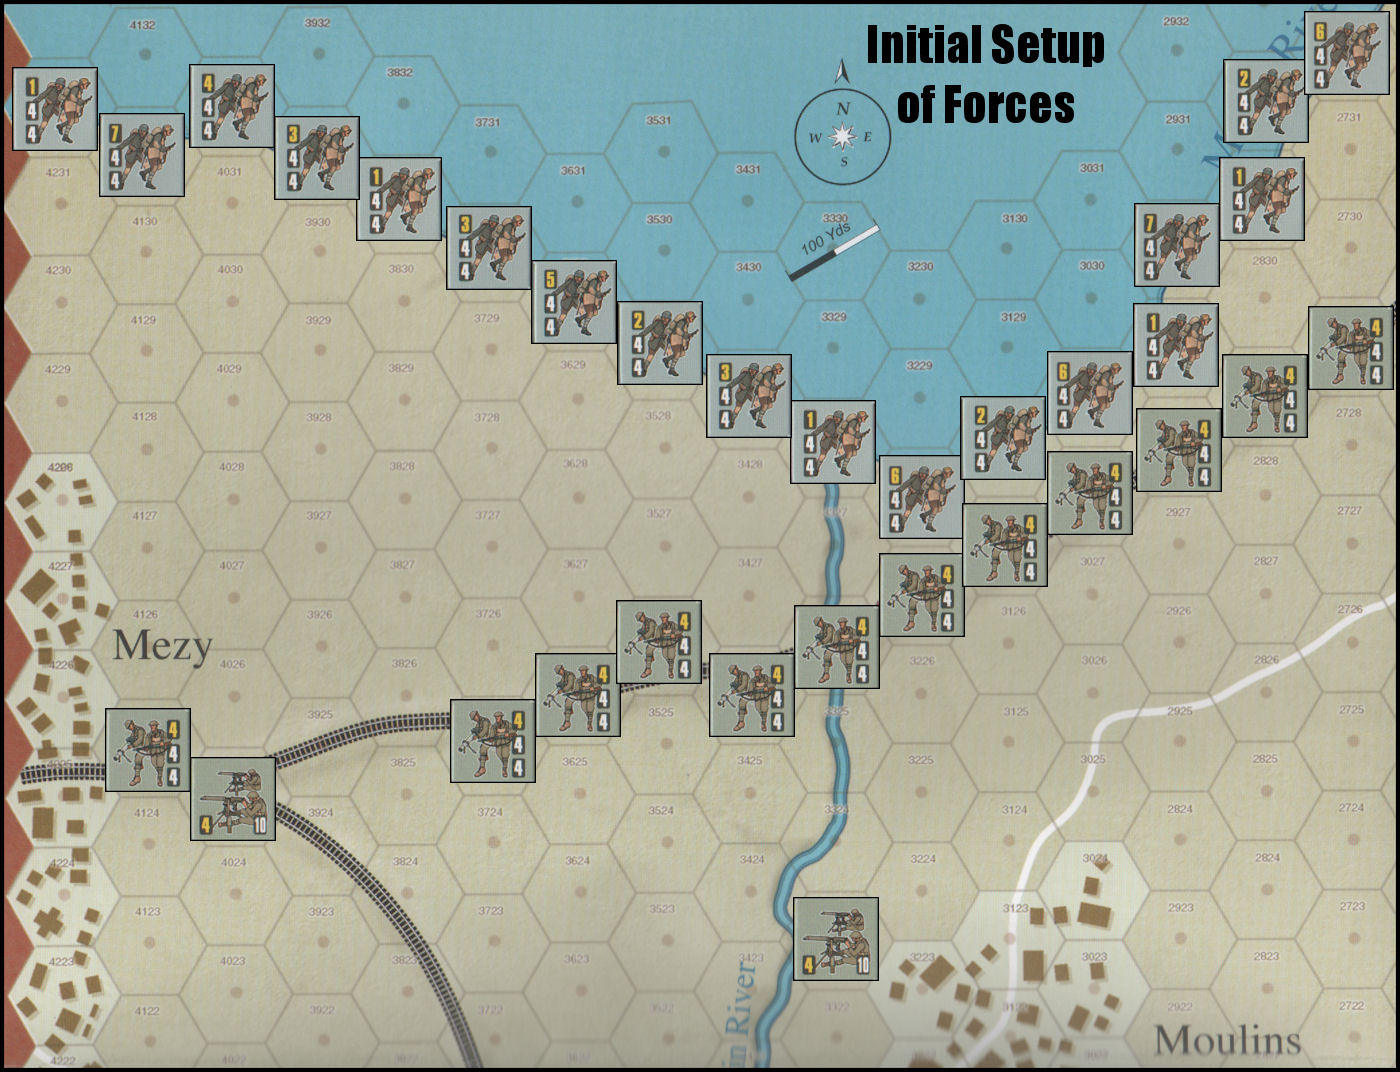
There are two American setup “zones”; the US Forward Zone and the US Rear Zone. In the first graphic, below, the American Forward Zone is the area highlighted in light green (including the two hexes of Hill 231. A total of 16 US Infantry units and 8 of the 9 Heavy Weapon emplacements must be setup in this zone. Note that the Varennes town hexes are off limits, forcing most of the Heavy Weapon Emplacements to be situated in the vulnerable area north of the Paris-Metz road.

The remaining 32 American infantry units must be set up in the US Rear Zone which consists of any Wooded Hills hexes or any Town hexes in Crezancy or Paroy. Basically, the bulk of the US units start out too far south to have any impact on the first game turn.
Initial German setup, on the other hand, is very constrained. Thirty units are randomly drawn and placed one at a time in each of the Marne Riverbank hexes. Although he has the advantage of setting up last, the German player cannot concoct any concrete battle plan prior to seeing how the random setup distributes his strong and weak units along the Marne River.
The graphic below shows the initial setup of forces in the northwestern part of the map. A brief sample of the first game turn will plot the course of the action in this sector during the crucial first turn.
Victory Conditions
The primary victory objective, for both players, is brutally simple: eliminate every one of your opponent’s units. The German player has an alternate victory condition that may be met by exiting units off a specific section of the south game map edge. The Germans begin near the north edge of the map, so exiting off the south edge means having to run the American gauntlet. In the original version of the game, there is no time limit. The German can take an unlimited number of turns to accomplish his mission. Alternate rules were published that proposed limiting the game to 16 turns.
The Game Turn
The next section is an abbreviated overview of the game turn sequence. Let’s assume that the Americans have decided to hold a tight defensive line along the east/west railroad tracks just south of the Marne River, leaving a small gap east of the town of Mezy, and a larger gap in the northeast. Other American units (not pictured) are set up further east. Two Heavy Weapon Emplacements are placed in the two hexes of Hill 231. Finally, American “Rear Zone” units are placed densely along the northwest edge of the Bois de Conde, to reinforce the north eastern sector. Additional strong groups are placed in the towns of Crezancy and Paroy. These units will be tasked with preventing the Germans from overrunning the weak rail line sector near the town of Mezy in the northeast.
It seems that the luck of the draw has left the northwestern German sector relatively weak. High strength “shock units” (Fire Factors of “5”, “6” or “7”) are few and far between. If the Germans are to make a credible push down the western side of the Surmelin River valley, strong reinforcements will be needed here.
Both sides are now prepared to begin the game turn. All game turns are made up of 12 distinct Phases that are followed in strict sequence:
Random Events Phase
As the name implies, this phase consists of rolling two dice and checking a chart that lists nine “events” which did, or may have, happened in the real battle. Some examples include German Artillery Problems, which makes German artillery less effective for the duration of the game turn, and Intense Poison Gas Attacks which reduces the movement allowance and visibility distance of ground combat units. The events generally favor the German player, with five of them favorable to the Germans and only two specifically favorable to the Americans.
This phase is skipped on game turn 1, so we’ll move along to the next phase.
German Reinforcement Phase
The German player rolls four dice and may bring that number of randomly drawn infantry counters on to the map, starting in the Marne Riverbank hexes near the north edge of the map. This phase is also skipped on game turn 1.
German First Bombardment Phase
There are six Bombardment markers in the game: three “heavy” bombardment and three “light” bombardment. The heavy bombardment markers have attack strength of 6 and the light bombardment markers have only 4 strength. The German player is free to place these markers on any hex occupied by American units that are also within Line of Fire (LOF) (aka “line of sight”) of one or more German units. Remember that each unit has its own LOF range printed on it, but since all German units have the same rating of “4”, it’s not hard to remember.
As the initial German landings along the banks of the Marne took place very early in the morning, special LOF rules apply to game turn 1. Every unit’s LOF is reduced to “2” for the duration of the turn. With this limitation in force, there aren’t a tremendous amount of legal targets for the Germans (at least in the area of the map that this example is focused on). The Germans decide to attempt blowing a hole in the center of the American line along the Surmelin River and place 16 Bombardment factors against the American unit in hex 3326 and 14 Bombardment factors against the enemy in hex 3227.
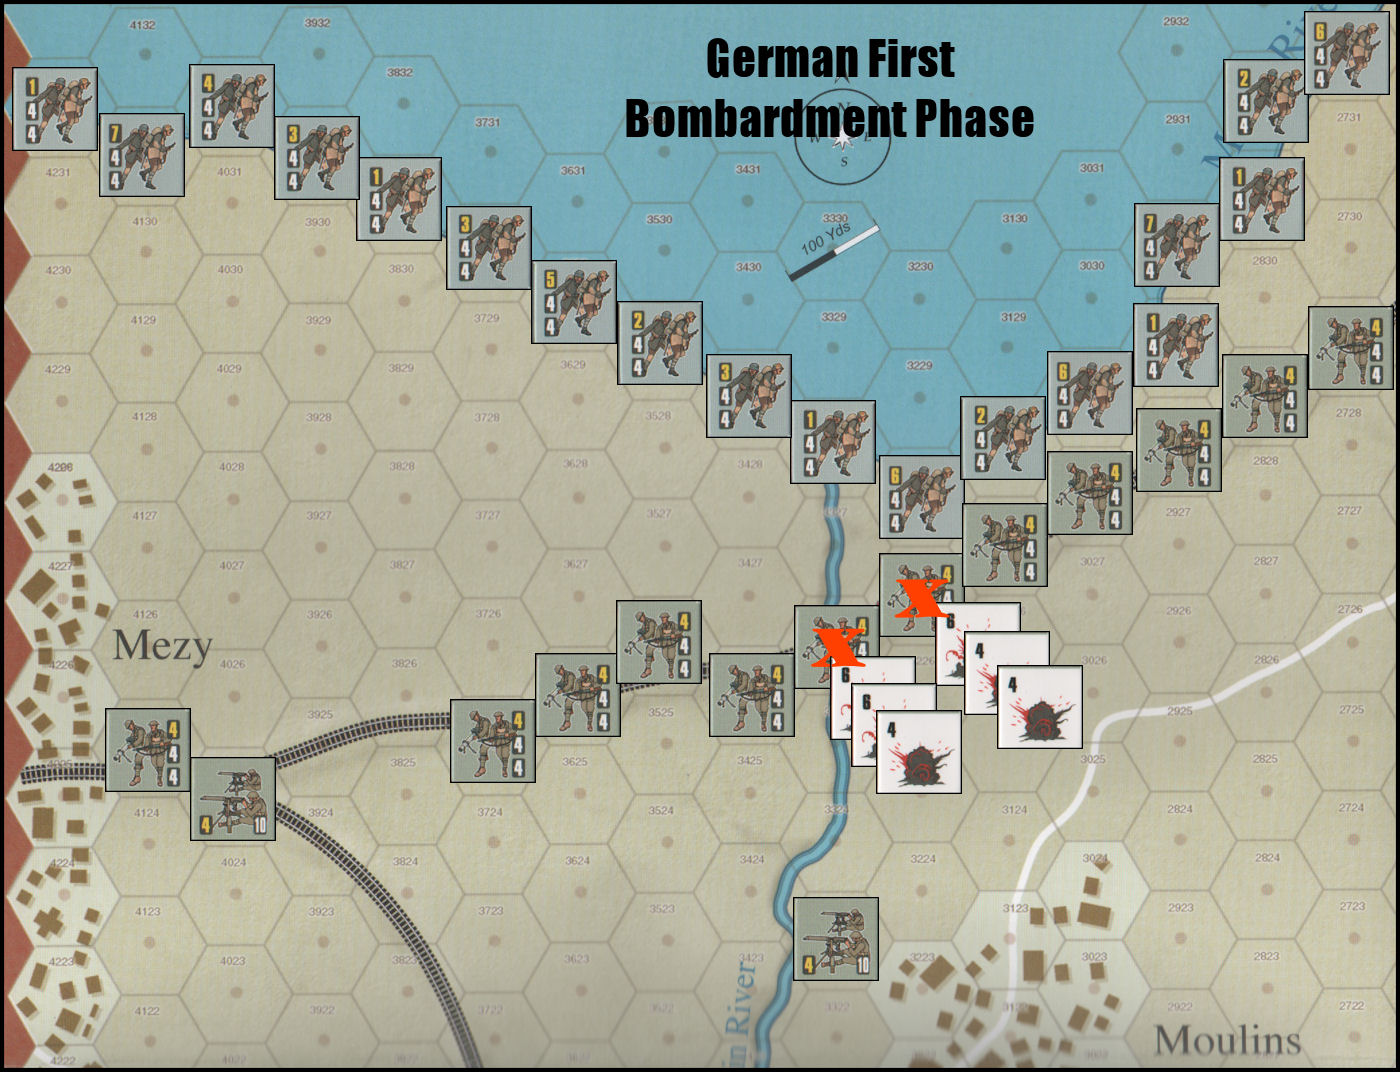
Bombardment attacks are resolved just like regular fire attacks (which you will see shortly). The total bombardment strength is compared against the defense factors of the terrain in the target hex. Both American units are in Railroad hexes that have a defense factor of “4”. So the first attack is “16” to “4”, which resolves to a 4-to-1. Therefore the German must roll “4” or less on a single die in order to eliminate the target unit. He rolls a “3”, destroying the American unit in hex 3326. The next attack is “14” to “4”, resolved to a 3-to-1 attack. Therefore a “3” or less must be rolled to score a kill. He rolls a “2”, eliminating the enemy unit in 3227 as well.
Since it’s impossible to roll less than a 1 on a six-sided die, odds of less than 1-to-1 are not allowed and, although the rules do not explicitly state it, it would only make sense that odds of 6-to-1 or greater are considered an automatic elimination.
US First Bombardment Phase
The American Bombardment phases are identical to the German Bombardment phase just described. In our example, the American commander is less concerned with his artillery targeting any particular sector, but more focused on targeting the strongest German units within his units’ LOF. He assigns “12” Bombardment factors to the “7” strength enemy unit in hex 2930, “12” factors to the “6” strength unit in hex 3029 and (a longshot) “6” Bombardment factors to another “6” strength unit in hex 3228.
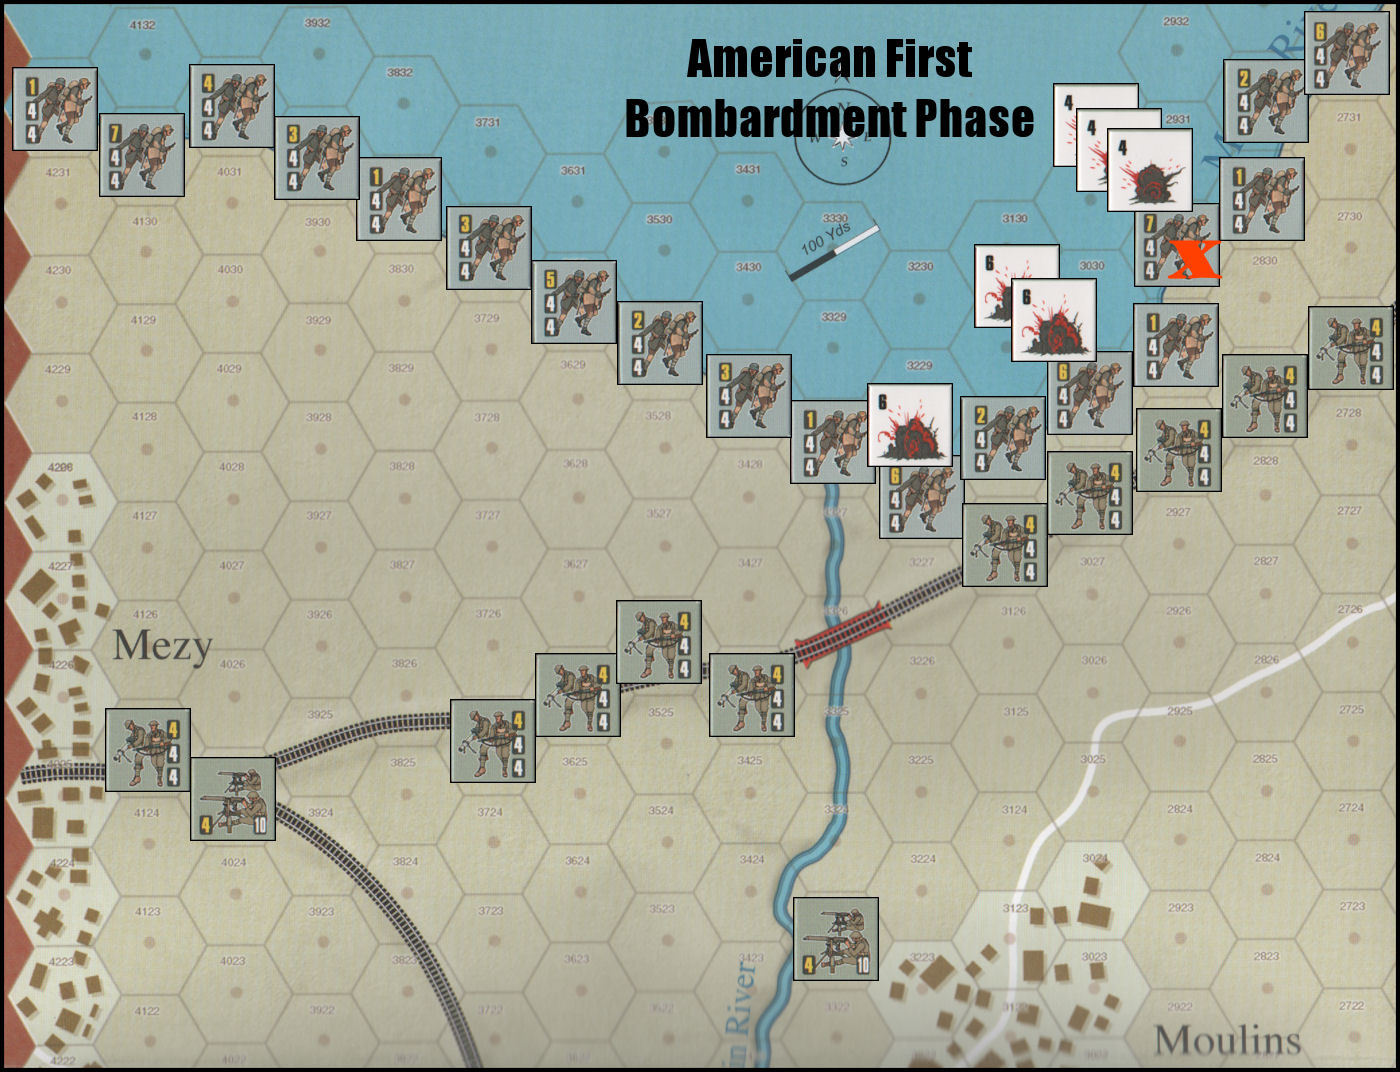
Starting with the weakest attack, “6” Bombardment factors against the “4” defense factors of a Marne Riverbank hex, the die roll is “6”, which is higher than the “1” required to score a hit in a 1-to-1 attack. The next two attacks are both 3-to-1 attacks, one of which succeeds (a roll of “2” against the German “7” strength unit) and one which fails (a roll of “4” against the “6” strength unit). The “7” German unit is eliminated.
German Movement Phase
Remaining cognizant of the victory conditions, the German player charges forward, across the board. He will attempt to close with and destroy as many American units as he can, but bypassing them when possible.
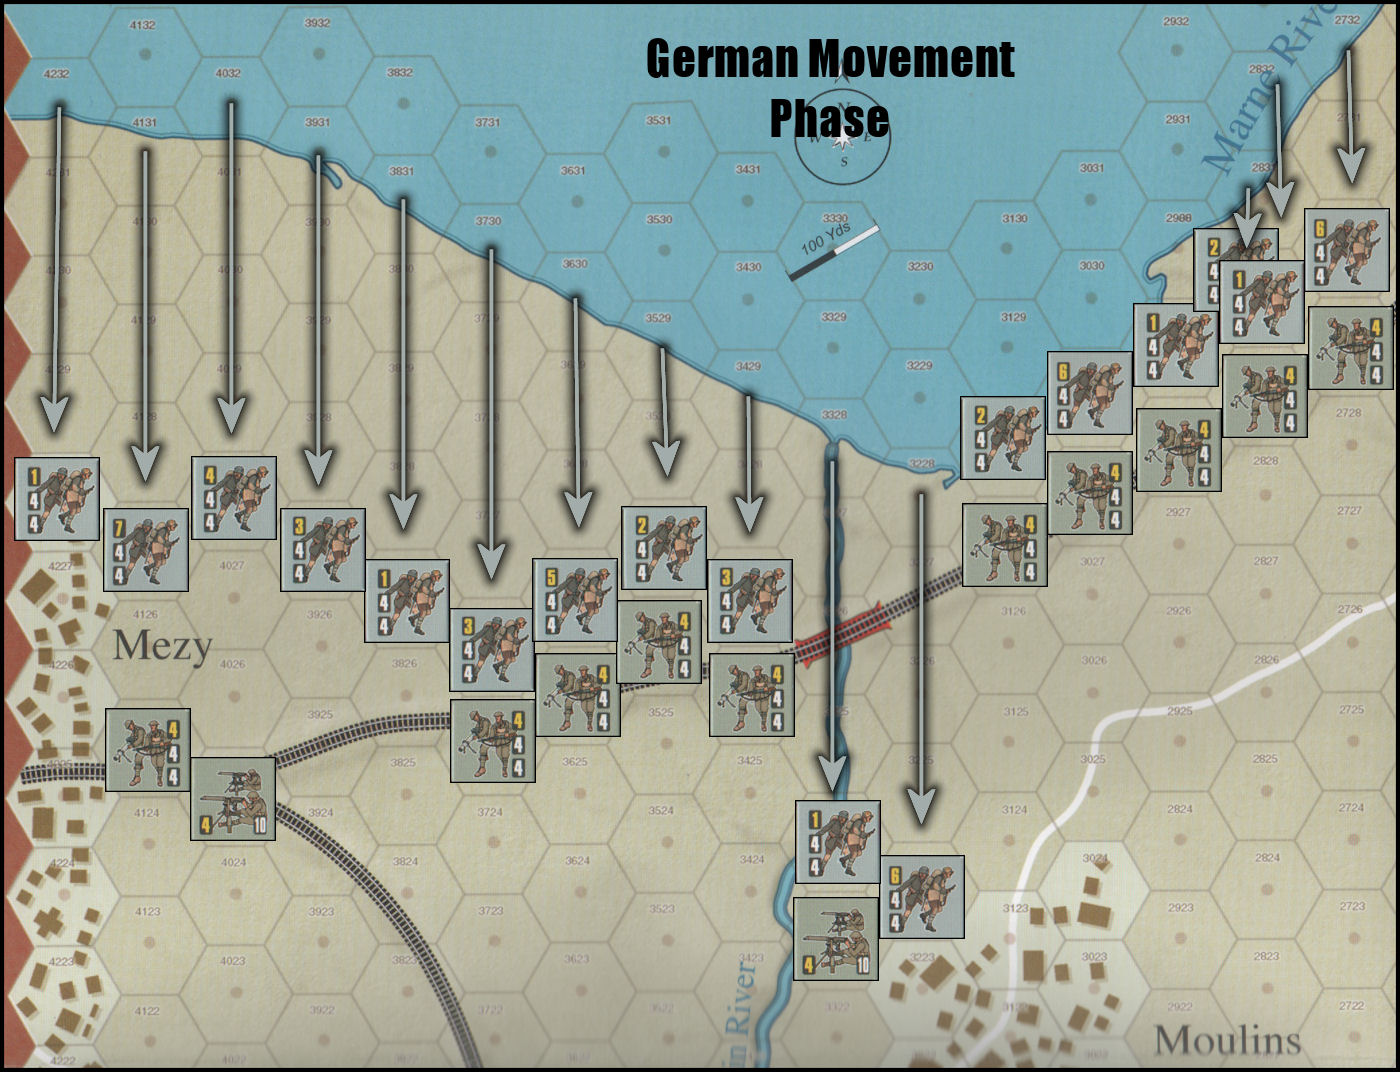
Even though he knows the “US First Fire Phase” is next and he is exposing his units to the full force of American fire power, on the worst defensive terrain possible, the German player decides to press ahead because he wants surviving friendly units adjacent to enemy units where their fire will be more effective. Besides, his reinforcements will be coming next turn, and the next, and the next… so his tolerance for accepting casualties is high.
US First Fire Phase
The US may now fire on any German unit that is within its LOF which, recall, for turn one is limited to 2 hexes. Each American unit may fire at one German target. Units may combine fire factors against one target. Fire may be conducted in any order, as long as no American unit fires more than once, and no German unit is targeted more than once.
The graphic below shows each American firing unit’s target, the odds of each attack, and Xs to indicate successful fire rolls that have eliminated the targeted German unit. If a firing unit is directly adjacent to the target unit, it is considered a Close Assault and the firing unit’s Fire Factors are doubled. In addition, if the target unit is eliminated, one or more firing units may advance into the target hex.
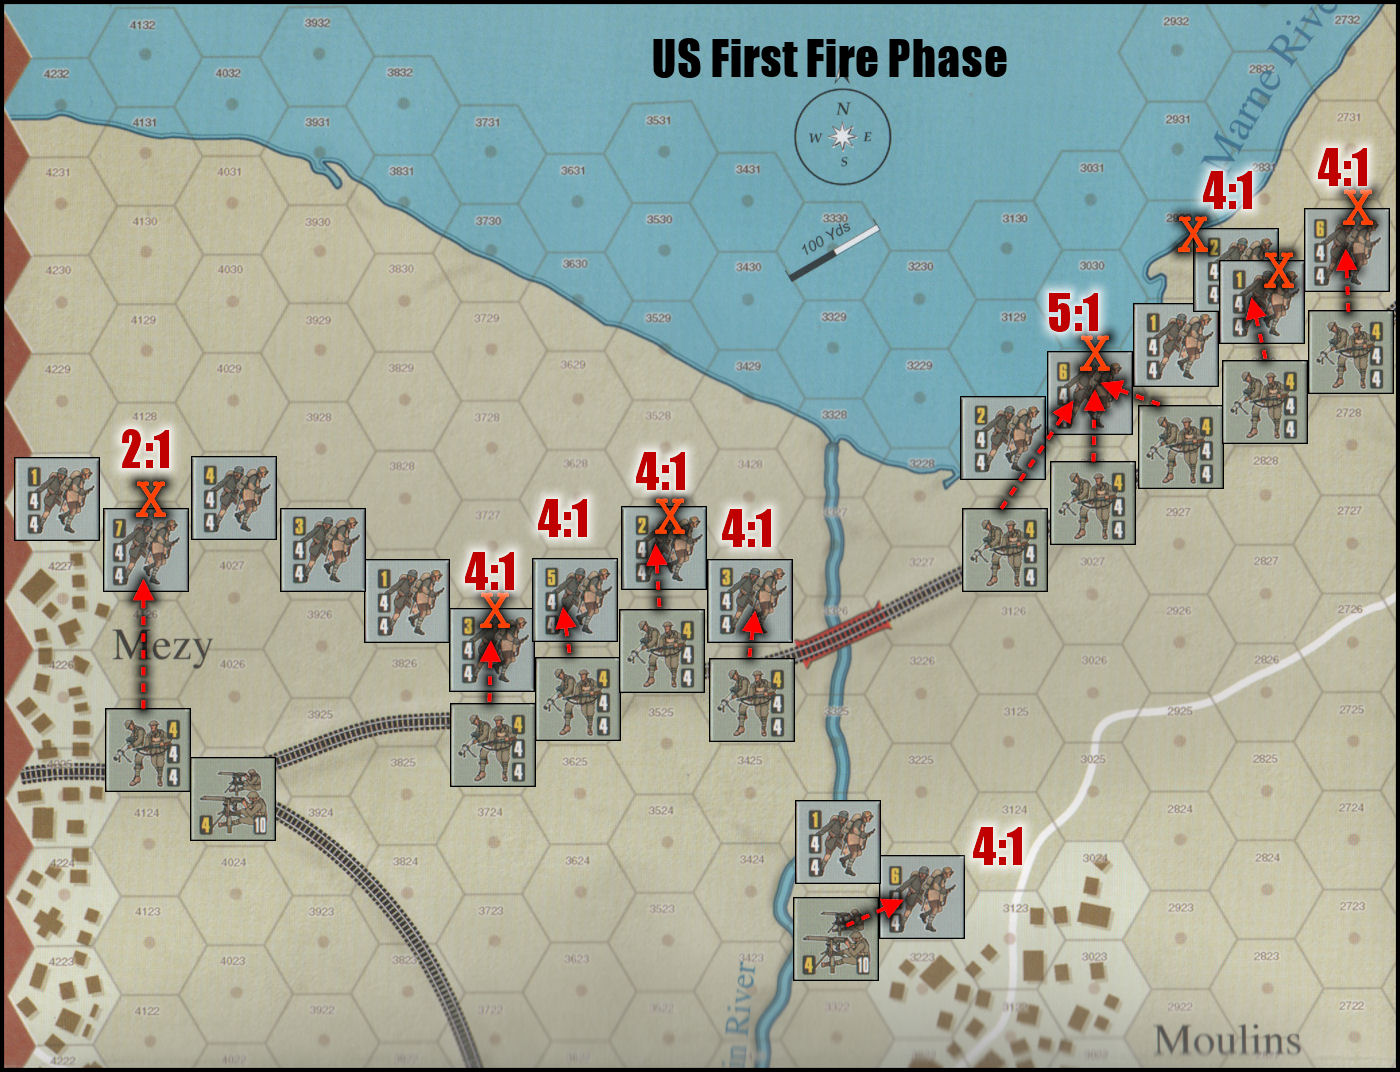
I’ll briefly review the fire combats that are taking place, starting from the west and working east:
- The “7” strength German unit in hex 4127 is targeted by the US infantry in hex 4125. Note that since the turn 1 special rules limit LOF to 2 hexes the Heavy Weapon Emplacement, which normally has a range of 10 hexes, cannot fire at any German units. So “4” American fire factors are compared against the “2” defense strength of the clear terrain occupied by the German unit, yielding odds of 2:1. The American rolls a “1” and eliminates the target unit. As this was not a Close Assault, the Americans do not have the option of advancing.
- US Infantry in hex 3725 fires at the German unit in hex 3726. Due to adjacency, US fire factors are doubled to “8” and compared against the clear terrain defensive factor of “2”, resolving to a 4:1 ratio. The US rolls a “3” and it’s another dead German unit. This time the American player may advance the firing unit into the vacated hex, but chooses not to, preferring to retain the defensive benefits of the rail road hex it currently occupies.
- The next attack is a 4:1 from hex 3626 to hex 3627. A die roll of “5” causes a miss and the German “5” strength unit will live to fight another day.
- US infantry in hex 3526 targets, and eliminates, the German unit in hex 3527.
- US infantry in hex 3426 fires at, and misses, the target unit in hex 3427.
- US Heavy Weapon Emplacement in hex 3323 fires at, and misses the target unit in hex 3224.
- Marne Riverbank hexes have a defensive strength of “4”, so the US assigns three units to fire at the German “6” strength unit in hex 3029. The American player surely wants to take out a powerful unit like that and so assigns the resources necessary to do the job. Two of the US infantry units are adjacent, which doubles their fire factors for a total of “16”. Then adding in the “4” additional fire factors from the infantry unit in hex 3127 brings the total fire factors to “20”, and the combat odds to 5:1. A “2” is rolled and the unit is eliminated.
- The American in hex 2829 fires into hex 2830 which contains two German units. Both units undergo a separate 4:1 attack. The US player is hot with the dice and eliminates them both.
- Finally there is one remaining 4:1 attack from hex 2729 to hex 2730, and another powerful “6” strength German unit is taken out.
German casualties are removed and we move on to the next phase.
German First Fire Phase
Although they’ve been more than decimated, the Germans fire back with remaining eligible units, confident in the fact that numbers will tell, and the Americans will run out of riflemen before they do.
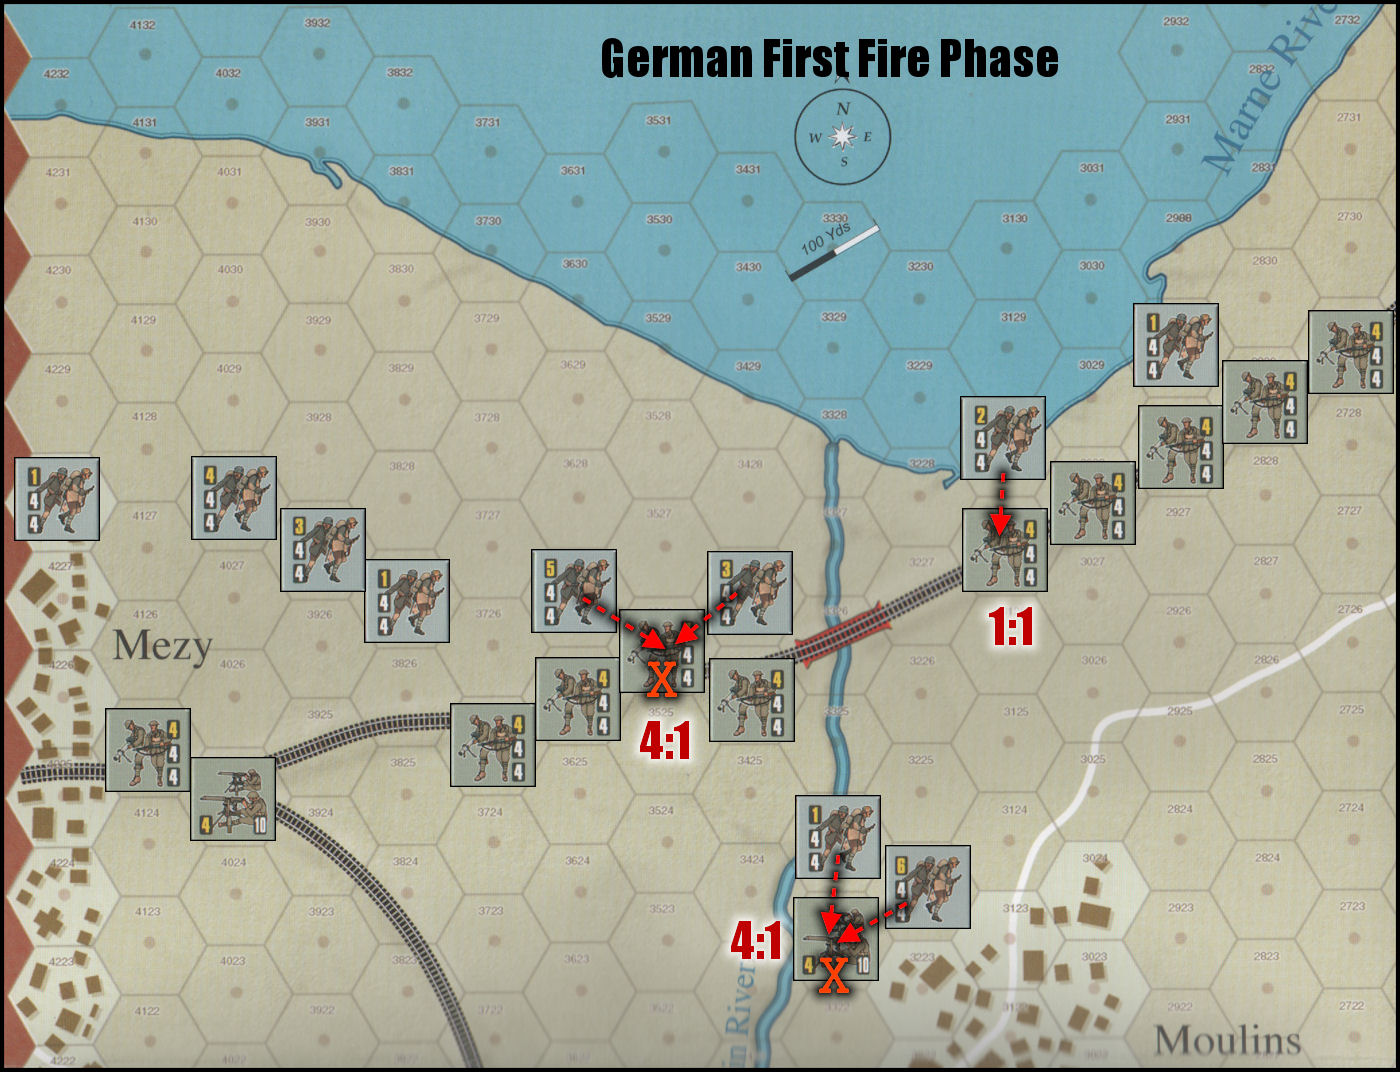
Notice that none of the first four German units on the west side of the map can even fire due to the 2 hex LOF restriction on turn 1. So, the German retaliatory fire is as follows:
- The two adjacent infantry units join together to target hex 3526. Both units are doubled due to adjacency (i.e. Close Assault) which resolves to a 4:1 attack (8 attacking fire factors doubled vs. railroad defense strength of “4”). The roll is a “2” and the American unit goes down. The German player chooses to advance one of his victorious units into the railroad hex to get the defensive benefit.
- Two German infantry fire on the US Heavy Weapon Emplacement in hex 3323, generating combat odds of 14:3 (7 attacking fire factors doubled vs. Surmelin River hex defense of “3”) simplified down to 4:1. A roll of “1” eliminates the American and once again the German decides to advance to take advantage of the improved defense value of the river hex.
- The final attack is a 1:1 attack launched by the “2” strength unit in hex 3128, doubled to “4”, vs. the American unit in hex 3127, with a railroad defense strength of “4”. The German player rolls a “6” and therefore misses.
US Movement Phase
Things have been going very well for him up to this point, but the American player now has a choice to make. Since the very next phase will be another German Fire Phase, should he take advantage of this phase to move his units out of German fire range? This would leave the German player unable to fire at any of his units in the upcoming “German Second Fire Phase”, but will also leave his American units unable to fire at the Germans in the following “US Second Fire Phase”!
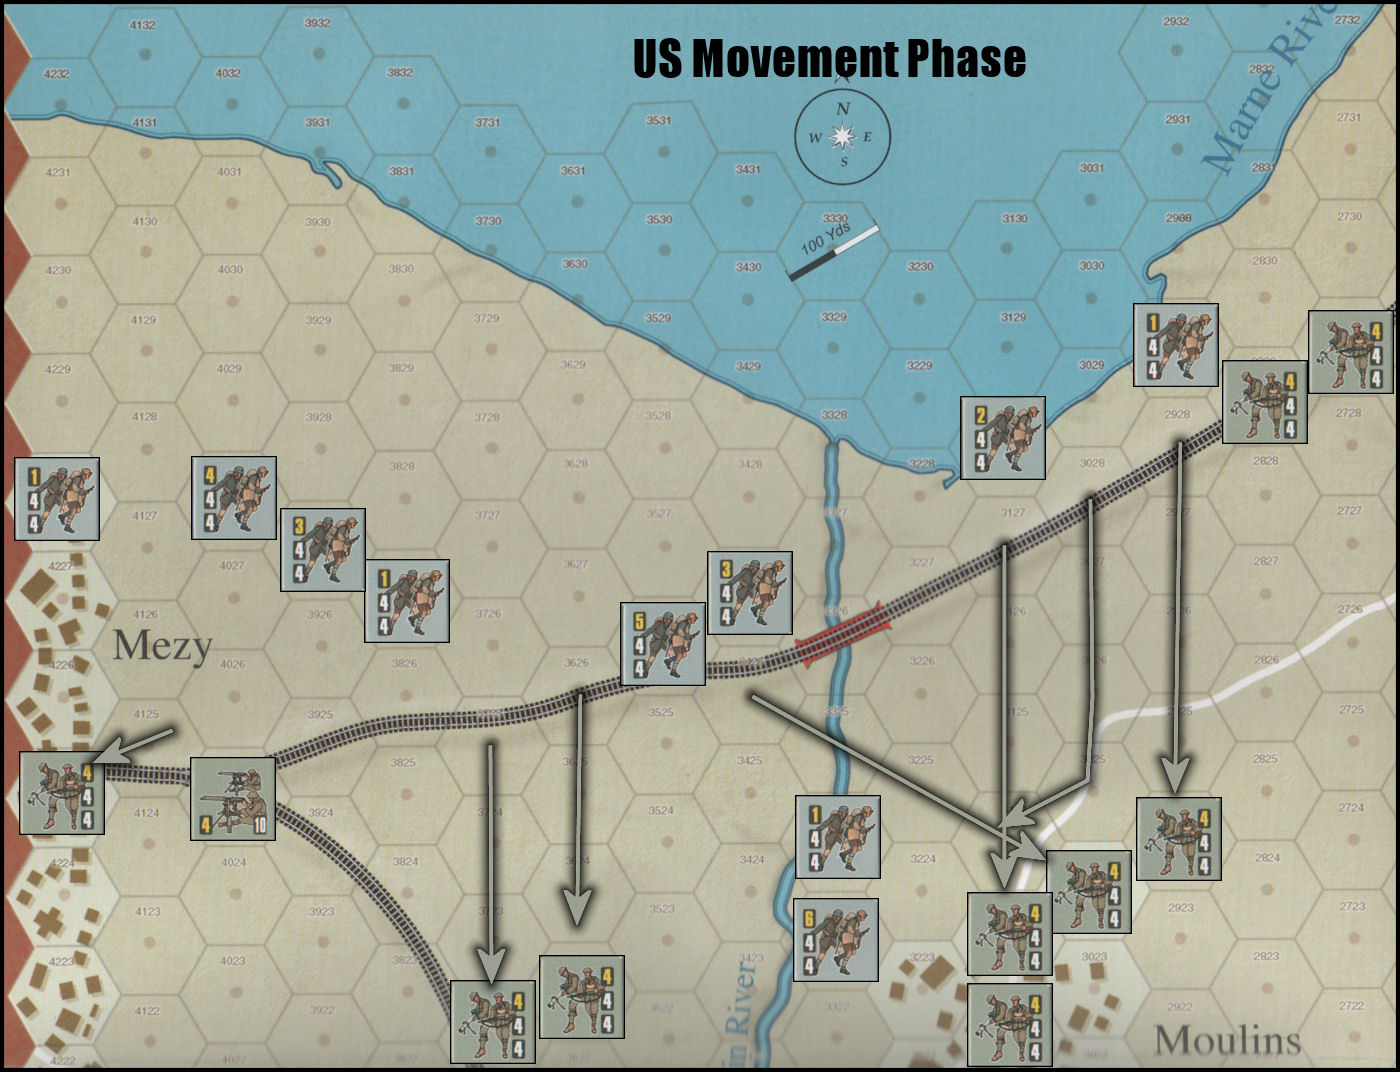
Another consideration is the fact that, by moving away from the Germans (presumably south), he’ll be giving up vital real estate, as well as the advantageous railroad defensive line.
Our American player chooses to quit while he’s ahead and move out of range of German units where possible, withdrawing into the towns of Mezy and Moulins, as well as falling back to positions along the north/south railroad line. The only units that remain in place are the two infantry in the northeast sector of our example map. The reason those are left in place is because the “1” strength German unit cannot muster enough fire power (even when doubled) to achieve 1:1 odds against the US units on the railroad, so there is no immediate danger.
Finally, there are substantial US units moving north from their setup location in the cities of Crezancy and Paroy. The Paroy units, moving double their movement allowance along the road, are now located just south of the area covered by this example map and will be fully engaged during turn 2.
German Second Fire Phase
As the American player has planned, there are precious few targets for the Germans to fire at. The only target-able US unit is the infantry counter in hex 3125, in the town of Moulins. The “1” strength German unit has a clear, 2-hex range, shot at him. The “6” strength unit in hex 3323 is eligible to shoot because his line of sight runs right along the edge of blocking terrain (the town hex in 3223) and, according to rules, if the LOF runs along the edge of a hex and only one side of the line has blocking terrain, then the line of sight is not blocked.

So, the German player takes his one shot, and it’s not a very good one either. The total of attacking fire factors is “7” and the defense strength of the target town hex is “6”, making this a 1:1 attack. The German player comes close, rolling a “2”, but not good enough to register the hit. Play moves on to the next phase.
Again the weak “1” strength German unit in hex 2929, even when doubled, does not generate the minimum 4 fire factors required to target the American infantry unit in hex 2829, and so the German Second Fire Phase ends.
US Second Fire Phase
The US player is now in the same boat as the German player was, except that the defense strength of hex 3323 (Surmelin River hex) is only “3”, allowing the “4” strength US infantry unit in Moulins to attempt a 1:1 attack. He also rolls a “2”, failing to score a hit.
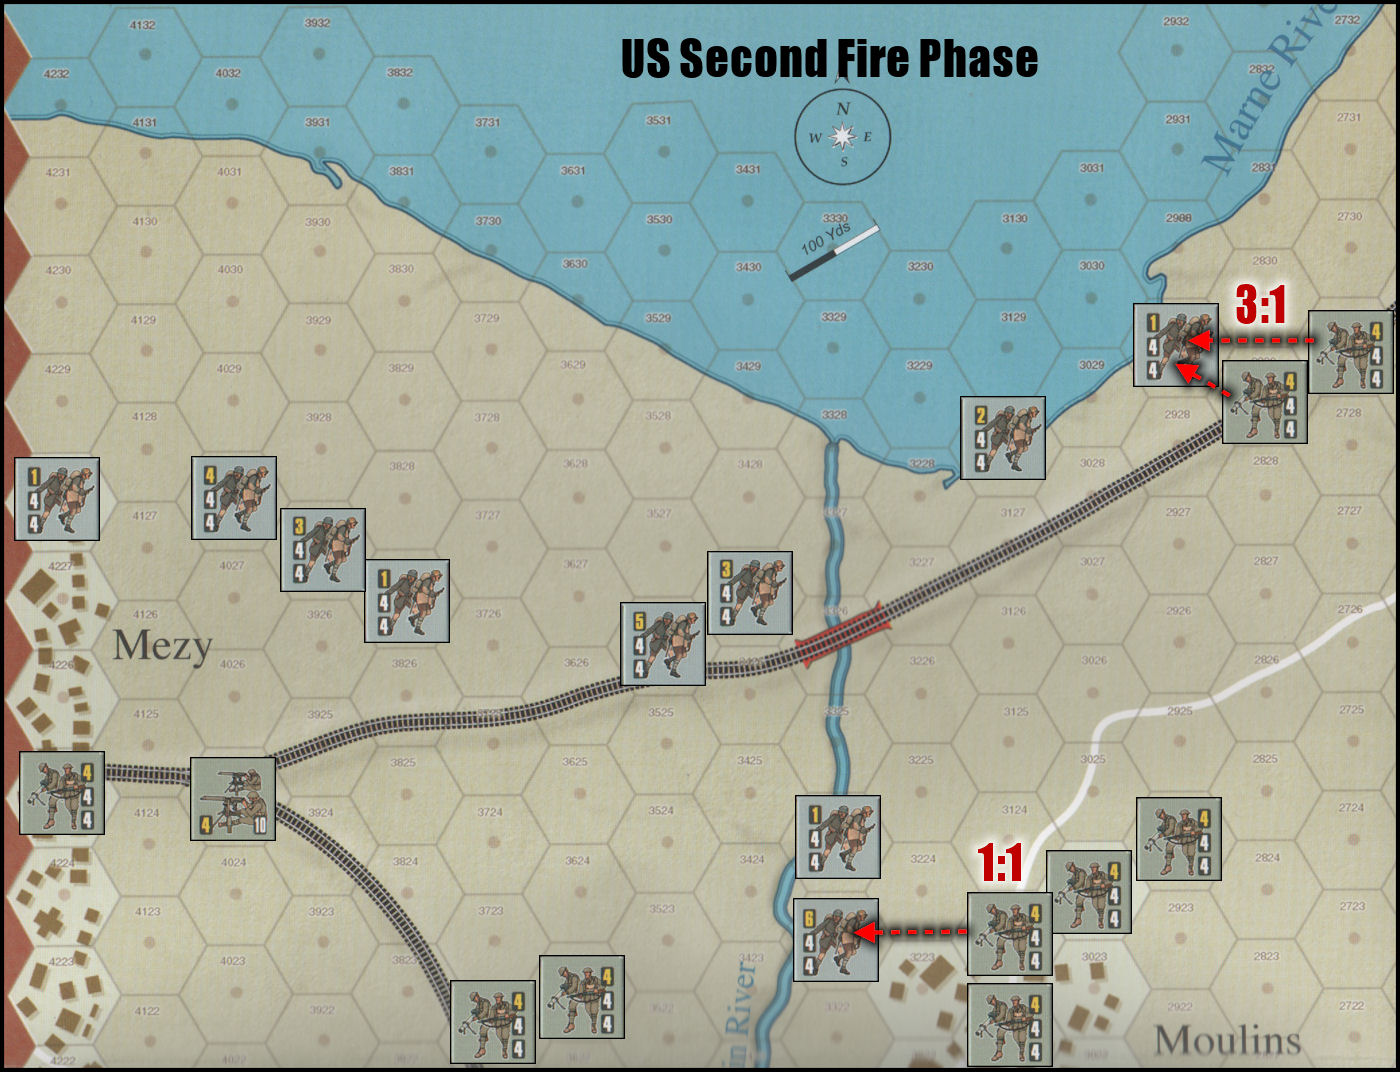
In addition, the American units in hexes 2829 and 2729 do have enough fire factors to make a credible attack on the German unit in hex 2929. The combat odds will be 3:1 (8 factors for the adjacent US unit + 4 factors for the non-adjacent unit vs. “4” defense strength of the Marne Riverbank hex). The US die roll is “6” which fails to score the hit! This failure will come back to haunt the US player during the Second Bombardment phases, below.
So ends the movement and fire phases for game turn 1. The US strategy of preserving units by avoiding contact has worked. It just remains to be seen if that was a good strategy to pursue in the first place!
German Second Bombardment Phase
Still operating under the restrictive LOF rules for game turn 1, the German can only target what he can “spot” within 2 hexes. This means that he can target the US infantry in the town of Moulins that he’s been trading fire with. Or, due to the American failure to eliminate the weak “1” strength German infantry in hex 2929, he may use that unit to spot, allowing him to target either of the US infantry units near it. He decides to allocate 16 Bombardment factors to the US unit in hex 2829, causing a 4:1 attack, and the remaining 14 Bombardment factors to the US unit in Moulins hex 3123.

Since there is no possibility of “drift” on game turn 1, the attacks proceed as is. A die roll of “3” eliminates the American unit in hex 3123 and a roll of “1” eliminates the enemy unit in Moulins hex 3123! The Germans end their portion of the turn with a bang!
US Second Bombardment Phase
The elimination of the US infantry unit in Moulins leaves the US player with only one single German unit that can be “spotted” and thus targeted with artillery: the weak “1” strength unit in hex 2929. So, lacking other options, the US player assigns all 30 Bombardment factors to that single German unit. “30” Bombardment factors vs. “4” defense factors for the Marne Riverbank hex nets a 7:1 battle, which is an automatic elimination.
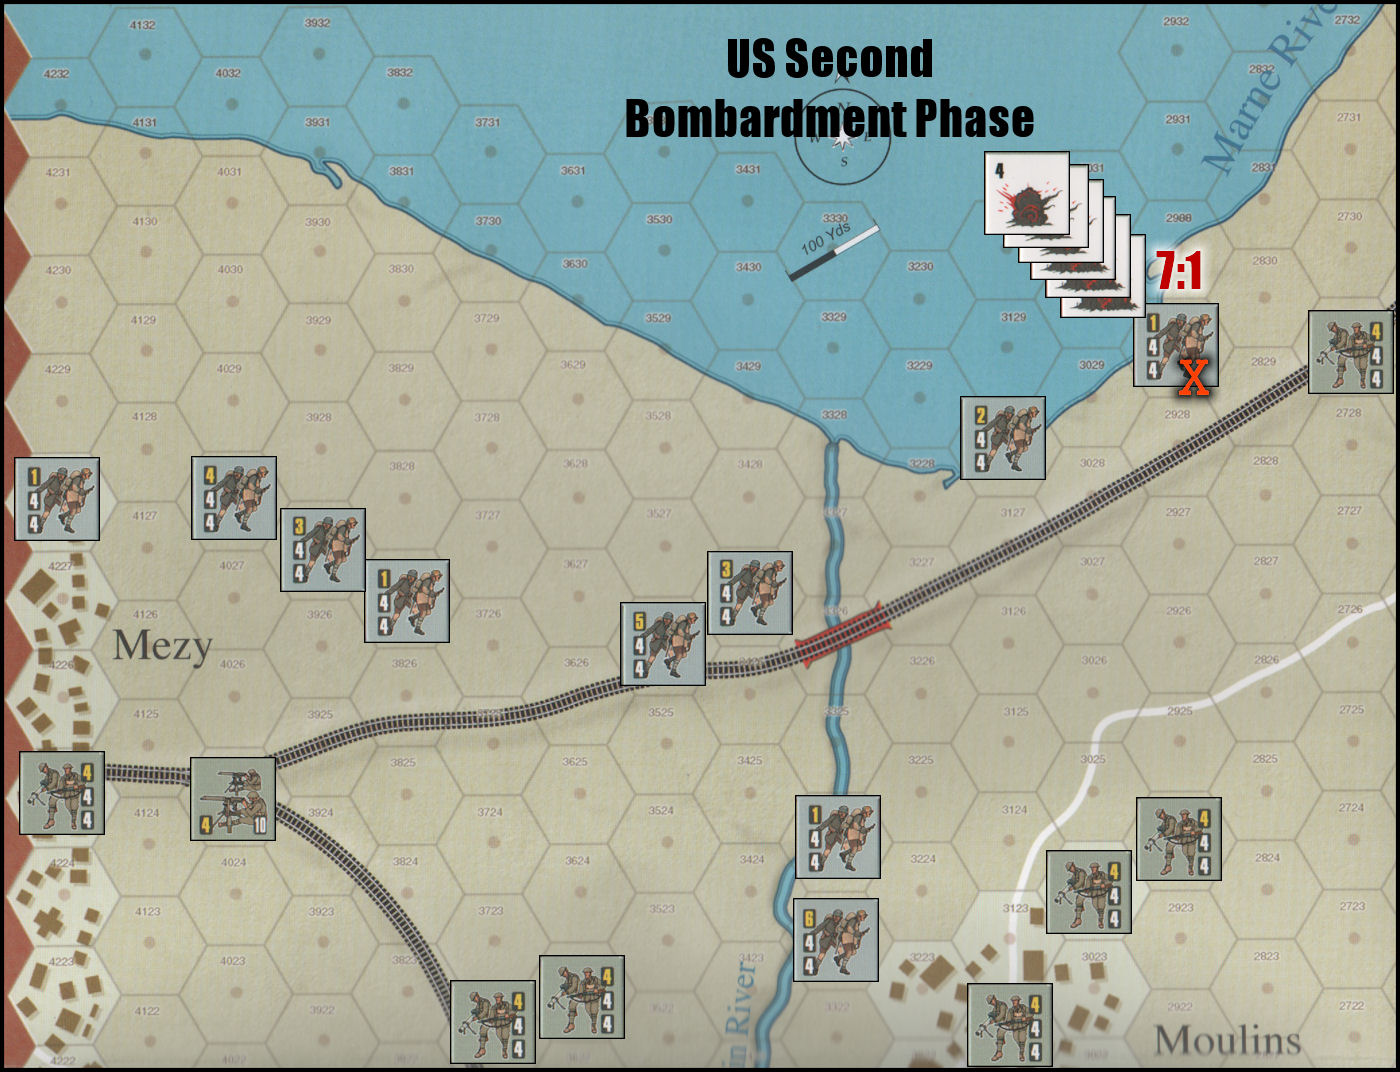
The German “1” strength unit is removed and the game turn ends.
End of Turn Assessment
At first glance, you’d be tempted to say the Germans got their clock cleaned as there aren’t many of them remaining on our example sector of the map. 6 American units and 9 German units were eliminated. More importantly, 35 German Fire Factors were wiped out as compared to 24 American Fire Factors. It all sounds very positive from an American point of view until you consider that all German units in the counter mix total 448 Fire Factors while the American total is only 228! 35 to 24 falls considerably short of the 2:1 kill ratio required for the US to outlast the Germans.
Near the start of game turn 2, the Germans will be receiving anywhere from 4 to 24 reinforcement units. That’s units, not Fire Factors. The amount of Fire Factors in 4 to 24 units could potentially range from 4 to 160 Fire Factors, though the average is usually about 14 units with a total of 55 Fire Factors. Even so, a constant stream of 55 Fire Factors per turn (until all German reinforcements are placed) puts tremendous pressure on the US defenders. So, once again, the game system is much more forgiving of German missteps, as the German player has a better chance of recovering from his errors than the American player does.
Finally, take a good look at the American positions in the first graphic (“Initial Setup of Forces”), above, and compare it to the last one in the series (“US Second Bombardment Phase”). This graphically illustrates the deterioration of the American position, and the challenges he’ll face to bring the situation back under control.
Summary
First Blood: Second Marne is the type of game that only takes minutes to learn, but provides countless hours of entertainment while trying new strategies. It usually plays in two to four hours, allowing for a complete game or two in a single sitting.
But no game is perfectly balanced or free of bias, and First Blood: Second Marne is no exception. The game presents an extremely challenging situation for the American player. The Germans have a much easier task to perform, in my opinion. For the German player, the challenge is really more about how badly and quickly you can defeat the Americans rather than if you can beat them.
The American player must maintain at least a 2:1 kill ratio in order to win the game (without turn limits, that is), and that’s a pretty tall order. And, because a target unit’s defensive strength is derived from the hex in the terrain it occupies, it takes just as much American effort to kill a “1” Fire Factor German unit as it does to kill a “7” Fire Factor German unit.
However, I think it is apparent from the brief example shown above that once the American player becomes competent, opportunities abound for thwarting a German player who does not stay on his toes. It’s really quite a fascinating tactical situation and, while I’ve just scratched the surface of plausible American and German strategies, I see the game becoming surprisingly deep, in an almost chess-like manner. Although recurring patterns develop, there seems to be limitless variety in the way the maneuvers and combat finally resolve. The initial setup options for Americans in the Forward Zone can vary, but those options are exhausted fairly quickly, probably in no more than 6 or 7 play throughs. However, the secondary strategies are what give this game tremendous replay value.
When I say “secondary” strategies, I’m referring to Rear Zone setup and troop utilization for the Americans, and reinforcement placement for the Germans. Do the Americans go for the “defense in depth” that Colonel McAlexander favored? And, if so, can they execute it as masterfully as he did? Or do they opt for defending “with one foot in the river”, laboring to destroy the Germans as they arrive on the south riverbank of the Marne? Crowding all available American firepower forward, in close contact with arriving German reinforcements, will furnish the US with a superior level of killing power vis-a-vis the Germans arriving piecemeal. But let’s not overlook the fact that some Germans will survive… and shoot back! And that they have a nearly 2:1 advantage in overall firepower which will exact a heavy toll on the irreplaceable US troops.
In the final analysis, you can overlook a lot of flaws in a game if you really enjoy playing it. I truly enjoyed playing First Blood: Second Marne, and didn’t think there were that many flaws to overlook! True, it tips more towards the shallow end of the complexity pool (which I consider a minor negative, but you may not!), but it made me think. And it kept me coming back for more.
In the not too distant future, we will be featuring strategy articles on this game. I’m determined to devise the “perfect” American strategy that has thus far eluded me. Even after half a dozen plays, and several months of pondering strategies, I’m not tired of this game yet. And that’s high praise indeed.
