by Tom Thornsen
Designer: Richard Berg
Publisher: GMT Games
“Awesome Bob” and I have both had this game in our collections for some time and finally decided to break open the box and try the system. I have played Richard Berg’s “Triumph and Glory” system for several years for Napoleonic warfare and this looks to be a simpler version of it directed to the US Civil War. This is the third game set in the series, so we figure that the bugs have been worked out by now. The rules certainly seem simple enough, so we could get right down to action. We spent a couple of meetings playing the other game in the box on the battle of “Cedar Creek” just to get our mechanics worked out.
For those unfamiliar with the activation chit system of these games, here is a summary of how it works. Each side is organized into a number of ‘formations’ (for this game they are divisions or artillery reserves) which is part of a superior activation group (a corps). Each activation group has two markers that are part of the ‘draw pool’ for each turn and each group activate when their Activation Marker (AM) is drawn. Each of the formations in the group must complete all their actions for that chit (Artillery fire, move, charge and finally rally) before the next formation in the group goes through the process. You may attempt to have multiple formations operate together by risking a die roll, but if it fails they must operated as if “out of command”, which means they may not move adjacent to an enemy unit.
Robert E. Lee has 3 groups, Longstreet’s corps, Jackson’s corps and Stuart’s cavalry. Each has 2 activation markers so a total of 6AMs. Longstreet and Jackson each have 3 divisions and an artillery reserve, while all of Stuart’s cavalry is treated as a single formation.
The USA has 7 groups, 6 infantry corps and the cavalry. That is a lot of AMs, but we will be playing the historical version of the game with McClellan in command. To repeat the piecemeal way the army was committed to the battle, the US player is limited to only 3AMs each turn at the start of the game. On turn 3 and each turn after a die is rolled to see if an additional AM may be added to that total. There are other restrictions on US commitment of units that I will mention as we go through this replay. Since I am more interested in an historical replay I chose to start with two I corps and one XII corps AM, so the action opens on the USA right flank.
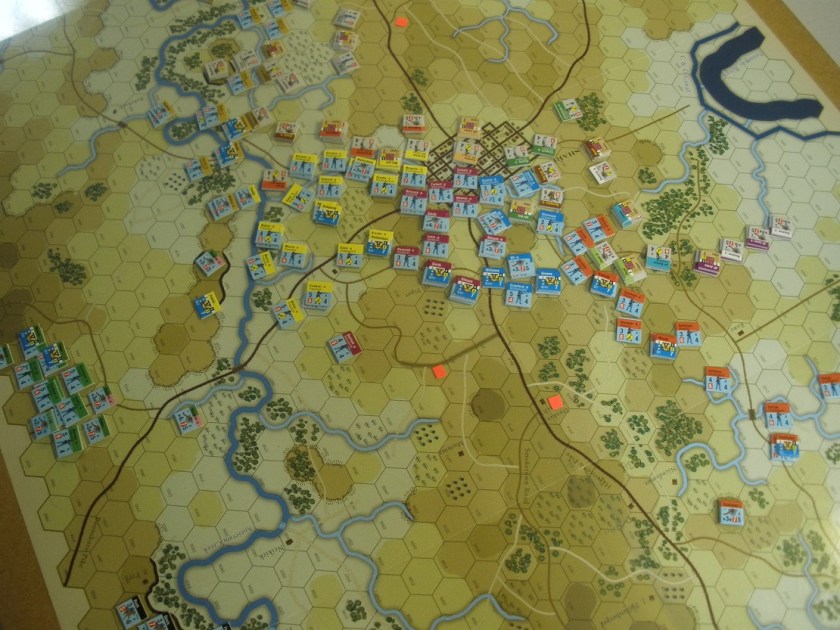
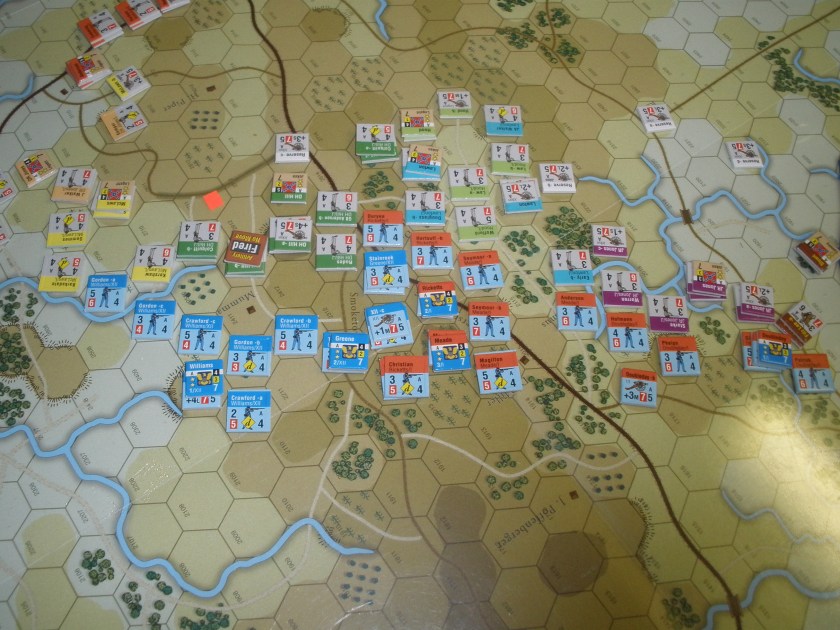
We join the action after the first 2 turns are completed, 5:45am and 6:30am. Hooker’s I corps has done good work. Doubleday on the right scored an early win when his initial artillery bombardment disordered the confederate artillery on the high ground to his right and the infantry was able to rush up the hill and destroy it. (Disordered artillery does not get any defensive fire and is automatically removed from the game if without infantry support in the hex when charged by enemy units). The Division’s objective is to secure that ground for his artillery and establish the right flank on the Potomac river to prevent Stuart’s cavalry from flanking the position. Both Stuart’s cavalry and JR Jones division are contesting the position.
The Dunker Church on the Haggerstown Pike is a VP space and if the US controls that space there is an improved chance of adding an additional AM to the USA pool. Meade and Rickett’s divisions are assigned the task of taking that space with Meade on the right of the road and Rickett on the left. Meade is set up with his division artillery on some high ground along the Pike while his infantry brigades drive back A.R. Lawton’s division, whose leader currently occupies the church.
Rickett’s division attempted to advance up Smokertown Road, but have encountered the very strong division of Daniel Harvey Hill on the high ground East of the church. Mansfield’s XII corps has moved up and will be sent to the left to take over from Rickett and protect that flank from any CSA attempt to advance from that direction.
While Hooker and Mansfield face Jackson’s corps, Longstreet’s forces continue to arrive. The confederates advance to protect the bridges across Antietam creek, but the lack of US ability to activate formations will keep the rest of the battlefield quiet for now.
8:00AM
The US side is still limited to 3AMs, so we again went with 2 I corps and 1 XII corps AM
Doubleday continues to hold the high ground in front of Jones infantry and Stuart’s cavalry. There is a lot of artillery fire being exchanged here, but so far it has been ineffective. The confederate should be moving up Jackson’s reserve artillery to stack with Jones’ artillery to get more fire power in play.
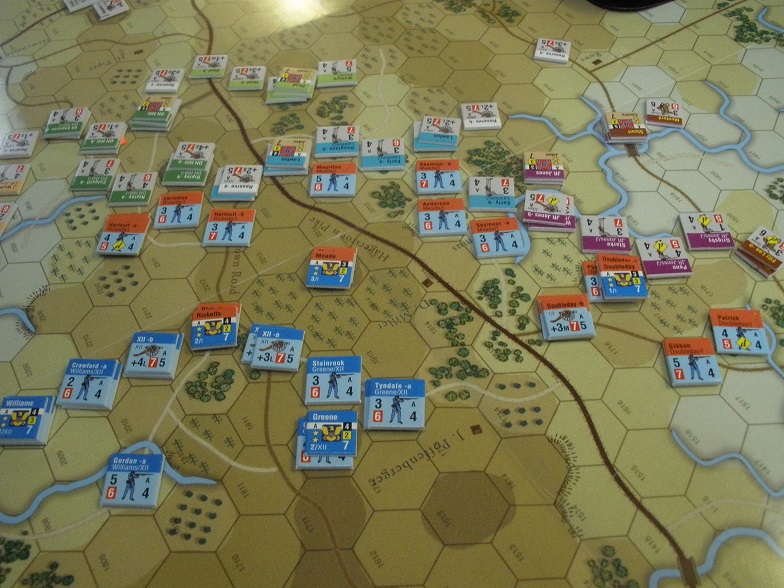
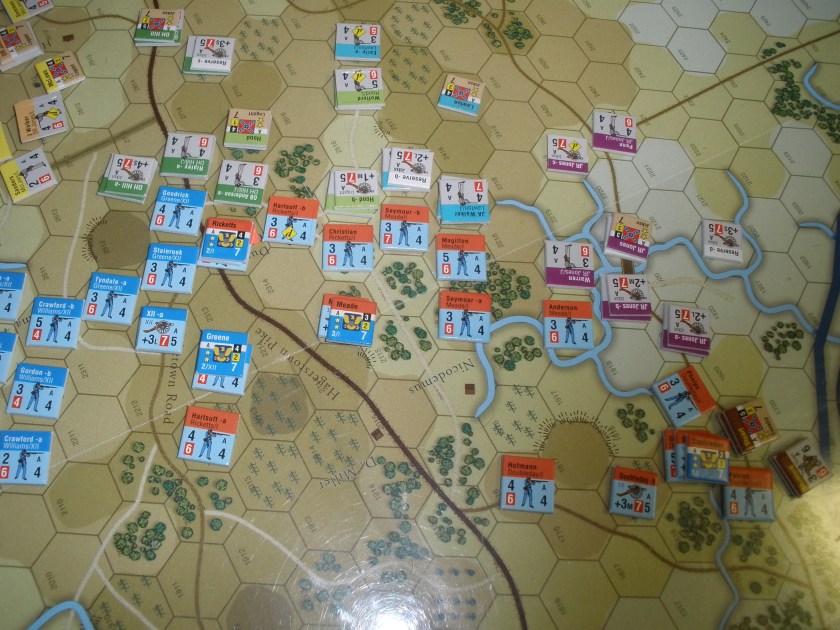
Meade has pushed Lawton’s division back while Rickett was able to shift to his right and conduct a successful attack to capture the Dunker Church! Most of Rickett’s division has been disordered in the effort, but the two division artillery units on the high ground are able to keep up a heavy fire on D.H. Hill’s force to keep them in check. Meanwhile Mansfield has moved the XII corps into position on Rickett’s left to protect that flank and bring the powerful artillery of the XII corps into action. The relatively low cohesion of Williams units will limit their effectiveness, but Greene’s division may be able to drive D.H. Hill’s artillery from the high ground they occupy.
A note on employing artillery
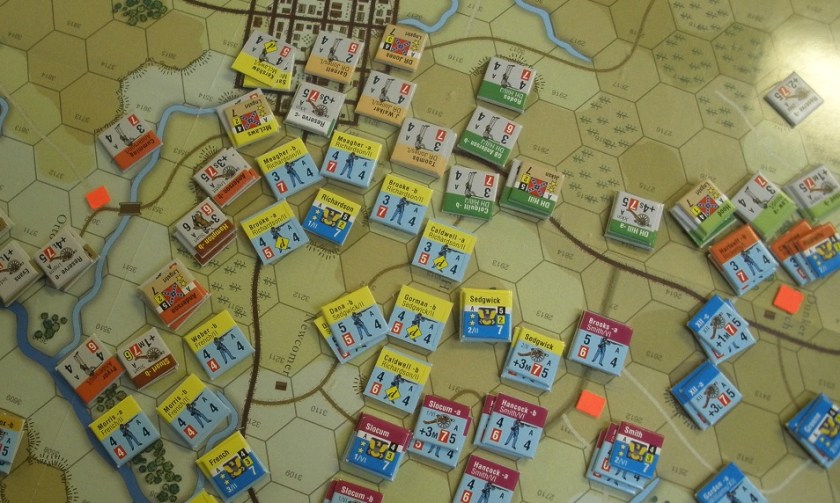
Note how D.H. Hill has deployed his artillery stacked with the infantry on the front line. This can be very effective on defense. The artillery will give a +2drm to defensive fire in addition to the +1drm for charging enemy unit in the open. This has a good chance of disordering any frontal attack on the position. For offensive purposes it is not quite as effective, as there are usually not enough factors involved to automatically disorder the target. Artillery fire at a range of 5 hexes has few die roll modifiers, and the total of a d10 plus the firepower will result in a cohesion check of the target on an 8-12. For a 3 factor artillery unit this means the best they can get is a 12 (by rolling a 9) and a defending unit with a cohesion of 7 will only be disordered 20% of the time.
For offensive purposes it is more effective to stack 2 artillery units in a space so they can combine fire. The stronger unit’s combat factor is used with +2SP added for the second unit regardless of it’s strength. In the graphic above you see that D.H. Hill has a +4 and +1 artillery unit adjacent to each other. By stacking the +1 with the +4 that stack would have 6SP of firepower. If they fire on a hex 2 levels lower than the hill they gain an additional +1drm. This has a reasonable chance of a 13+ total when added to a d10 roll, which is an automatic disorder of the defending unit(s). This is how Doubleday was able to disorder Stuart’s artillery with the opening salvo.
The risk factor here is that if the stacked artillery are charged by infantry, and fail to disorder them with their defensive fire, the charge is automatically successful and the artillery units are eliminated from the game. This is far too risky for units on the front line, so is usually used when infantry can be set up in front of the artillery to protect it. That is what I am trying to do with Doubleday on the extreme right flank. If the infantry can clear the rebels out from in front of the high ground then Doubleday can stack his two artillery units on the high level hex there to fire down on the CSA position.
8:45AM
The US gets lucky and is able to add a 4th AM to the pool. This is also the first turn that McClellan is allowed to activate Bull Sumner’s II corps, so we will activate II corps once, I corps once and XII corps twice to get Mansfield’s corps into position to protect Hookers left flank.
Doubleday and J.R. Jones continue their stalemate. Artillery fire is exchanged, but the infantry is reluctant to charge as the odds are not favorable to either side. Stuart’s cavalry ‘could’ attempt to move around the flank, but decides to wait for an opportunity to attack up the hill if the artillery can disorder the US infantry. So far…no dice…so to speak.
Realizing that they are too far forward, Meade’s brigades begin to fall back toward the Dunker Church to support Duryea’s brigade of Rickett’s division that is holding on to Dunker Church. D.H. Hill sends his infantry against that position, but are unable to dislodge the blue units there. Greene’s division, supported by XII corps artillery keeps up the pressure on D.H. Hill to prevent a stronger counter-attack. Note the lighter green units of Hood’s division from Longstreet’s corps moving through Lawton’s position. They are successfully driving Meade back, but because this formation is from Longstreet’s corps instead of Jackson’s corps they activate on a different AM. Stacking rules are interesting, in that infantry units of different formations may not stack together, but may move through each other at the cost of +1MP. Artillery may stack with one other unit of any type and any formation, but being in different formations and different commands makes it difficult for them to work together.
Because there was only one I corps activation this turn, the US took a very passive turn with I corps and let Mansfield’s XII corps put the pressure on D.H. Hill. So far, they are not making much of a dent.
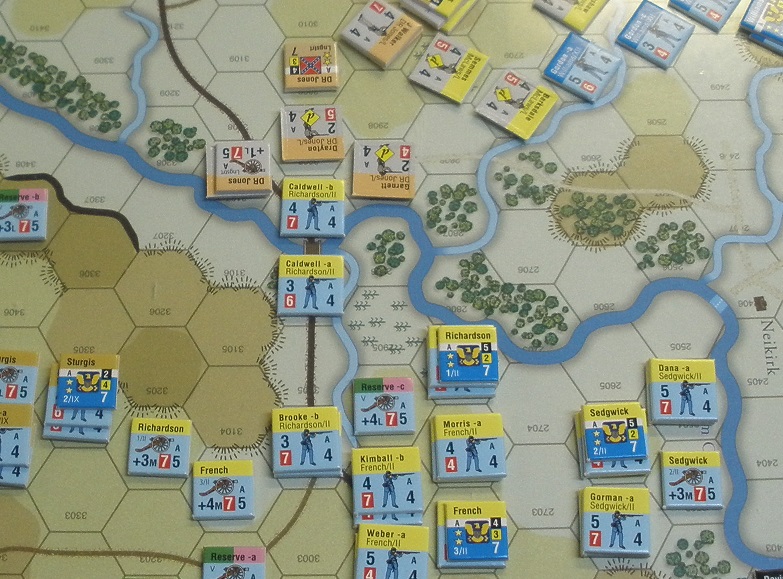
With the one II corps activation, Richardson’s division tests the confederate defense at the bridge across the river. Caldwell survives the defensive fire in good order, then successfully pushes the defending unit away from the bridge and advances the ‘top’ unit in the stack (the forward unit) into the hex. D.R. Jones attempts a counter-attack when one of Longstreet’s AMs is drawn, and rolls low…a bad thing for them. The attacking units are disordered, but none of them retreat. Because they are adjacent (in contact) with the US unit, they may not attempt to rally. They cannot charge if disordered, so they will have to withdraw to reform, but Anderson’s division is just up the road and moving up to replace them.
With the bridge over the river being contested, Sumner orders his other two divisions, Sedgwick and French, to cross at the ford by the Niekirk house and attempt to attack the confederate position behind the bridge from the flank. It will take awhile for them to get into position, so the artillery of Richardson and French’s divisions are detached and move toward the high ground southeast of the bridge where they can ‘fire down’ on the confederate position.
9:30am
Lo and behold, the US rolls well again and gets to add a 5th AM to the pool. This is an easy decision, as we want to put both AMs for I corps and II corps into play to get the flanks of our offensive moving forward. Mansfield will have one activation to keep his corps together and have an opportunity to rally any units that are disordered.
Once again, nothing much happens on the right flank. The forces are evenly matched, for the most part, so the artillery blasts away hoping to disorder the enemy and create an opportunity for the infantry to charge. Disordered units have -1drm when conducting defensive fire and if it fails the attacker could force them to withdraw with an additional disorder result.
However, II corps is able to activate twice and using extended movement (infantry may use 6MP instead of 4MP for extended movement if they come no closer than 3 hexes to an enemy unit) is able to cross the river, deploy with Sedgwick on the right and French on the left and advance against McLaw’s division. Gorman’s brigade of Sedgwick’s division leads the attack and drives the defending brigade away to cross the creek.
At the bridge over the Antietam D.R. Jones confederate division has disengaged and pulled back to the high ground while Anderson’s division has taken up their position to contest Richardson’s control of the bridge. With no good order units to back them up, the confederate forces again decline to charge the US forces as the odds are not in their favor and a failed attack would be a disaster.
10:15am
US does not get to add any activation markers for the turn, so still has 5AM. We again go with both markers for the I corps and II corps and one marker for Mansfield’s XII corps.

Edwin (Bull) Sumner’s II corps rolls forward! Sedgwick’s division drives McLaws weak division back toward the Sunken Road. Dana’s brigade actually charges into the Sunken Road. Most of McLaws division is either disordered or withdraws from the battle. D.R. Jones barely has time to rally a couple of brigades before Sedgwick’s division is upon them. The confederate line is close to collapse here, which would open the road to Sharpsburg.
French’s division drives into the left flank of Anderson’s division and drives them south, away from the bridge. II corps artillery on the high ground is able to “fire down” on the enemy position and disorder units so the infantry can more readily push them back. Anderson is the only confederate division in reasonably good order between the US attack and Sharpsburg.
With the rebels now driven away from the bridge, Richardson’s division is able to cross and form up as a reserve behind the other two divisions.
With Longstreet’s position in front of the town crumbling, Jackson’s corps attempts to withdraw to the south. D.H. Hill, after conducting a stubborn defense of the high ground, sees the US II corps coming up on his flank and pulls back to form a defensive line facing East. Greene’s division of US XII corps presses forward in pursuit. Lawton’s division, with some help from Hood’s division of Longstreet’s corps tries to hold their position long enough for Jones division and Stuart’s cavalry to disengage. Hooker’s entire I corps attempts to maintain contact with the enemy and look for opportunities to disorder and eliminate the retreating units.
What’s all this talk about Disordered Units?
All units start the scenario or enter play in ‘good order’. They may become disordered by taking artillery fire or when involved in ‘charge’ combat through defensive fire or as a result of a charge. Disordered units are flipped to their reverse side and have a lower cohesion, suffer defensive fire penalties and may not conduct a charge. When a disordered unit is again disordered it is removed to the Withdrawn box.
At the end of each formations activation, each unit of that formation that neither moved nor is adjacent to an enemy unit may attempt to rally by rolling a d10 equal to or less than its disordered cohesion value. If successful it is flipped to its Good Order side. If not, it remains disordered.
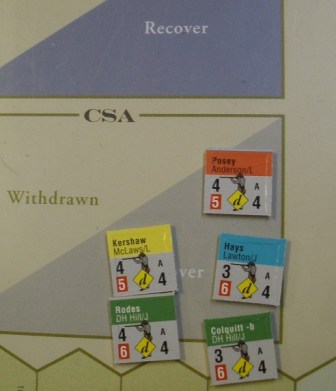
At the end of each turn, each unit in the Recover box takes a cohesion check and if successful is returned to the play area in command range of its leader and at least 3 hexes away from any enemy unit. If unsuccessful it is permanently removed from play. When this is complete all units that were placed in the Withdrawn box that turn are moved to the Recover box.
11:00am
At this point I realized that I could have added the two AMs for Hunt’s artillery reserve to my AM pool every turn. These three artillery units are part of V corps, which is not allowed across Antietam Creek until the USA has 6VPs. Any turn where V corps AMs are not used the USA player may add the two AMs of Hays artillery reserve to the pool and have them conduct artillery fire when the AM is drawn. One of these units is still in range of the enemy, so will add them the pool along with a I corps, 2x II corps, VI corps and XII corps AMs. With 5AMs I activate each of the corps on the right flank once, II corps twice in the center and get the fresh VI corps into motion to come to the support of II corps attack.
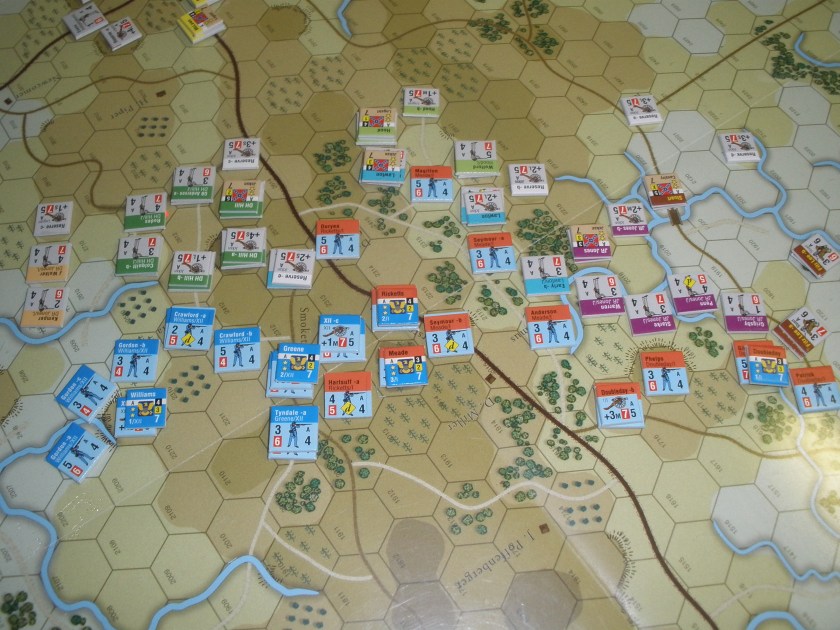
The confederate rally die rolls improve and several units disordered earlier in the battle return to the front. The left flank pulls back a bit to regroup with Stuart’s cavalry possibly heading into a reserve position near Sharpsburg. Jones division has a lot of artillery support and is able to keep Doubleday’s division in check along the creek. Meade faces off against Lawton’s reformed division being more concerned with protecting Doubleday’s flank. Rickett’s division gets hammered by Hood’s division and has to pull back with only one good order unit left. The Dunker Church remains in USA control with XII corps artillery in occupation of the high ground that D.H. Hill’s division had to give up to face the attack from II corps.
II corps divisions of Sedgwick and Richardson continue to press against the three confederate divisions of D.H. Hill, D.R. Jones and McLaws attempting to remain in contact with their disordered units and keep them from rallying. The Sunken road has been cleared and Richardson is ordered to take the high ground the McLaws division leader unit currently occupies. French’s division is in position on the left of the corps and prepares to advance against Anderson’s division in support of Richardson.
VI corps enters and moves to the support of II corps.
11:45am
I corps condition requires me to activate them twice this turn, so 2x I corps and 2X II corps AMs go into the pool. I add a VI corps AM to continue their advance to the center. Mansfields XII corps is being squeezed out of the battle, but if I can shift I corps to the right more maybe I can make room for them to contribute. Their artillery is valuable and I hate not being able to use it. What I really need is a 6th AM, but even with USA control of two of the spaces that add a drm (The Dunker Church and Sunken Road) I am still at 5AMs.
Hooker’s I corps stays in contact with the 3 confederate divisions in front of him, but is unable to make any progress. Meade’s division is solid in the center,but Doubleday’s division is under heavy pressure from DR Jones artillery and Rickett’s division can make no progress against Hood’s division. I will need to shift Rickett’s division into a position behind the other two to support them and have Mansfield’s XII corps take up the battle with Hood. I just don’t have enough AMs available to activate everyone.
The confederate player won the initiative and managed to insert Stuart’s cavalry to support Anderson’s division in front of the II corps advance. French’s division is not one of the better USA formations (low cohesion numbers) and has stalled with most of the division disordered. Hays artillery has been hitting the flank of the confederate position and has keep them from organizing any advance. II corps artillery attempted to move to rejoin the II corps ground units but the bridge over Antietam creek is packed with VI corps units. A better idea would have been to move them along the ridge to continue bombardment from the heights.
12:30pm
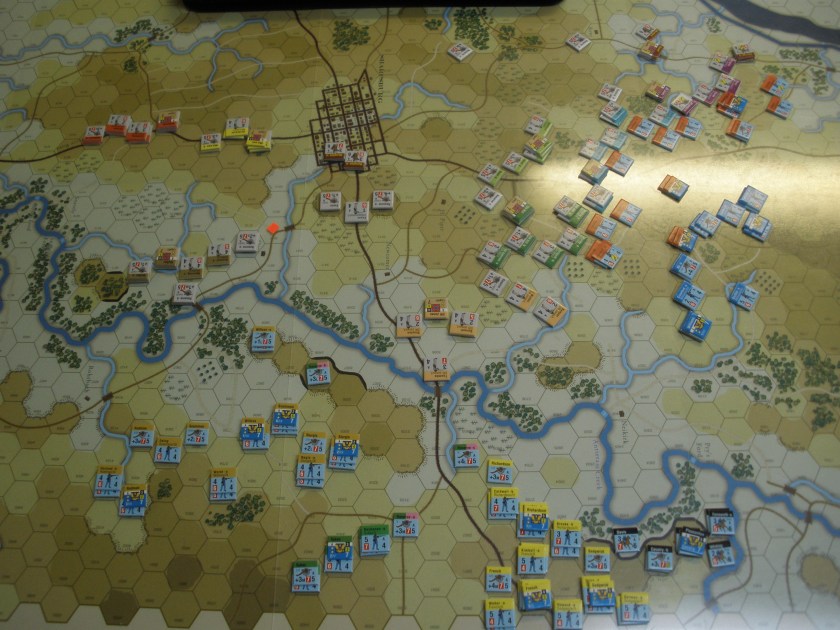
At the start of the 11:45am turn the USA rolled well enough to add a 6th AM to the pool for the turn. This event allows McClellan to add AMs from Burnside’s IX corps to the pool. The question is…does the Union want to do this and threaten the confederate right flank, or continue to concentrate their attack in the center by using both AMs from the corps attacking the center? We shall see. The nature of the game will change with Burnside’s bridge now coming into play.
The three hexes with orange squares on them are worth 2VP each to the Union if under their control, and each hex of Sharpsburg is worth another 1VP. There are a couple more 2VP hexes behind the confederate line to the top left of this picture. The Union needs 6VP to allow the V corps to cross Antietam creek, but things are already a bit crowded. They need at least 8VP at the end of the battle for a minor victory.
***************************************************
11:45am to 2:45pm (4 turns = 3 hours)
The USA was limited to 6AMs each turn, which limited the offensive options. The CSA is able to activate all of their units twice each turn with their 6AMs, but the USA had to alter their choice of AMs each turn to either react to threats or press the attack. It become clear that the best option was to focus 4 of the AMs in one area so two corps would activate twice in the turn, and use the other 2AMs to activate corps that were hard pressed and needed the rally phase to reorganize men.
II corps had advanced to the outskirts of Sharpsburg by 12:30pm, but the US player had to use some AMs to push in other areas and bring up VI corps to support the attack. This allowed the CSA player to pinch off the head of the advance and reconstruct the defense in front of the town. By 2:00pm DR Jones, McLaws and Anderson’s divisions of Longstreets corps had a solid defensive line in front of the Bull Sumner’s II corps, while Jackson’s divison of DH Hill was blocking the advance of VI corps and XII corps. The confederate line, while solid, was not deep.
Mighty Joe Hooker and his I corps did yeoman’s work on the USA right flank, keeping the other three divisions of Jackson’s corps engaged defending the Northern approach to the town of Sharpsburg. By 2:45pm the JR Jones division had pulled back from Doubleday’s division, but Ricket’s division kept pressing forward on the left to maintain contact with the advancing XII corps. The USA had used activations to get advance the VI corps and XII corps between the I corps and II corps and the powerful artillery of the XII corps was now on the high ground and able to start firing down on the CSA forces of DH Hill, which were going to be the focus of the USA advance.
2:45pm to 5:45pm
The USA now had four successful rolls for adding AMs to the pool, increasing his total to 10AMs for the 5:00pm turn. This increased activity proved to be too much for the confederate defenses, as any units that were disorded in an early attack would be disordered and removed from the action before they could withdraw and rally. As the number of CSA units dwindled, they dared not even withdraw and held their ground until sent to the withdrawn box. But with so many activations the combined attack of II, VI and XII corps pushed back DH Hill with the Federal forces eventually advancing almost uncontested into Sharpsburg.
At 3:30pm the three USA corps were ready and all 6 of their AMs went into the pool. This would continue through the next two turns as well and the CSA forces were simply overrun. The USA player had to deal with massive traffic issues, as units that were disordered had to be moved back out of enemy ZOC to later rally, while new troops moved up to take their place and continue the attack. For the most part this meant keeping a space between the front line and the reserve with space of all this movement to take place.
The confederate side, not having the luxury of a ready reserve to fill gaps, soon found the USA forces pushing through the gaps and getting their frontal ZOC behind the front line. This produced the unhappy result that any unit that was required to retreat was automatically disordered and possibly withdrawn if it suffered an additional disorder result from the combat result die roll. At the end of the 5:30pm the CSA conceded, as there was no chance of retaking any of the Sharpsburg hexes from the horde of Federal troops there.
Burnside’s Bridge 11:45am to 5:45pm
It played very little part in the actual battle result, but Burnside’s corps did keep some of Jackson’s artillery and a few confederate ground units busy along the river. This time the confederates enjoyed the high ground for their artillery and were able to ‘fire down’ on any USA units that attempted to cross the river. A single ground unit behind the bridge and fords with an artillery unit and an other infantry unit backing it up was sufficient to hold the attacker at bay. The big break came when the main confederate battery fired upon some of Burnside’s artillery and the counter-battery fire disordered the confederate artillery! A couple of union units made it across the bridge and one of the fords to disrupt the defense and allow reinforcements to eventually get over the bridge.
All in all, a fun game with many challenges for both sides. I have discussed overall strategy here with some of the tactical considerations I had to deal with along the way to make progress. It takes awhile to get all of the rules in hand, and the TEM will be consulted often, but the use of AMs to activate only a handful of units at a time and dealing with a very narrow area of the front makes it more than manageable. A key consideration for both sides is keeping their formations well organized to exploit opportunity when it appears. Many artillery attacks will produce no result, but the key is to have the ground troops ready to attack when they are successful, or have a reserve ready to fill the gap if you troops have a bad result.