By Harvey Mossman

Soviet Initial Strategies
Academy Games’ Strike of the Eagle (Designers: Robert Zak, Brian Bennett and Uwe Eickert) is so challenging and elegantly designed that it has quickly joined The Boardgaming Life’s top 10 desert island games. In fact, it is in the top five of my exclusive list. Nuanced but straightforward rules provide exceptional challenges for both players and the contest is never a foregone conclusion. This article will propose one opening Soviet strategy. I will not claim that this is the best or most efficient strategy; however it is designed to wrest control of the initiative from the Polish player, reverse the initial Soviet deficit in victory points and unhinge the Polish Northern front.
The Soviet commanders of the Northern and Southern Front face completely opposite situations. In the North, the Soviets must take the offensive and break the fortified the Berezina River line in an effort to push through towards Warsaw and end the war. In the South the Soviets are desperately trying to hold before a Polish onslaught until either reinforcements arrive or success on the northern front unhinges the Polish lines forcing them to abort their offensive. Let’s first look at the balance of forces available to each player.
Soviet Northern Front Strategy
On the Northern Front the Soviets have 12 infantry divisions totaling 34 infantry strength points along with one cavalry division worth 3 strength points for a total of 37 strength points. Additionally, by the end of the first round, six more infantry divisions and one cavalry brigade enter as reinforcements bringing 15 more strength points into play for a total of 52 Soviet strength points. The Polish player has 8 infantry divisions on the frontline totaling 23 strength points and one Calvary brigade worth 2 strength points. In rear areas he has another five infantry divisions for a total of 10 strength points and a cavalry brigade at 2 strength points. However, these units are not immediately available at the front and will take time to move into positions where their presence can be felt. Therefore, the Soviets have a numerical advantage in in both number of units and total combat value yet they can still be stymied by a tenacious Polish defense based on numerous fortified cities. How can the Soviet player utilize this preponderance of strength to crack the Polish line without suffering enormous casualties?
It is said that armchair generals discuss numbers, strategy and tactics while real generals talk logistics. Indeed, maneuvering against the enemy’s lines of supply in Strike of the Eagle is imperative in devising a successful strategy that will avoid excessive losses. Remember that infantry must trace three spaces and cavalry units five spaces to a Key City which in turn must trace a clear line to Warsaw for the Poles or the Soviet Eastern links for the Russians. Units out of supply at the end of an operation phase each suffer harsh penalties, losing 1 strength point and restricting their choice of orders to Move Out, Defend, or Withdraw. Moreover, units that are eliminated due to lack of supply yield 1 victory point to your opponent and can never be rebuilt for the rest of the game. Therefore, threatening your opponent’s supply line forces him to react to your moves.
On the Northern Front, the Polish defense is based on a line of fortified cities behind the Berezina River thereby making frontal assaults costly. The fortifications reduce the defenders losses by one and negate friendly attempts to outflank, The Soviets will be hard-pressed to take this position by frontal assault as they will often only obtain drawn combat results requiring the attacker to retreat. Therefore, it is best to look for areas where this line can be outflanked. The first axis of advance should aim at capturing the city of Vorenech. Here you can bring in units from Polotsk and the two strong infantry divisions from Beshenkovichi to attack the 2SP Byelorussian infantry division. It is often a good idea to force march the cavalry division from Vitebsk into this target city in the hopes of pinning the Polish unit so that it can be destroyed. Remember, the Polish player starts with the initiative and could very well retreat this unit by force march before you get a chance to attack. Therefore, if the Soviet player is allowed to execute his forced marches first, pin the Byelorussian unit with your cavalry. The Byelorussian unit is extremely exposed and no Polish units can reinforce it on the first operations phase. The Soviets will be attacking with a total strength of 11. With a 3 combat modifier card (either picked from the deck or a 2 combat modifier card played from your hand) your attack strength will be 13 causing 4 Polish losses. Of course Polish battle card play may modify Polish or Soviet losses and placement of a Defend order could further reduce Polish losses but the likely outcome is the elimination of the Byelorussian infantry division for one Soviet step loss. This victory achieves the first breakthrough of the Polish defensive line. On the next operation phase the Russians will have 3 infantry divisions and a strong cavalry division in Vorenech ready to drive straight ahead towards Hylbokaye, an important Key City for each side. If the Polish player does not pull out the infantry divisions in Druya and Disna, the capture of Hylbokaye will cut their supply line. (although not stated in the rules, we assume that Polish units cannot trace through neutral Lithuania). To adequately defend Hylbokaye against this Soviet juggernaut, rear area Polish units will have to be moved forward or the 4 strength infantry division in Berezino will have to react leaving a hole in the Polish line. No matter how the Polish player reacts this completely unhinges the left flank of his fortified line. Since Soviet reinforcements come in at Yartsevo, they can easily be railed forward to further pressure the extreme northern part of the Polish line.
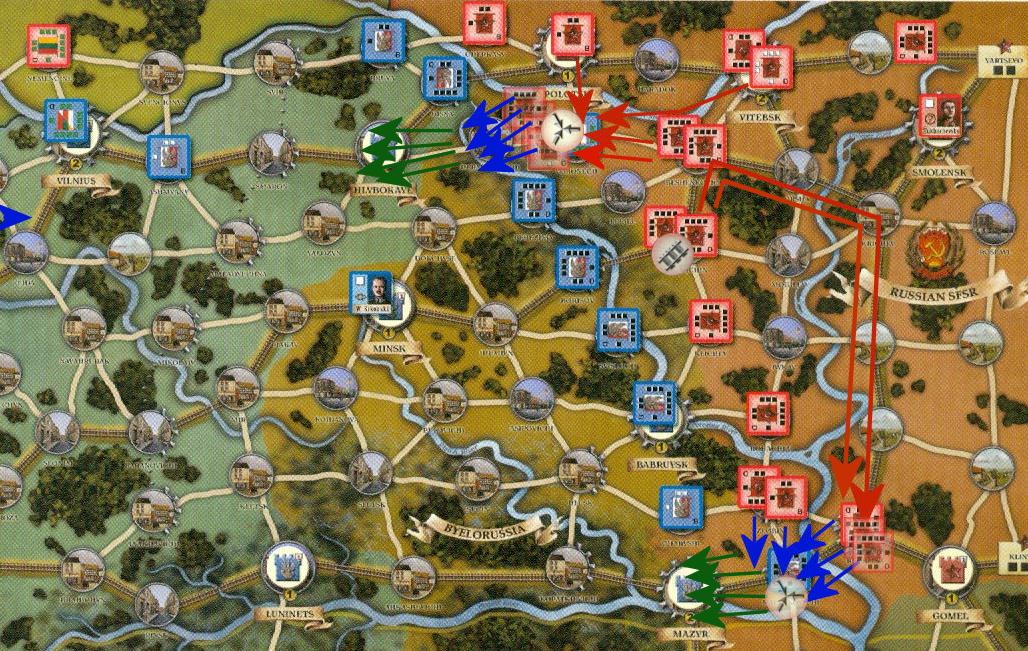
While the Soviet player unhinges the northern flank the Soviets can apply devastating pressure at the opposite end of the Polish Northern Front by driving on the key city of Mazyr. As we shall soon see, when we turn to Southern Front strategies, capture of Mazyr helps the Southern Front Soviet defend against any advances of Polish units into the territory formed by the confluence of the Prypiat River and the Dnieper River.
In order for this attack to materialize the first step must be to capture Kalenkovichi. The weakness of Soviet forces in the area makes this a difficult problem. In the first operation phase the two 4SP divisions in Tolochin must be moved by rail down to Rechitsa. A Reorganize order can be used on the infantry division that starts in Rechitsa if the Soviets have enough orders to spare. These units are now poised to strike in strength on the second operation phase with a Move To order on Kalenkovichi resulting in a flank attack which negates the fortification. The combat would include the three divisions from Rechitsa totaling at minimum 10 SP’s and two divisions from Zlobin for another 4 SP’s. Since this attack will not materialize until the second operations phase, it is conceivable that the Belarusian infantry division at Brest could have railed up to Kalenkovichi to aid the defense. If the Polish Calvary brigade in Charyshi tries to move and timely reinforce, the Poles will not have enough units to cover their southern flank and a hole will be created where the Soviets can penetrate into the Polish rear areas. Assuming no cavalry reinforcements but the possibility of the Belarusian unit being present, the combat would entail 14 infantry SP’s versus 4 Polish infantry SP’s possibly underneath a Defend order. The Defend order would negate 1 strength point loss caused by your 14 strength points but here is where it would be worthwhile to use a combat modifier card value of three from your hand which would then cause 4 Polish losses (5 for your combat strength and combat modifier -1 for the defend order) while the Polish are likely to inflict only one or two strength point losses. This results in the elimination of at least one and possibly both Polish units leaving Mazyr weekly defended while concentrated Soviet units poise to attack on subsequent operations phase.
With a strong push and average Battle Card and Combat Modifier card play, Mazyr should fall in the third operation phase. In addition, any Polish units trying to defend this area should have suffered substantial losses opening up the right flank of the Polish Northern Front. The capture of Mazyr also has several other important consequences. First it provides a victory point and a forward Key City from which the Soviets can draw supplies as they move along the northern Prypiat River. Ultimately their objective will be the key city of Luminets or an encirclement of the center part of the Polish line. Secondly, any Polish units operating on the right flank of the Soviet’s Southern Front will have to draw their supply from Rivne until Berdychiv is captured. This forces the Polish player to advance frontally against the Soviet forces and limits the opportunity to outflank the Soviet Southern Front line. Finally, if the Polish southern front is advancing, Mazyr provides a River crossing where Northern Front Soviet units can threaten the flank and rear areas of the Southern Front Polish line.
In summary, this northern Soviet front strategy attempts to outflank the strong central fortified Polish River line by unhinging the Polish extreme left and right flanks. It provides for the potential capture of two important Keys Cities garnering 2 Victory Points and the possibility of other Victory Points for a Great Victory in the battles generated. Since the Polish player starts with two victory points this quickly changes the momentum of the game. Additionally, victories in these opening battles should shift the initiative on the Northern Front to the Soviet player.
Soviet Southern Front Strategy
The strategic situation on the Soviet Southern Front is quite dire indeed. The Soviets have 10 infantry divisions and one infantry brigade for a total of 23 strength points as well as one cavalry division with 2 strength points. There are Garrison markers in each of the key cities on the southern front. The Polish player has 11 infantry divisions totaling 31 strength points, 3 cavalry divisions and the leader totaling 8 cavalry strength points. This means that the Polish player has a 39 to 25 strength point advantage and is more maneuverable due to the three Calvary divisions. Fortunately, the Soviet player only has two important cities to defend. Kiev must not fall or you will yield six victory points (two plus another four bonus victory points). Additionally, if Polish units crossed the Dnieper River, they may be able to advance on Gomel threatening the Soviet Northern Front supply lines. Berdychiv must be held if possible to prevent its use by Polish units to draw supply as they advance on Kiev. However, it sits in an exposed position with no direct retreat path towards Kiev thereby requiring that the cities of Koziatyn and Zytomir be kept open so that defenders in Berdychiv can eventually retreat. Otherwise, Berdychiv becomes a giant trap for Soviet units and a treasure trove for Polish victory points when Soviet units are eliminated for lack of retreat path. Additionally, as a road hub without fortifications, Berdychiv will likely be subjected to multiple flank attacks. Finally, the Poles have strong forces within easy striking range of Berdychiv. The overriding dilemma for the Soviets is how long they defend Berdychiv before their entire army is jeopardized. If the Soviet Army is destroyed in front of Berdychiv, a successful defense of Kiev is unlikely.
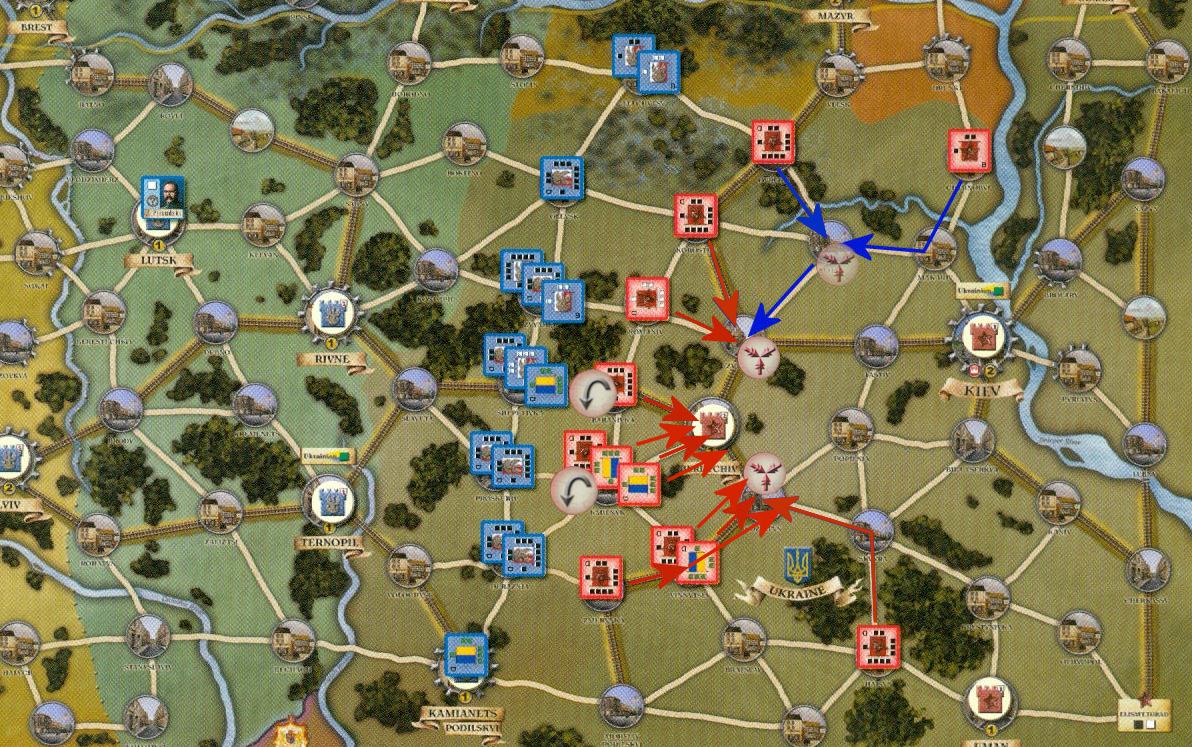
Red arrows indicate first operation phase moves, blue arrows second operation phase moves in the first round. Ghosted orders represent orders to be executed on the second operation phase.
There are so many possible strategies available to the Polish player when his offensive is launched, I can only give general guidelines as to an appropriate Soviet defense. First and foremost, the Soviet player must pick either Zytomyr or Koziatyn to defend resolutely. One of the cities will provide the retreat path when it is time to abandon Berdychiv. Establishing forces in Zytomyr, Berdychiv and Koziatyn allow some interesting tactical maneuvers to allay the effects of attrition on your forces and negate the multiple outflanking attacks on each of these cities. The Soviet player should initially place Withdraw orders on his frontline units as shown in the illustration above. The infantry unit in Korotsen and the cavalry unit in Romaniv will attempt a Forced March to Zytomir if not pinned. All other units will withdraw to Berdychiv except the infantry division in Zmerynka which will force March through Vinnytsia in an attempt to get to Koziatyn. Likewise the infantry division in Haisyn should end a forced march in Koziatyn. Once this line is achieved, a Defend order should be placed on Berdychiv and Zytomir with a Forced March To order. This Force March order allows units to exchange places between these two cities acting as support units thereby reinforcing the most threatened city and negating potential flank attack penalties. If any other orders are available consideration should be given to Force March the infantry brigade from Chernobyl to Fastiv to Koziatyn.
By the third operations phase, the Poles will be poised to attack in strength all along the Zytomir-Berdychiv-Koziatyn line. This is the moment of truth for the Soviet player. He must decide whether he can win the battle of Berdychiv as well as the battle for either Zytomir or Koziatyn. If he decides to stay and fight, Defend orders are appropriate and once again a judiciously placed Force March To order to shuffle units between these three cities to act as supporting units may be appropriate. On the third operation phase, much-needed reinforcements arrive in Elizavetgrad and, if possible they should execute a Rail Movement to either Zytomir or Koziatyn while Stalin reorganizes one of the units. If you have successfully held Berdychiv until the beginning of the 4th operations phase without losing too many units, you have achieved your objective. Hopefully by this time your comrade on the Northern Front has cracked the Polish defensive line and captured Mazyr. You now have the option of falling back on Kiev while awaiting the powerful 1st Cavalry Army to arrive. If the southern front Poles advance, they will be threatened by Soviet Northern Front units attacking south from Mazyr.
If possible, use a card for the 5th operations phase to accumulate reinforcement cubes. By Round 2, you should start to feel confident about holding Kiev and possibly launching a counterattack as reinforcements accumulate on your front. The Southern Front Polish player will eventually be forced to retreat as their Northern Front collapses. In Round 2 the Soviet player should cautiously pursue and use cards to accumulate reinforcement cubes so your Army is up to strength when the Polish retreat ends at the Curzon Line.
Summary
Strike of the Eagle is a game of maneuver and bluff augmented by sound strategy. It is a game where both players will have the opportunity to aggressively attack and tenaciously defend. While the strategies I have put forth can be adversely affected by card play and the fog of war, they at least provide a sound basis on which to develop your campaign. I am sure other and perhaps superior opening strategies will be discovered. The Boardgaming Life would like to hear about them. Please feel free to write us and we would be happy to publish the strategies that you have tried.
Feedback
However, I found one risky move in your strategy on Southern Front ☺
Moving 2SP division from Haisyn opens a gap which may be exploited in future phases by the opponent to flank attacks Koziatyn group, enter the rears and
take Uman. I think it would be better to leave it there (as reserve) and even Reinforce it (if able) with Reorganize order. That’s my subjective opinion.
Best regards,
Robert Zak, Designer
With regards to the risky move, It is really not that risky. First, the 2 SP Infantry in Kamianets will take 2 Forced marches to get to Uman or to
flank the Koziatyn group which means they don’t get there until Round 3. That is assuming the Poles have enough orders to move it each turn and if they
are spending orders on that then they are not using an order in the more critical central sector. If that 2 SP Division dashes for Uman it will get there
as a Force March on Round two with very little chance of taking the city due to being halved from the Force march. If other Polish units are diverted there
they will arrive on Round 3. By that time the Polish Northern Front should have been unhinged by Soviet attack as outlined by the article. Also, Soviet
reinforcements arrive in Elizabethgrad adjacent to Uman any nowcan quickly counterattack or at least threaten to.
Good Strike of the Eagle play is based on knowing the logistics and bluffing your opponent into making poor decisions. If the Poles capture Uman and use that to
draw supply for their attack towards Kiev, they are only really supplied to attack Kiev from the South and won’t reach Kiev until Round 5 at the earliest. By this
time the Polish Northern Front should be in full retreat and significant Soviet reinforcements should be arriving.
In summary, Uman is not critical to hold and if this strategy baits the Poles to go South then they are diverting forces from their main drive towards Kiev. Once
the Soviet Cavalry Corps arrives and the Polish Northern Front collapses, it is very hard for the Polish Southern Front Commander to continue his drive on Kiev.
In effect this strategy baits the Poles to go around south thereby drawing off some pressure in the center and right flank of the Soviet line. The center of Soviet
line is eventually going to retreat to Kiev anyhow but the longer you delay the Poles, the more likely you can hold Kiev.
Great to hear from you, and thanks for designing such an excellent game!
-Harvey Mossman
