Review of Vance Von Borries’s Slouch Hats and Egg Shells

Overview
Slouch Hats and Eggshells, designed by Vance von Borries and published by Legion Wargames, is a war board game that addresses the World War II Allied (Free French, British, and Australian) campaign to reclaim Syria and Lebanon from the Axis forces (Vichy French, French Colonial, and German). It is a standard hex and counter game designed for two players. The unit counters represent battalion and regimental sized formations. The map scale is 10 miles per hex, and the time scale is 10 days per game turn. The historical campaign lasted from early June to mid-July 1941 which translates into approximately 5 game turns, although game play can extend into August (max of 8 game turns).
The historical setting, amply described on the back of the game box as well as in the rule book, describes the campaign as being launched on the insistence of Free French leader General Charles de Gaulle, who demanded the seizure of Syria from the clutches of the hated Vichy French. The Allies believed that the Vichy French in Syria would offer minimal resistance, their defense collapsing like an “eggshell”. They deluded themselves into thinking that the mere sight of the Australian “slouch hat” would be sufficient to evoke surrender from the enemy. This proved to be a false assumption.
If you’re not familiar with this campaign, join the crowd. Slouch Hats and Egg Shells immediately attracted my attention because it covered a little known (by me, anyway) World War II campaign that also appeared to be an interesting situation. I find the interactive learning experience provided by war games to be the perfect educational tool, so I was looking forward to getting Slouch Hats & Eggshells on my gaming table.
Setting Up
Unfortunately, Slouch Hats and I got off to a rocky start, as I found the rules to be confusing and the setup instructions less than perfect. If there’s one thing I find frustrating, it’s ambiguous or incorrect setup instructions. I just want to get started playing the game! If I have to spend two minutes trying to figure out what the setup instructions are telling me, I get aggravated. There are two setup sheets; one for the Allies and one for the Axis. If you just focus on the setup sheets and forget about the setup hexes on the actual counters, you’ll be much better off. Most Axis units have setup hexes printed directly on the counter, but a few do not. And one has an incorrect setup hex number. Also the setup cards, in a few places, direct you to place units in the “Available Box”. There is no such thing as an “Available Box”! Minor points, but irritating nonetheless.
So I went to the ConSimWorld Forum for this game and posted my questions there. The publisher, Legion Wargames, did their best to address my questions. The designer…. eehhhh, not so much.
I don’t mean to imply that the setup or rules problems presented an insurmountable intellectual challenge; I’m just saying they were annoying.
Armed with CSW Forum responses and my own best guesses, I completed the setup and was ready to actually play the game. At this point, I have to say that I was really not enthusiastic about playing. After a quick perusal of the rules (and more questions for the CSW forum), it seemed to me to be a rather dull and dated game system (think Avalon Hill’s 1960s title, Afrika Korps). The combat charts show your basic Defender Eliminated (DE), Attacker Eliminated (AE), etc., combat result possibilities. However the detail level of the supply rules seemed way out of place with the rest of the game. This leads me to the next section: the Rules.
The Rulebook
I’m hopeful that someday an official errata list will be published. I think it would benefit anyone who wants to play the game. While the rules (other than the Supply rules) appear simple and straightforward, there are a number of mistakes, inconsistencies and omissions (again, see my CSW posts for more detail). The Designer Notes do explain that some of the rules were included merely to remain consistent with Rommel’s War, another game that apparently pioneered the game system used in Slouch Hats & Eggshells, and are of “limited utility” in this game. However, the problems I found have nothing to do with the inapplicable “Rommel’s War” rules.
I don’t want to beat the subject to death, but suffice it to say that I found some of the rules (particularly the Supply rules) difficult to follow. During a game turn’s Supply Status Phase, you must demonstrate General Supply which requires your units to be able to trace a Supply Route to a friendly Supply Source. This simply demonstrates an ability to reach units with various supplies. Next, you must expend Supply Points to provide Movement Supply to all motorized and air units. This represents fuel deliveries to units that require it. Finally, you must expend Supply Points to provide Combat Supply to all units that will engage in Combat in the upcoming Combat Phase, which I assume represents ammo deliveries.
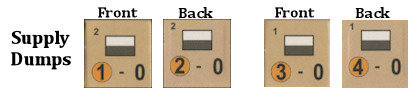
The actual components of your supply net are Supply Dumps, represented by physical unit counters, and Supply Points, which are abstract. You need to marry up the two in order to have any real logistical capability. Supply Dumps are the physical containers for the Supply Points. There are also Mobile Supply Units (MSU) that perform the same function as Supply Dumps with the additional capability of being mobile. Supply Dumps can be broken down or combined into different denominations (i.e. two 1-point Dumps can be combined into a single 2-point Dump) and are there are many situations where you must “make change” for a Supply Dump.
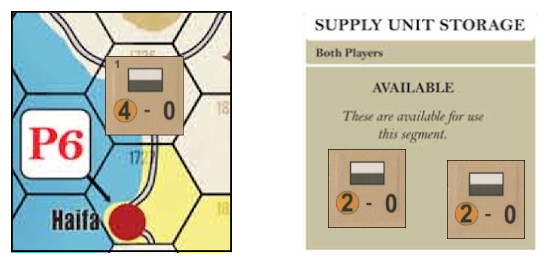
For example, the Allies start off with a 4-point Dump on the map, containing 4 supply points, and two 2-point Dumps in the “Available” section of the “Supply Unit Storage Box”, that could potentially house 2 supply points each. At that moment, they have 8 points of actual or potential capacity. Let’s assume that they use 2 Supply Points for movement/combat. They now have to remove the 4-point Dump counter (because it only has 3- and 4-point sides) from the map and replace it with one of the available 2-point Dump counters (which has 1- and 2-point sides). The 4-point Dump counter goes into the “Used This Segment” section of the “Supply Unit Storage Box”, and is unavailable until the following turn Segment. The 2-point “change” Dump is taken from the “Available” section and placed on the map in the hex where the 4-point Dump was located.

One of the challenges of the game is management of Supply Dumps to ensure that potential capacity is not wasted by making sure you always have the “correct change” available as your Supply Dumps are depleted of Supply Points. In the example above, if the Allied player expended 2 Supply Points from a 4-point Dump, and there was no available 2-point Dump to “make change”, the 4-point Dump would still be removed and the remaining 2 Supply Points lost. This is all by design, as a quick perusal of the rules, designer notes, and designer’s posts on ConSimWorld will confirm.
To compound the problem, next turn they can re-create a 3-point Dump, using Supply Point replacements, but new Allied Supply Dumps have to be created in the Middle East or Iraq Holding Boxes (although there is some confusion about this rule; see the CSW posts). Now you’re faced with the problem of how to transport the Supply Dumps back on to the map, where they can actually be used! The Allies do not (and will not during the course of the game) have transport capability to move anything larger than a 2-point Dump in one operation. So, you have to break down the 3-point Dump into 1- and/or 2-point Dumps and transport the smaller denomination Dumps. It’s a lot of fiddly change-making that doesn’t make a lot sense. It seems like a pointless logistics exercise. But, in all fairness, I’ve never been Quartermaster of an army in the desert…
The Air and Naval Transport, Movement, Combat, and Air Power sections of the rules are mostly coherent and easily followed (after a few plays). I thought the Replacements section drifted a bit toward the “fiddly” again, but I was able to get the gist and it did not impede play. But it still troubles me that the Supply rules are so out of step in their fiddliness and complexity. I may not be the sharpest knife in the drawer, but I play many other games with hefty rule sets (Vietnam, Gulf Strike, Pacific War, Central America, etc.), and normally don’t have this much trouble deciphering the processes. Again, see my ConSimWorld forum posts and make up your own mind.
So, as I said earlier, it was an unhappy introduction to Slouch Hats & Eggshells. But I resolved to give the game a few play-throughs before passing judgment.
During my second play-through, the imaginary light bulb over my head finally started glowing, and my patience was rewarded…
Playing the Game
Overview
The Allied player begins the game with most units off-board, in the “Middle East Holding Box”. He is the invader/aggressor in this game, so it’s up to him to come up with a plan to overwhelm the enemy defenses. The Axis starting positions are predetermined and static, so he does not have a lot of opportunity for varying his initial defensive configuration. But once the game begins, both players are free to maneuver as they see fit. The initial British invasion comes from the south, out of Palestine or Trans-Jordan, but subsequent reinforcements will open a new front emanating from Iraq in the east. So, although the Axis player is basically locked into a defensive role and the Allies an offensive one, both players have lots of options as to how to conduct operations. The tactical situation quickly becomes very fluid and interesting.
Each Game Turn is divided into the following Segments:
- Strategic Segment – Special Events are executed; Reinforcements are placed; Supply Status is checked for all combat units.
- First Axis Operations Segment – Transport, Movement, Combat, Exploitation Movement, and Administrative Phases.
- First Allied Operations Segment – Transport, Movement, Combat, Exploitation Movement, and Administrative Phases.
- Inter-Operational Segment – Both players can convert Supply Dumps to Mobile Supply Units and vice-versa.
- Second Axis Operations Segment – (Same as the first)
- Second Allied Operations Segment – (Same as the first)
- Recovery Segment – Engineering phase, and Victory Determination Phases.
So both players get to Transport, Move and engage in Combat with all of their units twice per Game Turn (supply situation permitting).
The Logistical Balance
As mentioned previously, the Supply rules are onerous, and my concern was that the Allies with their marginally superior logistics situation would simply walk right over the defenders, leading to a game without much replay value. The Allies begin the game with more available supply. They also receive more supply reinforcements during the rest of the game (a 3-1 supply point advantage for turns 2 through 5, and a 4-2 advantage for turns 6, 7 and 8).
Unlike the Allies, whose reinforcements (both combat units and supply) can march or be transported directly from the Middle Eastern Holding Box and Iraq Holding Box onto the game map, the Axis reinforcements in the Greece Holding Box must find air or naval transport to get them into the action on the map. The Axis have air transport capacity to get one single combat unit or Supply Dump from Greece to the main map and naval capacity to transport two combat units and/or Supply Dumps each Operations Segment. Air Transport cannot be interdicted in this game, but Naval Transport most certainly can. The Axis player must roll successfully on the Naval Transport Table for each counter attempting Naval Transport. The Naval Transport Table is structured in such a way that, should the British choose to interdict the Axis naval units with the full might of their fleet, not a single unit or Supply Dump will ever make it into Syria or Lebanon. Meanwhile Allied units are free to fly, march or motor their way across the Lebanese or Syrian borders from bases in Palestine or Iraq. If the Vichy French or Germans want to stop them, they must put boots on the ground directly along the Allied lines of advance.
Sounds pretty grim for the Axis, right? I thought so too, at first. But in addition to the tactical genius of their commander (i.e. you), they have another ace up their sleeve: the Axis Special Events.
Special Events

Unlike many games that have “special events” or “random event chits”, I consider the Special Events in Slouch Hats & Eggshells to be an integral part of the game design, not just ancillary occurrences to provide “flavor” or random-ness(?). The Axis and Allies have 18 possible Special Events each. Some give reinforcements, some provide intelligence, and others add combat bonuses. They illustrate events that did occur, or could have occurred, during the conflict. The variability furnished by 36 total events, and the uncertainty of which ones will occur when, does add a lot of replay value to the board game.
Each Special Event chit contains an Axis Event and an Allied Event. The Axis player can only play the Axis Event and the Allied Player can only play the Allied Event. Each Event has restrictions on when, exactly, it may be played and what happens when it is played.
At the start of the game, both players randomly select Special Event chits; the Allies pick 4 and the Axis pick 3. Starting with Game Turn 2, both players select one each for the duration of the game. After a Special Event is “played”, it is returned to the pool of events and may possibly be selected again. Each player has an insert that describes each of their events in detail. Some Events have a different effect on plays subsequent to the initial play, and that information is listed here as well.
Here are some Axis Special Events that are particularly beneficial to the Axis player:
- Event “M”: Vichy Destroyers – Removes one Allied naval unit after it has been assigned a mission. Gives Axis a chance to sneak a unit through via Naval Transport.
- Event “N”: Vichy Battleship Convoy – Gives Axis an excellent chance of getting two Supply Points and one infantry replacement point through to the map. Also prevents Allied commando amphibious raids for the turn.
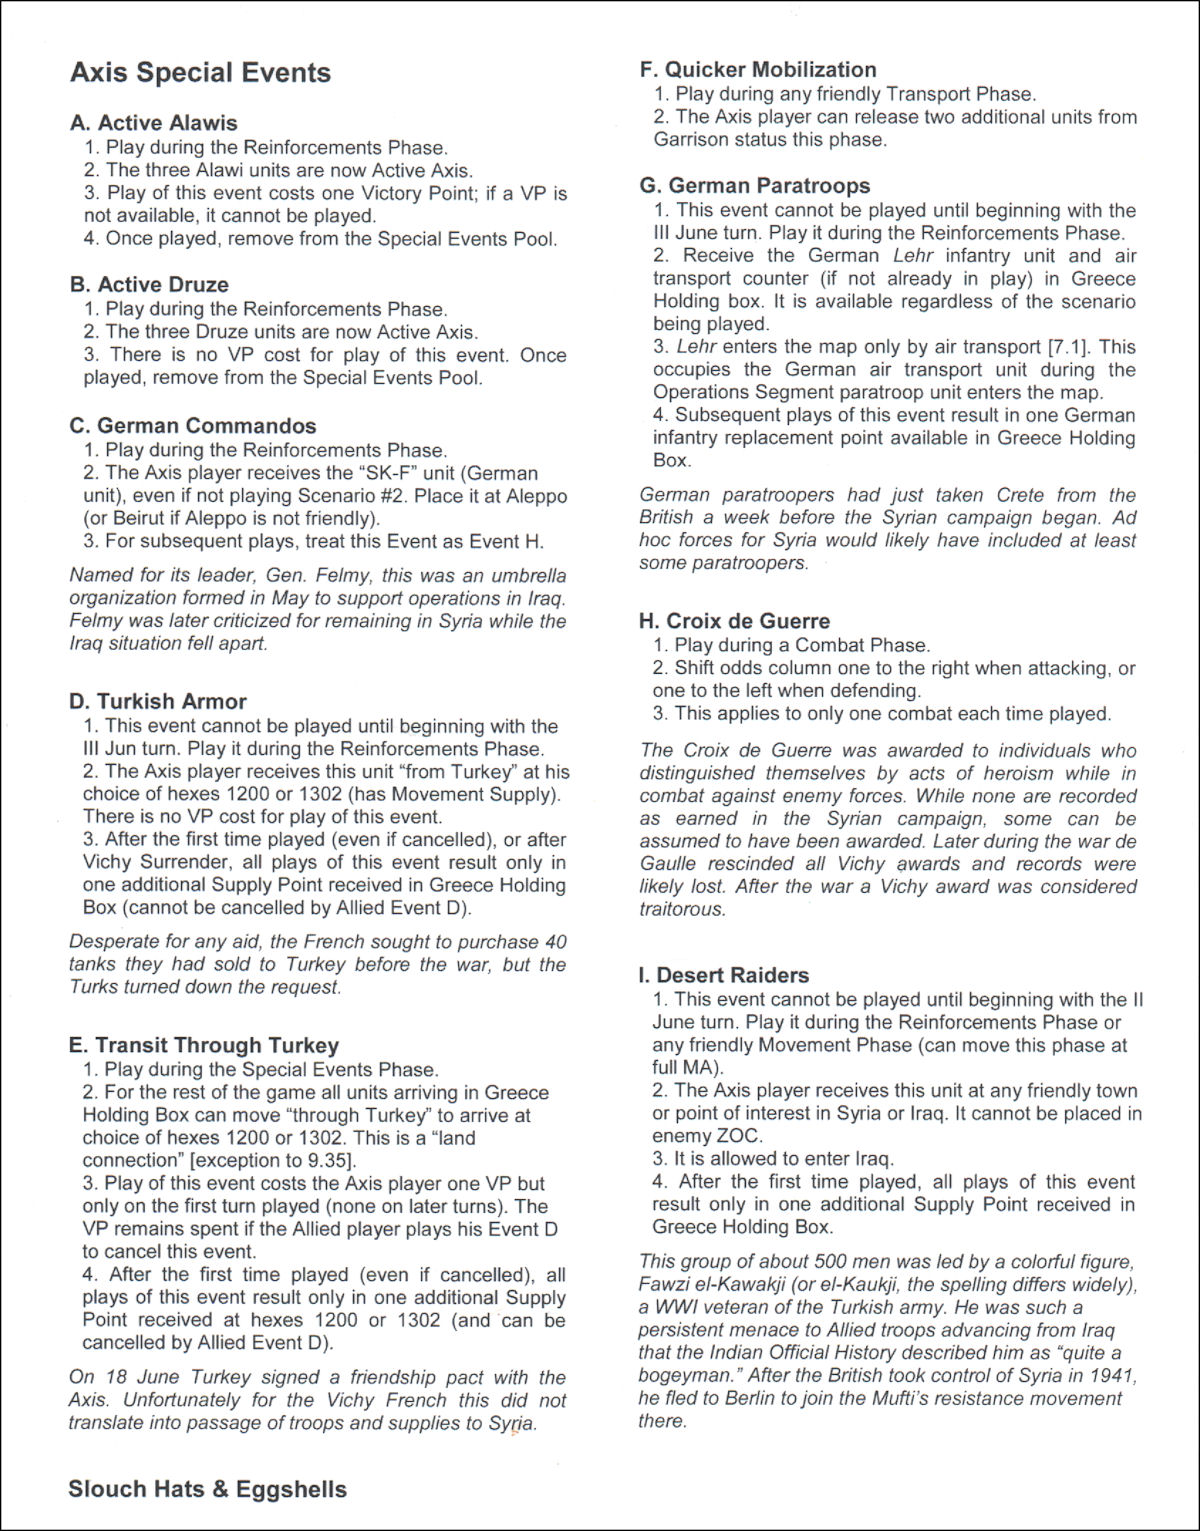
- Event “C”: German Commandos – Place German combat unit directly in Aleppo or Beirut.
- Event “E”: Transit through Turkey – This is the big one! This event provides a “land connection” from the Greece Holding Box to Turkey (hex 1200 or 1302). It eliminates the biggest Axis headache: how to get units safely (and quickly!) from the Greece Holding Box to where the action is on the map. It gives the Axis a huge advantage and is, in my opinion, the most powerful Event in the game. However, no game designer worth his/her salt would ever allow such an advantage, risk-free! So there is, of course, an Allied Event, named Diplomats Active, that will undo “Transit Through Turkey”. This introduces another strategic angle in the game: knowing when to play your special events and when to hold them. Neither player is forced to play any Event. They are free to hold them indefinitely. So, needless to say, if the Axis player finds himself in possession of “Diplomats Active”, he should hold it for the rest of the game.
- Event “P”: German Air Force – Allows the Axis player to nullify certain Allied Naval support points that turn, thus again allowing a Naval Transport to sneak through.
Now you can see a glimmer of hope in the Axis situation. They start off the game in a fairly strong defensive situation that will be difficult for the Allies to penetrate. Defense, in this game, does not require the expenditure of Supply Points that offensive operations do. That’s an advantage for the Axis who need only to maintain control of the victory point cities in order to win (more about victory conditions later). So, if they can remain minimally supplied (at least enough to allow full movement for their mechanized units), they can react to changing situations and hold the line against the British, Australians and Free French.
The Tactical Situation
There are two scenarios: a historical scenario, which lasts for 5 Game Turns, and a hypothetical scenario which postulates a much more aggressive German intervention and lasts for 8 Game Turns. In either scenario, the burden of attack is on the Allied player right from the start. Five Game Turns (or eight in the “Axis Intervene” scenario), with two operational phases in each, may seem like a lot of time to break through the Axis defenses and secure the victory points necessary to assure a successful outcome on the Vichy Surrender Table (more about this later), but I assure you it is not. If, as the Allies, you play it safe and schedule your attacks such that your casualties are minimized, you’ll be hard-pressed to bring the conflict to a successful conclusion.
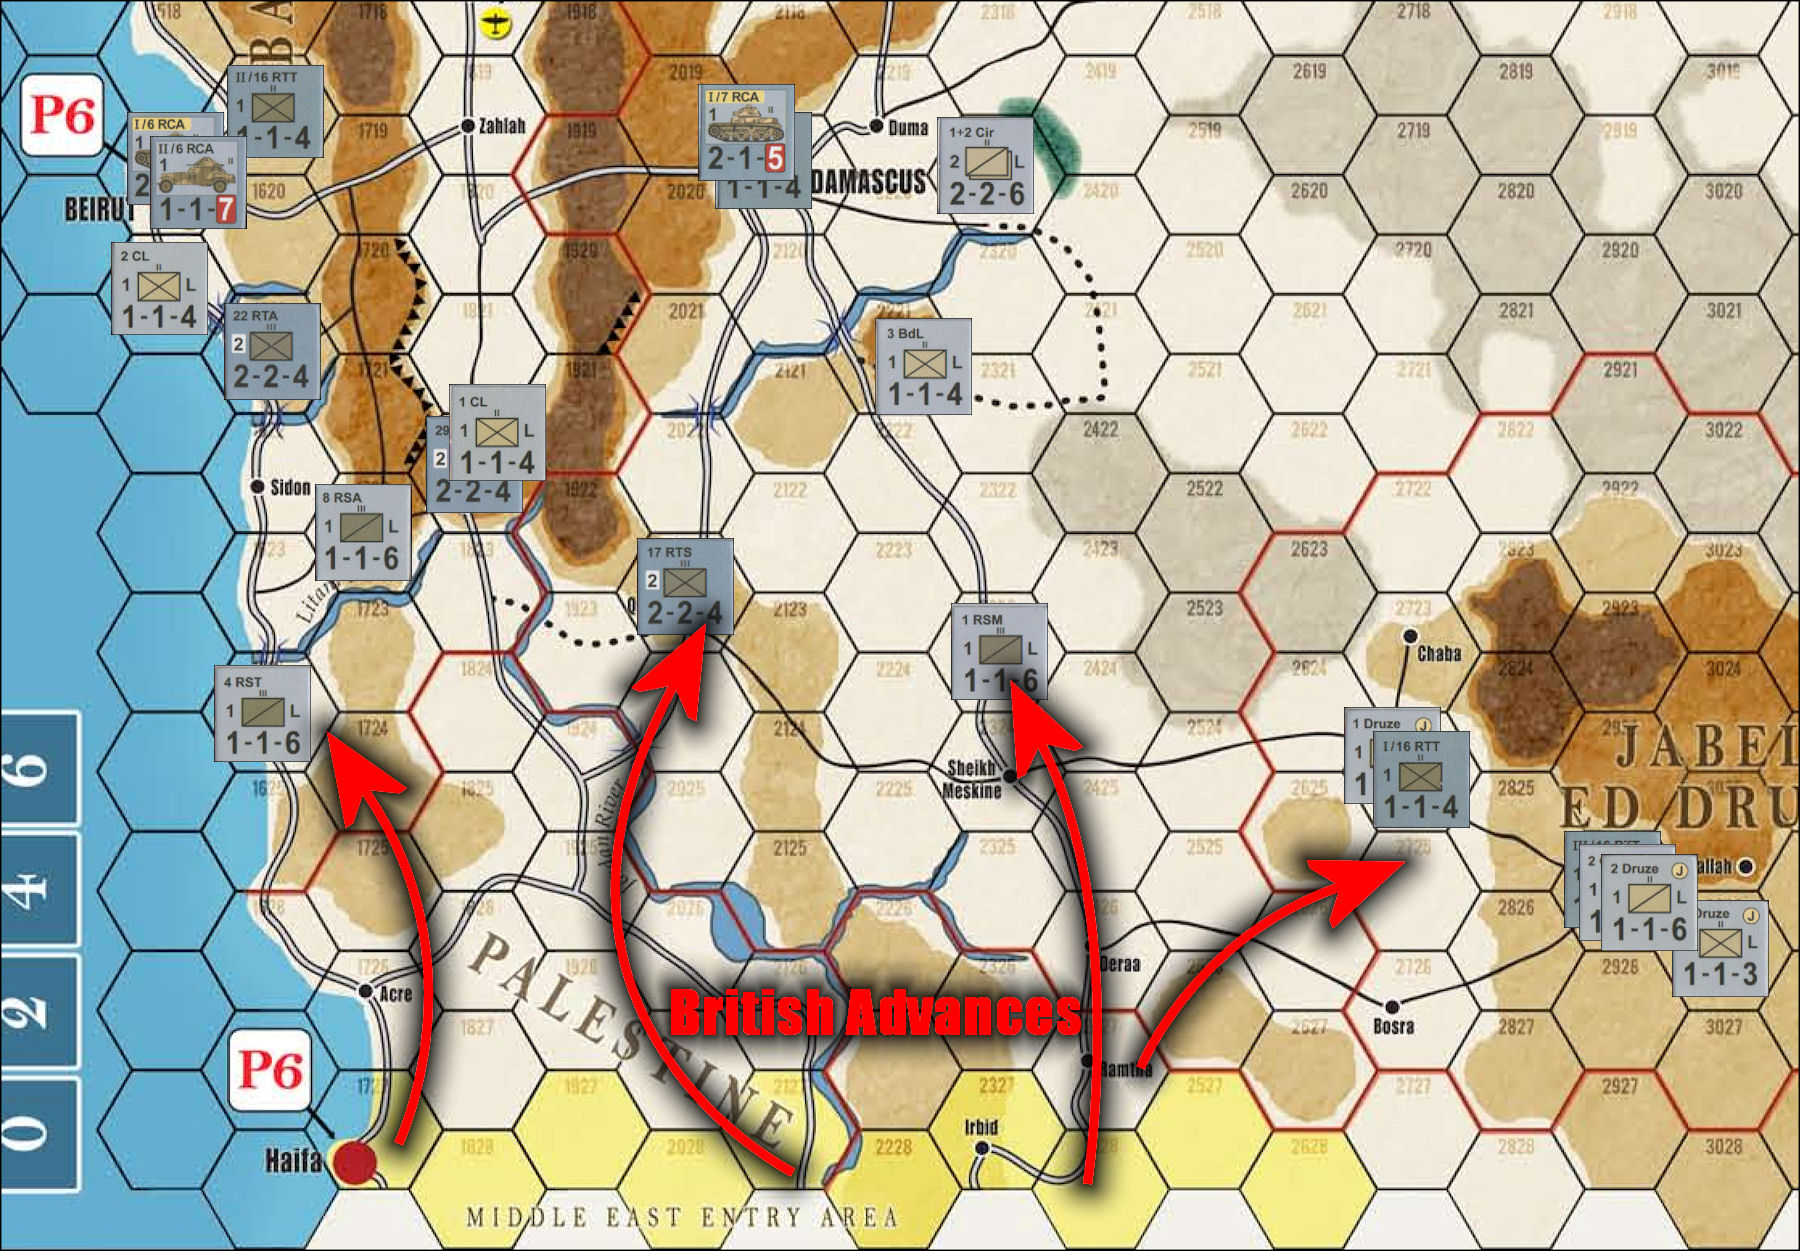
At game start, Axis forces occupy excellent defensive terrain south of Damascus and Beirut. The river lines, combined with the hills and mountains in that region form a natural protective barrier against overland assaults. The graphic, above, shows the Axis defensive line in the southern part of the map at the start of the game. Initial Allied armies enter the map from the south, charging out of the Middle East Entry Area. There is a limited amphibious capability, designed more for flanking enemy formations or grabbing the occasional unprotected coastal victory point city than for opening a second front.
If the Axis player manages his troops correctly, the Allies could easily find themselves at a standstill along a static front in the south. In Game Turn 3 the Allies open a second front, invading from Iraq in some strength. (Note: If Allied Special Event E, “Early Iraq Conclusion” is played, Allied units are free to begin the invasion from Iraq one turn earlier). As we all know, there is no such thing as a free lunch. Axis strength south of Damascus and Beirut will come at the expense of weakness in the eastern approaches. Some units will likely have to be shifted east to counter the new menace from that direction.

Relatively short interior lines of supply in the south give the Axis their biggest advantage, but the eastern desert is wide open to the Allies and is difficult to defend. The Axis player, with his thin line of defenders in the east (note the smattering of defending Axis units in the graphic, above, and the variety of axes of advance for the Allies denoted by the red arrows), must have the patience to confirm the main Allied lines of attack coming westward out of Iraq, before shifting his Vichy defenders to counter the threat.
The British navy affords the Allies total domination in the naval contest, and the same becomes true of the airpower contest as the game progresses. I think the Air and Naval units could have been abstracted out without diminishing the game in any way. But I suppose the few extra pages of rules to accommodate a physical navy and air force are not a major burden.
It’s really quite an interesting situation and presents both players with an enjoyable challenge. It does have an “old school” feel to it, as I mentioned earlier, but that’s not necessarily a negative. Some of my favorite games fall into that category.
Victory Conditions
So what’s the path to victory? There are two paths for each player. For the Axis, path #1 is just a matter of sitting tight and weathering the storm. If they don’t lose, they win. For the Allies, path #1 is a heap of “blood, toil, tears and sweat”, as they must occupy Victory Point hexes (mostly cities) and use the accumulated Victory Points to force the enemy to surrender. Path #2 is the same for both players: eliminate every enemy combat unit on the map. Quite a tall order for either player, so I would imagine that most games are won via path #1.
I really like the way the victory conditions are designed in Slouch Hats & Eggshells. To force an Axis surrender, the Allies may make a successful six-sided die roll on the Vichy Surrender Table once each turn. The roll may be modified +/- by either player by expending accumulated Victory Points. Victory Points are earned either by control of Victory Point hexes, or by Special Actions. First the Allied player may spend as many Victory Points as he has, receiving a +1 die roll modifier (DRM) for each two Victory Points spent. Then, the Axis player may do the same. After netting out all the +/- modifiers, the Allied die roll must be 8 or more to force the surrender of the Vichy French and win the game.

“Special Actions” include the following:
- Each turn “Surrender” does not occur.
- Arrival of 2nd German unit.
- Axis recapture of certain Victory Point Cities.
- Resolve Vichy Surrender table (the Allies actually have to “spend” a Victory Point in order to roll on the Vichy Surrender Table).
- Play of Special Events (either player may gain or lose Victory Points, depending on the event played).
This means the Axis gain a Victory Point each turn they survive without surrendering. They also deny the Allies as many as 6 Victory Points per turn just for retaining control of Beirut (3VP), Damascus (2VP) and Aleppo (1VP)! It should become readily apparent to the Allied player that he must move aggressively to secure those victory points as the clock is ticking. If the Allies should happen to get off to a good start, then the Vichy, et al, will be jolted from their complacent defense and be forced to counterattack in order to claw back a few precious Victory Points. So, the victory point/surrender process has an interesting and unpredictable influence on the tactical behavior of both players. Good entertainment, indeed.
Summary
I don’t feel that I have enough experience with Slouch Hats & Eggshells to comment with any conviction on play balance, but it seems to me that the Allies have an advantage. Fortuitous appearance of certain Special Events beneficial to the Axis player can turn that around in a second, but the basic situation favors the Allies (supply advantage, troop strength, naval/air superiority). It’s possible that the contest could become rote once both players are familiar with all the rules and possible strategies, but it’s my (inexpert) opinion that the game “has legs”. The number of different offensive approaches available to the Allies, coupled with the variety of Special Events will create replay value that is so important to gamers.
After a somewhat inauspicious start, I found myself really enjoying the game. I still find the rules awkward and unclear at times, but once I learned to just make a judgment call and move on with the game, the “war gamer happiness factor” moved up a few notches. I would definitely recommend to the designer that he take the time to support the game more actively and consistently because I think there’s an audience for this game that may not have discovered it yet. I know it’s difficult to have to answer the same questions over and over, while remaining positively charged and optimistic about a product. But that’s one of the keys to success in the war gaming industry. I know of designers who will take the time to answer questions about games that were published 30 years ago, because they understand there is no expiration date on their product, and no time limit for acquiring new customers.
All things considered, I’m going to give this game a positive recommendation. One “thumb up”, I suppose. If you’re a fan of older games like Blitzkrieg, Battle of the Bulge, Afrika Korps, etc., than I think you’ll definitely enjoy Slouch Hats & Eggshells. If you’re not familiar with any of that pedigree, then let Slouch Hats be your introduction. It has a “retro” feel, but with modern twists (i.e. Special Events) to keep it fresh, and top notch graphics that enhance the game experience. Give it a try, and let us know what you think.
