By Russ Lockwood
Designer: Eric R. Harvey and David March
Publisher: Decision Games at http://decisiongames.com/wpsite/
“Me Putin. Me want Poland. Nice shirts there. Not that I wear any. But what’s the West gonna do? Nyetski, comrade. Nyetski. Trust me. After I take Poland, I put up a statue of Chekov — the Star Trek hippee, not the writer, and everyone will sayink what a great guy I will be, especially the Poles. No, really. They love me over there. Russian media sez so.
Actually, iz not my fault. The West pays for Russian natural gas, which happens to go through Poland. But the Poles start frackingk and reduce market for Russian gas. I merely suggested the Poles join a nice little trade association run by Russian companies. Vhat’s not to like?
Poles say deal is not zo good. Next thingk I know, Poles say moose and squirrel shut down the big pump station for maintenance. Lots of maintenance. Now, gas backingk up. Rubles fallingk down. Big NATO plotski. No, really. Russian media sez so.
Vhat’s to do? Take Poland. It’s like they’re askingk me. They love me over there. No, really. Russian media sez so.”
Such is the background (well, sans stereotype) for the wargame Visegrad, which is in Modern War magazine issue 16. The map stretches from Moscow to roughly the Rhine and Alps at 35 miles per hex, with one week turns and brigade-size units. I will ask in advance that you pardon my shaky, hand-held camera-phone photos and the glare off the plexiglass, A tripod I am not.
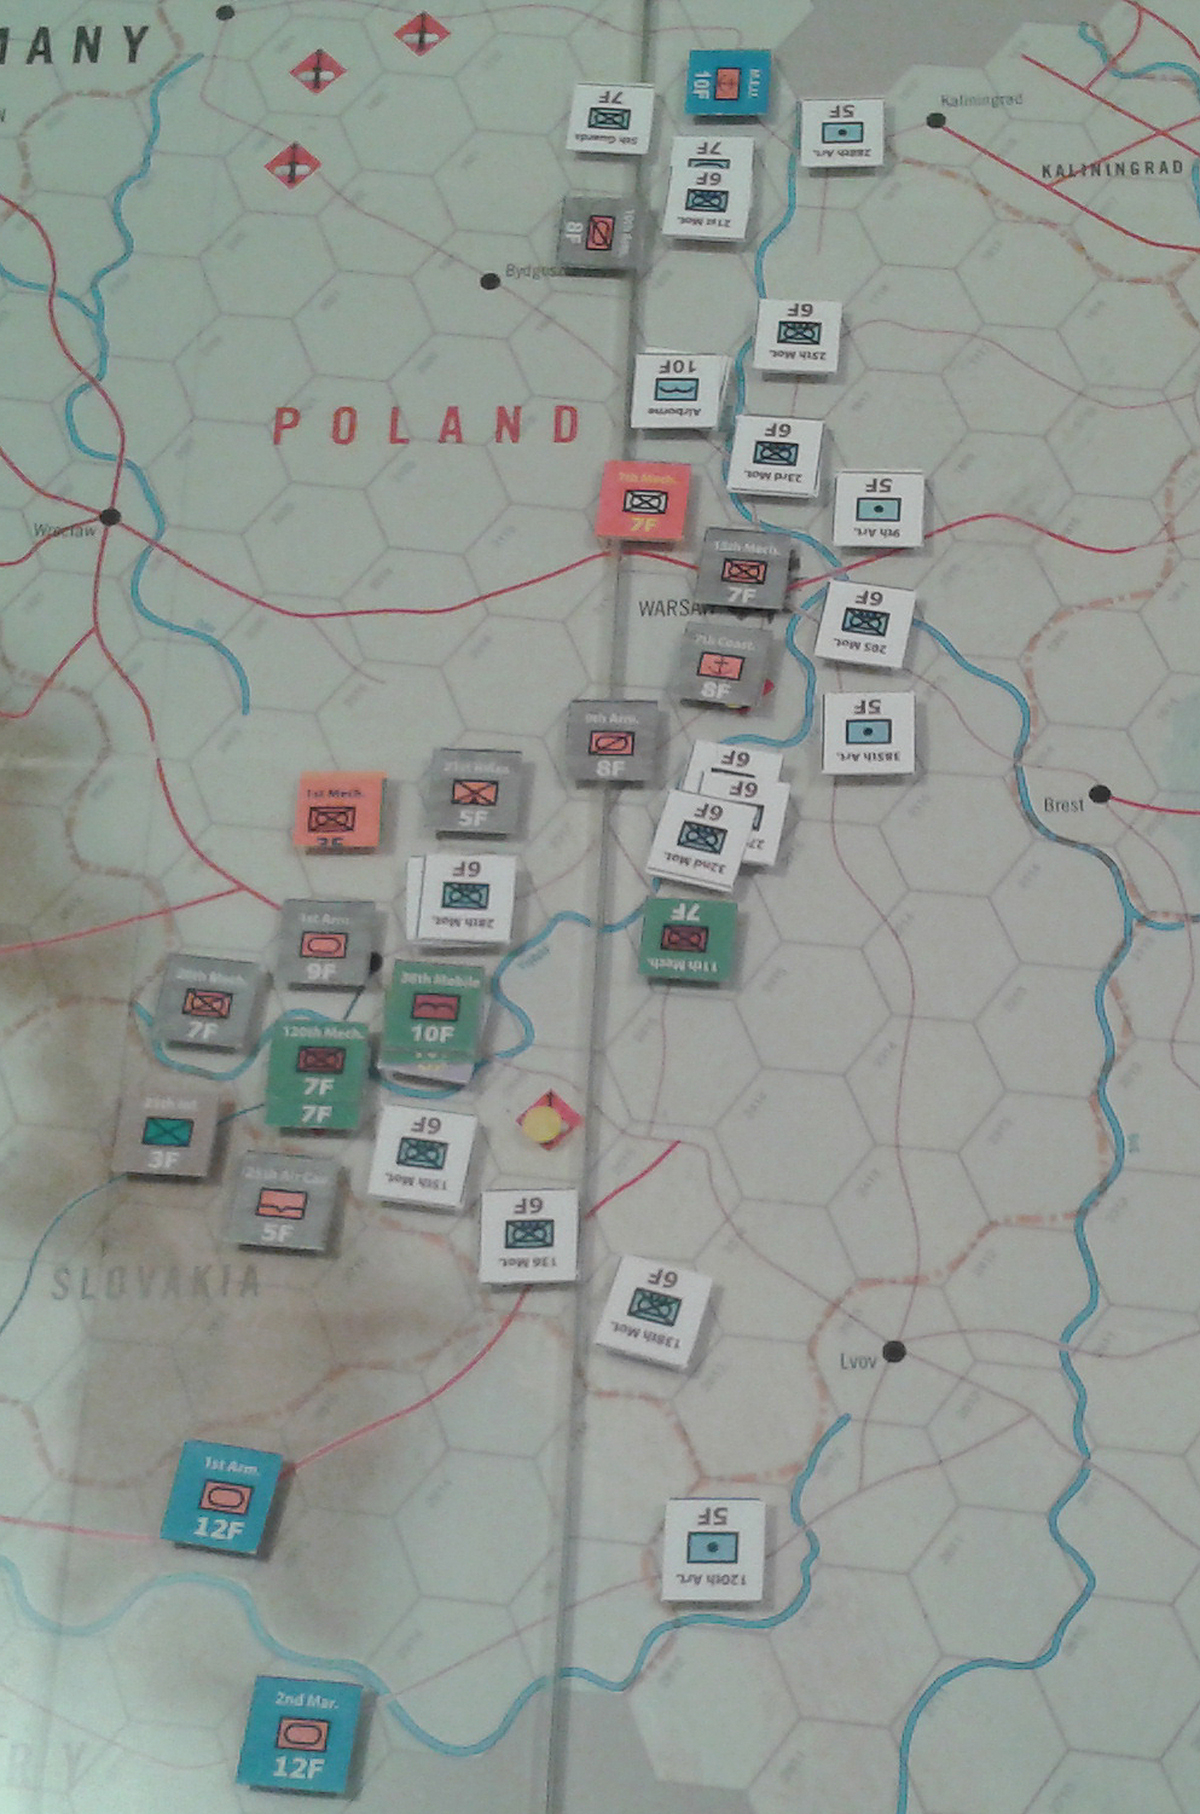
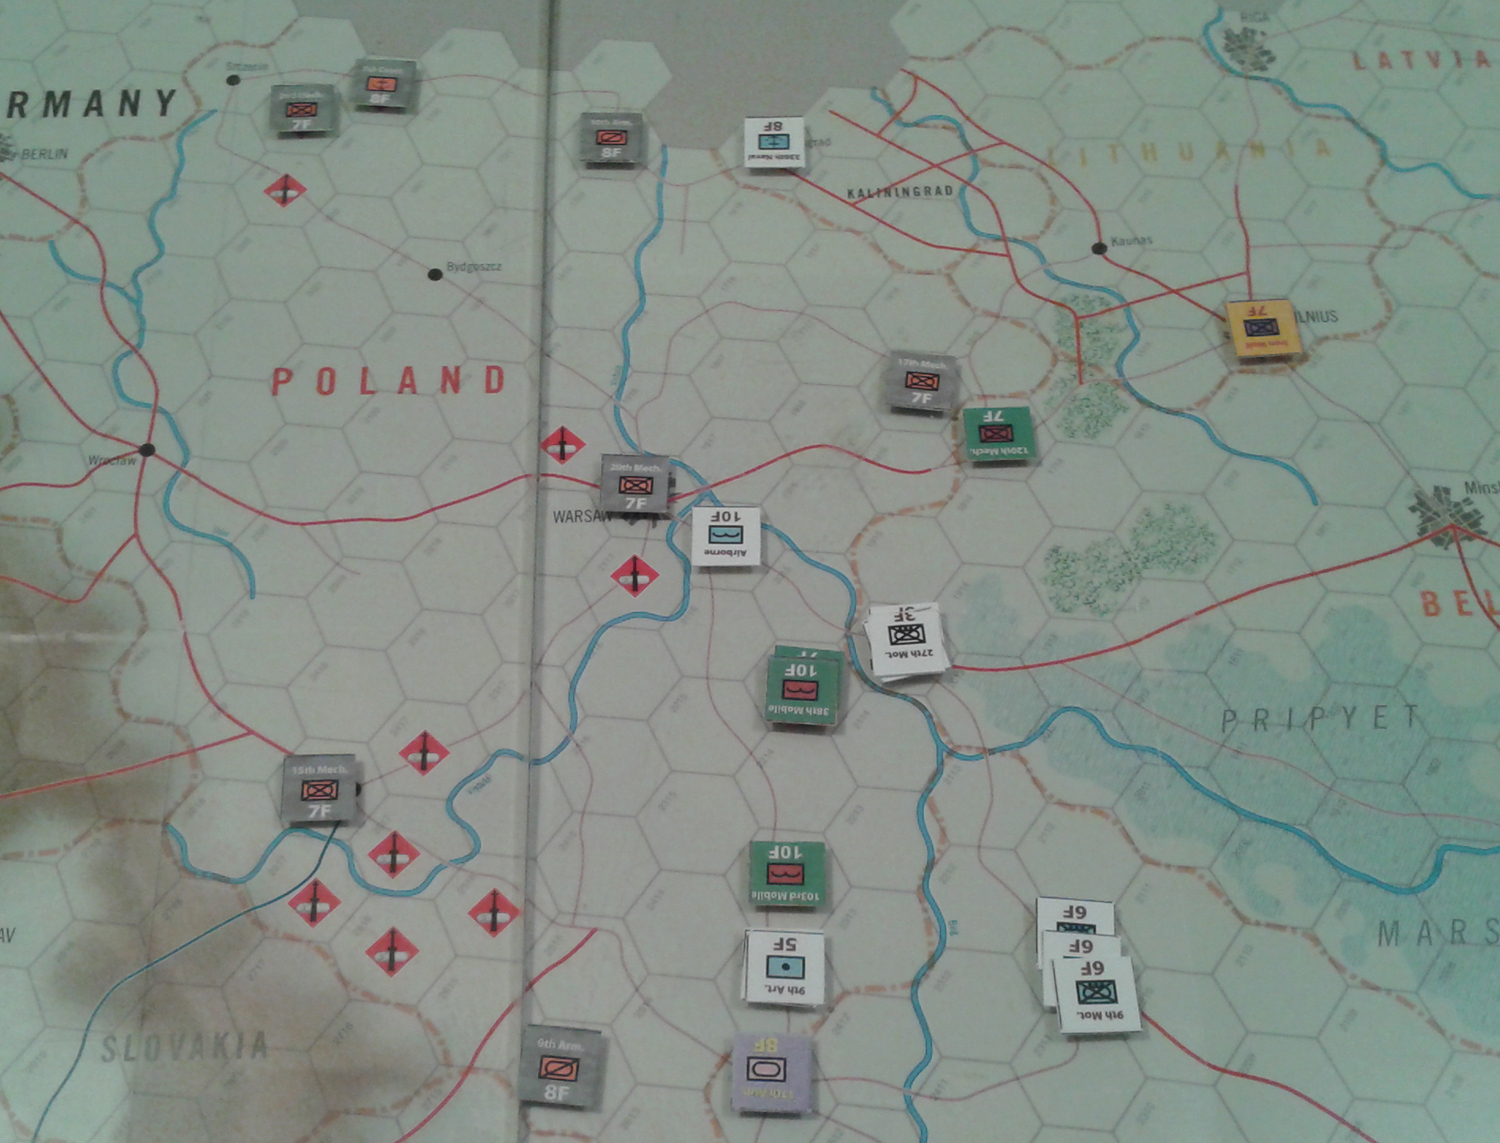 End of Russian half of turn 1. Note the gray Polish unit NE of Warsaw…
The Russians, along with the Belarussians and possibly some Ukrainians, want to destroy 10 hexes with fracking facilities: two around Warsaw, three in northwestern Poland near the German border, and five in the southwestern part of the country near Krakow. The Poles start on the defensive in Poland, get an increasing number of NATO brigades as reinforcements, and have to hang on — or — capture either Minsk or Kiev.
The Russians start with forces about equal to the Poles, ramp up quickly, and then drop off just as quickly. NATO starts slow and builds up gradually. If NATO doesn’t grab one of the two capitals, or Russia doesn’t grab all 10 fracking hexes at the end of 10 turns, the Russian player rolls 2d6 — if the roll is less than the number of fracking hexes destroyed, the Russians win. If equal or over, NATO wins. Cities count for nothing — only fracking hexes matter.
Quick Rules Look
At its heart, Visegrad is an I-go U-go system with additional air and cyberwar interaction. For those interested, the e-rules are on the modernwarmagazine.com site. Overall, the rules are fairly clean, but to warn you, Dennis and I played some things incorrectly on our Monday start and Thursday finish. We asked co-designer Eric Harvey to sort out the rules conundrums via e-mail, which he did after our first game. Eric noted he was more of a developer, as David March originated the design. So, our first game is a tad flawed, but our second is more accurate. Competently played? That’s a different question. The third game was a charm.
Each side gets a certain number of air units that can be used for close air support to shift odds up or down or to interdict a unit or stack of units. When played, the opposing side can intercept with aircraft still available. In both cases, only one of the air units may be assigned (no mob attacks) and victory is high die roll — which can be modified by an interactive escalation of cyberwar counters. Aircraft shot down as well as spent cyberwar counters may be brought back with rebuild points — the Russians start strong and fade. NATO starts weak and grows.
Basic ground movement is 5 movement points (MP) for airmobile units (which ignore terrain and ZOCs), 7MP for most units, and 9MP for the US armor units. Superhighways are 1/2MP per hex, open is 1MP per hex, woods 2MP per hex, and mountains 3MP per hex. It’s all fairly standard here.
Most terrain in Poland is open terrain, but the Vistula River poses a nice natural obstacle. Of note, if any attackers are attacking across the river, the attack gets a negative odds shift. The river’s twists and turns offer some frustration to the attacker trying to avoid that odds shift. Fracking hexes also shift the odds down one column.
Belarussian and Ukrainian units cannot stack with Russian units due to political differences. The four Ukrainian units at start roll a die: odds they join the Russians and evens they defect to the West. Apparently, ‘defection’ sounds better than ‘disarmed and eliminated from play.’
Combat Charts
Two types of combat charts are available — the basic Assault table and an advanced, more aggressive ‘CyberWar’ table attained by spending a cyberwar resource — if you have more than the enemy.
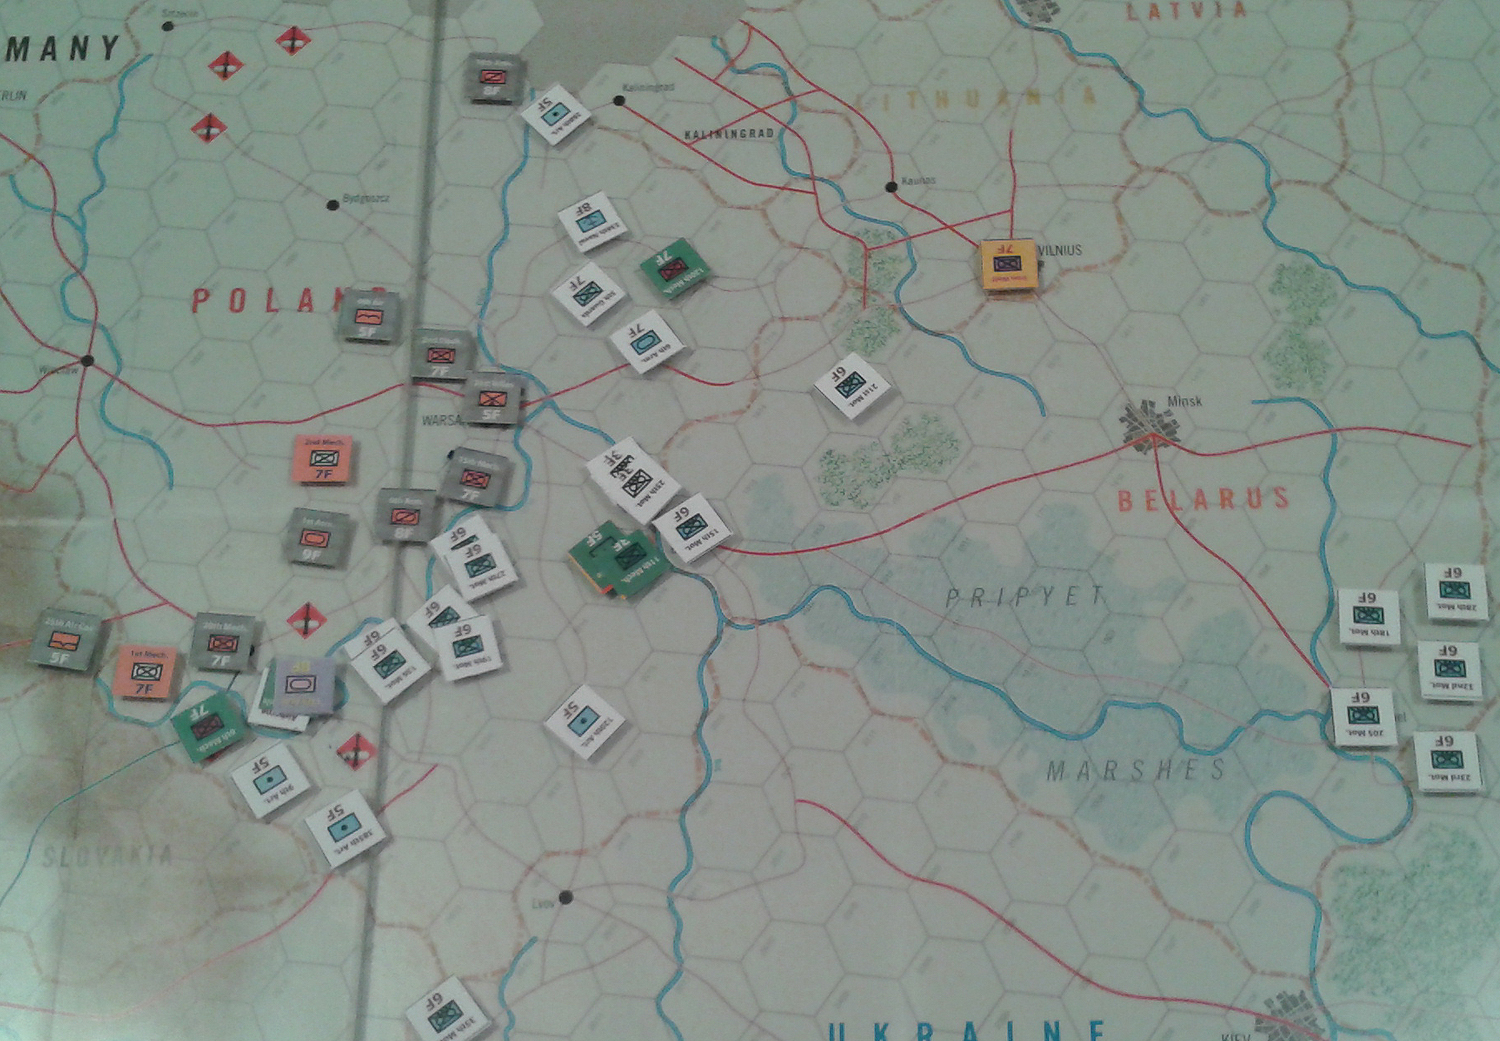
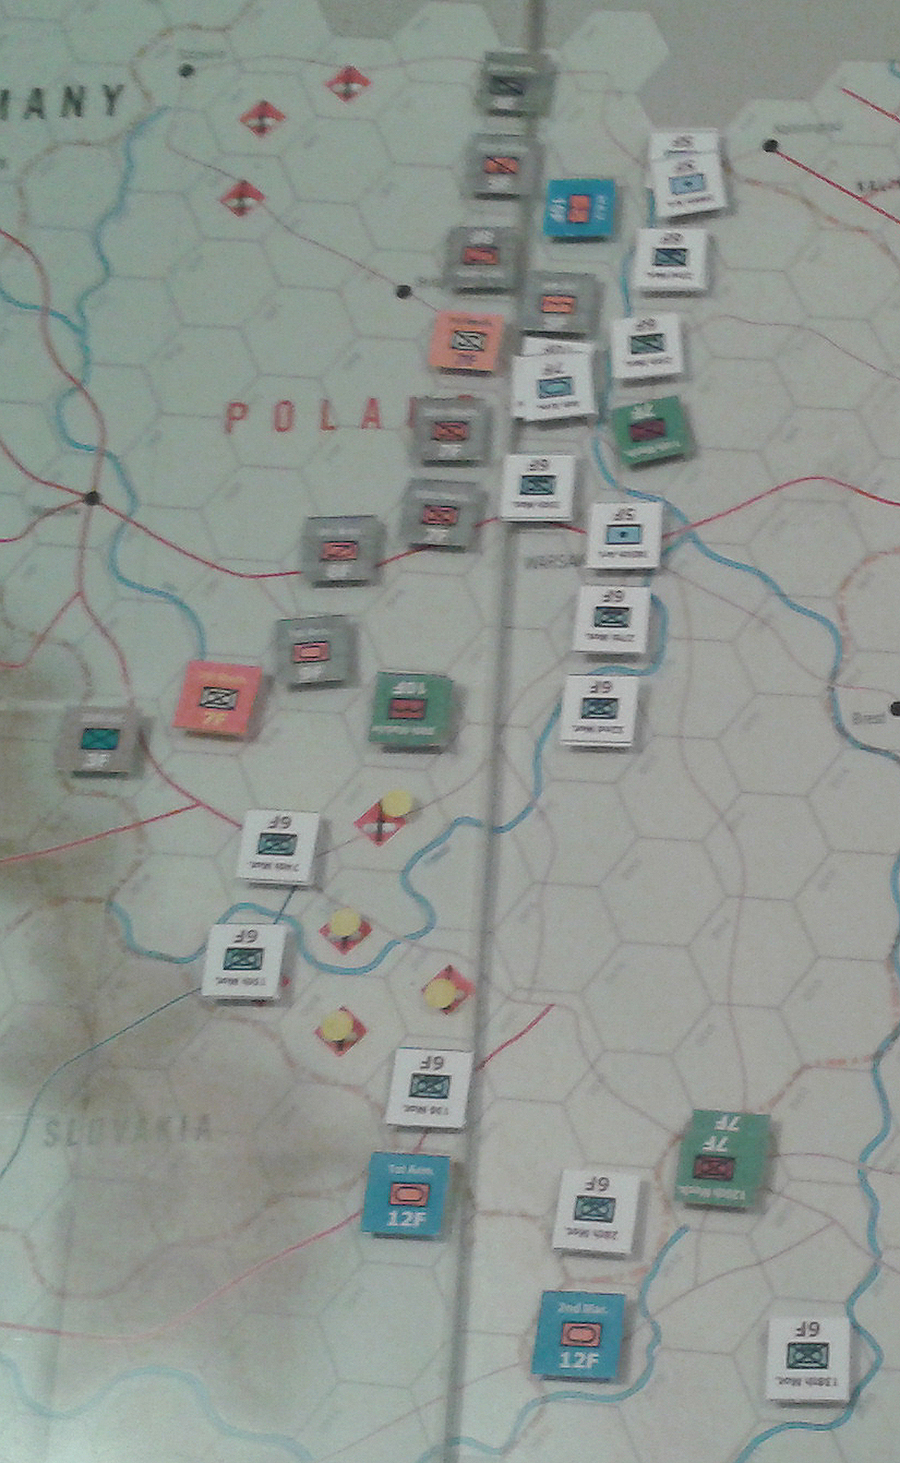
 End of Russian phase on turn 2. The horde cometh…
One difference from traditional wargames is that attackers mostly do NOT advance when a defending unit vacates a hex. Visegrad uses a number of D-retreat results, but Defender Withdraw (DW) does not allow attacking units to advance after combat to take the hex. Defender Panic (DP) and Defender Defeated (DD) do allow attackers to take the hex. Defender Eliminated (DE), somewhat counterintuitively, does NOT allow you to take a defender’s hex.
The more aggressive CyberWar table has far more opportunities for an attacker to advance, with Mobile Assault, Overrun, and other results.
Of note is the Bloodbath (BB) result, which kills off half the units and forces attackers AND defenders to retreat. Nothing like a high-odds attack and suffering a BB to lose three units to the defender’s one. Oh, to have a good ol’ fashioned EXchange result…unless you’re the defender.
ZOC: To Call Upon the Ancient Elements
ZOCs block retreat, even if a friendly unit is adjacent to the retreating unit. Such a friendly unit negates ZOC for supply purposes, but not retreat purposes. All units can move at least one hex, including from ZOC to ZOC. Airmobile units never have to stop in ZOCs of non-airmobile units, which means they can slither through lines (but not over enemy units) and cut off retreats with their ZOCs. The Russians have one big 10-factor airmobile unit and the Belarussians have two of them — very important in the opening turns. If the Russians are lucky, the one Ukrainian airmobile unit won’t defect and will open up more possibilities.
One rules conundrum which took a couple of e-mails to clarify concerned a ‘surround bonus’ for attackers that are on opposite sides of a defender’s hex. To be clear, to get the odds shift, the attacking units on opposite sides of a defender’s hex must be attacking the same defender. If they are on opposite sides of a defender’s hex but not attacking that defender, no surround bonus is given, although ZOCs still cut off a defender’s retreat. The rules definitely need a diagram to show this situation.
Those are the highlights. Some gimmicky units, like Marines and stealth aircraft, are also included. Now to the first game…we used the fixed scenario set up (not the free set up). I took the Russians and Dennis was NATO.
Caviar Invasion on a Borscht Diet
“Me Putin. Me use harai goshi move to take Polish frackingk sites. Always works, too. At least in gym. Russian gym. Now we try global gym.”
Visegrad’s premise calls for a short surprise invasion of Poland, which is one of the 28 NATO members. How that doesn’t trigger a massive war is beyond me, considering NATO was set up specifically to defend against such an attack. The premise — shaky.
The least NATO would do is mobilize to kick the Russians out of Poland before negotiating a cease fire and terms — like a regime change in Belarus and returning Crimea and other provinces back to Ukraine. Hey, if you’re going to speculate…
With France, UK, Germany and other NATO countries setting up rapid reaction forces, you’d think they’d be there in no time…but maybe that’s what the increasing replacement build points represent without having to include actual counters.
Latvia, Lithuania, and Estonia seem to have only 1 brigade between them parked in Vilnius. And when I say parked, I mean parked. The Iron Wolf brigade never moves and if forced to retreat, is eliminated. No fracking hexes in these Baltic states, so, no reason to invade unless you really want the superhighway network.
If Russia stays in Poland and doesn’t invade any other country, Italy never joins the war. Nice ally, eh? If Russia takes three fracking sites by the second turn, Romania never joins the war. Probably guarding their own border or taking back Rumalia.
Before anything starts, placement occurs and then the Ukrainians roll for defection…
Week 1: Feels Like Blitzkrieg
“Oh, greatski! Three of the four Ukrainian goulash brigades defect. There goes my southern flank. Just for that, me keepingk more provinces. And me give Dennis the Warsaw Warlock a beeeeg stinkeye for his great die rolling.”
Both sides put six cyberwar counters into land, balancing each other and preventing either side from using the more aggressive CyberWar combat table, which the Russians really, really want to use. Both stuck the remaining one cyberwar marker into the air portion (which, when spent, adds +1 to an air combat die roll).
Nevertheless, the Russian airmobile exploited holes in the Polish line, surrounded and eliminated three Polish brigades south of Warsaw, and blew a big pathway to the southern fracking sites. The Russian Marines landed in Kaliningrad to seal off access to Lithuania, and frontal attacks occurred, heading for the Vistula. The first fracking hex around Warsaw fell.
Week 1: Rolls and Poles
That’s the good news. The bad news: One Polish unit could, by sneaking around the north of the line, use the Lithuanian highway network to make it to Minsk. I recognized it, looked at all the odds, and took the risk, dropping an air unit atop the Polish unit for interdiction. On a roll of 2-6, it will be interdicted (move only 1 hex).
Before the roll could occur, along came the Polish air force, intercepting my interdiction attempt and tossing in a cyberwar marker (+1 to die roll). I tossed in my cyberwar marker to even it out. The Poles shot down the Russian aircraft. Game over.
We thought about resetting, but we’ve gone this far…so, we played on as if the Russian aircraft survived and the Polish ground unit was interdicted.
In this alternate universe, the Poles on their half of the turn reformed a line with some help from Hungarian units.
Week 2: Interdiction Street
Russian reinforcements showed up in stacks. Bad idea. In came four Allied interdiction aircraft. Up went four Russian aircraft to intercept. Down went four Russian aircraft in flames. The Warsaw Warlock’s luck continued…and meant all stacks, which were on superhighways, were interdicted and could only more 1 hex. Memo to modern Stavka — scatter the reinforcements next time.
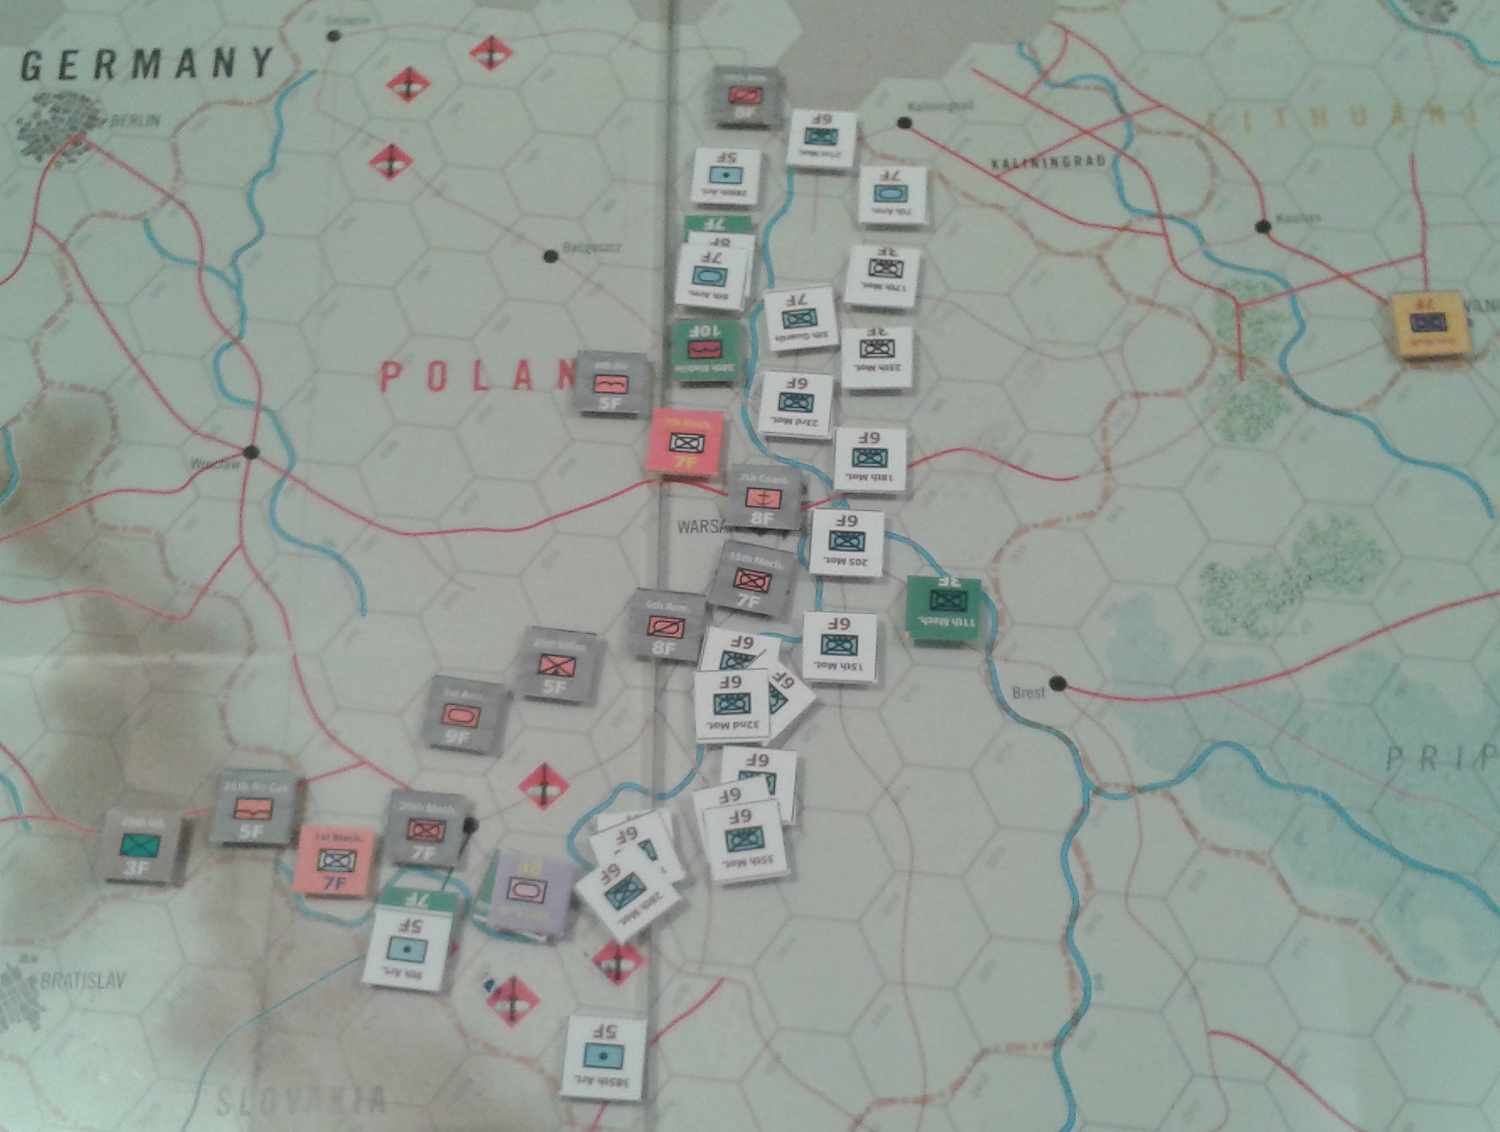
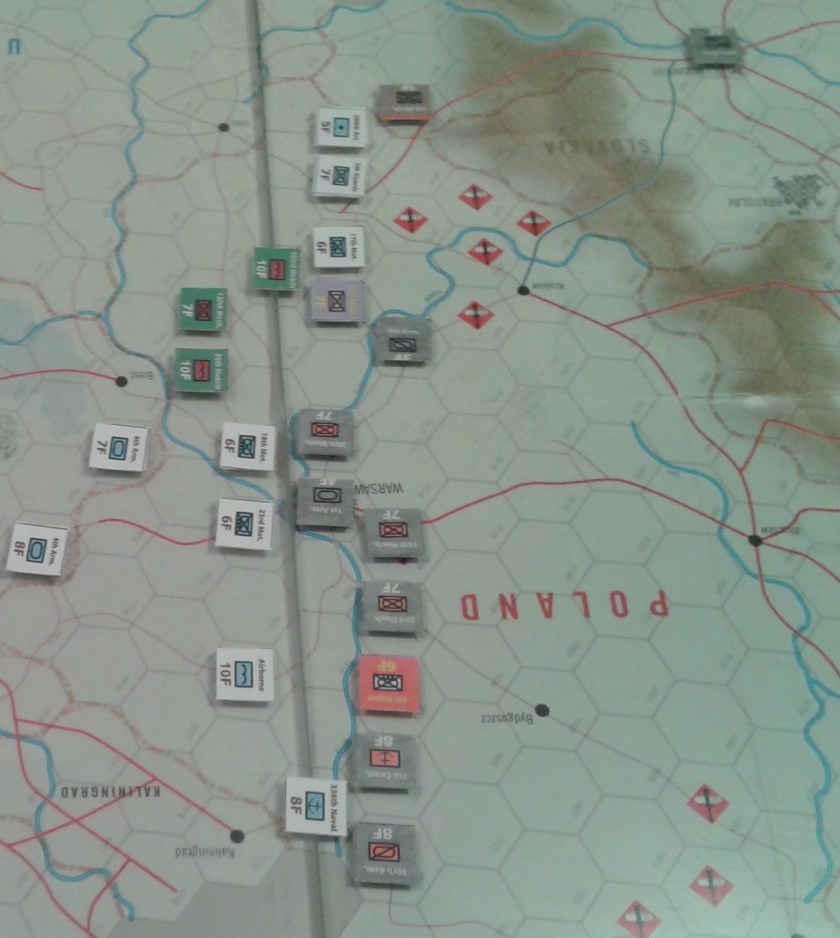
 End of Russian phase on Turn 3: The Krakow push.
On the ground, the Russian blitz headed west, taking three fracking hexes around Krakow, but the kill ratio dropped to almost nothing. Only one Allied unit bit the dust. Many retreated, but only one fell.
The Allies formed a solid line. Romania decided not to show up. Czechs and Slovakians showed up to help shore up the Allied line.
Week 3: Stuck in the Middle With You
“Jiminey Cricketski! The Warsaw Wall just went up along the Vistula River, bending back towards Krakow. The route into Hungary, Slovakia, and even Austria is open and free. Maybe a nice left hookski is what this offensive needs. By Tchaikovsky’s testicles, it sure looks invitingk. Nice Western superhighways. Fast food. Our comrades in the old Warsaw Pact want me to put up new Stalin statues. Must be true. Russian media sez so.”
My blitzkrieg transformed into grind-it-out mode. No surrounding this time, unless I want to violate other borders. Not goodski.
Nyet. Russian steamroller still has the edge in units as more reinforcements arrive. Strong attacks near Krakow dealt a DE and DW, but without an advance after combat, ’twas useless in grabbing a fracking hex.
In another part of the line, one unit got an exchange via BB.
Worse, just outside Warsaw, the river and Allied air pushed down odds of success and the Russian juggernaut suffered its first Attacker Defeated (AD) result — all attacking units were flipped over to their reduced side and retreated one hex.
The Allies patched the Vistula line and around Krakow without much trouble. Another Czech unit showed up. Both sides rebuilt losses.
Week 4: The US Comes to Save the Day
The Krakow offensive went nowhere. Two more attacks yielded a DE and DW, which eliminated a unit and pushed another back, but gave no advance, so the troops sat down and debated the merits of post-modernism architecture as an expression of the urban proletariat.
End of Russian phase on Turn 4. Stymied in the south but breakthrough in the north…sort of.
Meanwhile, up in the north, a massive offensive cracked the Vistula River line and managed to get a DD — allowing the troops to get across the river and capture the city of Bydgoszcz. The Russians took the first fracking hex next to Warsaw. Much rejoicing and vodka celebrated the rise of urban diversity from post-modernism in a post-technological society.
The US rolled low enough (1d6 to roll under the turn number) to enter the war. US Marines landed in the north and a pair of US armor brigades rolled east into Austria and Hungary to threaten the Russian southern flank. Only two Russian units held that border.
The Allies felt emboldened and launched attacks near Krakow, but were repulsed.
Week 5: Came in Like a Wrecking Ball
“Judo moves ineffective. Russian resources dwindlingk. Horse eaten. Attack, comrades, attack. Me want bear hug in the south and north.”
Up north, the Russian rammed into the Allied line with some success. A DE killed off an Allied brigade and a DW sent another one packing. Then came the BB (Bloodbath), which crunched units and forced a retreat — not the result the Russians were looking for.
 End of Russian phase on Turn 5.Uh-oh. Southern flank needs attention and what happened to the breakthrough in the north?!
In the south, units needed to be pulled back to guard against a blitz by US armor towards Kiev.
Near Krakow, Russian attacks finally paid off — a DD allowed the Russians to advance and grab the last fracking hex in the area. What a grind! Now, to head north…somehow.
The two US armored brigades and an airmobile brigade attacked and destroyed a Russian unit guarding the Ukraine flank. Good thing there’s no exploitation phase in this game.
In the north, disaster befell the brave comrades who advanced. Between Allied maneuvers and spending cyberwar markers to use the more aggressive CyberWar combat table, the Allies smashed the Russian penetration, destroyed four units, and regained almost all of the Vistula River line. The Warsaw Warlock got a promotion to Warsaw Wizard! Well done!
Week 6: Paranoia, Troop Destroyer
The Allied air interdicted many units. Rebuild points were exhausted this week. Another unit diverted to Kiev to guard against a possible US dash to the capital.
 End of Russian phase on Turn 6.Krakow cleared and south shored up, but those three fracking hexes taunt me and taunt me some more.
The southern NATO attack forced the Russians to pull back more units to surround and eliminate the airmobile unit, putting the US armor at risk.
Good news: an attack finally took the second fracking hex around Warsaw. That made seven fracking hexes of the 10 taken, leaving the three in the northwest part of Poland.
The bad news: Another attack near Warsaw suffered a BB, leaving a precious airmobile unit exposed to a counterattack and putting a heap of pain on Russian forces.
The Allied player refused the opportunity, preferring to reform a solid line and shuffle the US armored units to the north. With no reason to defend the Krakow area, the Allies withdrew northward.
Week 7: Stalemate
 The Russians thought the odds against them, but launched one last push as some reinforcements reached the north. Two attacks: a 6-1 DE that killed off a Polish brigade and a 5-1 BB that shattered what’s left of Russian offensive capability.
The Allies had enough troops to form a line to protect the last three fracking hexes, but not enough to mount a counteroffensive that would be able to take Minsk or Kiev by turn 10. The Russians had enough troops to form a line and perhaps hammer a unit or two, but not enough to push the offensive within the timeframe.
With such a stalemate, the Russians rolled the 2d6 to see which side would win. With seven fracking hexes taken, a roll of six or less would be a Russian win, a seven or more a NATO win.
When the dice stopped tumbling, a big fat pair of sixes showed. Boxcars — an ignominious loss!
Rules We Botched
During the game, we wrote down questions that came up about the rules, and like true wargamers, figured something out (right or wrong) and plunged onward. Our e-mails to Eric Harvey with questions confirmed that most of the interpretations we made were indeed correct (be still my heart!). However, we mangled two rules…
The Russians received the surround bonus even though the ‘surrounding’ attacking units did not attack the same defending unit. As noted, Eric cleared that up.
End of Russian phase on Turn 7. A stable line after one last press.
The Allies benefitted from a liberal interpretation of repeated use of the stealth aircraft. The rules contain the word ‘normally,’ which we (incorrectly) interpreted as returning the aircraft to base on its ‘normal’ (unused, rarin’ to go) side.
In actuality, ‘normally’ means return to base like any other aircraft, on its temporarily Out of Service (wait until next turn) side.
Regarding the Russian reinforcements, we debated the meaning of a clause that says start ’em on the Eastern edge of the map in Russia “if not Ukraine.” Ultimately, we decided to stick them in Russia. Eric upheld that decision.
We also debated whether starting rebuilt units “in any friendly capital” meant Minsk or Kiev. We decided against that and made rebuilt Russian units start in Moscow. Again, that is correct, says Eric.
However, Polish units could be rebuilt in Budapest, Prague, or any other friendly capital, Eric noted. We’re pretty sure he did not mean any capital in the Baltic States.
Thoughts on Game One
Visegrad’s a nice tight game for the first few turns, with a fluid opening attack followed by a slowing grind, followed by a grinding stop. Then, it’s down to a dice roll. That 2d6 end is a little disappointing — four to five hours of gaming comes down to a 2d6 roll? I don’t have an answer, just an uneasiness that the exercise is pointless if it all really comes down to a 2d6 roll.
In some respects, Visegrad is half a game – albeit such a full game would be a long one. The missing half comes with NATO on the offensive and the Western factories churning out cruise missiles and drones and sending more troops to Eastern Europe.
Face it, maybe Russian nibbling away at non-NATO Ukraine (regardless of border protection treaties) won’t do much more than get a finger wagging, but a blatant invasion of a NATO member like Poland will likely trigger an all-out war — not unlike 1939.
But back in paper war land, the game is worth a second play. Or should I say, a third play, because that one Polish unit waltzed through Lithuania to take an uncovered Minsk on turn one of the first game. In retrospect, is indeed worth changing the Russian setup to prevent and easily done, albeit with rejiggering the counters and odds.
GAME THE SECOND
We switched sides. Dennis took the Russians and I took the Poles. My goal was to try a forward defense as much as possible to get the Romanians (three units) to enter. Mind you, the fixed set up guarantees that the Russians can take three fracking hexes on turn one: both Warsaw hexes and one Krakow hex.
Dennis put in only three cyberwar markers while I put in six. Two Ukrainians defected while two were available. During the opening turn, the Russians went three for three in eliminating Polish units, opening holes in the north and south.
 End of Russian phase on Turn 1 of the second game.The new strategy opened up bigger holes.
The Poles scraped together a line, sticking a sacrificial unit way in front in the south to try and keep the Russians from gaining fracking hexes — to try and get the Romanians into play, or at least have a chance of Romanians getting into the fray.
On Turn 2, the Poles tried interdicting two Russian airmobile units, but Russian fighters shot down both. Of note, this is the second game where Dennis dominated the air combat die rolls in the beginning of the game — first as the Warsaw Warlock (later Wizard) and then as the Moscow Marauder.
The Russian juggernaut suffered a bad turn two, with one Polish unit getting away only half dead and another getting a BB that bloodied the Russians and forced them back a hex.
BBs are the Polish salvation, especially if the Russians are piling on at 5-1 or 6-1 odds and suffer disproportionate casualties.
This also allowed the Poles to patch together another line.
The Cyberwar Lesson
On Turn 3, due to the play sequence about when cyberwar markers are purchased (a clever twist, by the way, that we started to realize in the second game), the Poles only had three and the Russians had six. Bad news for NATO as the use of cyberwar markers allows the Russians to use the more aggressive combat table to gain many advances after combat. Units were surrounded and the Polish line crumbled.
Note to future Polish HQ — never, ever, ever allow the Russians to dominate cyberwar. Ever.
The Russians broke the Vistula line, grabbed more fracking hexes, and put pressure on NATO.
Well, NATO had more depleted units than usual, but the replacements and rebuilds allowed the barest hint of a line to be reformed. The roll for US entry (needing a 1 or 2) was a 5, so no go there.
Turn 4 saw more Russian attacks, but another BB disrupted the offensive…at which point the Russians are in about the same position as in game 1. They can likely take the Krakow fracking sites, but not the northern sites…leading to another 2d6 for victory. A roll of 10 meant the Russians failed.
Thoughts on Game Two
We’re starting to see two trends in two games. Never let the Russians get a cyberwar advantage and the Russian juggernaut slows and the game becomes a 2d6 roll.
 End of Russian phase on Turn 2 of the second game. Polish sacrifices save the fracking hexes for a turn and the possibility of Romanian intervention…alas, it was not to be.
The former doesn’t bother us so much because the trade-off is more Russian air wandering around Poland bombing, interdicting, and intercepting. The Russians have more AF units than the Poles and get a better replacement rate, too.
The latter is troubling. What’s the point of playing a game if it comes down to a 2d6 roll?
There may be a third trend — the game is exciting for two turns and the third seems to be a make or break turn for the Russians.
GAME THE THIRD
While trying to figure out Lithuanian loyalty — the set-up is under the Polish player and Lithuania is currently a NATO member, so we decided that it is friendly to NATO — we noted that the set-up did NOT indicate the starting air force for each side.
 It occurred to us that neither side has aircraft at start, but the Russians get to build them first and so get a first-turn surprise.
So, with the third game, we started without aircraft. Note that the Baltic States and NATO currently switch off responsibility for putting up Baltic Air Policing fighters, so it seemed odd that NATO had no aircraft on day one, nor would scramble any on Russian incursions, but we figured it was a turn one Russian benney (benefit). That’s how we played it.
Of the Ukrainians, three of four defected and were removed.
Then, Dennis tried something different — he sent airmobile to grab three fracking hexes (two at Warsaw) and one at Krakow (hex 2417) and used the air force to try and interdict seven Polish ground units (all successful).
Of note: remember in the first game there was one Polish unit that can reach Minsk? Dennis did what I did and used interdiction on it. I pointed it out and he (as I did) assumed the risk. The difference? The Moscow Marauder pinned the Pole.
In the south, the Russians manned the Bug River in defense. In the center, he made more successful attacks that really opened up the Polish line.
The Poles dealt with the airborne sitting in 2417 by surrounding and eliminating it. Still, there were a lot of holes in the Polish line and two Russian airborne units to exploit them.
Turn 2
 On turn 2, the Poles dropped air interdiction on the two Russian airborne units. The Russian air force rose to intercept, and miracle of miracles, only one Polish air unit was shot down in flames. The other actually won — the war’s first Polish ace no doubt — and pinned one of the airborne units.
A fourth fracking hex was captured by the Russians while Polish units were eliminated north and south, but in the center, a glorious BB hurt the Russians. The Russian air force continued to interdict Polish units.
On the Polish turn, three Polish air units rose to intercept and try to free up units to move more than one space — three Polish units crashed and burned. The Moscow Marauder strikes again!
The Poles scratched together a line, well, sort of, but did surround and destroy the Russian marines that had been left a little too far out of the way.
The US failed to intervene.
Turn 3
The Russians pulled out all the stops and swung a unit through Hungary and Slovakia to get at the Krakow fracking hexes. The big push was on!
Disaster for the Russians — not one but two BBs blew apart the Russian dreams of an offensive and then came an AW. By this time, the Russians had 10 steps of destroyed units and only seven rebuild steps for the rest of the game. The Poles were in pretty good shape for the moment, especially since the US intervened, and possibly, although the odds are against it, could drive towards Minsk or Kiev. Unlikely, yes, but at least the possibility existed.
Well, we reasoned that the Russians could take the other Krakow fracking hex…making the game come down to another 2d6 roll.
Thoughts on Game Three
Here we are again…2d6 for the win. The Russians need a 6 or less (41.6% chance) to win. Fail.
Three different strategies and three similar results.
The one variable that may help the Russians is the Ukrainian airmobile unit. In all three games, it defected and so was out of play. And extra unit with the ability to weave through ZOCs would help the Russians.
SNIPE AND TRIPE
Ground counters have an “F” on them. We knew it meant that they could fight against other land units. It turns out ALL ground units have an F on them.
On the combat table, we sometimes read DD as defender destroyed, not defender defeated, constantly catching ourselves because other games use DD as, um, defender destroyed. In Visegrad, DD results in the defender losing a step and retreating (if able), not die in place. Maybe DH (Defender Halved) or DSLR (Defender Step Loss and Retreat) or something else would be better.
We remain baffled why victorious units cannot advance into a hex after a DE (Defender eliminated) result, even after the designer confirmed it and noted lethality would prohibit such an advance – although a DD would. Worse, advance after combat drops from 50% of the results at 4-1 to 33% at 5-1 and 6-1.
OVERALL
Overall, Visegrad is a nice, tight three-turn game, sometimes four-turn game. The problem is that it goes 10 turns. After all that, the 2d6 for the win roll seems disappointing to both sides.
Neither of us tried a northern blitz of sending the Russian airmobile northwest towards the fracking hexes near the German border and supporting it with the Marines landing by sea. It is possible to get adjacent to the three hexes with only two Polish units defending. The Russians get a 3-1 or 4-1 surrounded on a fracking hex, with a likely destruction of the defending unit. Add air interdiction to pin Polish units in range and the Russians gain the possibility of advancing on turn 2 to grab at least one, if not two, of the hexes and possibly the third. Then it’s turning south and the slog towards Krakow. It may end up the same way with a 2d6 die roll determining the winner, but it would be different.
We also did not try the free set up.
Both are worth a shot, I suppose, because our three southern strike strategies ended up the same way – a great three turns followed by a slog and a 2d6 die roll. Give Visegrad credit for providing enough interest to keep us trying different approaches.
THE DESIGNER RESPONDS
By Eric Harvey
“I think your AAR is great and ready for prime-time. My only thoughts are that you mention me as the designer, but I am really more appropriately the developer in this capacity (since the design is shared by David March, who originated the concept).”
“As for the 2D6 victory: The intention there, just for the FYI of it, is that the Russian player can’t know if this grand venture will work or blow up in his face, and so his only strategy is to try to maximize his odds and try to plan for the big win (not just scratch by with just enough to qualify for a so-called marginal victory). This also prevents the Poles from hanging back and just trying to delay long enough to hold just barely enough to win. This is not too different from what has happened in the Ukraine in real life; The Russians didn’t get the roll they needed because they didn’t succeed well enough on the ground.”
RULES Q&A WITH THE DESIGNER
Here’s a summary of rules that we asked Eric about and his clarifications.
Russian units cannot set up in Kaliningrad.
Units can move ZOC to ZOC and unsupplied units exert a ZOC.
Fracking hexes (destroyed or intact) provide defensive bonus for both sides.
To get the surround bonus, attacking units must be on opposite sides of the defending hex AND be attacking that defender.
Russian reinforcements start on the east edge of the map in Russia – not Ukraine.
Russian rebuild points can be used to rebuild Ukrainian units that did not defect.
Rebuilt Russian units are placed in Moscow, rebuilt Ukrainian units in Kiev, and rebuilt
Belarussian units in Minsk.
Rebuilt NATO units (including Polish units) can be placed in any friendly NATO capital.
Airmobile units do NOT move through enemy-occupied hexes.
SAC air counters, after use, are placed on their OOS side.
Air interdiction is only on enemy units, not hexes.
When Player A places an aircraft counter on an enemy unit for attempted interdiction and Player B decides to use an aircraft counter to force an air battle, Player B commits cyberwar counters first since he caused air combat and is the attacker.
Related Articles:
NATO: The Next War in Europe (Review)
The Third World War: Battle for Germany (Review)
World at War: Blood and Bridges (Review)
Cold War: Strategy – Event Card Advantages
We like to hear from you. Please feel free to leave your comments below.
About the Author
 Russ Lockwood has been bouncing around the wargaming world for the last 25 years in one capacity or another. Most know him as creator and CEO of MagWeb.com (on-line archive of 162 military history and related magazines from Coalition Web, Inc. from 1996-2009). He appeared on camera on The History Channel (Modern Marvels), ABC, NBC, Fox, and various cable TV shows. MagWeb was also covered by the NY Times, USA Today, and other newspapers, a variety of trade and consumer magazines, and a multitude of on-line sites. He’s given lectures at various HMGS conventions, Origins War College, and various professional meetings and seminars. Although MagWeb closed in 2009, those white MagWeb rulers still appear on wargaming tabletops across the country.
On the prior professional front, Lockwood was Editorial Director of AT&T’s web division, Senior Editor at Personal Computing Magazine, Assistant Editor at Creative Computing Magazine, Telecommunications Editor for A+ Magazine (Apple), tech writer at AT&T, Staff Writer (Financial) NY Times Information Service, and freelancer for PC Sources, Windows Sources, PC, MacUser, Byte, Restaurant Business, Hotel Business, Computer Buyer’s Guide and Handbook, and other magazines. He also hosted a radio show, ComputerWise, for five years, and was an on-line editor for ZiffNet on Compuserve and Ziffnet on Prodigy.
He is currently a freelance editor and writer covering financial and defense news, with a concentration on the retail industry. If you are really interested, go to Linked In, where he maintains a profile.
On the miniatures front, you may have seen his byline in various hobby publications in the 1990s and 2000s. Lockwood is also the author of: Snappy Nappy: Simple, Subtle & Ultrafast Miniature Rules for the Napoleonic Era, and, Hyperspace Hack: Ultrafast Spaceship Fleet Battles with Miniatures (both published in 2009 and available from http://www.onmilitarymatters.com and http://www.caliverbooks.com).
Lockwood is also the editor of the Secrets of Wargame Design series, releasing the fifth volume in 2015.

Very entertaining summary. I really enjoyed reading this and following the game. Thanks.
We tried a fourth game with a northern strategy…
GAME THE FOURTH
This time, I tried the northern strategy outlined above and we came to an immediate rules question — do Russian Marines that land on turn 1 gain combat supply on turn 1, or do they trace supply overland (which they cannot do)? We said yes, and with the airborne they managed to grab one fracking hex in NW Poland before being surrounded and destroyed.
We also had, for the first time, the Ukrainian airmobile unit NOT defect, and so grabbed (along with a Belarussian airmobile) all but one of the Krakow fracking hexes. Alas, although we pushed further north faster, and even violated Czech Republic territory to surround more Polish units, the line of Poles went up far enough away that the Russians could not get to the last two fracking hexes in NW Poland. The extra fracking hex allowed the Russians a 60% chance of “winning” using the 2d6 roll.