Napoleon’s Triumph: The Attack Sequence
Overview
Napoleon’s Triumph, by Simmons Games, is one of the most innovative war games in several years. Unfortunately, this unusual system has, to some, been an obstacle to learning the game and fully enjoying its novelty. I hope to smooth the learning curve for new players of this marvelous game by explaining the attack sequence in the way that real world commanders would see it. Hopefully, from this point of view, the elegance and subtlety of the combat resolution will no longer confound the players so they may fully appreciate the sophistication of the design.
The units are represented by rectangular blocks printed with a number of infantry, cavalry or artillery symbols that designate its unit type and strength. Fog of war is paramount since the unit strengths face away from your opponent. Typically units are aggregated into Corps commanded by various historical leaders however Independent Units are not attached to a Corps requiring them to be individually commanded. Each side has a certain number of Corps Orders and Independent Orders that can be issued to units.
The battlefield of Austerlitz is divided into geographic areas named Locales. The borders between Locales are called Approaches. Within a given Locale, units can be in one of two Positions, either occupying the central portion of the locale termed the Reserve or deployed along the border in the Approach. Units in the Reserve position may move to the Reserve position of any adjacent locale or move into the approach of the locale it currently occupies. Units already in the Approach may move into the Reserve of its locale or cross the Approach into the Reserve area of the Locale directly adjacent. When units attempt to move into a Locale occupied by enemy units, there is combat and the attack sequence is resolved. It is the combat sequence that seems to be the source of the greatest confusion when attempting to learn the game.
The Attack Sequence
I will now attempt to give you a general sense of how a typical combat flows without getting into the intricacies of each step since they are clearly explained in the rules. In this manner I hope to impart the overall concept of what each combat step represents on the actual battlefield thereby illuminating the elegant logic of the Attack Sequence. Let’s look at each step a little more closely from the point of view of the commanders on the field and how the tactical decisions they make are reflected through the attack sequence.
1. Attack Threat
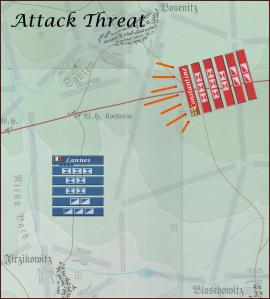
The Attack Threat is where the attacker announces his intent to attack a given Locale through a given Approach. He must have units that could potentially move through the Approach designated in the Attack Threat. An important concept here is that he does not yet designate which units will make the attack. He simply points to a given approach and states that an Attack Threat will be coming through this Approach. He’s forcing the defender to make a decision about defending the Locale or retreating.
2. Retreat Option
The defender now must decide whether he’s going to retreat out of the Locale or defend. If he decides to defend, he must name which units in the Locale he plans to allocate to the defense of the designated Approach.
3. Feint Option
The attacker may now declare his Attack Threat as a Feint which means he is not really going to attack through that approach and the attack sequence will end here. Feints are useful to draw away defending enemy troops so that fewer are available to defend other approaches in an enemy occupied locale. As this Attack Threat is not a Feint, the Attack Sequence proceeds.
4. Defense Declaration
The defending player now names his leading units. These must be named from the units he designated to defend the Approach. You can think of the leading units as the units in front of the line who are going to take the brunt of the initial attack. If the approach is wide he can designate up to two units to be the leading units in the defense. If it is a narrow approach the maximum number of leading units is one. There are certain restrictions as to which units can be named leading units and these are clearly explained in the rules.
5. Attack Declaration
This is similar to the Defense Declaration. At this time the attacking player must decide which pieces will be committed to the attack and designate leading units (up to 2 units for a wide approach or one unit for a narrow approach). Even though only 2 units can lead the attack, designating more attacking units than the defender gives advantages if there is a tied combat result. Once again there are restrictions as to which units can be designated to lead the attack. A Corps order is then expended to move the units to initiate the attack.
6. Initial Result
This is actually very simple. Both sides sum the strengths of their respective leading units with appropriate combat strength penalties applied. Whoever has the greater total combat strength is the winner of the Initial Result. In this case, Constantine has 2 units each with a combat strength of 3 making his total combat strength 6. Lannes has an infantry unit with a Combat strength of 3 and one with a strength of 2 for a total of 5. Since Constantine has 1 more than Lannes, he is the winner of the Initial Result.
7. Counterattack
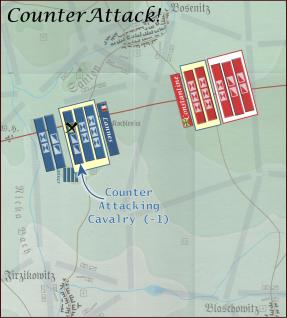
The defender has the option of adding more units to the fray in the hopes of reversing the momentum of the initial attack. The units designated to counterattack must have been selected as defending units in Step 2 (Retreat Option). Units that counterattack automatically lose one step but will have their remaining combat strength added to the defending leading units in the next step of the sequence where the final result is determined. Once again there are certain restrictions as to which units can be designated to counterattack.
8. Final Result
In this step the battle is actually decided. It is computed exactly the same way as in the Initial Results step, except that the combat strengths of the defender’s counterattacking units are now included. Whoever has the greatest total combat strength wins the combat. The addition of the counterattacking cavalry has changed the math. Constantine still has 6 from his 2 infantry divisions but Lannes now has 7 (5 from the 2 infantry divisions and 2 from the cavalry since it immediately lost 1 strength point when the counterattack was declared). This results in a French victory!
9. Attacker Losses
Losses are inflicted on the attacking units. In general, the loser takes losses equivalent to the number of the opposing player’s lead units and the difference from the Final Result. In this case it is the attacker who will take the additional losses. So Constantine will take 2 for the two French lead defending units plus an additional 1 from the net differences in strengths in the Final Result Step.
10. Defender Losses
The winner takes losses equivalent to the number of opposing lead units. Since the Allies had 2 leading units, Lannes must take 2 losses.
11. Completion
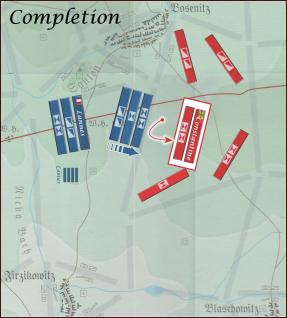
In this step the loser must retreat his combat units. Corps that lose in battle must detach all but one unit leaving the Corps hopelessly shattered. Each turn they will have a chance to reattach one unit but it is a lengthy process to reorganize the Corps. The winner, in this case the defender, can now use any defending units that survived the combat to advance into the Approach. This tends to give them a defensive advantage in subsequent combats.
Summary
I hope this vignette increases your understanding of the logic of the attack sequence and allows you to visualize what is happening on the battlefield at each step. The attack sequence is the heart of this game and must be mastered before players can fully appreciate the nuanced beauty of Simmons’ design. I have deliberately omitted the specific mechanics and restrictions involved in each attack step so that you get a sense of the forest without being blinded by the trees. I suggest you now go back to rules and use this narrative to visualize each individual attack sequence step and its associated procedures.

In my opinion, Napoleon’s Triumph is aptly named. It is truly a triumph of design. Simmons has delivered a most innovative war game that evokes the feel of Napoleonic grand tactics. The rectangular units and board graphics conjure the visual beauty of the period maps we have so often scrutinized. I strongly urge anyone interested in the Napoleonic era to take a look at this game and not be deterred by its pioneering concepts. Once digested, you’ll be aptly rewarded with hours of tense, challenging play.


Cannot understand why there is no battles with this system for Fredrick the Great, the Seven years wars battles with like a double sided or quad maps for 2 or 4 battles and common components.
Absolutely! It seems like any 18th century battle would be appropriate for this system.